An empty wall will always look unattractive, even in the most minimalist interior. But sometimes there are things on the walls that don’t fit in with the overall style of the room. So what can you use to decorate empty wall space besides traditional shelves and pictures? As you probably already guessed, this is a beautiful wall clock. In this article you will find many interesting options, as well as detailed step-by-step instructions that will help you make your own wall clock.
DIY wall clock
How about turning your boring old watch into a true work of art? To create a homemade clock, you can use almost everything you can find in the house. The hands and clock mechanism are essential parts that can be removed from an old watch or, if necessary, purchased separately in a store. No restrictions - everything depends only on your imagination!
Homemade clock with butterflies
If you can buy it, then why make a wall clock with your own hands?
The answer is obvious - everything created with your own hands is done from the heart and for the soul. Of course, a watch from a store can be of higher quality, and even with a guarantee, but the advantages of making it yourself are much greater:
- you can bring to life any, even the most daring idea;
- any thing made with your own hands is a source of pride (you can show off a whole device to your friends, and not just some flower pot or postcard);
- the dimensions of the homemade watch will be what you need;
- After work, you will have a better understanding of the internal structure of the watch.
There are no restrictions - it all depends only on your imagination. Any interior will be transformed with a new wall clock. Wall clocks will look great in the interior if you make them yourself. Original clock made from a vinyl record.
Domino clock
Ideas
What to hide For a modern person, no matter how big or small, the wrapper is important. Even the same candy may seem tastier if it is wrapped in a candy wrapper with your favorite movie character, rather than in parchment. Therefore, the learning process should be packaged in a beautiful wrapper: use your favorite Lego men, cars, stickers, prints of super heroes, everything that your child likes, that he is willing to look at for hours, and that he is even willing to sleep with.
Or even make it in the form of a wrist bracelet; I think kids will also appreciate this option.
Regarding the teaching system, choose the one that you think is more understandable to your child and which you can teach “without stuttering.” Some people make watches like real ones without minutes, others hide the minutes under a leaf so they can “peep.” Someone, on the contrary, makes a double dial, where both the hours and minutes are clearly visible, and even the hands move in their own circle, clearly pointing to the number. And someone makes a clock with the task of sticking the corresponding number of minutes on Velcro, and even below you can put in separate numbers what happened (for example, 10:30). Of course, it is more convenient to make such watches with Velcro from felt, although Velcro can also be glued onto cardboard. The main idea!
Or you can improve your regular home clock by sticking minutes in a circle for quick learning.
In a word, what are we still talking about? It's time to get down to business! We have a universal, basic master class coming up that you can take as a basis for your idea.
What to use to make a dial?
Speaking about the panel under the dial, it is worth noting that a DIY wall clock can be not only round, but also square, triangular, even in the shape of a flower.
Musical wall clock Beautiful clock in the children's room Original gear clock made of plywood Wall clock made of epoxy resin
So, you can make a panel:
- from a vinyl record;
- to order in a laser cutting workshop;
- from cut wood;
- made of thick cardboard or cork backing;
- from plasterboard.
Plywood can also be used for homemade clocks
Clock in the form of an antique bicycle
On a note! You can also purchase pre-made plywood panels at your local craft store or online.
The benefits of making your own watches
Buying this piece of furniture is not a problem; the stores offer a huge range of products. The main problem is that the lineup has no personality.
Exclusive products are expensive, and not everyone can afford to buy them. A handmade clock will decorate any wall of your home. In addition, the craftswoman who created such a thing can be proud of her work and demonstrate it to guests.
The main advantage of creating a watch composition is that it can be made from scrap materials. The cost of the product is low, since you only need to buy the mechanism itself.
It is important that the housewife independently chooses not only the material, but also the size and shape.
About ways to decorate watches
You can decorate finished wall clocks with your own hands in a variety of ways; the choice of one or another depends on capabilities and personal preferences:
- you can cut out, paint and glue numbers;
- you can paste a ready-made image;
- embroider something and cover the piece with fabric;
- glue three-dimensional plywood parts;
- draw something in watercolor, and then cut it out and paste it on.
Unique watch with coffee notes
Handmade decorative wall clock The design of your clock can be anything
Even keys can be used when decorating watches
Decoration techniques. What to choose?
In general, it all depends on you, your imagination and your desires. Here are a few basic techniques that you can take a closer look at:
- Decoupage - attaching a pattern or ornament to a base, varnishing;
- Quilling is the process of creating a pattern by twisting strips of paper;
- Elements of scrapbooking - creating collages using photographs or drawings;
- Working with epoxy resin - filling the mold with resin with the addition of various decorations (sparkles, rhinestones, dried flowers);
- Painting with acrylic paints in various styles;
- Using strains to emboss ornaments;
- Embroidery;
- Use of wooden blanks.
Decide what is closer and clearer to you. Perhaps you are already familiar with some technique, or maybe you have long wanted to try yourself in a new style - this is a good opportunity.
The nuances of making wall clocks
Clocks, among other things, also have a certain mystical meaning, because they have a unique function - they control time.
Wall clock with minions
Anyone can make a wall clock with their own hands. You just need a little time, a little imagination and a minimum of consumables. As a result, the clock will become a true highlight of your interior! Proceed from the fact that almost anything can act as a dial. It is only important that the watch turns out beautiful and original.
Handmade watches - unique interior decor
One of the possible options is a round board, which previously served as a cable reel. To decorate a room that has a geographic bias (for example, a travel agency office), you can make a clock from halves of a globe. Such a product will be compact, but very unusual.
Quite often, wall clocks are made round
For the kitchen, you can make a wall clock with buttons instead of numbers on the dial. The result will be a little thing made in “grandmother’s” style.
A more complex option is a ball clock. To create them you will need a bright ball, as well as curved arrows. Such a watch will look beautiful and futuristic, like a time machine from science fiction films.
A watch made of watches - no one has anything like it
You can also make a picture clock. To do this, take any picture and adapt it to show time.
Mirror wall clock
Video - How to make an original wall clock
Subtleties of wristwatches. What to do with them?
There is no limit to creativity! You can even make your wristwatch original and exclusive. But in creative stores you are unlikely to find the necessary mechanism. To do this, you will either have to disassemble your old watch or deliberately buy an old one at a flea market.
But to do this job, you need to have special skills and tools. This type of work is more complex and serious, as it is considered a craft.
If in doubt, look on the Internet, look through photographs of sketches of various watches on your wrist, and take a closer look. It is quite possible that you will decide to master this art.
Which option should I choose?
Bright “Chrysanthemum” clock made from plastic spoons The base of this clock is cut out of polystyrene foam, although cardboard can also be used. The spoons are glued, holes are cut out. Painting process Photo of the finished clock made from spoons
Space lovers will certainly be interested in the following project. Look how beautiful a wall clock with a moon print will look.
Wall clock with moon print. Space lovers will really like this clock.
In addition, you can make a beautiful eco-clock using moss.
Stunning eco-watch made of moss If you think that such a living watch requires special care, then this is not so - there is no need to water the moss
Another original option is a colorful watch with watercolor touches.
Bright clock with watercolor touches To make such a clock, you will need a minimum of materials Painting the base of the clock
A clock made of cork wood will decorate any interior.
Cork wall clock
Fans of the minimalist style can make a dark plywood clock.
Dark clock in a minimalist style made of plywood
Another representative of the above-mentioned “grandmother” style is a knitted wall clock with a cute cuckoo.
Cute knitted cuckoo clock
But here is a fairly simple clock that you can make with your own hands from a piece of plywood.
The simplest clock made from a piece of plywood
For lovers of everything original, we recommend taking a closer look at another project – a stylish wooden watch with a leather belt.
Stylish wall clock with leather strap
Video – Beautiful DIY wall clock
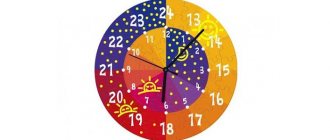
Teaching a child time consists of several techniques:
1) You can start studying clocks with your child if he knows the numbers. If not, then you need to introduce the baby to them first. To do this, various educational materials, cards with numbers, etc. will come to the rescue.
3) For classes, use a simple clock with large numbers; you can buy them, or you can make them yourself. You can make a clock from paper or cardboard on which the child can turn the hands himself.
4) First, introduce your child to the hands: hour, minute, second.
5) Then show the numbers on the layout, explain that 5 minutes are counted between the numbers, and so on.
There is no need to start right away with a complex theory, tell your child everything in the form of a fairy tale, how the small hour hand looks like a turtle walks slowly and slowly, and the big minute hand looks like a bird and jumps quickly and quickly.
To help, we offer you a template for making a clock and learning time with your child. You can download the material at the bottom of the page.
What you will need to make a watch:
1. Clock templates;
3. Glue (glue stick or PVA glue);
4. Needle and thread;
5. 2 buttons.
Work process:
1) Print the template.
2) Cut out the clock and glue it onto cardboard, cut out the numbers and hands and glue it onto the dial.
3) Take a needle and thread and sew on the arrows. In order for the hands to rotate freely, we use buttons: we fasten one on the front side, the second on the back.
4) These are the training hours you get in the end.
Involve children in the manufacturing process, they really like any “sabbath”. And playing with toys that the child made himself is much more interesting.
I hope you and your baby enjoy this watch and learn time with pleasure and benefit.
Educational video for kids about alarm clocks and watches from Fiksiklub
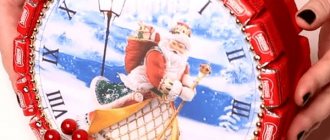
DIY watch for the New Year.
New Year is one of the holidays with a particularly warm and soulful atmosphere. And it is created from many small little things. A festive tree, colorful lights, beautifully wrapped gifts and, of course, various New Year decorations.
For those who want to create a festive and warm atmosphere with their own hands, we will tell you how to make a beautiful New Year's clock that can decorate any home. Beginning needlewomen can try to make a simple round clock from foam plastic, and those who have skills in this matter can try making a New Year's craft that looks more like a cuckoo house.
Master class No. 1. DIY wall clock made from cutlery
How to make a wall clock from cutlery
A fairly popular idea that will appeal to many. To create such a watch you will need:
- scissors;
- disposable tableware (plate – 1 pc., forks – 6 pcs., spoons – 6 pcs.);
- AA battery;
- hands, clock mechanism;
- pencil or felt-tip pen;
- a sheet of cardboard 30x30 (in the example a cardboard box is used);
- black acrylic paint;
- tassels;
- PVA glue.
What is needed to create such a watch?
On a note! Such watches can be classified as budget watches, since their production will cost only 200 rubles. It also takes a little time - about 1.5 hours.
Step 1 . First, prepare the base. Take a plastic plate, measure its diameter (in our example it is 24 cm) and draw a circle.
The circumference of the plate is outlined
Step 2 . Using the markings, cut out a circle from cardboard.
A circle is cut out of cardboard
Step 3 . Coat the circle with PVA glue and glue it to the inside of the plate.
The finished circle needs to be glued to the plate
Step 4 . Divide the circle into 12 equal parts, mark the places where the spoons/forks will be. That is, start creating the dial.
The circle is divided into 12 equal parts
Step 5 . Paint the spoons and forks with black paint. The best option is acrylic paint. Or, alternatively, you can use black plastic utensils.
Painting cutlery
Step 6 . Wait 10 minutes for the paint to dry. Draw a circle with a diameter of 10 cm, glue forks and spoons along its base, alternating them. Also cut a square in the center for the mechanism.
Gluing forks and spoons
Step 7 . Paint both sides of the base and wait until the paint dries.
Painting the base of the future watch
Step 8 . Install the hands, clock mechanism, insert the battery.
Installing the clock mechanism and hands
The result should look something like this.
This is how the finished watch will look in different interiors
Specifics of devices with quartz filling
The main advantage of a quartz movement is its low cost. The disadvantage is that the operation depends on the power source (battery). Operating principle: the charge supplied by the battery passes through the quartz crystal, causing it to vibrate. The vibrating crystal makes the device work and the hands move.
Stores selling goods for creative activities offer sets with a quartz device.
Master class No. 2. Clock with tropical decor
The clock mechanism, as mentioned above, can be removed from an old watch or ordered online. But pay attention to some important points:
- what is the thickness of the dial;
- what is the thread diameter;
- what is the height of the rod (this is the “stump” on which the arrows are placed).
Wall clock with tropical decor
Note! If you plan to make three-dimensional parts, then make sure that the arrows do not cling to them.
You can easily make such a beautiful watch with your own hands
Step 1 . First of all, determine where the number 12 will be. To do this, turn the panel over, install the clock mechanism and mark the middle of its upper part, then draw a perpendicular line. It is from this point that the countdown will begin and the step between the numbers will be marked (if there are any at all).
The countdown will begin from this line
Step 2 . Take a sheet of paper, trace the outline of the dial on it and start drawing the decor. In our example, the outlines of the leaves are drawn, cut out and transferred to the plywood with a pencil.
Step 3 . Color the blank according to the chosen decor.
The blank is painted
Step 4 . After the paint has dried, screw on the clock mechanism. Usually such mechanisms are sold with assembly diagrams, try to stick to them. Place a rubber backing on the stem and apply it to the back of the dial. The middle of the loop (top) should coincide with the mark made with a pencil.
Step 5 . Turn the workpiece over, put the washer on the rod and tighten the nut. You can use pliers to tighten it tighter.
The nut must be tightened tightly
Step 6 . Start putting on the arrows, first making sure that they are all straight. First put on the hour hand, then the minute hand, and finally the second hand. Put them on until they click slightly. Do not press too hard, otherwise you may damage the delicate fasteners. It is also important that the hands are parallel and not touching (otherwise the clock will not move).
Black arrows
Step 7 . In accordance with the mark, set the hands to 12, insert the battery and set the correct time using the wheel on the back of the mechanism.
All arrows are set
All, after spending just a few hours, you can decorate your home with an original wall clock!
It will take literally a couple of hours to make such a wall clock.
Watch base – what is it?
Be sure to go through all your bins, chests and pantries. It is quite possible that you will find something that can be used in further decoration. Namely:
- Buttons that have been lying around for a long time, ribbons and pieces of fabric (great for decoration)
- Old records of different sizes (why not a base for a watch?)
- Clippings from magazines, newspapers, old photographs.
- Dried flowers and leaves.
- Pieces of plywood that remained after repairs, wood cuts, hemp (can also serve as a good base)
- Thick cardboard (pay attention to whether there are any boxes of equipment lying around - an excellent consumable material for the base)
- Shells, pebbles and various small parts.
Master class No. 3. Embroidery hoop clock
Using decorative buttons and an embroidery hoop, you can make a very original wall clock. You can choose a fabric base that matches the texture/color of the interior, and use unnecessary multi-colored buttons.
To make such a watch, prepare:
- clock mechanism, hands;
- thin board or cardboard;
- hoop;
- braid or ribbon;
- buttons;
- textile.
Step 1 . Prepare the hands and clock mechanism (you can remove them from an old watch).
First the arrows are removed
Step 2 . Fix the fabric between the hoops and trim off the excess. Then sew on the buttons, positioning them like numbers on a dial.
Clock mechanism fixed
Step 3 . Cut a hole in the middle of the dial, install the clock mechanism so that the fasteners are located in the center. To fix the mechanism, cut out a circle from wood/cardboard, the diameter of which corresponds to the diameter of the hoop, and glue the mechanism to it. As an option, the mechanism can be hung on a decorative ribbon, fixing it on an embroidery hoop and making a small loop to hang a clock on the wall. At the end, set the arrows. That's it, our original craft is ready!
Original wall clock made from an embroidery hoop
Printable templates
Pictures enlarge by clicking. You can print the template, glue it on cardboard, cut it out, attach the arrows and study...
I hope you enjoyed this tutorial and will stop by again when you decide to build something with your little one. And I am constantly adding to the collection for creativity so that you can find a hint for all your questions. Therefore, subscribe, then you won’t miss anything! And tell your friends about the site so that they can get all the information they need!
Now I say goodbye! Goodbye everybody!
Master class No. 4. Clocks from old magazines or newspapers
Magazines and newspapers can also be used to make original wall clocks.
Wall clock from old magazines
In this case, you need to prepare:
- hands, clock mechanism;
- pages of magazines or newspapers (24 pieces, approximately the same size);
- a circle cut out of cardboard with a hole in the center;
- pencil or pen;
- transparent plastic discs (2 pcs., you can take them from CD boxes);
- scissors;
- silk thread for embroidery;
- long needle;
- transparent tape.
Materials and tools for making watches
Step 1 . To begin, wrap the first page around a pen or pencil. Make all 24 tubes in the same way, secure their ends with adhesive tape so that they do not unwind. Next, step back from the edge of the tube by about 1/3 and bend it in half in this place.
The page is wrapped around the handle, the finished tube is bent
Step 2 . Thread a long needle and thread it through the bent end of the tube. Pull the needle through and tie a knot at the end of the thread; Sew all the tubes in a circle in the same way.
The thread is pulled through the bent ends. The tubes are arranged in a circle.
Step 3 . Place a transparent disk on top of the tubes so that the hole on it is located in the center of the resulting circle. Place the clock mechanism on the disk so that the fasteners for the hands align with the hole.
Clock mechanism included
Step 4 . Then turn the structure over and attach another disk. Place cardboard on top and secure the clock mechanism with a nut.
The mechanism is secured with a nut
Step 5 . Then screw the arrows themselves. Homemade wall clock is ready!
Screw the clock hands and you're done
The heart of the watch is the clock mechanism
An integral attribute of any chronometer. Modern mechanisms are distinguished by a variety of design solutions and the quality of materials used in their production. Such devices are divided into two groups:
- mechanical;
- quartz.
You can determine which category a chronometer belongs to visually: just glance at the second hand. If its movement can be described as continuous and silent, then you have a product with mechanical filling. Is the move abrupt and nervous? The watch is quartz.
Master class No. 5. John Cleese's Foot Clock from The Ministry of Stupid Walks
This original watch will be an excellent gift that can fit into any interior due to the fact that it is made in neutral black and white colors.
Designer watches with hands-legs
To make such a clock, prepare:
- printed John Cleese and numbers for the dial;
- canvas 200x200 mm;
- plastic (give preference to something that bends poorly - take, for example, a plastic folder);
- hands, clock mechanism;
- PVA glue;
- brush;
- black marker;
- decoupage glue;
- awl;
- wire cutters;
- scalpel;
- scissors.
What is needed when creating a watch
Step 1 . You need to start with a printout of John Cleese himself (his image can be downloaded from this link) on A4 sheet. Trim the finished drawing so that its dimensions are approximately 210x210 mm.
Printed drawings
Cut sheet with dial
On a note! It is advisable that the printer used is a laser one - this way the ink will not leak.
Step 2 . Moisten the picture with a small amount of water and wait for it to be absorbed. While this is happening, apply glue to the canvas. Glue the wet picture onto the canvas and carefully smooth it out. Apply a second layer of glue on top (obviously you need to use transparent), press the edges of the sheet and wait until the canvas dries. Only then apply another layer of glue.
The picture is wetted with water The canvas is smeared with glue The image is glued to the canvas Another layer of glue is applied The next morning the craft will look like this
Step 3 . Cut out the legs according to the template, leaving a five-millimeter margin along the contour. Sprinkle the picture with a small amount of water and wait until it is absorbed. Next, apply glue to the prepared piece of plastic, carefully glue the paper legs, smooth them out. Apply another layer of glue to the picture, wait for it to dry (you can leave it overnight - that’s enough).
Legs are cut out according to the template
Pictures are sprinkled with water
A piece of plastic is cut out. Paper legs are glued.
Wait for the glue to dry
Important! If the plastic is slightly bent after the glue has dried, glue a sheet of thick paper to its back side.
After complete drying, arm yourself with a scalpel and carefully cut along the contour of the leg.
The legs are cut out with a stationery knife. Ready-made arrows-legs.
Step 4 . Determine the center of the canvas; at this point, use an awl to make a hole wide enough to accommodate the arrow fastener. Install the clock mechanism on the reverse side and secure it with a nut.
The center of the canvas is determined. A hole is made in the center. Another photo of the process. A clock mechanism is installed. If your mechanism also includes a metal ring before fastening between the canvas and the nut, then so that it is not visible, you can print the image of John Cleese again, cut out a suitable one from it diameter circle with a hole in the middle and glue it so that it covers the metal ring. The black circle covers the metal ring.
Step 5 . Place the arrows on top of the plastic legs. Mark with a pencil the places where mounting holes need to be made. If necessary, trim the arrows (their length should be slightly less than the length of the legs), and then glue the legs to them. When the glue has dried, attach the hands-legs to the dial. You can paint the mounting nut black if necessary.
Arrows and cut out legs Mark the locations of future holes Holes are made
Trimming arrows
The parts are glued to the hands. Attaching the hands-legs to the watch.
Step 6 . Ready! The result is such an original wall clock.
The result of the work done
How to make a craft for the New Year?
To make a craft for the New Year, we will need the following materials:
- Box;
- Colored paper;
- Glue;
- Tinsel;
- Decorative elements: Christmas tree toys, snowflakes, stickers, rhinestones, etc.
The materials have been prepared, then we will proceed to the manufacturing process.
- First, cut out numbers and divisions from colored paper;
- We stick them on the lid of the box;
- Next, fill the box with tinsel and close it;
- Then we use glue to fix the box more tightly;
- We decorate the dial with decorative elements and hang Christmas tree decorations from below.
That's all, the New Year's craft is made in the best possible way!
Master class No. 6. Decoupage wall clock
Vintage is always coziness, a harmonious combination of events from past years. A handmade vintage style wall clock can decorate any interior, giving it a touch of romance.
DIY wall clock decoupage
To decoupage a vintage watch, prepare:
- clock mechanism, hands;
- workpiece (its diameter should be 30 cm);
- palette knife;
- acrylic primer;
- brushes;
- relief acrylic paste (you will need a thin one);
- matte acrylic varnish;
- transparent modeling gel (in our example, “Tair” is used);
- stencil with dial;
- acrylic paints (in the example the following colors are used: white, pistachio, natural umber, peaches in champagne);
- rice cards (with drawn notes, flowers);
- moderator;
- special decoupage glue (in the example “Tair” is also used).
What you need for decoupage
Step 1 . First, prepare the workpiece - evenly apply a thin layer of acrylic primer to it.
Step 2 . To make the base whiter and smoother, sand it using sandpaper, then apply a second coat of primer.
Sanding the base with sandpaper
Step 3 . Start creating an artistic background. Take pistachio, peach and taupe paint (for the latter, add a drop of umber to the white paint). Use pieces of sponge to apply. When layering colors softly, apply them in smoky patches like in the photo.
Creating an artistic background for decoupage
Step 4 . To make the roses clearly visible, paint them on the reverse side with white paint.
The reverse side of the roses is tinted with white paint.
Step 5 . Glue the pieces of rice cards with glue: first the notes, and then the piece with the flowers.
Gluing pieces of rice cards
Step 6 . Using gray-beige paint, combine the background and soften the edges of the glued pieces. Dust the edges using just a little paint. You can add a little dry retardant to achieve greater lightness and transparency.
Dust the edges with grey-beige paint
Step 7 . Make a relief dial. Using a stencil, apply relief paste with a palette knife. You don’t have to level the surface too much - let traces of strokes remain on it. Next, remove the stencil and wait for the relief to dry completely.
Creating a relief dial
Step 8 . Apply another layer of acrylic varnish - it will protect the decorative layer. Wait for the surface to dry.
Acrylic varnish is applied
Step 9 . Using a transparent modeling gel, make the flowers voluminous. To apply, use a palette knife, moving according to the movement of the petals. Wait for the gel to dry (it will become transparent).
Add volume to roses using a modeling transparent gel
Step 10 . Take natural umber, dilute it with water until you get a milky consistency; also add a little retarder. Apply the resulting mixture using a bristle brush so that it penetrates into all the recesses.
Patination of the dial of future watches
Step 11 . Wipe off excess patina with a folded wet rag, focusing on the top of the relief so that the patina remains in the recesses.
Removing excess patina
Treat the edges of the dial with a patina compound, then wait until the watch dries.
The edges of the watch are processed
Step 12 . Apply matte acrylic varnish (preferably in two layers; wait for the first to dry before applying the second).
The watch is coated with acrylic matte varnish
Our watch is almost ready. Now just pick up the hands and install the clock mechanism!
Photos of finished wall clocks
Types of clock mechanisms
Another children's option
Of course, children always want to please, pamper and surprise. Therefore, we make a watch for a child with our own hands so that it looks fun and playful.
We will need an old clock mechanism with hands, a used disk, colorful plastic cutlery and a marker.
Using a marker, we draw numbers on the disk equidistant from each other. On the back of the disk, opposite each number, we glue plastic spoons, forks and knives in turn in different colors. We insert the clock mechanism into the center of the disk.
Setting up the time. This model is suitable for both the nursery and the kitchen. The child will be incredibly happy with the bright craft, which also turns out to be useful.
Best ideas for inspiration
And finally, here are some more examples of decorating, creating or remaking wall clocks. Check them out, get inspired and create!
Bright wall clocks will decorate any interior Creative ash wall clocks Bicycle wheel clocks Triangular wooden wall clocks Homemade wall clocks with an original design Amazing wall decor Interesting wall clocks Another original dial design
Clock from an old kitchen colander
Large wall clock Homemade wooden wall clock
Original domino clock
A simple wall clock made of buttons A clock made using the decoupage technique A clock made from ordinary books Photos of a homemade wooden clock A wall clock for the kitchen A large clock on the wall Another example of a clock made from a bicycle wheel
5/5 — (15 votes)
Rules for using wristwatches
There is a stereotype that a wristwatch should only be worn on the left hand, regardless of gender. But in reality this is not so important. You will not offend anyone if you are much more comfortable wearing a watch on your right hand.
For men, the choice of hand mainly depends on the functionality, convenience and safety of the watch. For a woman, combination with other accessories is more important. Therefore, everything depends on you. Creative success!