/Accessories and decor/Decoration/
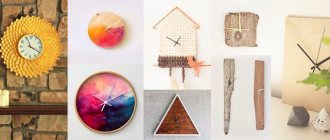
Do you want to decorate your home for the holidays or just create a cozy atmosphere in it? Then simply decorate the dining table, shelves and consoles with candles. And to save on buying a lot of candlesticks, we recommend making them yourself. In this material you will learn 7 ideas for making candlesticks from easily accessible, improvised and even waste materials in just one evening.
Preparing your desktop
First of all, you need to prepare your table on which you will work. There should be no unnecessary things on it and every tool should be at hand. Not everyone has their own desktop and has probably already thought about creating one. Making a table is not difficult, but choosing a place for it in the house is difficult. The ideal option is an insulated balcony, on which you can do crafts at any time. I have already written about preparing the table in a separate article and tried to describe in as much detail as possible the entire process of creating it. If you don’t know how to prepare your workplace, then read the following Article. After you have completed the process of creating a table, try to start choosing your future craft.
Design solutions
Designer wooden candlesticks are quite expensive, and purchasing ordinary standard ones is not at all a reason to be proud. The best option would be to make wooden candlesticks with your own hands, and for this you do not need to have special skills.
Designer candlestick in the shape of a root
Horseshoe candlestick
From hazelnut branches
From thick wooden branches, saw cuts, driftwood and even thin twigs, you can quite easily make wonderful and very original candlesticks with your own hands, such as those shown in the photo. In addition to the fact that such an unusual element will become a worthy decoration for any room, a wooden candlestick made by yourself can be an excellent and unique gift for loved ones.
We choose quality material
The main material is plywood. The choice is always difficult. Each of us has probably encountered such a problem as delamination of plywood from the end part and asked the question, what causes this delamination? Well, of course, this is mainly due to low-quality plywood. If this is not the first time you have picked up a jigsaw, then you can select plywood from the remnants of a previous craft. If you are new to sawing and you don’t have plywood, then buy it at a hardware store. Choosing material for sawing is always difficult. You should always choose plywood carefully, often look at the defects of the wood (knots, cracks) and draw conclusions. The difficulty in choosing plywood lies in the fact that no matter how you guess at its defects and shelf life. For example, you bought plywood, cleaned it, translated the drawing and suddenly it began to delaminate. Of course, this has happened to almost everyone and it’s oh, how unpleasant. So it is better to pay attention when choosing and choose good plywood. I wrote a special Article in which all the principles of choosing plywood are described step by step.
Logs across and in half
Cool idea for those who don't have a fireplace. Just take a regular log and cut it down the middle. After this, drill small pockets and place candles there. Outwardly, it is comparable to a small fireplace. You can even turn it over, and the pockets will be located on the reverse side.
Candles from the inside
Candles from the bark side
Stripping plywood
We clean our plywood with sandpaper. As you already know, “Medium-grained” and “Fine-grained” sandpaper is used for cleaning plywood when sawing. You've probably seen sandpaper in hardware stores, and that's what we'll need. In your work you will need “Coarse-grained”, “Medium-grained” and “Fine-grained” sandpaper. Each of them has its own property, but a completely different coating, by which it is classified. “Coarse-grained” sandpaper is used for processing rough plywood, i.e. which has many defects, chips, and cracks. “Medium-grained” sandpaper is used for processing plywood after “Coarse” sandpaper and has a slight coating. “Fine-grained” or otherwise “Nulevka”. This sandpaper serves as the final process for stripping plywood. It gives the plywood smoothness, and therefore the plywood will be pleasant to the touch. Sand the prepared plywood in stages, starting with medium-grain sandpaper and ending with fine sandpaper. Sanding should be done along the layers, not across. A well-polished surface should be flat, completely smooth, glossy in the light and silky to the touch. How best to prepare plywood for sawing and which sandpaper is best to choose Read here. After stripping, check the plywood for burrs and small irregularities. If there are no visible defects, then you can proceed to the process of translating the drawing.
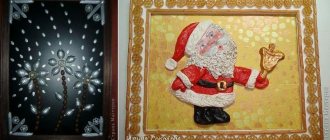
Flashlights
Traditional candle lanterns on New Year's Eve can be supplemented with a composition of fir branches, red rowan, textile and plastic Christmas tree decorations. You can also paint it with acrylic on glass from an art store. Even a child can draw very simple snowflakes and stars. New Year's motifs are more complex - deer, bells, snowmen, Santa Claus. Everything is limited only by your imagination.Translation of the drawing
For me, drawing translation has always been the main process in my work. I will tell you a couple of rules, as well as tips for high-quality translation of a drawing. Many people transfer the drawing onto plywood not only using a pencil and copying, but also using “Black Tape”, glue the drawing to the plywood, then wash off the drawing with water and the markings of the drawing remain on the plywood. In general, there are many ways, but I will tell you about the most common method. To transfer the drawing onto prepared plywood, you must use a copy, a ruler, a sharp pencil and a non-writing pen. Fasten the drawing in plywood using buttons or simply hold it with your left hand. Check if the drawing fits the dimensions. Arrange the clock drawing so that you can use a sheet of plywood as economically as possible. Translate the drawing using a non-writing pen and ruler. There is no need to rush, because your future craft depends on the drawing.
Candlestick made of polymer clay
Similar houses or these cute cones and pyramids can be made from polymer clay. Sold in craft departments and art stores. We sculpt it as if from plasticine, bake it in the oven, and paint it. It is easier to immediately sculpt monochromatic products from clay of the desired color, since oil paints take a long time to dry, and not all acrylic paints are suitable. (Consult with sellers)
Drilling holes in the parts
As you have already noticed, the parts contain parts of the grooves that need to be cut out from the inside. To cut out such parts, you need to drill holes in them using a hand drill or, as in the old fashioned way, make holes with an awl. By the way, the diameter of the hole must be at least 1 mm, otherwise you can damage the elements of the drawing, which, alas, are sometimes difficult to restore. To avoid damaging your work table when drilling holes, you must place a board under the workpiece so as not to damage the work table. It is always difficult to drill holes alone, so ask a friend to help you in your task.
Preparing the stencil
Keep in mind that drawings, diagrams and sketches for cutting come in different sizes.
For example, to make an interior item, say a shelf, you need to use whatman paper in A1 or A0 format, and to create some toys you can even use an ordinary sheet of cardboard.
Well, then the outline of the product is applied to the surface of the workpiece; during this process it is necessary to maintain the exact dimensions of the drawing.
You can find templates for cutting with a hand jigsaw on special resources, but it is easier to come up with your own ideas using a simple model as a basis and taking into account the type of workpiece.
An individual approach when developing a drawing, template or diagram of a future product is welcome, because it will emphasize the very texture of the wood.
Source pinimg.com
Sawing parts
There are many rules for cutting, but you need to stick to the most common ones. First of all, you need to cut out the internal parts, only then according to the external pattern. There is no need to rush when cutting. The main thing is to always keep the jigsaw straight at a 90-degree angle when cutting. Cut out the parts along the lines you accurately marked. The movements of the jigsaw should always be smooth up and down. Also, do not forget to monitor your posture. Try to avoid bevels and unevenness. If you go off the line while cutting, don't worry. Such bevels and irregularities can be removed using flat files or “coarse-grained” sandpaper.
Blessed base - glasses
The simplest version is to place a wide candle on the leg of an inverted beautiful champagne container, and place a Christmas tree, figurine, or ikebana under the bowl. If you prefer mobility, simply pour beads or kumuki inside, gluing the base to an LED disk trimmed with foil. A composition is created in the recess, including fir branches and fresh flowers. A border with rhinestones and tinsel is attached to the edge.
Step-by-step instructions for making New Year's decor:
- Spruce branches are trimmed to fit a tall glass. Their height should not darken the lamp.
- Having laid them out on the table, they are smeared with glue on one side.
- Then the samples are applied in a circle, cutting off the lower protruding stems.
The result is an openwork convex mesh.
To avoid glass walls cracking from heat, buy small candle products.
A floating candle-tablet in water with rose hips, pine needles, and beads looks very attractive. Such a delicacy will come in handy at a wedding or any other celebration.
Cleaning Parts
You should always clean the parts of a future craft carefully. At the very beginning of the work, you already sanded the plywood with sandpaper. Now you have to do a small part of stripping the plywood. Using medium-grain sandpaper, sand the edges of the parts and the back of the plywood. “Fine-grained” sandpaper is considered the final stage of cleaning parts. It is better to clean the front part of the parts with fine sandpaper. When processing plywood, take your time. You can also use a rounded file, which is convenient for cleaning the inside of the holes. Try to ensure that the parts come out without burrs or irregularities.
Balloon
To mount an exclusive exhibit, construction plaster is diluted with water to the consistency of sour cream. The inflated ball is half wrapped in bandages, lubricating them with the prepared mixture, repeating the layers three times. After drying, the broken rubber bands are removed, and the bottom and walls are painted in different colors, incredibly beautifully reflecting the light.
During the process, the edges of the product can be left smooth or given a broken, torn configuration.
Note!
Do-it-yourself illuminated mirror - step-by-step master class on how to make it yourself, photos of types of lighting
DIY flower stand - TOP 100 photos of stand options, detailed instructions, diagrams and drawings from the masters
Do-it-yourself furniture restoration: restoration methods, step-by-step master class, necessary tools and materials
Varnishing crafts
If desired, you can transform our craft by covering it with Wood Varnish, preferably colorless. Read how best to varnish a craft. Try to choose a quality varnish. Varnishing is carried out using a special brush “For glue”. Take your time. Try not to leave visible marks or scratches on the craft.