The pre-holiday bustle usually includes planning dishes, selecting gifts, and decorating the premises. Let's say a name day simply cannot do without bright decorations, like banners with flags. Therefore, in this review we will show you how to make a birthday garland with your own hands. Below you will find 10 of the most interesting master classes that will help you create a beautiful holiday garland with your own hands. In addition, we have added a selection of flag templates with and without letters, which can be printed on a printer if desired. And here you can see how to make roses from different materials (15 master classes), they will also fit perfectly into the holiday decor. We also showed how to pack a bouquet of flowers yourself, very necessary skills worth noting (11 MK).
Volumetric paper garland
The simplest option for creating a voluminous paper garland will appeal to adults and children. The process does not take much time, and the result exceeds expectations. At the same time, the production itself is exciting and delights children. At the same time, this is an excellent way for an adult to relax and take a break from everyday routine and stress, and for a child it is an opportunity to improve concentration and fine motor skills, and show imagination.
Paper balls
To make it, you will need to take a sheet of paper of the desired shade; it does not have to be the classic white color. The paper is then folded and cut as per the instructions to create a square shape folded in half. The large triangle is folded two more times. On the resulting small triangle, markings are made according to the example of the template, and the shape is cut out. The finished form is straightened and connected in the appropriate places, as in the diagram, to form three-dimensional snowflakes that remain to be put on the thread.
Flashlights
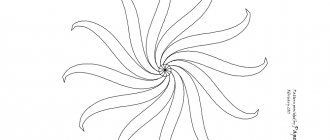
Another cool option for a paper garland. Using the template below, cut out the required number of elements from colored paper, glue and secure with a thread. Ready!
Christmas tree decorations 3D
Make a garland in the form of Christmas tree decorations. Cut out the parts according to the template, fold them in half and glue them together, as shown in the MK below.
Geometric garland
Lovers of strict forms will be delighted with this idea. Redraw the template or print it. Fold it towards you along the dotted lines and glue it together. Add glitter as desired and secure the shapes to string or string.
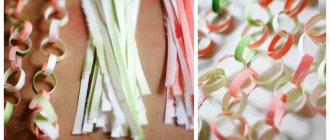
Garland of strips of paper
Here's a quick and original idea made from stripes. Here, by the way, you can use old magazines, for example, postcards and so on.
Or this option. You can make real winter patterns from plain paper. By the way, this is a great idea for decorating a home photo zone.
Make balls from strips of paper and secure them with string or ribbon. The original decor is ready!
Beautiful Russian winter letters for decoration: letter templates, print and cut out
To ensure that the inscription itself does not commemorate the frosty, clear days of winter, it is worth looking for appropriate letter templates to decorate the holiday. To make your search easier, we have collected them in this section.
Beautiful Russian winter letters for decoration
Beautiful Russian winter letters for decoration
Accordion paper garland
Garlands in the form of an accordion have a special appearance; they attract attention and enhance the feeling of the holiday. To create them, just stock up on colored paper of various shades, cut into identical strips. The edges of the strips are attached to each other, maintaining a right angle, and are alternately wrapped, stacking on top of each other. The resulting garlands are short or medium length. Each of them must be connected at the beginning and end, using glue or a stapler, to form a circle. Finally, the circles are strung like an accordion on a thread or ribbon and placed in any suitable place in the room or on the tree.
For inspiration, more ideas for garlands made of paper fans.
Glowing inscription
An ordinary LED garland can be turned into a spectacular “Happy New Year” inscription if you follow the step-by-step instructions:
- Prepare 2 garlands - they should be as long as possible so that the inscription is not interrupted.
- Put an inscription on whatman paper or the back of a piece of old wallpaper - use a simple pencil for this purpose. It is better to choose a font not printed, but capitalized.
- When bending the garland, repeat the outlined contours of the inscription, fixing the wires with transparent tape. Place both garlands so that the first fork is on the first letter of the inscription, and the second fork is on the last.
- Decorate whatman paper with pieces of foil, paper snowflakes, sparkles, and hang small Christmas tree decorations.
The same idea can be implemented not on whatman paper, but directly on wallpaper or window glass. Just keep in mind that marks may remain on the wallpaper after the garland is dismantled. You will also need to consider the location of electrical outlets or the use of a rectifier to connect the glowing device. It is important to choose an LED garland, since it practically does not heat up and has a low fire hazard.
Garland of paper stars
Garlands of stars can be called an example of an ideal decoration for the New Year, giving a special, bright festive effect. And such a craft can be given a particularly interesting look using paper or cardboard with a “mirror” surface that imitates gold or silver.
Flat stars on a thread
Stars of different or the same sizes are cut out from suitable paper, and a hole is made in one of the “rays” of each figure using a hole punch. Threads are threaded through the hole, tied to keep the position of the star static, and the product is ready.
Stars a la origami
First, a square is formed from a sheet of paper, cutting off the excess part. The square is folded into a triangle, then several more bends are formed on it in accordance with the instructions. This way, you get the details of future stars, which need to be joined into single shapes using glue. These stars are glued to a regular garland between light bulbs or to a thread, forming a unique product.
3D stars
Halves of stars are formed from paper according to the example diagram, which will need to be connected to each other by laying garlands or thread between them for fixation.
Origami stars
And of course, the idea of a New Year's garland for fans of the origami technique. Below you will find detailed step-by-step instructions for making stars.
Star patterns
In your work, you can use any one or several templates, according to which unusual and beautiful stars can be easily cut out and assembled for future garlands.
Felt crafts
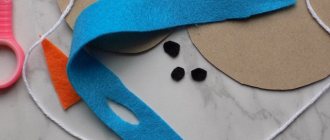
The uniqueness of felt lies in the fact that its properties have much in common with paper - it is easy to glue, cut, fold, etc. Felt goes well with a variety of decorative elements and has many colors to create beautiful crafts. Try sewing bright letters from felt for a cozier “Happy New Year!” it will be difficult to find. The method is suitable for those who have the opportunity to work with a sewing machine.
For needlework take:
- felt scraps of different colors;
- letter templates for cutting, printed on paper (or better yet, on thin cardboard);
- scissors and a stationery knife with a thin blade;
- white or shiny threads - this color will stand out favorably against the general background, emphasizing talented needlework;
- decorative elements - sequins, beads, rhinestones, lace, artificial snow, etc.;
- double sided tape;
- fishing line, twine, twine or rope for fastening.
Step-by-step instruction:
- Cut out the pre-printed letters and trace their outlines onto the back of the felt. The templates can not be cut out, but simply copied using carbon paper.
- Using the drawn contour, cut out letters and numbers from felt, trying to convey their configuration as accurately as possible.
- Using a sewing machine, sew each letter around the perimeter. The stitching should be straight and as close to the outer edge of the felt as possible. It will emphasize the contours of the letters and prevent the material from crumbling.
- Decorate the finished letters and numbers as you wish. You can attach the decor with double-sided tape.
All that remains is to string the felt letters onto a fishing line or rope and hang them in a visible place.
Garland of paper circles
An interesting solution would be to make garlands of circles for the New Year. They are distinguished by a unique appearance, reminiscent of the style conveyed in the well-known “The Great Gatsby”. Falling from the ceiling, flowing along the walls or curtains, they enhance the bright festive atmosphere. But in accordance with the amazing effect, this option has a rather labor-intensive implementation process.
To form the decoration, it is better to take hole punches with stencil forms for cutting out circles of various diameters, or try to draw the necessary circles yourself with a compass or by hand. You will also need colored paper, glue and thread of a suitable color and density. You can also use paints, glitter and other additional decor.
During the process, you can use one of the master classes as an example or instruction.
A simple garland of paper circles, glue and ribbon
You can also sew the circles on a machine or glue them onto tape in semicircles.
Dilute the paper circles with other elements, such as stars.
Balls 3D
Add more circles to each ball and you will get another original version.
Well, if time permits, be sure to pay attention to the honeycombs.
Beautiful Russian capital letters for design: letter templates, print and cut out
- For years, art schools and other specialized educational institutions have been teaching how to create inscriptions and correctly place texts on a poster. Therefore, all the nuances of writing letters cannot be revealed in one article. We won't even try. After all, now there are a lot of ways to bypass the process of writing text: letters and entire inscriptions can be printed on a printer, redrawn from a finished poster or cover onto tracing paper, and then transferred to a poster or other surface.
- If necessary, you can simply paste the text printed on a black and white or color printer. But if you have time, you can experiment with colors, textures and apply paint in some unusual way.
What tools are needed to write beautiful text
Beautiful Russian capital letters for design
Beautiful Russian capital letters for design
Paper Christmas tree garland
Garlands with paper Christmas trees have a stylish and modern appearance. But they require accuracy and scrupulousness in work, since the end result should be geometrically correct and symmetrical mini-trees connected into one chain. With skill, this version of the garland can be made in an hour or two. The main thing is to stock up on templates, suitable thickness, density and color paper, scissors, glue, threads or tapes. And then it’s enough to take one of the master classes as a basis and either reproduce it or use it as an example and source of inspiration.
Garland with Christmas trees 3D
Solid garland of paper Christmas trees
Christmas trees made of triangles
Christmas trees made from paper strips
Flat Christmas trees on tape
Beautiful Russian letters for decoration: letter templates, print and cut out
If you need to design a poster in a humorous way, with cheerful notes, then look at the letter templates presented in this section.
Beautiful Russian letters for decoration
Beautiful Russian letters for decoration
Garland chain
Make a chain of multi-colored rings, adding color to your New Year's decor.
Or dazzling white, recreating a snowy atmosphere in a warm house.
Beautiful Russian New Year's letters for decoration: letter templates, print and cut out
In this section you will find a selection of beautiful Russian letters for decorating a New Year's event.
Beautiful Russian New Year letters for decoration
Beautiful Russian New Year letters for decoration
Beautiful New Year's inscription for decoration
Beautiful Russian New Year letters for decoration
Beautiful Russian winter letters for decoration
Beautiful Russian winter letters for decoration
Crepe paper garland
Original crafts are made from crepe paper (also corrugated). For this type of crafts, it is better to use a thin one, then the product will turn out airy.
Fluffy corrugated paper garland
Make a fluffy garland from long strips. By the way, this craft can be used as a boa to complement a festive look.
Garland with crepe paper tassels
Or this option with tassels.
Crepe paper on a string
Beautiful Russian fairy letters for design: letter templates, print and cut out
To decorate a children's party in a fairy tale theme, special templates are suitable. All you need to do is find the ones that suit you from this section and print them.
Beautiful Russian fairy tale letters for decoration
Beautiful Russian fairy tale letters for decoration
Beautiful Russian fairy tale letters for decoration
Garland of snowflakes
The most obvious option for decorating for the New Year. Of course, snowflakes can be cut out. This idea seems to lie on the surface. But you can get creative and do something more interesting.
Snowflakes from openwork napkins
If you don’t have time for decor at all, but really want to decorate your apartment, house or office, round openwork napkins will come to the rescue. This garland looks especially cool in a=vertical design!
Snowflakes made of accordion paper
Make voluminous snowflakes out of accordion paper. By the way, instead of paper you can use paper bags, then you will get a huge garland!
Strict geometric snowflakes made of paper strips
Beautiful Russian capital letters for design: letter templates, print and cut out
If you need to make an inscription in capital letters, then look for a suitable option in this section.
Beautiful Russian capital letters for design: option No. 1
Beautiful Russian capital letters for design: option No. 2
Beautiful Russian capital letters for design: option 3
Simple flat garlands
And finally, garlands for the lazy.
New Year characters
Print the templates below, cut them out and secure them to string or string.
Flashlights
This idea captivates with its simplicity and at the same time originality. If you don't have glitter paper, regular paper will do. The highlights can be completed with a white marker, paints, or completely abandoned.
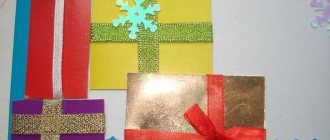
Checkboxes
Flags are another simple and festive option. Choose the appropriate flag shape or combine!
Gingerbread houses
Well, how do you like this miracle? The cutest gingerbread houses will be a great addition to your New Year's decor.
Garland mesh
Another adorable idea for lazy adults or kids! I remember such beauty from kindergarten; by the way, in kindergarten we made a garland chain with the whole group. And you?
Eco garland leaves
Well, an option for lovers of eco style. Not a single tree was harmed during the making of this craft! However, in winter it is difficult to find a tree with leaves. Although …
Or the “thicker” option
By the way, you can make any shape, for example, holly. Tissue paper leaves also look really cool.
Video on how to do an angel stretch
I specially selected a video on this topic from YouTube, I hope it will help many people create a stunning hangout for the upcoming holiday, and below you will find other templates. So, let's go have a look first.
Now the promised stencils:
Beautiful children's cartoon Russian letters for decoration: letter templates, print and cut out
A children's event can be decorated with original cartoon letters. Where can I find them? In this section!
Beautiful children's cartoon Russian letters for decoration
Beautiful children's cartoon Russian letters for decoration
Beautiful children's cartoon Russian letters for decoration
Beautiful Russian letters with flowers for decoration: letter templates, print and cut out
Beautiful Russian letters with flowers for decoration
Beautiful Russian letters with flowers for decoration
Beautiful Russian letters with flowers for decoration
Gypsum
It's easier to work with plaster. And in order to cast letters from this material, you can make a mold that anyone can handle.
To do this, you will need cardboard and wide tape that is used to glue the inside of the form. Then you need to dilute the plaster with water in the proportions indicated on the package. After this, fill out the form and wait for the workpiece to dry completely.
When working with plaster, remember to protect your clothing and body by wearing an apron and gloves. You can simply remove dried letters from the mold by cutting them, and sandpaper will help you get them perfect.
Photos with such letters at a wedding can be taken outdoors in any weather conditions. Neither rain nor snow will spoil them.