4/5 — (8 votes)
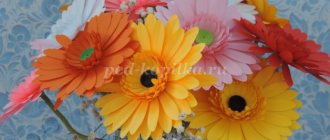
Have a good and bright day everyone! Very soon, in a month, the first flowers will appear, I suggest not to wait for this and make your own flowers from paper. After all, you can give such lovely gifts of nature without a reason, but if you need a reason, then don’t forget to congratulate your mothers and grandmothers on March 8 or Happy Mother’s Day, because it is on these days that such crafts are always given.
Let them be paper, but they can be presented so cool and superbly that they will look even better than alive, and even more so they can stand on a table or shelf for a single year. And this certainly makes me happy. Take a look at this picture, do you like it? If yes, then in the last article I showed step by step how you can do this.
In my opinion, today’s theme will always be popular, because this is the most beautiful and delicate souvenir that you can give for any occasion. So, I suggest you hang out with me for a while))).
Instructions for making flowers from paper:
To make such flowers, we will need:
Tools and materials:
- Double-sided colored paper (possibly with patterns) or pages from newspapers, magazines, books
- Scissors
- Glue
1. First, take scissors and cut out a square from colored paper (the larger the square, the larger the flower will be).
We twist the square so that we get a rhombus. 2. Fold the diamond in half diagonally. We have a triangle.
3. Once again, fold the two corners of the triangle into the middle to form new corners, as in the photo below. We have a rhombus again.
4. Now let's start creating the core. Thanks to the core, our paper flower will look more natural. To do this, carefully straighten the two side corners. The bend line should be exactly in the middle on them.
5. We bend the side corners of the triangles (F and G) inward so that they do not extend beyond the boundaries of the sheet.
6. Next we need to fold the two side triangles in half. The corners remain inside. After this, apply glue to the sides, as shown in the picture, and glue the petal.
7. We have one petal with a core.
8. To make one flower, we need five such petals. We already have one, we need to make four more of these petals. To do this, repeat the previous steps four times.
9. We got 5 petals. Now, to make a flower out of them, spread glue on the sides of the five petals and glue the petals together.
To make paper flowers more vibrant and original, you can use colored paper with patterns.
If you want to give a vintage look to your paper flowers, you can make flowers from newsprint or from book pages.
By showing your imagination, these paper flowers can be used to decorate almost any holiday or gift!
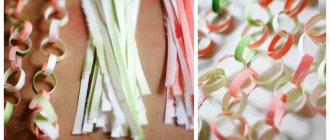
Rainbow of shades
For a bouquet you will need to make five or seven flowers. For each flower, you can take an individual color or combine shades, for example: red with pink, blue with light blue. You can use spray paint and glitter.
Thanks to the imagination of craftswomen, such masterpieces can be created and used as a gift.
Paper flowers - Rose
Let's make such a wonderful paper rose together. For this we need:
Tools and materials:
- Scissors
- Ruler
- Threads
- Scotch tape (preferably colored or double-sided)
- A piece of wire
- Stretch Crepe Paper
- Ball or candy
Step-by-step instruction:
1. First we need to prepare the preparations. To do this, you need to choose the color for our rose and cut crepe paper of the desired shade measuring 7 x 5.5 cm - these will be our petals. The more preparations we prepare, the more magnificent the rose will look.
2. Now we need to stretch our blanks across. This is necessary in order to give them a bend and shape.
3. Next, we make a blank using green paper (look at the picture). This trick will make our rose look more realistic.
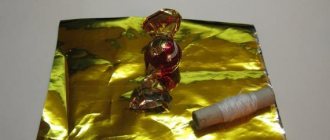
4. At this stage you need to connect the stem of the rose with its petals. Carefully wrap the petal blanks around the ball or candy and attach them to the stem with a thread.
5. Now you need to make the wire more similar to the stem. To do this, take green paper and wrap it around the wire. After this, we attach the green leaf blanks to colored or double-sided tape.
That's all! The paper rose is ready. If you want to make a whole bouquet of such roses, then repeat all the steps as many times as necessary.
To make the bouquet look more fun, you can use paper of different colors.
How to decorate a flower pot with threads and rope
To use threads or rope you will need superglue, but you can use a glue gun. Two technologies are used. First, a small section of twine is coated with glue and glued to the pot. The second method is to turn the pot upside down on a slight elevation, completely lubricate it with glue, and quickly wrap it with rope. Its tip must be hidden with a skewer or pulled inside with a hook. This decor of flower pots will stand out from the rest.
Homemade clay pots Source cvetyportal.ru DIY fabric flower pots Source www.vosgesparis.com
If you follow thread technology, you can easily create any ornaments. You can attach twine woven into a braid on top or decorate the rope surface with dry grass, buttons, and pieces of fabric.
Suitable for decorating pots are laces from old sweaters, jackets, and the handles of gift bags.
You can hang a flower pot using a flowerpot Source lifehacker.ru
The surface decorated with a rope pattern, the spaces of which are filled with a mosaic of shells and pebbles, looks unusual.
Ways to decorate large flower pots Source mycrafts.ru
The thick twine blends beautifully with the fabric. Gray twine harmonizes with bright checkered fabric, and bright braid matches with burlap. Paper rope also adheres well and looks original. But you definitely need to coat it with varnish.
DIY paper orchid
Such wonderful orchids can be used for decoration or you can make a branch and put it in a vase.
Tools and materials:
- Scissors
- Color printer
- Glue
- Paper
- Clothespin (if we want to decorate gift wrapping)
Paper orchid templates
Download and print these templates on a color printer
Step-by-step instruction:
Decor of lace pots in vintage style
This idea appeals to me the most. If not all, then at least a couple of these vintage pots could be made. It would just be a shame to use napkins that I knitted myself; I’ll have to see what’s available in fixed price stores.
I recommend watching: Modern interior decor with lace
The technology here is the same as for decoupage: we apply strips of lace to the prepared surface and cover it with glue.
I also like the pots in the next photo: first you need to cut out the lace elements and paint them with acrylic paint, and then glue them.
Another pot is decorated around the edge with lace cut from a round napkin.
Sweet bouquet of paper flowers
Such a bouquet of flowers with a sweet surprise inside will be a unique gift for a loved one!
Let's start making it.
To make such a bouquet of flowers from paper, you need to prepare the following tools and materials:
- Corrugated paper
- Wide tape
- Narrow ribbon (0.5 cm)
- Wire
- Green type tape
- Scissors
- Wire cutters
- Wooden skewers
- Wrapping paper or mesh for a bouquet
- Sprigs of greenery
- Bow for decoration
Well, and, of course, chocolates
Step-by-step instruction:
1. First you need to take wire cutters and cut the wire for the stems into 10 cm pieces. In our case, you need 7 pieces of wire.
2. Take scissors and cut a thin ribbon (0.5 cm wide) into pieces about 25 - 28 cm long.
3. From corrugated paper we make seven blanks in the form of rectangles, measuring 18x12 cm.
4. Then cut out small rectangles in the bottom corner of a sheet of paper, measuring 9cm x 5cm. These will be our future flower buds.
5. Place the smaller piece on top of the larger one and place the candy on the smaller piece.
6. We twist our blank together with the candy into a tube, forming a bud.
7. We take the wire and place one end of it in the middle of the bud. We wrap the bottom of the bud blank around the top of the wire, forming the stem of the flower.
8. Now you need to wrap the tape around the top of the wire to secure the stem and bud well.
9. We take the previously cut ribbon and tie it around the bud with the candy.
10. Now we need to fluff the flower and give it a wavy look. To do this, gradually turn away the edges of the paper at the top of the bud, pulling it a little so that the paper stretches and bends like a petal.
11. We carry out all the above steps with all the buds.
12. We take a wooden skewer and, using tape, attach three flowers and decorative greenery to it. Then we add other flowers and continue wrapping the stem with tape.
As a result, we should get a bouquet like this:
You can stop here, or you can continue and beautifully package the composition.
13. We take the packaging, which should be longer than the stems of the bouquet, place the bouquet diagonally and wrap the flowers in the packaging.
14. We tie the bouquet with a ribbon and decorate it with a bow.
The bouquet of flowers is ready!
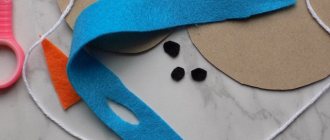
Snowman Olaf
This character from a Disney fairy tale was created just a few years ago, but has already won the hearts of children around the world. Using an interestingly shaped jar, two pots and several stands, you can recreate this cute snowman. If the top is not secured, but used as a lid, you can store sweets inside Olaf. The snowman's nose can be made from a plastic carrot used for decoration, or you can choose a similar oblong object and paint it with orange paint.
Paper flowers with rounded edges
Quiet paper usually comes in large sheets, in a stack of 8-10 layers. This is exactly how many layers we need for the flower.
1. Take a stack of eight sheets and cut out a rectangle of any size. The diameter of the flower will be equal to the width of the leaf.
2. The next step is to fold our rectangular sheets into an accordion. The height of the fold was about 2 centimeters, but you can also experiment with this parameter.
We fold the sheets into an accordion until the very end, turning the sheet over after each movement.
This is how it should turn out.
3. Cut a piece of rope, ribbon, fishing line or thread
4. We tie our accordion in the middle. It should look like this.
5. Use scissors to round the edge to form a rounded petal.
It is difficult to cut through all layers at the same time, so try to cut in several steps.
6. On the other side we do the same.
This is how it happened:
7. If you buy ready-made pom-pom flowers from tishu, then you will be given exactly such a blank, which now you need to open, forming the flower as follows: starting from the top, lift all layers of paper to the middle.
At the same time, rotate the flower, grabbing the paper in turn from one side to the other.
After a while, you will have a stunning paper flower in your hands!
You can also watch all the steps in this video:
It was a flower with round petals. Go ahead!
Paints
If the hostess has the ability to draw, you can decorate the flower house with painting. And what it will be: elegant Japanese drawings, strict geometric shapes, non-standard torn lines, funny polka dots or pictures from cartoons, it’s up to her to decide for herself.
If you don’t have any special drawing talent, you can buy ready-made stencils or cut them out of durable cardboard. It will not be possible to depict a complex design, but even a novice artist can easily create an unusual ornament.
Instead of paints, you can use colored nail polishes or permanent markers.
Paper flower with pointed petals
1. We repeat all the same steps until the petal formation stage.
2. At the stage of petal formation, we do not round the edge, but make it sharp.
3. We make sharp edges on both sides.
4. Now open the flower and see what happens.
This is what a miracle turns out to be like in the end!
Christmas bells
For this idea you will need the smallest size pots. These are often sold not in flower shops, but in special departments for creativity. A bead on a string is glued to the bottom of the pot (it is better to choose a large wooden one). If the pot has a hole for draining, a thread with a bead can be pulled through, secured inside at the base. These bells can be hung throughout the house or used as Christmas tree decorations. Even children can handle this kind of work!
Paper flowers. Chrysanthemum
The next version of paper flowers that we will learn to make resembles a chrysanthemum.
1. We take the workpiece, but now we do not round or sharpen the edge, but cut it into thin strips.
2. We do the same on the other side.
3. Opening the flower.
As a result, we got such a flower.
Very cool!
Volumetric tree on the wall
This unique 3D decoration can be made with your own hands on the wall (and even on part of the ceiling) without any problems. To create a real masterpiece, it is not necessary to have the knowledge of a sculptor or artist.
Important: This decor requires a lot of space.
You will need:
- Master OK;
- Bucket;
- Marker and scissors;
- Acrylic paints and brushes;
- Scotch;
- A bag of dry plaster;
- A large sheet of cellophane film.
Progress:
- Let's draw a contour mirror image on the cellophane film with a marker, and when we cut out the drawn middle, we should get a stencil;
- We stick it on the wall with tape;
- Pour water into a bucket and spread the plaster;
- Using a trowel, carefully fill the empty stencil space;
- Remove the film after the mixture has dried;
- We apply several more layers of gypsum, making the last one round;
- When the solution has dried thoroughly, paint the sculpture with acrylic-based paints.
You can choose a wide variety of palettes. A “natural” image would look great in the living room, or a fabulous tree, unusually painted, on the wall in a children’s room.
Flowers made of paper (paper towels)
Let's now look at how to make these paper flowers using paper towels. 1. Tear several rectangles from the paper towels.
In our version, the paper towels came with perforations. It needs to be cut off.
2. Now divide each sheet into several layers, depending on how many layers it consists of. They are usually two-layer or three-layer.
Thus, we obtain a fairly thin and durable paper suitable for making flowers.
3. Take 8 thin pieces of paper and stack them on top of each other.
4. We fold the sheets into an accordion, bend them in the middle and tie them.
5. We make sharp edges on both sides.
6. Opening the flower.
As a result, we get such a beautiful flower from paper towels in a couple of minutes!
Tree with LED garland
The manufacturing process begins with a frame, for which aluminum wire is best suited. It easily bends at any angle, giving the future structure any configuration. A more realistic color is achieved by wrapping the white insulation of the wire with black electrical tape.
- Then, the finished frame is evenly wrapped with a garland, secured to the wire with black electrical tape. If desired, you can create additional decorations for LEDs in the form of decorative nozzles made of transparent plastic. Upon completion of the work, the manufactured tree just needs to be connected to the electrical network and checked for its functionality.
Thus, the question of how to make an LED tree with your own hands can be considered resolved.
- The main advantage of this method is considered to be ease of manufacture. The main disadvantage is the impossibility of producing large-sized wood. This is due to the standard length of the garland, which is not enough to fit on the entire tree. Therefore, this method is most suitable for the manufacture of miniature products, which are also very popular.
Paper flowers (we use napkins)
Now let's look at creating flowers from paper napkins.
In our version, we took a multi-colored napkin. Let's make the lower layers of the flower yellow and the middle white.
1. As with paper towels, we also divide the napkins into layers.
2. Stack the yellow layers of napkins and cut out a rectangle of the desired size.
3. After this, we stack the white layers of the napkin and cut out a rectangle slightly smaller than the yellow rectangle.
4. After this, we place the yellow layers with the colored side up, and place the white center just below the main petals.
5. We fold the layers into an accordion.
6. Open the accordion and carefully separate the yellow layers from the white ones.
7. Fold the layers back into an accordion. As a result, we get two packs of white and yellow accordions.
8. Take a white accordion and cut its edges into thin strips.
9. Take a yellow accordion and make rounded edges.
10. Open both accordions and combine them in this way: put the white one on the yellow accordion and assemble it back into the accordion.
11. Bend it in the middle and tie it.
12. Layer by layer we open the flower.
This is such a wonderful flower! Agree, napkins make no less original flowers!
Finally, one more master class:
Decorating flower pots: how to create a beautiful decoration
Clay pots are suitable for creating beautiful interior items, although plastic ones are no less beautiful. You should definitely treat them with several layers of acrylic so that when watering, water does not leak out and spoil the decor.
Any material is suitable for decoration. Let's look at the most common options.
Decorating with golden acrylic paints Source www.dizainvfoto.ru Decorating a flower pot using pencils Source dekormyhome.ru/
Bright street composition Source realty.mail.ru
Paper
This is usually an intermediate option, used temporarily until a more suitable design is created. Anything will do except cardboard: even old newspapers, wallpaper, sheets of music, craft paper, A4 sheets.
The paper is glued to the sides, it is better not to touch the bottom. The paper is tied on top with decorative braid or twine, even if the material itself holds up perfectly.
The pot is covered with corrugated paper, for example, from the linings of cardboard boxes. The paper is glued into strips, after which they are varnished. Externally, such pots look stylish and are in no way inferior to ceramic ones.
Option for decorating a flower pot with paper Source www.greensmile.ru/
Colored primer for aquarium
First, the entire surface of the pot or its individual sections is smeared with glue and sprinkled with soil on top. After drying, you can paint it any color or leave it as is. The top of the soil is coated with varnish.
Decoupage
We open the pot with acrylic. Already on a dry surface, glue a beautiful design cut out of a thick paper napkin using PVA. After drying, the drawing is coated with acrylic varnish.
Instead of napkins, any images on paper will do. They are cut out, dipped in water, then blotted with a towel, coated with glue on the back side and glued. Decoupage made from lace looks elegant.
See also: Catalog of companies that specialize in interior redevelopment.
Paints
Different paints are suitable for decorating a flower pot: sprays or regular acrylic. To prevent paints from mixing, you need to use masking tape. Using a sponge or brush, various ornaments and designs are applied. They are varnished on top.
Painting a clay pot Source www.dizainvfoto.ru
Decoration using decoupage technique Source vdome.club Decoration using buttons and other simple materials at hand Source flowers-for-home.narod.ru/
Mosaic
Any fragments and remains are used, including those from construction and repairs, pieces of ceramic tiles, pebbles, and buttons. The surface is treated with sandpaper, covered with primer, and glue on top.
After this, you can begin laying the mosaic, moving from bottom to top. You can lay pieces of material in stripes, various patterns, or you can cover the entire surface with a material that is uniform in color and texture.
Homemade flowers on the shelves Source realty.mail.ru A simple decoration element - a bow Source www.pinterest.dk
Cereals and seeds
The surface is covered with several layers of acrylic paint, a pattern is applied and they begin to lay it out. To do this, a small area is smeared with glue and the selected type of cereal is applied. You can simply sprinkle it on the area coated with glue. The entire surface is treated in this way. At the end, the product must be secured with spray varnish.
Pot made of plasticine and cereals Source yandex.ru Original silver flower pot Source youtube.bonus-mobile.ru
Beautiful DIY flower pots Source biznakenya.com
Decorating flower pots is not complete without egg shells. Shells in brown and white shades are suitable; acrylic paints are used to add additional picturesqueness. It is especially beautiful if the shell contrasts with the color of the surface of the pot.
The shells of boiled eggs will need to be carefully prepared: remove the inner film, place in a soda solution to degrease. Then you need to rinse and dry well.
Pasting is carried out in stages: first, a small area of the surface is smeared with glue, pieces of the shell are laid out on it with the convex side up and pressed lightly. You need to act carefully so as not to break the shells. This way the entire surface is covered.
If you outline patterns in advance, you can get beautiful ornaments. The remaining gaps between the mosaic pieces are filled with crushed shells, which are simply sprinkled on the surface covered with a layer of glue.
Decorative covering option for a flower pot Source vdome.club
The last step is to prime the resulting surface with PVA glue and dry it. If desired, you can paint the surface or leave it as is, but be sure to varnish the top to secure the decor.
Hyacinths in a pot-cup Source dekormyhome.ru/
Corn pots Source stroitelcentr.ru
Another Santa, but in a completely different form...
One of the simplest crafts that looks very impressive! You need to paint “bricks” on the pot with acrylic paints to depict a chimney. Santa's legs can be easily made from Christmas tree garlands or wire wrapped in tinsel. Snow on the pipe is well imitated by white polyurethane foam. You can attach a sign to the “chimney” with the name of the child or friend for whom this gift is intended.