Sweet design is compositions and crafts made from sweets. The author of this idea advises you to try your hand at this very relevant form of creativity. Having mastered the basics of this exciting and now fashionable creativity in the hand-made style, you will be able to please your loved ones with an unusual bouquet of chrysanthemums. Such a bouquet is not only beautiful and original, it will also delight the hero of the occasion with its sweet taste. Nowadays such compositions and bouquets are given for all kinds of holidays, and such a flower arrangement of chrysanthemums is a gorgeous present. First, let's prepare everything you need for work:
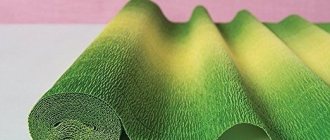
1. Candy. The quantity depends on how many flowers you plan to make to compose the composition.2. Thin colored film of gold or yellow color (polysilk).3. Corrugated paper in yellow and light yellow colors. It is quite possible to use only one shade of yellow paper.4. Green tape or corrugated paper.5. Strong sewing threads.6. Long skewers (can be replaced with wire).7. Scissors.8. Hot glue gun.
1 step.
Cut thin colored film into squares. The number of squares should be equal to the number of planned chrysanthemums. The dimensions are approximately 10*10, and then use the size of the candy as a guide.
Wrap the candy in polysic and tie it tightly with threads so that you get a small tail.
Secure the wrapped candy onto the skewer using hot glue.
Step 2.
Cut a strip of light yellow paper. The width of the strip will be approximately 3 cm, and the length will be 10 cm. Then we will cut this strip with fringe, the width of the fringe stripes is approximately 1 cm. In the future, these will be the petals of our flower.
Then carefully twist each strip of fringe once, like a candy wrapper.
We fold the fringe strip in half at the bend, stretch the paper a little with our fingers and form a recess.
We do this with each strip of our fringe. Secure the bent ends with glue.
This is what your strip of light yellow paper should look like after the entire petal formation procedure:
Now we’ll do the same thing, but only with strips of yellow paper. The strips need to be cut approximately 15 cm in length.
Step 3.
We assemble the chrysanthemum from its component parts. We take a candy mounted on a skewer and wrap it in a strip of light yellow petals. We make sure that the petals are arranged in a checkerboard pattern.
Now we wrap the future flower with two stripes of yellow petals. To give the required volume to the flower, it is necessary to place the petals a little higher than the previous ones. This is what a chrysanthemum looks like during the assembly process:
Step 4
Let's make a beautiful stem for our flower. To do this, use scissors at an angle to cut off the excess paper at the base of the flower.
This is how the flower looks before the process of removing excess paper: And this is how it looks neatly after removing excess paper: Now let’s decorate the skewer using tape or green corrugated paper. The author in this case uses paper. In this case, cut a narrow strip of green paper.
Now we will cover the base of the flower with green paper. To do this we will use hot glue. We begin to carefully form the sepal. And gradually move on to decorating the skewer with the same strip of paper. Secure the end of the paper strip with glue.
https://www.youtube.com/watch?v=ioORdMhuB8c
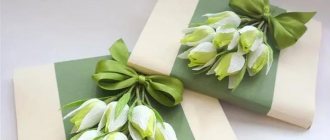
This is what a finished sweet chrysanthemum looks like: And this is a side view: Now all you have to do is make the number of flowers you need using the above technology and assemble them into a chic composition. For decoration you can use beads and any decorative elements. Thanks to the author for the wonderful idea.
Source
96
Suitable for MK:
Source: https://rukodelie.usamodelkina.ru/4570-svit-dizayn-hrizantemy-iz-konfet.html
Corrugated paper chrysanthemums
I did the job so that the vase would not be empty, people at first don’t understand that the flowers are not alive))
We unwind approximately 50 cm from the roll in half, i.e. It turns out 1m. cut off
fold in half away from you and in half again
here is a strip 6-7 cm wide
we cut from the edge where there are many layers, and where the last thick fold is not cut
Now cut into noodles 2-5 mm thick, about a centimeter before reaching our fold. I don't try to cut evenly or equally. There is nothing perfectly straight or symmetrical in nature. creativity is not mathematics)))
cut along our fold
it turns out 8 strips about a meter long, 6-7 cm wide
We do the same with yellow paper - this will be the middle (I ran out of yellow). only we need it a little narrower, so we don’t cut it at the end, we cut it off near the saetimeter
twist the toothpick, periodically dripping PVA
one yellow (white) stripe and three orange ones on top
half of the napkin was cut into noodles and the two resulting strips were rolled (do not forget to smear with PVA). In my bouquet, some flowers are with napkins, some are with green corrugated paper. napkins look better, they hang softly, covering the sepals and the color is more natural, but with paper - brighter (choose yourself)
Tips from needlewomen
Working with isolon is not difficult, especially if you follow these little tips:
- the material during work should be selected correctly, for example, for small chrysanthemums it is better to use thin (2 mm) isolon, but when creating life-size flowers, a denser one - from 3 mm;
- You can use a pen to mark elements, but it is more practical to use a sharp knitting needle or needle;
- If you can’t find the material of the desired shade, you can use markers, art pastels, acrylic or latex paint.
Corrugated paper chrysanthemum
Share the link to this article with your friends on social networks.
Making flowers from paper is quite a fascinating activity. In addition, making paper flowers is not so difficult, the main thing is to successfully choose the execution technique and correctly perform all the indicated steps.
Today there are a huge number of interesting ways to create them, so even a novice needlewoman will find the technique that she can do. With ready-made paper flowers, you can decorate your home in an original way or even give them as a gift.
In this master class we will show you how to make your own chrysanthemum from corrugated paper.
Prepare the necessary materials:
- corrugated paper of the desired shade to create petals;
- green corrugated paper;
- scissors;
- glue gun;
- a simple pencil;
- wire;
- ruler.
Paper flowers - an original gift
Children can make paper flowers for their mothers, grandmothers or teachers. Men prefer to give real flowers to women, but paper chrysanthemums are suitable for all women as an original gift, especially if there is a candy attached to the bud of each flower.
A bouquet made with your own hands looks advantageous and will last longer than fresh flowers. For winter decor or gifts, paper flowers are better than real ones.
You can make daisies, roses and tulips from plain or corrugated paper, from napkins and other available materials. To do this, you just need to make a flower once, following an example from the Internet, and the skills of creating paper decorations will remain forever. By making paper chrysanthemums with children, you can not only create beautiful flowers, but also bring the kids the joy of joint creativity.
DIY chrysanthemums made from corrugated paper master class
Home › Mother's Day ›
Flowers are the most popular interior decoration. Chrysanthemums are most often used in phytodesign. They will fit perfectly into both everyday interior design and festive ones.
Today there are already more than ten thousand varieties of chrysanthemums. The most original variety is needle chrysanthemum. And so that a bouquet of such unusual flowers will delight you for a long time, we suggest creating them with your own hands from paper. Corrugated paper is best for the job. So, let's make chrysanthemums from corrugated paper together.
You can also make chrysanthemums with candies inside using this master class.
You will need:
- corrugated paper of any shade you like to create petals;
- green corrugated paper;
- yellow crepe or corrugated paper;
- a piece of wire;
- scissors;
- glue gun with glue stick.
DIY chrysanthemums made from corrugated paper master class:
To form one blossoming bud of a needle chrysanthemum, you will need three such stripes.
And it’s easy to give the resulting petals a realistic shape! To do this, we begin to twist all the thin strips with our fingers.
Do the same with the remaining blanks.
Next we proceed to the formation of the bud. Apply a drop of glue to the solid part of the blank with petals and attach it to the base of the yellow flower.
The tips of the blue petals should be 3-4 mm higher than the stamens. We wind all the prepared pieces.
- As a result, you will get such a voluminous bud.
- Then we wrap the entire stem with a green corrugated strip.
- Then you need to cut out large chrysanthemum sepals from green corrugated paper.
- Afterwards, we give all the cut out parts a convex shape.
- Apply glue to the bottom of the sepals and attach them to the top of the stem.
- To decorate such a bud you will need four or five of these leaves.
The leaves of chrysanthemums have a rather unusual shape. To create such a leaf, we need to fold a piece of green corrugated paper in half, and then cut out a curved outline along the edge. Next, stretch it and glue it.
Now we spread the petals to the sides. Corrugated paper chrysanthemums are ready! A bouquet of chrysanthemums made by yourself can be used not only for interior decoration. It can be given to your mother on March 8 or to your teacher on September 1.
Corrugated paper chrysanthemums Link to main publication
Source: https://do-by-hands.ru/den-materi/xrizantemy-iz-gofrirovannoj-bumagi/
Tools and materials Time: 2 hours • Difficulty: 4/10
- Printer;
- printed flower templates (presented below);
- scissors;
- round pencil or stylus;
- office glue.
Create charming chrysanthemums and water lilies from paper with your own hands and decorate a gift for a loved one with them!
These flowers are in perfect harmony together and by creating a bouquet of them and placing it on the dressing table, you will add a “tasty” zest to the interior of your home! And if you have Adobe Illustrator, you can change the shades and sizes of the flower details to your liking!
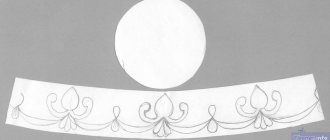
Templates
Attention: the templates are made in such a way that one A4 sheet should yield 2-3 flowers. If you want flowers of a different size, zoom in or out accordingly.
Chrysanthemum: master class with description
First, let's make a chrysanthemum out of paper.
Step 1: Cut out the blanks
Print out the chrysanthemum templates in as many colors as you want. One A4 sheet will yield approximately 2 flowers (it all depends on how lush you want your chrysanthemums to be).
Carefully cut out the parts. In this master class, all flower details are made of white paper, since it is intended solely for educational purposes. The templates presented above are already created in color, which you can change if you wish.
Step 2: Wrap the Petals
Holding each element by its central part with your finger, wrap all the petals with a round pencil or stylus up (with the exception of the four smallest ones, the petals of which do not need to be wrapped).
Divide all the shapes by size. The larger the element, the lower it will be placed in the flower. And, accordingly, place the smallest figures in the upper tiers of the flower.
Step 3: Shape the Center
The four smallest figures are intended to form the middle. To do this, fold them in half and then in quarters.
Twist the elements so that they form a tassel. Trim the bottom of the tassel so that it looks harmonious with the flower and does not stick out.
- For slightly larger figures, wrap all the petals so that they stand vertically upward.
- For the remaining elements, simply wrap the petals in an arched direction upward.
Step 4: Fold the Flower
Next you need to fold the flower. To do this, take the largest elements and glue their centers to each other. Then place 3 and 4 layers of petals.
After this, arrange all the elements in decreasing order of size. Make sure the flower is neat and symmetrical.
- Glue a pre-prepared tassel made from the 4 smallest petals into the center of the flower.
- Your DIY paper chrysanthemum is ready!
Water lily: master class
Now let's move on to the master class on making lilies.
Step 1: Cut out the pieces
- Print out the water lily templates in the number of flowers you need at the rate of 3 flowers per 1 sheet of A4 paper.
- Cut out all the necessary shapes. Arrange them in increasing order. Bend all the petals on the figures up.
Step 2: Cut the fringe
Take a rectangle from the template. On one side, finely cut the paper into strips in the form of a fringe ¾ of its width. Roll the fringe and secure with glue.
Step 3: Glue the Pieces
Assemble the flower by gluing the elements on top of each other in order of decreasing size. Glue the fringe into the center of the flower.
- Spread beautiful ruffles on the flower, giving it shape and volume.
Step 4: Glue the leaves together
Glue the two leaves together as shown in the photo.
Glue the leaves under the flower. The water lily is ready!
As you can see, nothing complicated! Happy handmade everyone!
Source: https://masterclasso.ru/hrizantemyi-i-vodyanyie-lilii-iz-bumagi