Fantasy is the best way to look creative, be different from others and significantly save money on buying new things. Every home has a closet, chest of drawers, or several suitcases filled with old things with which fond memories are associated. It happens that an item was purchased, but was never worn. All these treasures take up a lot of space, but it would be a shame to throw them away. For those who are hesitant to get rid of unnecessary things, you can use such a simple idea as remodeling clothes and turning an outdated warehouse into a fashionable wardrobe. Of course, you will have to make some efforts and, perhaps, spend money, purchase some jewelry and accessories to achieve the desired result. If successful, the new thing will be completely unique.
T-shirt with side lace inserts from an old T-shirt
1. Measure the side panels and, based on the measurements, cut the sides of the T-shirt (including the sleeves).
2. Cut each insert in half to sew onto the T-shirt.
3. Lay the T-shirt flat and sew on the lace inserts on the left and right using a machine.
4. Use pins to secure half of the lace inserts, leaving the areas where the sleeves will be untouched.
5. Using a machine, sew where you have marked with pins.
Tank top with a bow on the back, made from a T-shirt
You will need:
- t-shirt
- scissors
- pins
- sewing machine or needle and thread.
1. First, wash and dry your T-shirt if it is new. Place her on a flat surface with her back to you. Make sure the seams are symmetrical and the T-shirt is pressed.
2. Using a pencil, draw a line along which you will cut. Choose the width and length of the future bow yourself. The shape of the line should resemble the Latin letter U.
3. Start cutting a U shape along the line on the back of the t-shirt. Be careful to only cut out the back portion, not both sides of the t-shirt.
4. Fold the cut piece of fabric in half and cut off half. You will use the larger half for a bow (folding it like an accordion), and you need to cut the second half in half - you will get two strips.
Tie one strip around the middle of the bow and secure with thread and needle. If necessary, cut off excess.
5. Attach the bow with pins and sew it to the back of the T-shirt. It is better to sew at the top so that the batik is a continuation of the collar.
6. Turn the T-shirt inside out and you're done. You can make several bows, but then you need to cut an even larger U on the back.
* If you couldn’t sew the bow evenly, it’s okay, you can always fix it. The main thing is to take your time and you will succeed.
How to make a powered screwdriver
A powered screwdriver is the dream of many home craftsmen. In principle, it happens that in a home workshop there is no need for a cordless tool. You can have access to an outlet at any time. Of course, having a cordless screwdriver in your hands is convenient. But when working, you also hold in your hands, in addition to the tool itself, a battery. And it will be harder.
Also, batteries often get damaged and break. And since you are unlikely to buy a battery separately from a screwdriver on sale, you will have to puzzle over how you can provide your screwdriver with the necessary power from an outlet, bypassing battery devices.
Advantages of cordless screwdrivers
Cordless screwdrivers are very convenient at construction sites - it’s very easy to work with them on the roof, in difficult conditions, where trailing wires will only get in the way and create unnecessary danger. But this is where battery failure most often occurs - the screwdriver fell, the battery broke, and you will have to look for a new one.
Let's figure out how to make a powered screwdriver.
Replacing a screwdriver with a conventional drill
The easiest option is to use a regular small drill as a screwdriver. You just take the bit and clamp it into the chuck instead of the drill. Working with a drill as a screwdriver will require some skill. The fact is that the drill does not have a “ratchet” - in a screwdriver, the ratchet will work as a fuse when the fasteners are tightened. Therefore, you need to clearly feel this moment and release the button. Otherwise, broken screw heads, damaged bits and bad mood are guaranteed. Another difference between a drill and a screwdriver is the rotation speed.
If the torque in a drill is small and the rotation speed is high, then the opposite is true with a screwdriver. Some even have the ability to adjust the rotation speed. Without a high torque, it is unlikely that you will be able to tighten a large self-tapping screw - you will have to resort to using a screwdriver. Therefore, small screws are usually tightened with a drill.
It is not recommended to use a hammer drill as a screwdriver, although its operating parameters of torque and rotation are more acceptable. The hammer drill has a large radial runout, making it difficult to tighten screws with its help.
Just a corded screwdriver
The second option is to purchase a corded screwdriver at the store. They come in several types. The first, cheapest ones are the same electric drill with a ratchet installed on it. They are not positioned as a professional tool, and can only be used to tighten small fasteners. However, having a ratchet will save the screw heads, your bits and your nerves.
A more expensive screwdriver is a specialized network one. Such a tool has a built-in gearbox, most often of the planetary type.
They are positioned as a professional tool, and are much more expensive.
Often such screwdrivers have the ability to tighten large nuts, bolts, and have a magazine for small screws. This option is the best, although the most expensive.
Converting a cordless screwdriver to a corded one with your own hands
The third option is to convert the cordless screwdriver to work on mains power. You will need knowledge of electronics and circuit design, so it's not for everyone. In addition, you will need to know the operating parameters of your battery.
If the battery is broken, you can ask people on DIY forums to measure the current and voltage parameters of the battery. This will help you make a network power supply. In principle, if you have good knowledge of electronics, you can simply disassemble the battery. Its design will contain chemical batteries connected in a certain way. Knowing their type, from the name of the battery, as well as the connection diagram, you can quickly estimate the battery parameters. And then assemble a rectifier with the necessary operating parameters. Or even replace the elements in a failed battery. And then you won’t have to assemble the rectifier.
Video on battery repair and conversion
This is about repair: This is about altering the battery type:
This is about converting to a network model:
hochu-stroitsya.ru
T-shirt beach dress
You will need:
- T-shirt (possibly with a bright pattern)
- scissors
- needle and thread.
1. Cut off the sleeves. Save them - you will need them later.
2. Place the T-shirt with your back facing you.
3. Cut large crescent moons where the sleeves were - do this only on this part of the shirt (the back), DO NOT touch the front.
4. Turn the T-shirt over again and cut out the collar, about 2cm from the stitching.
5. Turn the T-shirt over again and cut this part of the T-shirt in a straight line just below the collar. It turns out that you have cut off the part that connects the back - don’t worry, then you will connect all the parts using a “braid”.
6. Cut the lower back of the T-shirt into three equal vertical strips. Pull these strips a little to make them longer and a little narrower.
7. Start knitting a braid from these 3 strips (from bottom to top).
8. Take your collar, fold it in half and find the center. Mark this place.
9. Using thread and needle, sew the braid to the center of the collar.
10. Cut strips from one of the sleeve cutouts and use it to cover the seams that are visible where the braid meets the collar. Simply wrap the strip around the joint and secure with thread and needle.
Precautionary measures
After remaking a screwdriver, it is important to adhere to the following precautions:
- Provide rest for the device every 20 minutes of operation, which will extend its service life;
- Do not operate the device at a height of more than 2 meters from the ground;
- Periodically clean the power supply from dust;
- Make sure that the electrical cable during operation is not pinched, strained or exposed to negative factors, which can lead to the creation of a short circuit current.
After the alteration, following the safety rules, the old screwdriver will last longer than the new two.
How to make them T-shirts: T-shirt twisted in the shape of a butterfly
You will need:
- wide, long T-shirt (preferably sleeveless)
- thread and needle or sewing machine.
1. Prepare a T-shirt. Cut out sleeves if necessary.
2. Turn the T-shirt inside out and cut it in half along the side seams.
3. Place one half on top of the other. Twist the half on the back side once.
4. Pin the rolled half and the front of the T-shirt and join with a stitch. Turn the T-shirt inside out.
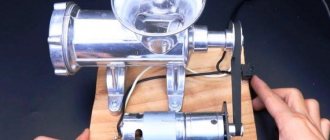
Using a household screwdriver as a drill
Diagram of the assembled mini-drill.
It is very easy to turn the most ordinary screwdriver into a drill. The design of the chuck makes it possible to quite reliably fix drills with a cylindrical shank. It is enough to insert a drill into the clamping chuck of the tool and you can start working.
However, it must be understood that the structural strength is not designed to accommodate holes, especially in hard wood, metal or concrete. When significant axial loads are applied, there will be a high probability of failure of the planetary gearbox that transmits torque from the engine to the working element or the torque control clutch.
Fashionable T-shirt with a pattern cut out on an old T-shirt with your own hands
You will need:
- t-shirt
- scissors
- chalk.
1. Place the T-shirt on a flat surface and draw with chalk the pattern shown in the picture with red broken lines.
2. Carefully make cuts along the indicated lines (see image).
3. Pull the fabric a little so that the strips of fabric curl a little.
* If you want to make the same pattern on the reverse side, just repeat steps 1-3.
* If you wish, you can give the T-shirt a more rounded shape - just fold it in half lengthwise, draw one “wave” as in the picture and cut it out.
Models of altered mink coats in the photo (before and after)
Don’t rush to sell or give away your old mink coat, which can easily be upgraded to a fashionable one. New fur will not always be of the best quality; there are too many fakes now.
- You can completely change the cut of an old fur coat: cut off the length and make it into a skirt or hood with original ties;
- decorate with perforated leather, similar to lace or suede, embroidered with beads or gems;
- you can come up with many other options and get an unusual, exclusive new thing;
- if the fur coat has become a bit short, the solution to the problem is simple: insert a piece of decorated leather or suede into the waist and sleeves;
- you can combine an old mink item with other fur;
- Another option is to make the fur coat even shorter and get a comfortable and practical car coat.
Important! A white mink coat often turns yellow quickly and it is not always possible to bleach it. In this case, the product can be painted
For example, a white mink that has turned yellow with time will look great with a gray-brown leopard. The main thing is not to be afraid of experiments, and a worn item will turn into a bold designer item.
Read more about how to bleach a yellowed fur coat here. You can also learn how to dye fur at home.
A beautiful top made from a large T-shirt, without the use of threads or needles
You will need:
- t-shirt
- scissors
- chalk.
1. Mark with chalk on the front of the shirt what is drawn with red lines in the image.
2. Cut along the lines.
3. Mark with chalk on the back of the shirt the other lines that are drawn in red in the image.
4. Cut along the lines.
5. On the back, cut the middle section halfway lengthwise.
The front of the T-shirt after cutting.
The back of the T-shirt after cutting.
6. On the front of the T-shirt, tie two stripes into a knot, then move them back and tie them to the back stripes.
*If necessary, you can cut off excess parts of the fabric or tie them in a bow.
Frill
Charming frills have long secured their right to be considered the undisputed trend of the season. If you like such a fashionable novelty, you can complement any basic item with stylish decor. For example, a great idea would be to cut off the hem of a loose dress and design it as a frill. For such an addition, you can use contrasting material.
Stylish ruffles can be successfully placed on a top, jumper or blouse. This season there are no limits to your imagination.
And now let’s move on to the most important question that now worries many readers - how to decorate these frills? The easiest way would be to use regular stitches with the fabric tied together. You can also follow the diagram in the photo to achieve the desired result.
What can be made from a large T-shirt: a beautiful pattern without threads and needles
You will need:
- t-shirt
- scissors
- ruler
- chalk
- rivets.
1. Using a ruler and chalk, draw straight lines to the right and left of the collar. In this example there are 11 lines.
2. Using scissors, make cuts along these lines.
3. Make one cut at the bottom of the T-shirt, on the left or right.
You can tie the halves in a knot:
4. Using rivets, start connecting the strips that formed on both sides of the T-shirt (at the top).
If you're bored with the jacket
Things from a business wardrobe also tend to get boring or simply go out of fashion. In this case, it is not necessary to say goodbye to a thing with such a sad fate. The bottom of a jacket or vest with a slight movement of the hand can turn into an ultra-fashionable overlay peplum, which will significantly transform the usual combinations. The most fashionable tandem will be with a classic shirt and high-cut trousers. The top of the product can also serve faithfully if you turn it into a stylish crop top.
Interesting: Women's fashion accessories for summer 2020
What to make from an old T-shirt: a scarf
You will need:
- t-shirt
- scissors
- fabric paint (if desired).
1. Cut off the bottom of the T-shirt. The width of the cut part is about 20 cm.
2. Cut the resulting ring to create one long strip of fabric.
3. Cut off the bottom seam.
4. At the ends of the scarf, make cuts about 10 cm long.
5. Pull the resulting strips so that they curl a little.
6. If desired, you can paint the ends of the scarf with fabric paint.
Also see
- Anti-aging haircuts for women after 35, 40, 50 and 60 years old
February 29
- Fashionable short bob haircut in 2022
January 14
- Fashionable haircuts 2022: bobs for blondes and brunettes
January 9
- Stylish haircuts for short hair 2020
December 18
- Types and varieties of bob haircuts
February 6
- Fashion trends,Haircuts
Women's haircuts 2022: fashionable cascade
June 20
- Stepped women's haircuts ladder and cascade in 2022
September 3
- Fashionable knitted sweaters 2020
6 September
- Fashionable evening dresses - 2020
February 17
- Do-it-yourself table setting: description and photo
28 January
- Setting the table with paper napkins
28th of February
- Asymmetrical oblique haircuts 2020
November 12
New T-shirt with a bright stripe and a DIY bow
You will need:
- t-shirt
- ribbon 7 cm wide
- scissors
- chalk.
1. Cut out the collar.
2. Lay the T-shirt on a flat surface. Place some tape on it and outline it with chalk.
3. Carefully make several cuts in the T-shirt, but only in the front - do not touch the back. The cuts should be slightly wider than the tape.
4. Thread the ribbon through the slits. Sew a ribbon at the bottom, and tie a beautiful bow at the top and also attach it with thread and a needle.
Required materials and tools
For most, the third option may seem difficult, because it is much easier to buy a new device and use it for several more years. In fact, the old screwdriver will last even longer, but for this it is necessary to restore it. This is quite simple to do, and you will need the following tools and materials:
- A charger that previously played an important role in charging the battery.
- Multicore electrical cable.
- A battery from a screwdriver that has become unusable.
Tools you will need are a soldering iron, acid, solder and insulating tape.
All these details will allow you to transform the screwdriver so that it can be connected to a 220 Volt network.