Chocolate glaze
For lovers of chocolate and chocolate pastries, chocolate glaze will be a wonderful decoration.
You will need : 100 g dark chocolate, 50 ml 20% cream, 50 g sugar.
Cooking . Break the chocolate into pieces and melt in a water bath. Add sugar, stirring, and cook in a water bath until the crystals dissolve. Pour in the cream little by little and mix thoroughly. Pour the resulting glaze over the finished cooled cake. Sprinkle with chopped nuts or sprinkles if desired.
What to look for when choosing
No matter what cake decorations are made from, truly beautiful decorative elements are obtained only from a high-quality product.
Today they use glaze - it is convenient with its fluid consistency, but its taste is not as bright as that of real chocolate - couverture.
Important! Chocolate must contain cocoa butter.
When choosing chocolate, you should pay attention to its composition, taste and fluidity. Four types of chocolate can be used for decoration:
- white;
- lactic;
- dark;
- bitter.
White chocolate
It does not include grated cocoa. A quality product contains at least 20% cocoa butter and at least 14% milk in dry form. Soy lecithin is used as an emulsifier, and vanilla is used as a natural flavoring.
Milk chocolate
Milk chocolate contains at least 33% cocoa butter. In addition, the composition includes milk powder, an emulsifier, sugar, and sometimes natural flavors. Real milk chocolate uses cocoa mass.
Bitter and dark chocolate
Dark and bitter chocolate has a very high cocoa content and does not contain milk powder.
Multi-colored glaze
By adding food coloring to the sugar icing, you can get real confectionery “colors” and decorate cakes, muffins, and cookies with them.
You will need : 1 egg white, 1/2 tsp. lemon juice, 400 g of powdered sugar, food coloring.
Cooking . Beat the whites until stiff peaks form, then add lemon juice and beat lightly. Add powdered sugar little by little, continuing to beat. The finished glaze should be thick, but flow off a spoon. If the glaze is too thick, add a little water, milk or lemon juice. Pour the glaze into different containers, add a couple of drops of food coloring to each, stir and immediately start decorating the baked goods. Using a pastry bag or syringe, you can apply different patterns to Easter cakes and cupcakes.
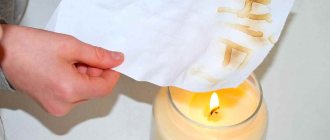
How to make a cornet
Sometimes a housewife may not have a pastry bag in her kitchen with which to apply chocolate to baked goods. In this case, a disposable cornet made by yourself will come to the rescue.
Kornetik step by step:
- Divide a square sheet of parchment in half diagonally and divide along the fold line to form triangles.
- Place one of them with the wide part towards you and roll up a bag from the right corner: to do this, the corner on the right is folded inward, and the lower ones are connected so that a cone is formed.
- The left corner is wrapped from the outside so that its ends coincide at the bottom.
- To fix the tops, wrap them on the outside several times.
The disposable cornet is ready for use. Before placing the chocolate in it, the sharp tip is cut off with scissors to get a hole of the desired size.
Sugar fudge
Fondant can also be used to decorate Easter cakes, cakes and pastries. You can diversify the taste of this fudge using cognac, vanillin, spices or other flavorings.
You will need : 250 g sugar, 150 ml water and 1/2 tsp. citric acid.
Cooking . Pour hot water over the sugar, stir until it dissolves and put on fire. Cook until boiling, skimming off any foam that forms. Then cover with a lid and cook, periodically checking the readiness of the syrup. To do this, scoop up a little syrup with a cold spoon and put it in cold water: if the syrup does not dissolve in water and you can roll it into a ball, the syrup is ready. Add citric acid, stir and cool the syrup by placing the pan in cold water. Beat the cooled syrup for about 10-20 minutes until it turns white and curdles. To coat the baked goods with fondant, mash it with a spoon and heat over low heat, stirring constantly.
Decoration methods
The simplest decoration for a birthday cake is the usual filling with icing, but one- or two-sided porcelain, metal, plaster or plastic molds are also used to decorate the cake with chocolate.
In order not to invent complex shapes, a pyramid is suitable for decoration:
- First you should draw the templates on cardboard.
- Then cut.
- Using a disposable pastry bag, apply a design: along the edges of the pyramids, a thicker layer is made, and the lines are made thinner. To make the pyramid stronger, you can add cocoa butter to the chocolate.
- The preparations are left in the refrigerator for up to two hours.
- To assemble, two parts are joined together with their flat sides, squeezing out the chocolate, and then cooled. Then they are placed on the cake and the remaining parts are attached to the sides.
- Additionally, the cake can be decorated with marzipan or mastic flowers.
Decorations made from glaze are convenient because they can be prepared for future use. To do this, they are placed on parchment and allowed to dry for twelve hours at room temperature.
Simple buttercream
This cream is ideal for decorating tall cakes. By covering the surface of the cake with cream, you can create an unusual cake in the shape of a rabbit, lamb or chicken.
You will need : 120 g butter, 3-5 tbsp. cream, 450 g of powdered sugar, 1 packet of vanillin.
Cooking . Beat the butter well, add vanilla and cream. Add powdered sugar (and optional food coloring) little by little. If the cream is too thick, add a little cream. The finished cream can be used immediately or stored in the refrigerator for 2-3 days.
Chocolate ganache
Ganache is a type of cream. A cake, cupcake, Easter cake can be covered with ganache and additionally decorated with berries or fruits.
You will need : 160 ml heavy cream (at least 33%), 160 g chocolate.
Cooking . Grind the chocolate. Boil the cream and pour into the chopped chocolate. Wait 2 minutes for the chocolate to dissolve, then whisk until smooth and thick. Cool to room temperature and pour over the finished cooled Easter cake, muffin or cake.
Mastic figures
The mastic prepared according to this recipe turns out to be quite elastic and pliable for sculpting various figures. Using dyes, you can make a bunny or chicken, which is perfect for decorating Easter baked goods.
You will need : 1/2 kg of powdered sugar, 10 g of gelatin, 50 ml of water, food coloring.
Cooking . First fill the gelatin with water and wait until it swells. Then put on fire, heat until completely dissolved, add half of the powdered sugar. Mix thoroughly, then add the remaining powder and mix well again. Add dyes to the finished mastic and knead well. Immediately start sculpting the figures.
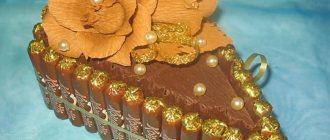
Chocolate decor ideas for cake
For a cake with chocolate decor, you can come up with a wide variety of decorations, from ornaments to three-dimensional figures made with your own hands from chocolate.
Patterns, curls, inscriptions
With the help of a cornet, patterns of varying complexity are applied to the cake and inscriptions are made. They can be applied either to the cake itself, or placed first on parchment and allowed to harden, and then transferred to the confectionery product.
Lace, mesh, openwork
For chocolate lace you will need a lace napkin, tracing paper and a large cutting board. The napkin is placed on the board and covered with tracing paper. Chocolate is applied to tracing paper, repeating the pattern of the napkin.
The openwork and mesh are applied to a design previously transferred to parchment.
Balls, drops, leaves
To form the balls, special molds are used, into which chocolate is poured into a thin layer. For the leaves, you can take any textured leaves that do not emit toxic substances and cover them with chocolate.
Drops are also very simple to make: using a cornet, melted chocolate is applied to parchment in the form of drops and allowed to harden.
Other ideas for decorating homemade baked goods
By pouring glaze, fondant, or cream over the baked goods, you can additionally decorate it with chopped or whole nuts, dried fruits, fresh or frozen berries, and sprigs of herbs.
Decorations made from multi-colored candy eggs look interesting on Easter baked goods, instead of which you can also use M&M's dragees or chocolate eggs.
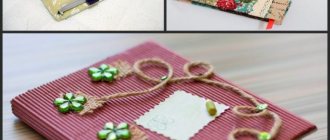
An unusual option for decorating baked goods is candied flowers. Read about how to make such flowers in our material.
Using our recipes, you can easily turn an ordinary Easter cake into a real masterpiece.
DIY Christmas tree cakes. Master Class
Category: Christmas and New Year Published 12/20/2015 · Comments: · Reading time: 2 min · Views: Post Views: 467
Hello! I suggest hanging cakes made from New Year's balls and silicone baking molds on the Christmas tree. They look very nice, and you don’t need anything special to make them.
For one “cake” you need a silicone mold, hot glue gun, white structural paste (like cream), a New Year’s plastic ball, white acrylic paint, a syringe with a piston and a hole through which it is filled with paste using a palette knife (I have a paint bottle with a sharp spout through which I squeeze the paste), a kebab stick.
So, let's get to work:
1) My plastic Christmas balls are pink, but I need a cream color. So the first thing I do is remove the layer of pink paint with fine-grit sandpaper or mesh.
I degrease the ball with alcohol and, after drying, paint it creamy. Because the pink color kept bleeding through, I had to paint several layers until I got the creamy color I wanted.
2) Degrease the silicone mold. I apply hot silicone glue from a gun to the bottom of the cream ball, let the glue cool for a few seconds and insert the ball into the bottom of the silicone basket mold. I press it evenly so that the ball is centered and hold it for a few minutes to secure it. I leave the ball to cool while I prepare the pasta.
3) If the paste is thick, you can dilute it with white acrylic paint, about 1:5, stir thoroughly and fill the paint bottle using a palette knife.
4) I fill the basket with the first layer of paste around the ball, squeezing the paste out of the bottle in thin spirals. Such filling is necessary to make the Christmas tree toy lighter. I let the paste dry for several hours (I dried it overnight).
5) While the first layer of paste is drying, I select berries and bows to decorate the “cake on top”. At the same time, I slightly tone down the very bright colors of the silicone baskets.
6) I change the loop for a new one. Then, I mix the paste with paint and fill the basket, squeezing a new layer of “cream” around the ball. Then, while the paste is still wet, I use a kebab stick to correct the applied layer and remove the gaps between the ball and the paste.
7) After this, I immediately apply a little paste at the top of the loop of the ball, for which I will attach the ball to the Christmas tree. Before the paste dries, I press the prepared berries into it. I sushi.
 I wanted to sprinkle the “cake” with a little cinnamon. It’s more like the real thing and I love the smell of cinnamon.
9) Now everything needs to be dried well and, if desired, you can tie a beautiful nylon bow. New Year's cake for the Christmas tree is ready!
Cakes are decorated not only with berries, but also with flowers. I couldn't resist either :)
I hope you find my new master class useful. I will be glad to know your opinion in the comments :)
I wish you good luck, inspiration, joyful and fruitful preparations for the New Year 2016!
Post Views: 467