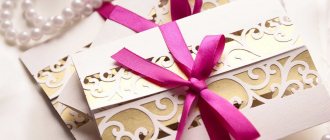
Glasses for the newlyweds are one of the most important attributes of a wedding. They often appear in wedding photographs, and therefore must match the style and overall color scheme of the celebration.
Despite the huge variety of wedding glasses in stores, sometimes it is very difficult to choose the perfect option.
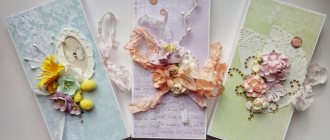
In this case, you can buy ordinary glasses and decorate them with flowers made of polymer clay. This option will always be unique and will cost much less than ready-made ones.
Master class on glasses with voluminous decor
There are also more complex options for decorating holiday glasses that require some skills. For example, such a charming “skirt” made of artificial flower petals. Alas, the glass will most likely be disposable (at least his attire), but during the celebration it will look very unusual.
To make it, purchase several artificial buds and carefully disassemble them into petals. The glasses themselves should be degreased and dried well so that the decorations adhere firmly to the glue. The smallest petals are glued on first. They need to be pressed almost tightly to the glass, because this is the inner, not yet fully blossomed part of the bud. Glue the next layer of petals a little lower, slightly turning them to the sides. At the very base of the glass should be the largest petals, already fully open. Our rose is ready!
Small beads scattered across the petals will be a nice accent. Let the product dry thoroughly. As a rule, superglue dries completely within 24 hours. And you can serve our beautiful rose glasses for the celebration!
A more complex product is wine glasses with polymer clay decor. If you are already familiar with this art, this is a great opportunity to add sophistication to the holiday atmosphere. In spring or summer, light and delicate flowers are perfect, in cold seasons - something heavy and solemn, for example, scarlet roses.
Wine glasses in the form of the bride and groom
A special decoration of the wedding celebration will be festive glasses, decorated in the style of the bride and groom. Some people limit themselves to depicting a tuxedo and a wedding dress, but for a craftswoman it’s not difficult to create real wedding dresses.
The easiest way is to use tapes. Glue a black ribbon to the middle of the “groom’s” wine glass, add a bow tie and a white collar. The “bride’s” glass is decorated in a similar way with a white ribbon and a lace cut along the top edge. Satin bows should be attached to the legs.
Dressing the glasses:
- For work, prepare a small piece of black and white fabric, several small buttons.
- Measure out a strip of white shirt material to completely wrap around the glass. Sew a row of buttons to the fabric.
- Using a glue gun, the shirt is attached to the glass.
- Black fabric will be needed to cut out the lapels and bow tie.
- All that remains is to glue the prepared butterfly with the lapels of the jacket to the white fabric.
For the “bride” you will need to gather a piece of organza onto a thread, decorating it with a large bead or brooch. Cut a satin ribbon to fit the width of the wine glass and attach an improvised veil to it. The resulting accessory is placed on the glass, having previously been coated with glue.
The process of decorating wedding paraphernalia allows you to fantasize and combine unique decorative elements. Handmade decorations will carry a positive charge for many years on the most important day of your life - your wedding with your loved one.
Applying a monogram
A monogram is not just the initials of the newlyweds, it is a kind of trademark, the coat of arms of the future family. As a monogram, you can use the first letters of the name of the bride and groom, the first letter of the future common surname, etc.
You can come up with a monogram yourself using special programs that, based on the letters you submit, will create several options for unique monograms.
There are several ways to apply a monogram to glasses.
- Stained glass paint – using a thin brush and special paint, draw a monogram on the glass;
- Glitter – the monogram is created using transparent glue and sprinkled with small glitter of the required shade;
- Rhinestones – rhinestones of various sizes, shapes and shades are used.
To create a monogram from rhinestones you need:
- Print the monogram on paper;
- Place the piece of paper with the monogram inside the glass;
- Glue the rhinestones to the glass according to the pattern
Decorating wedding glasses is a troublesome task, but it's worth it. The wedding glasses created by you with love and tenderness will be dear to you throughout your entire family life.
Bright, original wedding glasses will take pride of place in your family memorabilia collection and will come in handy at your anniversary wedding.
Decorations for the newlyweds' table
Wedding glasses
Wedding glasses are no less important than the bride's bouquet, cake or hall decoration
But it’s much more interesting to decorate the glasses with your own hands!
It is better not to limit yourself to one pair of glasses for the newlyweds, but to stock up on a large number, since they are used at the registry office, at a banquet and at a photo shoot, anything can happen: they will break (of course, only for luck!) or be forgotten somewhere along the way.
There are many ways to decorate wedding glasses. It should be noted that this is a very painstaking work that requires patience and accuracy!
MASTER CLASS ON THE TOPIC
For example, sprinkling or gluing glasses with sparkles and rhinestones.
Decorating glasses with artificial and fresh flowers.
Painting with acrylic paints, and you can paint glasses with intricate monograms, flowers, or you can simply write the initial letters of the newlyweds’ names and so on.
Decorating glasses with polymer clay or mastic.
Elements for decorating glasses can be combined.
Wedding glasses with swans
For a purple wedding
Golden chic
You can even use ordinary thin twine, and classic lace and heart-shaped tags will add tenderness and sophistication to them. Such glasses are suitable for weddings, which are decorated with elements made from natural materials.
It never goes out of fashion to decorate glasses in the shape of a bride and groom. Here everything depends on the flight of fancy - glasses can be “dressed up” in entire costumes with the bride’s veil and the groom’s suit.
In addition, you can order engraving on glasses in the form of declarations of love, your family’s logo, your names, etc.
Wedding candles
At a wedding, candles are used to perform the ceremony of lighting the family hearth. A set of candles for him should consist of two thin candles for the young and one thick, symbolizing the family hearth.
You can purchase ready-made candles in a specialized wedding store, or buy simple candles and decorate them yourself. The third option is for needlewomen who have already succeeded in making candles with their own hands. The first two options limit you to the range. but if you know how to make candles yourself, then you are limited only by your imagination!
YOU WILL NEED IT
There are many different ways to decorate candles. The simplest thing is to decorate candles with stylish wrapping paper...
...or wrap it in delicate white or sparkling champagne lace.
Rhinestones, beads, and seed beads are often used to decorate candles.
Satin ribbons and candle painting go perfectly together
Those who have already mastered the art of making candles with their own hands can make such candles in a nautical style...
...or make chic carved candles.
MASTER CLASS ON THE TOPIC
Tatyana Abramenkova reveals all the secrets of decorating candles with polymer clay in her master class:
Artificial flowers made from all kinds of materials will be a wonderful delicate decoration for wedding candles. At the same time, remember the fire safety rules!
When decorating wedding candles, you can use beautiful fabrics, currently popular coffee beans, chains, cones, dried berries and herbs, and much, much more. All in your hands! Keep the warmth of your family hearth all your life!
Wedding champagne
Wedding champagne, like glasses, decorate the festive table of the newlyweds. A manifestation of excellent taste will be the consistency of all these in the same style. There are many options for decorating champagne: painting, decoration with ribbons, rhinestones, flowers. All technologies are consistent with those used in the decoration of glasses, because... These accessories come in pairs and complement each other.
MASTER CLASS ON THE TOPIC
It is better that one leading and predominant color be chosen in all this.
It is very popular to decorate bottles of wedding champagne in the form of a bride and groom with all wedding accessories: a veil, a full skirt for the bride and a suit for the groom.
Amina Creates shows how to decorate champagne with your own hands in her master class:
An alternative could be a beautiful champagne stand.
Tatyana Abramenkova tells how to decorate champagne with polymer clay in her master class:
What types of glasses are there?
A pair of wine glasses that are broken for good luck can be of a simple shape and without elaborate decorations. For guests on a walk, they use simple glasses from the mass market. The second pair, which is kept as a keepsake, is purchased with hand painting, flowers, ribbons, rhinestones, fancy patterns and swirls. Crystal glasses are purchased for the bride and groom.
Among the wedding paraphernalia, you can buy glasses from mass production or from an exclusive collection.
Craftsmen who manually decorate elegant champagne flutes offer several types of decor:
- Spot painting. A glass made using this technique looks elegant and elegant. They use products made from the finest glass. The surface is covered with fine powder. The pattern contains floral splashes that shimmer in the light.
- Decoration with crystals and Swarovski rhinestones. Glasses inlaid with stones will not go unnoticed by invited guests. They will become the main focus at the wedding banquet. Bright shine gives an ordinary wedding a unique chic and emphasizes the luxury of the special day.
Crystals and rhinestones of various colors are used for inlay. The shade of the decor should be combined with the main palette of wedding accessories.
- Polymer clay. Real story paintings are made from this material. Often a romantic or spring motif is used. Wedding glasses are decorated with bouquets of flowers. Volumetric decor looks stylish at modern weddings.
- Stained glass painting. Glasses made using this technique are among the original attributes. Nothing can highlight the beauty of wine glasses more than a translucent bright pattern. The thinnest glass transmits a scattering of multi-colored reflections, which every now and then “light up” from sunlight.
- Matting. An unusual design technique in which transparent glass is shrouded in white frost. They use a translucent and deep application technique. For added effect, use a glitter coating.
- "Crystal" gel. Wine glasses with a relief texture are considered one of the best of their kind. On their surface you can see flowers, the initials of the young people and various patterns.
Decor ideas
Decorating with rhinestones is a painstaking job, and the more complex the chosen pattern, the more attention and time you will have to devote to each glass.
The most interesting ideas:
- Decorate the stand and stem of the glass, leaving the bowl clean. The decor can be either plain or in the form of a twisting spiral.
- Placing the initials of the newlyweds on the bowl.
- Laying out symbolic images of rings or hearts.
- Laying out figures of birds or flowers - this will require the smallest type of rhinestones, many different colors, as well as preliminary work with sketches.
Very difficult to do - but this is the most memorable option.
Decoration of wedding glasses for guests
If you want your wedding to be unique down to the smallest detail, then you can come up with something interesting not only for your glasses, but also for the wine glasses of your guests. What could it be?
- If few guests are invited to the celebration, then you can put their names on the glasses. You will get not only original wedding attributes, but also functional accessories that serve as place cards. For a crowded wedding, you can also use this idea, but make the glasses of the bridesmaids, groomsmen, and parents personalized. A simpler and faster option is to decorate the stems of glasses for guests with sparkles or paint them with bright paint. Such accessories look bright and impressive, and it’s very easy to make wedding glasses with colored stems yourself!
- As we already mentioned, glasses can be used as seating cards. To do this, you can not write the names of the guests on the glasses, but simply buy name tags that are attached to the stem or bowl of the glass. Such tags can be made from cardboard (various kinds of hearts on the stem of a glass, birds on a bowl, etc.), as well as from wood or metal (tags on the stem of a glass in the form of keychains or bracelets).
- Swizzlers are another creative idea for guests' glasses. They are cocktail sticks on which banquet cards can be attached on top.
The portal www.svadebka.ws told you what the glasses of the newlyweds and guests at the wedding could be. What design to choose for your wedding wine glasses is up to you! The main thing is that they are in perfect harmony with other accessories and emphasize the individuality of your couple! And don’t forget about the guests, they will appreciate the fact that you have prepared original glasses for them! Moreover, such wine glasses will become a highlight of the wedding table decor!
- 28 photos
How to choose the right option?
When ordering decorations for wedding glasses, young people sometimes “get their eyes wide open” from the abundance of luxurious and stylish options
To make the right choice, you should take into account a number of basic recommendations
Popular articles DIY Easter eggs: thread craft
The design of the wine glasses should be optimally integrated into the overall theme of the wedding celebration. If you are holding an event in a rustic style, then the wine glasses can be draped with burlap
If the design is carried out in the traditions of vintage and shabby chic style, then you should give preference to lace, ribbons or cameo. It is very important that the color scheme of the glasses is in harmony with the main shades that prevail in the decor of the room where the celebration is being held. Shade palettes must match; the use of contrasting shades is strictly prohibited
For example, the orange decor of the wine glasses is unlikely to fit into a silver or lilac wedding, and gold in the dishes will look out of place with a silver shade of the room.
Let's talk a little about glasses. Their shape should be quite beautiful and comfortable, since the young spouses will have to hold them in their hands for quite a long time.
Traditionally, wine glasses with an elongated thin stem are used, although you can choose some other options. For example, paired wine glasses on one common stem are quite popular - they, in fact, represent a rather attractive stand with a pair of recesses into which glasses are inserted. If desired, you can give preference to hexagon-shaped glasses, concave glasses and other original products.
How to make gold plated glasses
Golden colored wine glasses are in harmony with a classic style wedding. They match the color of sparkling champagne and new wedding rings. The idea will be useful for a themed celebration, when decorating bottles, candlesticks or vases.
For a wedding, you can decorate glasses using gold spray paint. It is recommended to work outside or near an open window to avoid poisoning. It is also better to use rubber gloves so that traces of paint do not remain on your hands:
- Unnecessary newspapers are spread on the surface.
- The wine glasses are laid out from top to bottom. The top is tightly wrapped in paper and secured with tape.
- Spray paint at some distance. It is enough to apply two layers of gilding to the legs.
- Each layer is given time to dry completely.
- Golden sparkles are poured into the container.
- The glass surface is smeared with glue and sprinkled with glitter.
- If the decor lies unevenly, add glue and continue working.
There is a simpler variation of gilded glasses. It is enough to draw an inscription or pattern on the glass with a glue stick, sprinkling glitter on top. The remains are shaken off onto newspaper and left to dry completely.
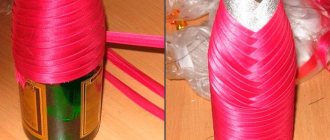
Decor of wedding wine glasses with ribbons
Wedding glasses decorated with ribbons look cute and gentle. This decorative element can add a festive touch to any wine glass - sometimes it’s enough to tie a ribbon on the top of the stem to turn ordinary glassware into a real wedding attribute. Below we will consider the option of independently designing a wedding attribute using polymer clay and elegant satin ribbons
Such wine glasses will be a wonderful decoration for a wedding celebration; their unique decor will certainly attract the attention of all those present.
Necessary materials
- Glasses.
- One stick of white polymer clay (color can be chosen as desired).
- The outline on the glass is white.
- The outline on the glass is lilac.
- Dry pastel (white, lilac).
- Large beads.
- Small beads.
- Superglue gel.
- Thin satin ribbons in snow-white and lilac shades.
- Alcohol or acetone.
- Stationery knife.
- Nail scissors.
- Paper.
- A pin with a ball head.
- File.
- Brush.
Stages
Wipe the surface of the wedding item with alcohol to degrease. Rinse with water, then dry, wipe the future wedding wine glass until it squeaks with a soft cloth. Cut pieces of equal width from a stick of polymer clay. Cut the resulting circles again into several equal parts - these are future flowers. To make the base for the flower, take one cut piece of polymer clay, roll it into a ball, then press it onto the surface of the paper. The required base thickness is approximately 1.5 mm, no less. If the clay is too fresh and sticks to your hands too much, rub a little pastel with a nail file, then roll the parts in “flour” - they will not stick to your fingers or paper. Next, roll five balls one by one (for five petals), press them to the paper, then place them on your palm. To create the petal, take a round-headed pin and roll out a piece of polymer clay in a circular motion from the center to the edges. The thickness of the finished part should be about 0.5 mm. To form the final petal look for the wedding glass, lightly pinch one edge to create an angle. Carefully attach the petals to the base. It is better to do this with a toothpick so as not to damage the delicate flower. Make several half-opened buds. To do this, take three petals and carefully mold them together using a toothpick. To make the wedding wine glass richly decorated, make small buds like lilac flowers that are just beginning to open. First make a ball, then roll it into a droplet. When ready, use nail scissors to cut the top of the drop in half, and then the halves themselves. Place all the finished flower decorations in the oven to bake for a quarter of an hour at 110 degrees. Let cool in open oven
Next, use superglue to attach the resulting decorations to the wedding item - it is important to create the right, beautiful composition. Take a nail file, rub pastels of both colors, mix. Using a brush, rub the resulting mixture into the petals, and then draw the veins with a purple outline. Using a white outline, draw patterns that you like. Complete the resulting drawings with lilac-colored details. Using a stationery knife, cut large beads and fix them on the surface of the wedding wine glass.
There is no need to cut small decorative elements - decorate with them places that seem empty. Take two ribbons - white and purple. Fold them in loops as shown in the first photo. Insert one into the other, carefully tighten the knot so that the ribbons do not twist. Singe the edges (this will prevent the satin threads from coming apart and fraying), then glue the resulting bow to the leg of the wedding attribute. The beautiful wine glass is ready!
Complete the resulting drawings with lilac-colored details. Using a stationery knife, cut large beads and fix them on the surface of the wedding wine glass. There is no need to cut small decorative elements - decorate with them places that seem empty. Take two ribbons - white and purple. Fold them in loops as shown in the first photo. Insert one into the other, carefully tighten the knot so that the ribbons do not twist. Singe the edges (this will prevent the satin threads from coming apart and fraying), then glue the resulting bow to the leg of the wedding attribute. The beautiful wine glass is ready!
Photo
Looking through various ideas for creating wedding wine glasses with ribbons, it will be easier for newlyweds to come up with and implement their own option. Ribbons on the thin stem of a champagne glass look elegant, emphasizing its elegance, and decorations with ribbons and lace on the bowl look festive. Satin, silk, and tulle fabrics of different widths can be used.
Stages of creating a mug with polymer clay
In principle, the stages of creating the decor of a mug with polymer clay are no different.
Step-by-step instructions for working with polymer clay:
- It is necessary to knead the clay well to make it easier to work with.
- Form a ball or sausage out of clay, mold the necessary elements for decoration and attach to the cup.
- If the clay does not need baking, then let it harden well. If you need to bake, you need to put it in the oven for 10 minutes.
- It is worth noting that clay from different manufacturers may differ in the required temperature, so it is worth initially finding out how many degrees to preheat the oven.
- After cooling, carefully remove the molded elements using a blade. Thoroughly degrease the surface of the cup.
- Apply glue to the modeling elements and to the surface of the cup itself and glue. Leave to dry for 10-12 hours.
- Open with a thin layer of acrylic varnish.
Greek pearls
Tired of rhinestones and sparkles? Then use wonderful beads that will always come to the rescue. It doesn’t matter if you have decor of different sizes in your arsenal, because you can even use beads!
How to do it? Start by preparing the necessary material. Choose beads of the color in which you are holding your celebration. Agree, it would be inappropriate if your wedding is all in red and pink tones, and the young couple has glasses with blue and green beads on the table. To create decorated dishes you will have to use a glue gun. Apply a drop onto the grease-free glass and use tweezers to carefully place the bead. Try to make a unique design: start decorating the glass with large artificial pearls, gradually reducing the size of the beads. Approaching the edge of the glass, you can use small beads. Decorate the glassware with silk ribbon or wrap the stem with brown twine.
General rules
Having decided to test your talent in needlework and demonstrate your taste, be patient and remember the main working points. Before you start decorating the glasses for the wedding, you will have to wash them until they shine, and then degrease the glass surface. To do this you will need pure alcohol or acetone. The processing will be better if you wipe the wine glass with a cotton swab.
The glasses must be degreased first.
The creative process should be carried out with cleanly washed hands. It is necessary to keep wet wipes ready. They will remove droplets of glue from your hands.
To remove adhesive drips formed when decorating glasses with your own hands, use any solvent, including acetone used for degreasing. Depending on the size of the glue stain, it can be removed using:
- ear stick;
- toothpicks;
- needles.
Remove glue stains with ear sticks
Ensure high-quality lighting of the workplace, otherwise many small defects may remain on the wine glass. It would be a shame if they ruined the impression of the original design of the wine glass.
Since champagne glasses can be decorated with a variety of materials, it is useful to know what glue to use to fix what.
So, textile elements are glued with ordinary PVA, miniature details, such as beads and rhinestones, are attached to an adhesive composition with a cyanoacrylate base, and bulky beads are forced to stay in place with “liquid nails.”
Volumetric parts are attached with a glue gun
Additional decorative elements for glasses
- rhinestones;
- beads;
- rain;
- confetti;
- mica;
- nail polish;
- glitter;
- polymer clay;
- multi-colored sugar;
- protein glaze with candy, nut and chocolate sprinkles;
- textile;
- yarn (knitted Christmas-themed covers);
- feathers;
- cotton wool;
- decorative rings with pendants;
- colorful stickers with New Year's motifs;
- ready-made jewelry purchased at a supermarket or specialty store;
- contour acrylic paints and much more.
In addition, glasses with decorated legs and rounded stands will look very aesthetically pleasing. They are skillfully painted with paints, expressed with sequins, beads, sparkles, and they also make special covers from soft, colorful fabric with their own hands. The variety of such products amazes and pleases the eye. After all, seeing a little Santa or Father Frost, a Snowman, a funny deer, a gnome in a red jumpsuit on the stand of a wine glass will be quite interesting and pleasant, especially for children
After that, cut out the parts, sew them and put them on the leg. Everything is elementary and extremely simple! Be sure to try to create something like this, and we recommend our next photo ideas.
Indeed, decorated glasses for the New Year 2022 will look much more beautiful than ordinary drinking containers. Their appearance will lift the spirits of you and your guests, make you admire the beauty of such art and not stop there. More and more new ideas will overwhelm you and be born at an unstoppable speed in the form of cool and unique works.
Finally
Our useful and entertaining article has come to its end, providing for your consideration a photo of an idea on how to decorate glasses for the New Year 2022 with your own hands. As you noticed, this design process is quite entertaining and not at all complicated. It may be interesting even for your little children. They will be very happy to paint their wine glasses for a children’s event or cover them with colored paper. Engage in joint creativity in order to get closer and stronger, grow spiritually and morally calm down from the hustle and bustle of everyday life. In addition, the home and His Majesty’s table will be significantly transformed for the upcoming holidays to the delight of you and your loved ones. In such a chic atmosphere, everyone will feel just great! Happy holiday, dear friends! Peace, prosperity and mutual understanding!
- How to decorate windows for New Year 2020
- Letter to Santa Claus
- Crafts for New Year 2020
- DIY snowflakes for New Year 2020
VN:F
Wait…
Expert advice
Of course, creating important attributes for a wedding is very exciting. But in the process of decorating, a lot of pitfalls can emerge that can ruin the whole job. For this reason, you should familiarize yourself with some advice from professionals in this matter.
- In order for the result to look neat, without pieces and threads of dried glue being visible, it is better to choose a special glue for glass and ceramics. It is distinguished by the fact that it hardens in a matter of seconds and has an absolutely transparent color. Silicone can be an excellent analogue of such a material.
- Many craftsmen prefer to use cyanoacrylate glue to attach the decor. It fixes beads, rhinestones and other small elements especially quickly. Its main advantage is that it is not afraid of moisture. You can really find it in any store selling construction supplies.
- PVA is often mentioned in master classes. It is well suited for decoupage and decoration with textile materials. It also leaves almost no residue. If inaccuracies do appear, they can be eliminated with alcohol or warm water.
- Before you start decorating wedding wine glasses, you should try out the chosen technique on any unnecessary dishes.
- Glasses should always be washed and dried well before use. Any remaining dirt or fingerprints can lead to the decor simply falling off at the most inopportune moment.
- After completion of the work, the glass can be coated with colorless paint or varnish for glass surfaces. This will hide all the imperfections in the work and make the decorations stick more firmly.
- Glass decorations can be purchased much cheaper at office supply stores or sewing supply stores.
- In order not to waste money on unnecessary materials, it is recommended to clearly decide on the technique in advance, think through each step and write a list of everything you need.
A wedding is one of the most important events in the life of a couple in love. In order to leave as many pleasant memories as possible from this event, you should not neglect the decor and decoration of the holiday. Glasses are what will be in the hands of the heroes of the occasion throughout the day. Therefore, wine glasses must be exclusive. And it’s better to make them yourself.
Such handmade products will appeal to all guests and will be kept in the family home for a long time. The main thing is to choose the most suitable and affordable method for decoration. If you have time, you can decorate glasses for guests. It is important to consider that glassware for sparkling drinks should not stand out from the overall composition.
Wedding table decorations
The wedding table is a real work of art. The chefs not only prepare delicious dishes, but also decorate them perfectly. But this does not detract from the role of the designer in creating the inherent color of the wedding.
How to decorate wedding glasses?
Fashionably decorated glasses for the bride and groom do not surprise anyone. Rather, their absence causes misunderstanding. The retail chain offers a large amount of beautiful tableware.
Decor of wedding glasses
It's easy to decorate glasses with your own hands. Traditionally, tall wine glasses are used. It is enough to fix several compositions on them with colorless superglue to give a stunning look:
Rhinestones and sparkles against a background of white flowers and fabric leaves never go out of style. The smaller the drawing, the more delicate and modern the composition looks.
Wedding glasses decorated with rhinestones
Glasses designed to match the wedding style look stylish. The color scheme repeated in the table decoration will be a good holiday decoration.
Glasses in a single wedding design
Wrapped several times with ribbons of one or two colors with the ends beautifully secured in a bow, such glasses, despite the simplicity of their design, look stylish and beautiful.
Wedding glass decor with ribbons
An interesting result is obtained by lace attached to the glass, decorated with beads and rhinestones on top. Additionally, you can place a couple or three of delicate flowers in a tone corresponding to the color of the wedding.
Delicate decor of glasses with lace
An excellent option for decorating glass: Take the thinnest ribbons and wrap the glass several times. We secure all the parts with a glue gun and install rhinestone rivets. We tie a bow beautifully on the leg.
Neat bows on the stems of glasses
Those who have at least basic skills in drawing with paints on glass can fully demonstrate them when decorating glasses. Just imagine: wedding wine glasses covered with a white pattern reminiscent of lace; the glass has a pattern of delicate spring branches with newly blooming flowers. If your design is not expressive enough, a bow tied on the leg will save the situation.
Painting on wedding glasses
An excellent and original idea: decorate wedding glasses with delicate small fresh flowers that match the color of the bride’s bouquet.
Wedding glasses with fresh flowers
The petals, arranged according to the design principle of a natural rose bud, attached to the glasses with glue, look beautiful only when fresh. But the result will be admired.
Decor of wedding glasses with rose petals
When working with the material, pay attention to securing the ends of the satin ribbon; it is recommended to treat them with fire
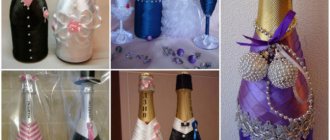
How to decorate wedding bottles?
At the celebration, two bottles of alcohol are traditionally placed in front of the bride and groom. According to tradition, one of them opens after a year, the second - on the birth of the first child.
There are several options for their design:
Allows you to tie the alcohol with a bow to match the color scheme of the wedding and get an impressive decorative element.
Bow for decorating a wedding bottle
Bottles dressed up in the costumes of the bride and groom look beautiful. Especially if the style of the costume repeats elements from the clothes of the heroes of the occasion.
Wedding bottles “bride and groom”
Nowadays, making beautiful wedding labels for bottles is not difficult. Want to leave a lasting impression on your wedding? Place champagne with specially prepared labels on the table. For example: Ivanovo champagne, Champagne from the Kuznetsovs. If the picture shows a photograph of the newlyweds, you will not find a single empty bottle after the holiday, even for yourself as a souvenir.
Champagne with wedding labels
The bottles on the newlyweds' table can be decorated to match the style of the bride and groom's glasses. You don’t have to be afraid to go overboard with decorations; alcohol on the newlyweds’ table is interesting only to the heroes of the occasion and does not greatly affect the overall style of the holiday.
Wedding glasses and champagne in the same style
Decorating the hall with garlands
In order to make paper garlands with your own hands, you will need a sewing machine. Prepare circles cut out of paper of the same diameter and matching each other in color. Take a strong thread and use a sewing machine to connect all the elements into one garland. Leave empty spaces between circles. Attach the resulting structures to the ceiling.
Decorating the wedding hall with garlands
Tools and materials
The most popular material is cheap and affordable Chinese-made clay. It is suitable for beginners; for masters, it is better to choose a higher quality and more expensive analogue. Chinese clay is baked at a temperature of 130 degrees without changing color or losing its properties. After baking, transparent colors become more cloudy, and whites turn grey.
The composition contains a plasticizer, thanks to which the clay remains soft and plastic.
Flexibility remains even after hardening, so it is very easy to work with the material. It is better to make polymer clay mugs from Fimo brand clay. It has a high degree of flexibility. For small parts, such properties can fail, since where plasticity is needed, it is not there.
In other cases, excessive flexibility causes a lot of inconvenience:
- The clay should hold its shape well, especially in those places where there are fragile areas.
- Excessive softness sometimes does not allow creating a streamlined shape, although the Fimo brand is in great demand among professional craftsmen.
- To eliminate the negative effect of softness, the clay must be kept in the open air for 2-3 days before sculpting. In this case, it is important to place a piece of material on a white sheet of paper so that the clay does not absorb excess pigment.
- The same method should be used to soften the polymer composition of this manufacturer.
The polymer material is suitable for sculpting small flowers, jewelry and other decor. It will not be possible to create a full-fledged cup from this brand of clay. Plastic from the Tsvetik brand is considered more expensive, but its texture allows you to create flowers, large beads and various products for attachment to a relief surface.
The texture also allows you to create complex products that require dexterity and refinement of actions. The sets come in 6-12 different colors to match the color palette. This means that after baking, the shades practically do not change, the composition remains the same due to its properties.
Foreign analogues of this brand are:
- PREMO;
- Sculpey;
- Kato;
- Pardo.
Domestic clay is made from available raw materials, which is why it exhibits more fragile properties after drying. When using a rolling machine, the material may look like soft hot cake fondant. Finished decorative products literally crumble and crumble, especially old clays that are 3-4 months old. lay idle.
Polish polymer clay, which is considered the most affordable, strong and versatile, has excellent properties. It can be boiled, baked - suitable for creating flowers, petals, sculptural decoration and creating “sausages”.
Foreign clays also differ from each other:
| Name | Characteristic |
| "Fimo" | The brand presented 3 different types of clay – Professional, Soft and Effect. The second type is the softest. It is also considered the most universal for any modeling, and after drying the color does not change. Translucent shades become brighter, and white remains the same snow-white. If the translucent white color is in a thick layer, it will remain with a gray tint after drying. You can also create additional effects by adding sparkles, glitter, and pearlescent particles from mica. |
| Premo | The clay has a pleasant surface and soft texture. After drying, the effect of having a wax film is created. It is best suited for creating sausages. |
| Studio | Plastic from the Sculpey brand has a velvet texture that differs from other analogues. The color range is the most diverse. Rich colors are distinguished by restraint and nobility. |
| Cernit | Dense polymer clay that needs to be kneaded well in advance. The packaging contains wax-like material – soft, dense and translucent. After baking, the color changes significantly and a transparent texture appears. The clay is suitable for sculpting dolls, faces and imitation marble. Natural textures from it are the most realistic. |
| "KATO" | This plastic requires higher temperatures to bake. The consistency is harder, it should be kneaded with a special hammer. Due to its strong properties, clay can rarely be found in Russia; the demand for it is very small. In artistic modeling you can use clay from this brand for “sausages”, small details and thin layers. |
For beginners, you should purchase several primary colors, which can be mixed with each other due to the low consumption of each of them.
Namely:
- blue;
- yellow;
- red;
- white.
The latter can only be purchased with sufficient transparency if this is necessary to implement any complex details.
You will also need the following tools for sculpting:
| Name | Characteristic |
| Knife | It should be sharp; it is advisable to purchase not a stationery one, but one that is designed for cutting paper and cardboard. Dull knives will smear the design during cutting - it is better to exclude Japanese accessories, as they have thick knives. Cheap analogues will quickly become dull, so the range of choice should correspond to 200-400 rubles. |
| Rolling pin | Even a beginner should have it. If you don’t have a special rolling machine, a rolling pin will help if you need to create a thin layer of material. A noodle cutter can also replace a pasta machine. Plastic rolling pins are not suitable as they will stick to the clay. An acrylic roller is considered more versatile. A metal analogue that does not transfer materials to the PG surfaces is also suitable. Available materials include bottles of hairspray, tubes, uncut glasses, glass bottles and smooth, even packaging for round things. |
| Toothpicks | They will be needed to create small indentations to imitate the nose, mouth and other facial features. You can use them horizontally to press cuts onto sausages. After baking, they can be used to make holes if their diameter does not exceed 1-2 mm. |
| Not plastic stacks | These materials are needed for figurative, sculptural and artistic modeling. |
| Metal molds | This is a part of decorative art, without which it is impossible to create quick and simple decorations. Textured sheets of rubber and silicone are also easier to cut with metal notches. |
| Decor | You can use buttons, metal caps, pendants and chains as decoration. |
| Pastel, skeletonized leaves, shadows and sparkles | These materials may be needed for various decor. |
| Foil | As a rule, it should be used to form the frame when creating mugs or dolls. To prevent the weight from increasing due to clay, you can also use wooden beads as a base. |
Polymer clay mugs sometimes require a bright white color, which is difficult to achieve. When working with “pure” color, you need to use gloves and a white sheet of paper. Periodically, hands should be wiped with wet wipes. Then the fibers of the particles will not fall on the white mass of clay. The process of obtaining clay for modeling that is comfortable in softness is also considered an important point.
To prevent it from drying out, you need to use the following materials:
- cream, Vaseline - for heating polymer clay;
- softeners - chemical components to replace petroleum jelly if the clay is fragile;
- water and paints - to obtain a solid material.
If you add Vaseline to a dense layer of material, the modeling will not bake. To do this, you need to add softeners to help uniformly soften the material before drying. It is best to use Moldmaker - it is a plasticizer for making clay and polymerizing finished raw materials.
To test new materials, the following quality control method must be used:
- The clay needs to be softened. If it “flows” in your hands, you should mix it with a hard type of clay.
- To obtain a homogeneous mass, you need to leave the clay on a white sheet for 2-3 hours.
- If the paper is saturated with grease, the clay is ready for use.
- If, when mixing clay with paint before sculpting, it becomes soft and sticky, you can no longer work with it.
By following simple recommendations, you can learn how to make beautiful things, decorate mugs and create unusual decorative items.