Plastic bottles come in a variety of shapes, which makes them an excellent material for creating crafts, such as vases. Making a vase from a plastic bottle with your own hands is easy and quick; besides, plastic bottles can often be found at home in every housewife. Using improvised materials you can make very interesting and original vases.
Plastic bottles, among other things, are a very flexible and pliable material, it is easy to cut and shape into any shape.
We bring to your attention interesting master classes on creating lovely vases from plastic bottles. You can use corrugated paper, plasticine, and old CDs to decorate them.
A vase from a plastic bottle can be made in several ways, and here are just a few of them:
- You can cut beautiful patterns on the surface of the bottle using scissors or a heated nail;
- You can wrap the bottle with threads, jute or ribbons;
- You can also paint the bottle with spray paint or make a design using masking tape;
- You can decorate a vase made from a plastic bottle with twigs, coffee beans, fallen leaves and other materials.
And many more different ways. Perhaps you will choose something from the list, or maybe you will come up with your own vase, and then it will be unique.
Painted vase from a plastic bottle
You will need: plastic bottles, primer, scissors, electrical tape, spray paint.
Master Class
- Cut off the top of the bottle.
- Cover the edge with electrical tape.
- Apply a coat of primer to the bottle.
- Paint the bottle with spray paint.
- Wait for it to dry completely!
The painted vase from a plastic bottle is ready! I recommend watching this video!
DIY vase from a plastic bottle
Hanging vase using decoupage technique
You will need: napkins for decoupage, scissors, brush, glue, glue gun, hole punch, plastic bottle, decorative braid with pom-poms or ribbon, rope for hanging.
Master Class
- Cut off the top of the bottle and work from the bottom.
- Glue the decoupage napkin to the bottom of the bottle.
- Use a hole punch to make two holes for the rope at the top, opposite each other.
- Tie a rope.
- Glue the ribbon to the top edge of the vase using a glue gun.
A hanging vase made from a plastic bottle using the decoupage technique is ready! I recommend watching this video!
DIY vase made from a plastic bottle.
Pot for planting flowers
Was the floor vase easy for you? Then you can make a pot from a plastic bottle without much difficulty. Rice will help you get inspired. 2. Let's look at it in more detail:
- Cut off the top of the bottle, considering that this is the future bowl of a flower pot - plan its size;
- Make a hole in the plug through which excess water from irrigation will flow into the stand;
- Insert the top of the bottle, cork side down, into the remaining base of the same bottle. The pot with drainage is ready.
You have just assembled a pot from an ordinary plastic bottle with your own hands, and now decorate it and fill it with soil. Plant seeds or cuttings of your favorite flowers and wait for abundant shoots to appear.
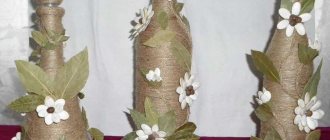
Vase made of plastic bottle and threads
You will need: knitting threads of any colors (thick yarn), a wide plastic bottle, scissors, a strip of fabric, threads, a needle.
Master Class
- Cut off the top of the bottle and work from the bottom.
- Cut the sides into an even number of equal strips, for example 10.
- Tie the end of the yarn to the bottom of any strip.
- Start weaving in this way: braid the strips through one - the first in front, the second in the back. From below, gradually rise up, weaving around the entire vase.
- Secure the knot to the inside of the vase.
- Sew the fabric strip with large stitches onto the edge of the vase.
A vase made of plastic bottles and threads is ready!
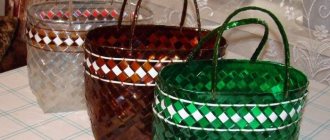
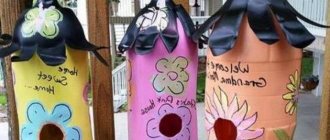
Set of vases made from plastic bottles
You will need: 6 identical square plastic bottles, rubber band, colored tape.
Master Class
- Gather the bottles together, placing them side by side, 3 pieces in 2 rows.
- Put a rubber band on them.
- Carefully secure the structure with tape.
- Remove the rubber band.
A set of vases made from plastic bottles is ready! I recommend watching this video!
Plastic bottle flower vase making — Look like ceramic vase | प्लास्टिक की बोतल फूल फूलदान बना रह0
Master class on photos and videos
Let's look at the simplest master classes that teach us how to make vases from plastic bottles.
Let's start with the original product, which is a product of six identical bases.
Arm yourself with:
- bright tape;
- stationery eraser;
- scissors;
- square plastic bottles in the amount of 6 pieces (it’s enough to take 0.7 or 1 liter).
Follow the simple instructions:
- We place the bottles so that they are arranged in 2 rows of 3 pieces.
- We fix them with a rubber band.
- We connect the bottles with colored tape (it’s good if you use several multi-colored strips).
- Get rid of the gum.
- It will take you a minimum of time to make such a vase, and as a result you will receive an unusual product that will fit well into any living space, no matter what style it is decorated in.
Another simple option that requires application:
- plastic bottle;
- aerosol paints;
- primers;
- electrical tape;
- scissors
Algorithm of actions:
- Using scissors, remove the top of the bottle.
- Cover the cut area with electrical tape.
- We treat the base with a primer. At this stage, it is recommended to drape the bottle over the glass jar.
- Apply the primer in an even, neat layer.
- Spray with spray paint.
- You can use this vase after the paint has completely dried.
Don't have a regular water bottle or drink at home? Then use a plastic detergent container. Rinse it well first and dry it. In addition to this material, we will need:
- markers (choose those that cannot be washed off with water);
- hole puncher;
- stationery knife (you can use scissors instead).
Follow these instructions:
- Use a knife or scissors to cut off the top of the detergent bottle. Leave a small rounded part for the vase to hang.
- Make a hole in the rounded part using a hole punch.
- Color the bottle with permanent markers.
Hanging vase for the garden
You will need: a plastic bottle of detergent, scissors or a craft knife, a hole punch, a permanent marker.
Master Class
- Cut part of the bottle as shown in the picture.
- Use a hole punch to make a hanging hole in the top of the bottle.
- Draw a pattern on the vase.
A hanging vase made from a plastic bottle for the garden is ready!
We make an exquisite craft with step-by-step instructions
In addition to the classic version of making a vase from plasticine, you can make a wonderful souvenir using a bottle. Such a product can act as a wonderful gift, as well as a craft for 4th grade children. The manufacturing process is simple and takes relatively little time. For your convenience, we offer instructions, following which step by step, you will receive a beautiful decoration for your interior.
In the process we will use the following materials:
- Plasticine
- Plastic bottle
- Brushes and paint
- Toothpaste
- We start by clearing the surface of the bottle from the label, washing it and drying it.
- Now that the base of the vase is ready, let's start sculpting. We apply plasticine to the bottle as your imagination requires.
- Next, we are making jewelry, which will be flowers. Using plasticine we create plant petals, stems and cores.
- We fix the resulting parts on the product.
- In order to be able to apply paint to the vase, you need to apply toothpaste over the plasticine and allow it to dry. T
- Now we paint the vase and draw the elements to give the decor the most advantageous look.
The resulting vase can be a creative design solution and add some spice to your home. She will also make a delightful gift, made with all her heart.
You can also use jars as a base for a vase. This product will be more spacious and voluminous. It is done in exactly the same way as when using a bottle - we clean and dry the container. Then we stick layers of plasticine onto the surface of the jar and decorate the top with plasticine flowers. You can also attach beautiful beads that will add originality to your product. Using this technique, you will give your child the opportunity to learn the art of modeling from plasticine, develop fine motor skills and provide hours of exciting work.
Vase “Cat” from a plastic bottle
You will need: a two-liter plastic bottle, a stationery knife, black and pink markers, a can of white paint.
Master Class
- Mark the height of the vase by making a horizontal line around the bottle.
- Draw two ears above the line.
- Cut out the cat along the intended contour, carefully and slowly cut out the ears.
- Spray paint the vase.
- Wait until completely dry.
- Draw a cat's face with a marker and color the ears.
A vase in the shape of a cat from a plastic bottle is ready! I recommend watching the video master class!
Crafts from plastic bottles: “Cat” vase. Crafts for the garden and garden from garbage. Video lesson
Original vase made from a plastic bottle
You will need: a plastic bottle, scissors, a stationery knife, a colored napkin.
Master Class
- Cut off the neck of the bottle.
- Cut the top of the bottle into equal strips.
- Bend the strips outward from class=”aligncenter” width=”722″ height=”512″[/img]
- Fold the strip in half and turn it to the side so that the strip crosses the next two strips and reaches the middle of the third.
- Do this process with each strip.
- Insert a tissue paper into the vase for color.
The original vase made from a plastic bottle is ready!
Openwork vase made from a plastic bottle
You will need: a plastic bottle, a soldering iron or nail, a can of paint, a marker.
Master Class
- Cut off the neck of the bottle.
- Draw a pattern with a marker.
- Heat the soldering iron or nail.
- Carefully work with the soldering iron, making a hole according to the pattern.
- Paint the vase and wait until it dries completely.
The openwork vase made from a plastic bottle is ready!
Stained glass painting
For those who love complex patterns and want to try to create something unusual, we suggest mastering dot painting.
To do this, prepare:
- alcohol or acetone
- cotton swabs and disks
- contour paints
- synthetic brush or toothpick.
When the drawing is ready, you need to wait for it to dry naturally or put the vase to bake in the oven. Recommendations for temperature and time are indicated by the manufacturer on the paint.
Contour paints can be used not only for dotting techniques, but also for stunningly beautiful stained glass painting.
For this you will need:
- degreaser
- contour paints
- natural brush
- cotton pads and sticks
- sketch of the drawing.
It is very important that the paints are baked, as this will speed up the process of decorating the vase. First, degrease the outside of the vase and leave it until it dries.
The next step is to secure the sketch from the inside of the vase. When everything is ready, use a thin brush to draw all the closed contours and leave them to dry for 2 hours
First, degrease the outside of the vase and leave it until it dries. The next step is to secure the sketch from the inside of the vase. When everything is ready, use a thin brush to draw all the closed contours and leave them to dry for 2 hours.
Provided that everything is done correctly, you will receive a stunningly beautiful vase with a design.
Exquisite vase made from a plastic bottle
You will need: a half liter plastic bottle, a candle, a needle, scissors.
Master Class
- Cut a hole in the bottom of the bottle equal to the diameter of the cap.
- Cut off the bottom of the bottle.
- Place the bottom part with the hole on the neck of the bottle and screw on the cap.
- Think over the drawing.
- Light a candle, hold the needle for 10 seconds and poke holes in the plastic at the top. The needle should go in like clockwork.
- For one flower you need to pierce 5 holes, the length of 5 petals. Cut out the petals with scissors.
- Make 6 flowers this way.
- Make a vertical strip of holes from the middle of the vase, almost reaching the neck.
- Make 15-20 strips of holes in the same way.
- Decorate the bottom of the vase by making figures of eight and holes.
An exquisite vase made from a plastic bottle is ready! I recommend watching this video!
Romantic vase made from a plastic bottle
I recommend viewing a photo gallery of ideas for creating creative vases from plastic bottles!
Making a vase from a plastic bottle is quite simple. Choose the best idea and follow the step-by-step master classes. Try to create with your own hands and undoubtedly everything will work out!
For the holidays:
New Year:
- Star
- Octagonal star
- Classic kusudama
- Kusudama Sakura (Chernova M.V.)
- Garland of balloons
- Christmas balls
- Volumetric paper ball
- How to draw a snowflake
- Volumetric paper lantern
- Lantern pendants
- Paper lanterns
- Garlands of ballerinas and snowflakes
- Felt Christmas decoration
- Learning to draw a Snowman with a letter (Tikhonova N.A.)
- Snowman made from a sock
- Bullfinches on the branches
- Christmas angel
- Christmas stocking
- Learning to draw a New Year's candle (Kurova T.V.)
- Carnival New Year's mask (Goloshumova O.E.)
- Mittens
- How to draw a Christmas tree
- How to draw a fluffy Christmas tree with a pencil or felt-tip pen
- Christmas tree for every day
- Christmas tree on Christmas tree
- Christmas trees made of colored paper
- Christmas tree made of paper
- Making Christmas trees
- DIY Christmas tree
- Volumetric Christmas tree
- Let's make a Christmas tree
- Christmas trees made of strings
- Drawing Christmas trees
- Learning to draw a Christmas tree and Santa Claus (Kurova T.V.)
- Santa Claus (origami)
- Drawing Santa Claus
- Santa Claus from paper-1
- Santa Claus from paper-2
- How to draw Father Frost and Snow Maiden
- Snowflakes-ballerinas
- Volumetric snowflake
- Volumetric paper snowflake
- 3D paper snowflake
- Cutting out snowflakes
- New Year's applique
- Year of the monkey. Draw a monkey
- Do-it-yourself souvenir dog (Kurova T.V.)
- Let's draw a dog - a symbol of the New Year (Fuflygina N.N.)
- Craft “Pig from plastic bottles”
- Drawing the symbol of the year of the pig
- Drawing a pig
- Christmas tree toy “Pig”
Valentine's Day (February 14):
- Valentine's Day Crafts
- Fantasy for Valentine's Day
Defender of the Fatherland Day February 23
- Ideas for February 23
- Drawing a tank (Isaeva A.V.)
- How to draw a military plane
- How to draw a tank
- Drawing a submarine
March 8:
- Tulips for mom
- Snowdrops for March 8
- DIY candy bouquets
- Flowers for March 8th from cotton pads
- Roses for Mother's Day (Abramycheva E.M.)
- Flowers on a napkin
- Roses in a pot
- Making tulips
- Paper flowers
- Paper hyacinths
- Flower bouquet
- Flowers made from palms and paper
- Flower of Wishes
- Making daffodils from paper
- Cardboard tulips
- Tulips made of colored paper
- Mimosa
- New ideas for March 8
Cosmonautics Day (April 12):
- Drawing a rocket
- Drawing an astronaut
- Space walk (Sinitsyna I.V.)
- I'll draw a rocket (Sinitsyna I.V.)
- We sculpt space and astronauts
- Drawing a spaceship (Pokrovkova N.N.)
Easter:
- Original crafts for Easter
- Crafts for Easter
- Crafts for Easter
- Easter crafts for little ones
- Crafts for Easter from dishes
- Easter crafts from disposable plates
- Making Easter bunnies
- Easter egg (Kneis E.A.)
- Drawing an Easter egg (Sinitsyna I.V.)
- Drawing Easter eggs
- How to draw Easter eggs
- Easter paper bunny
- Drawing the Easter Bunny
- Easter bunny made from plates
- Easter chicken
- Ideas for Easter from plates and napkins
- Easter applique (Sinitsyna I.V.)
Victory Day May 9:
- Craft “Victory Ship (S.V. Litovchenko)
Postcards:
- Postcards for February 23
- Greeting card for February 23 (Isaeva A.V.)
- Postcard for daddy (Dulishkovich S.N.)
- Shirt (by February 23)
- Postcards for March 8
- Postcard for March 8 – 1
- Postcard for March 8 – 2
- Postcard “Bouquet of Flowers”
- Postcard for mom – 1
- Postcard for mom – 2
- Cards for mom
- Card using the outline of a child's hand
- Postcard for mommy (Dulishkovich S.N.)
- Making a postcard (mimosa)
- Happy March 8th (Kneis E.A.)
- Butterfly postcard
- Magnet postcard for May 9
- DIY postcards for May 9
- Postcard for May 9th from plasticine
- Plasticine postcard for May 9
- Postcard “Happy Victory Day!”
- Postcard for May 9 – 1
- Postcard for May 9 – 2
- Postcard for May 9 – 3
- Easter cards (chicken) (Sinitsyna I.V.)
- Easter card made from pistachios
- Drawing a New Year's card
- Drawing a New Year's card (Fuflygina N.N.)
- Postcard “Christmas tree” – 1
- Postcard “Christmas tree” – 2
- New Year card “Christmas tree”
- Volumetric postcard “Christmas tree”
- New Year card (origami)
- New Year's card made of paper
- New Year card
- Postcard with a surprise
- Coloring cards for the year of the pig
- Postcard “Doggie”
- The work of an artist in your home. Postcard (Itkim T.V.)
- Invitation to the Birthday
- Postcard for the holiday “Chamomile”