Home » Building a house » Do it yourself
Vladimir 12/30/2017
135040 Views 4 comments
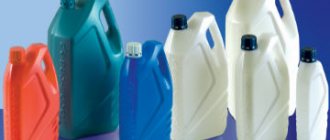
What can be made from plastic bottles
Sometimes you can’t even believe how many useful things can be made from plastic bottles. These can be interior elements and crafts that even a child can make. From them you can make tools for working in the garden, in the garden and much, much more.
Manufacturing of stands and decorative elements
To make jewelry stands, you should use bottles of various sizes from 0.5 to 3 liters . Using scissors or a utility knife, cut out the bottom, leaving 4 cm of plastic. We will get bottle saucers.
It is necessary to make a hole in each saucer, which must correspond to the diameter of the rod we have chosen. It is best to string saucers onto a threaded rod between special layers with washers and fastening washers and their nuts.
Stand for decorations
A wooden rod or metal pin is suitable for an improvised rod. You can also glue the saucers using glue. A saucer cut from a 3-liter bottle will represent the lower base of the stand.
Bottle with rod
- Plastic bottle;
- An empty ballpoint pen or a cocktail tube;
- Knife or scissors;
- Match or wooden toothpick;
- Awl;
- Wooden or metal peg;
- Wire or tape.
This watering system can be made in two ways: by attaching the rod to the bottom of the bottle or to its neck. In the first case, the bottle can be installed on the ground without additional equipment; in the second, the process of adding water to the bottle is greatly simplified.
In any case, the first thing you need to do is prepare the rod. To do this, wash out the remaining ink from it (in the case of using ballpoint pen refills) and close one of its ends with a plug. To do this, you can use a piece of a match or a wooden toothpick. Using an awl, make a small hole 3-4 millimeters from the closed end.
Initially, the hole should not exceed 0.3 millimeters in diameter. In the future, if necessary, it can be expanded, but it will not be possible to reduce it.
Now, 1-2 centimeters from the bottom of our container, we make a hole into which we insert the rod. It is no coincidence that the word “container” is used instead of the word “bottle”, since depending on the manufacturing method you choose, the bottom of the container can be either at the bottom of the bottle or at its neck.
Please note that the rod must fit into the container as tightly as possible.
If you have placed the rod at the neck of the bottle, then you need to screw it (the neck) with a cork. We cut off the upper part of the resulting container, and essentially the bottom of the bottle, using a knife or scissors.
It makes sense to “capture” 2-3 centimeters of its wall along with the cut off bottom of the bottle. By making a vertical cut on it, this part of the bottle can be used as a lid to protect the container from debris.
Now fill the bottle with water and see how quickly the liquid flows out through the hole made at the closed edge of the rod. The optimal speed is 10 drops in 5 minutes. If the water flows out more slowly, it is enough to slightly widen the hole in the rod.
The finished system is installed near the plant, and the end of the rod is placed in close proximity to the root system. To do this, the container with the rod is attached to a peg of sufficient length using wire or tape. The free end of the peg is stuck into the ground next to the plant.
Despite the fact that a bottle with a rod at the base can be placed without additional equipment, we recommend strengthening it with a peg, as this will prevent the bottle from tipping over due to gusts of wind.
Now all you have to do is pour water into the bottle and the drip irrigation system is ready for use.
If the bottle is positioned upside down, to water it you need to unscrew the cap a little to allow air to enter the bottle.
Watering system from a bottle with a rod
Cupcake containers
Cupcakes and pieces of cake have an unpleasant property - they quickly become chapped and therefore lose their appearance and taste. Beautifully decorated cakes can be very difficult to take home without breaking their shape and keeping the cream decorations intact.
Cupcake containers
The use of improvised plastic boxes will solve this problem. You can make containers for cakes and cupcakes from plastic bottles yourself. To do this, you will need a circle cut out of cardboard and two parts from a plastic bottle.
Method using a sponge
- Plastic bottle;
- Foam sponge (washcloth).
The manufacture of this drip irrigation system is the simplest of all those proposed. It is enough to pour water into the bottle, and instead of a cork, stick a piece of foam sponge of the appropriate size into the neck.
If water seeps through the sponge very much, try taking a larger piece of foam rubber. By experimenting, you can achieve the desired intensity of watering.
After this, we place the bottle near the plant, so that the neck with the sponge is located near the root of the plant. As the sponge gets wet, excess moisture will drip to the root, providing water to the plant.
The advantage of this “system” is its ease of manufacture. The disadvantages include the impossibility of accurately adjusting the intensity of watering, rapid water consumption and the need to disassemble the structure for filling.
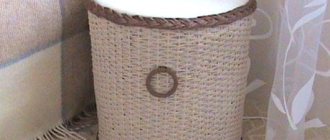
Organizers
Are you annoyed by clutter in your workplace? Organizers made from plastic bottles will come to the rescue.
Organizers for textiles
Using a utility knife, carefully cut off the neck. These items can serve as storage for newspapers, magazines, and office supplies.
The choice of design and decoration is yours
Root irrigation system
Root irrigation system
- Plastic bottle;
- Awl;
- Knife or scissors.
Making this drip irrigation system is very simple. The bottom of the bottle is cut off with a small piece of the wall, on which a vertical cut is made. As in the previous case, this part of the bottle will serve as a cap.
Near the neck, several holes are made with an awl through which liquid will flow.
The more clay soil you have on your site, the more holes you need for normal watering.
All that remains is to bury the bottle near the plant so that all the holes are underground. After filling the bottle with water, moisture seeping through the holes will provide the root system with a sufficient flow of water.
Holes can also be made at the base of the bottle, and water can be poured through the neck.
Ease of manufacture and the ability to irrigate several plants at the same time (in this case, the bottle is dug between them, and holes are made around the entire circumference) are the undoubted advantages of this system. The disadvantage is the fact that it is difficult to determine the intensity of watering, since the “working area” of the bottle is underground.
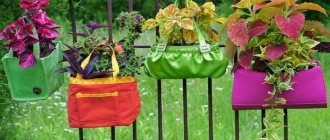
Curtains and artificial flowers
Light curtains and elegant partitions for dividing the space of a room into several zones can be made from plastic bottles.
Such decorative elements look quite impressive
They form reflections in the rays of the setting sun. This decorative element will surprise and be remembered by your guests for a long time.
Hanging system
- Plastic bottle;
- Awl;
- Knife;
- Wire or rope.
This drip irrigation system is suitable for those who have supports next to their plants. Although if they are not there, it is not a problem to install stakes between the plants.
As in the two previous cases, we cut off the bottom of the bottle, making a lid out of it.
At a distance of 1-2 centimeters from the cut bottom, we make two holes on opposite sides of the bottle. We pass a wire or rope through them, with the help of which the bottle can be hung on guy wires stretched between the supports. Make a small hole in the bottle cap. If the flow rate seems too slow, the hole can be widened.
You don’t have to make a hole in the lid, but simply unscrew it a little, allowing the water to flow out at the desired speed.
Now you need to hang the bottles over the plants, after which the work on making the “irrigation system” can be considered complete.
The advantages include ease of manufacture and the ability to accurately adjust the watering speed; the disadvantages include the obligatory presence of supports near the plants.
Main advantages
For those who have no idea what it is and what it is used for, I will tell you in a few words the main advantages of this design. There are many of them:
- no special knowledge required for manufacturing;
- water is supplied directly to the root system of plants;
- parts are durable and can be easily replaced in case of malfunction;
- water is saved because there is no need to moisten a large area;
- weeds die, because the soil surface remains dry and has a detrimental effect on the similarity of weed seeds;
- due to the absence of a damp environment, the risk of fungal diseases is reduced.
The main advantage is that it will be completely free, because the material for the construction can be found in every home. Do not rush to throw them away during the winter, but collect them in a secluded corner of the shed.
It is important that such devices can also be installed in a greenhouse or greenhouse, and on especially hot days you will not have to worry about moistening your favorite vegetable crops. The flower garden is another element of the site that cannot do without watering. Place several bottles near the most capricious and delicate bushes and rest assured, no heat will harm your pets.
Throw it away or keep it
Many people prefer not to look for a place to store packages, but simply throw them away. However, according to Novate.ru, this is a big mistake. Now we are not even talking about the fact that this is uneconomical, because for economic purposes you will have to buy new copies. The main problem is the pollution of the planet, because polyethylene bags take hundreds of years to decompose. During this time, they pollute the environment and release toxic compounds that harm the soil, flora and fauna. In addition, packages can threaten human life. For example, in the state of Bangladesh, which is located in South Asia, polyethylene products ended up in sewers and caused floods. As a result of this natural disaster, thousands of people suffered. That is why storing packages is not so much a matter of saving as a matter of wanting to save your planet.
Lifehacks for the kitchen
The bags are mainly used in the kitchen. You can put sandwiches in them, pack vegetables for freezing, and empty garbage. A convenient, beautiful organizer will solve several problems at once:
- decorate the interior;
- will allow you to place a large number of bags in a small volume;
- will reduce costs for new products;
- will help you put things in order in the cabinets in the kitchen and hallway.
Where to buy and what to look for when buying?
When choosing a plastic container, you need to pay attention to the following points:
- Scope of application . Before making a purchase, you need to decide for what purpose the container will be used: for storing food, things, tools, etc.
- Temperature range that the product can withstand.
- Size . Containers come in both small and large.
- Design . If the container will be located in a visible place, this point should be given special attention.
- Lid . Its presence or absence.
- Smell . Normally, a high-quality product does not have any foreign odor.
- Form . The thicker the walls, the better the container holds its shape. If it is warped or deformed when a slight force is applied, it is better to refuse to purchase such a product.
You can purchase a plastic container at a retail store. If you require a specific brand, you can always find it in large online markets.
Top 3 popular products
The most purchased plastic containers:
POLYMERBYT
Storage container 35.5x23.5x19 cm. The product has a lid that is securely held in place by plastic clips. The container is spacious, the usable volume is 10 liters . Price 550 rubles.
BEROSSI
Freezing container Zip 12.1x20.1 cm. Convenient and spacious container that is not afraid of low temperatures. You can freeze any food and liquid in it.
The height of the product is minimal, so it will fit in the freezer without any problems. The container is equipped with a convenient sealed lid. Price – 850 rubles.
Bon Appetit
Two-level food container 2 l and 3 l. The container is designed for storing food chilled and at room temperature. The walls are durable and made of high-quality plastic. The container is equipped with a lid. It can be washed in the dishwasher and heated food in the microwave. Price – 350 rubles.
Varieties
Plastic containers are presented in a wide range in the store. Their varieties:
- Open bowls or baskets. They are placed in a visible place. There are carved items that can be used to store small items: keys, spare batteries, flash cards, etc.
- Small boxes with sections. They are purchased for storing beads, jewelry, rhinestones, etc.
- Container baskets. They are convenient to place in chests of drawers and cabinets. Such products are used for storing underwear, socks and more.
- Container vases. They are used to store cosmetics, brushes, and office supplies.
- Transparent container boxes with lids. You can store tools, shoes, clothes, hats, bags in them.
- Colored containers. They can be painted in one or several tones.
- Containers with lids and handles. These are universal products that are designed to store different things: toys, clothes, construction sets, cereals, etc.
- Small containers with airtight lids for storing food.
Also on sale are the following products:
- with handles and wheels,
- perforated and completely sealed,
- with and without wheels.
How to make a hole in a glass bottle with your own hands
If you need to make a hole in a glass bottle, then you do not need to buy special equipment. This can be done at home with your own hands. You can drill with either a regular drill or a screwdriver.
It is preferable to use a screwdriver, since it has fewer revolutions (high speeds are not needed for drilling glass). It is recommended to use a drill with pobedit inserts, but if you don’t have one, you can take a regular drill for metal work, for example, in this instruction we use a drill with a diameter of 8.2 mm made of P6M5 steel. Don’t believe those who say that you only need to use pobedit drills and nothing will work with ordinary ones. Now we will make sure of this.