Children's education is an important component of the development of society's culture. It is best to carry out the process of acquiring new knowledge in a playful way. The child gradually comprehends new areas. One of these areas can be called geography. Before embarking on a more in-depth study of this science, it is necessary to provide basic knowledge. One of the best ways to get acquainted with the basics of geography is to make a model of the Earth from plasticine.
The benefits of homemade crafts for the garden
Of course, garden figurines and decorations for gardens and vegetable gardens can be bought in the store. But a lot of things are easy to do on your own. This way you can have a great time in the winter, remembering the summer days, or find something to do during a quick rain, spend time with your children, showing them the basics of needlework.
Making your own decorations for the garden will help you get rid of trash that you don’t dare throw away, and free up balconies, garages, sheds, and rooms in your country house. The material at hand can be anything. Most often they use plastic bottles, tires, remnants of boards, hemp, old toys, kitchen utensils and anything else that the zealous owner (or housewife) has caught the eye of.
Very often, neighbors also become infected with the desire to do something unusual, so soon the entire gardening community is pleasing the eye with cute little things that lift their spirits.
And lastly: original crafts highlight the area and make it an excellent place to relax, becoming a stylish place where relatives and friends come with pleasure.
Additional Tips
To make a high-quality image of the planet’s globe and give maximum accuracy, you can use some additional materials and capabilities. Once the basic layout is done, you can try some additional techniques:
- Almost all globes have a schematic representation of meridians and parallels. They help improve the accuracy of the map. To repeat this and implement it when making your own crafts, you can use a thin silk thread, carefully positioning it in the desired direction and lightly fixing it.
- Large cities on a political map can be marked using beads or seed beads.
- If the model is quite large and detailed, you can use a needle or toothpick to apply the inscriptions of some countries and cities. In addition to creative experience, this will help the child increase the level of his geographical knowledge.
Old furniture
Unnecessary or very shabby furniture can serve once again as an unusual flower bed. You can remove the doors of your grandmother’s old dressing table, take out half the drawers and install a flowerpot with flowers there, or arrange a doll’s house inside. Pots can also be placed on the top surface, and the existing mirror can be painted with cute patterns.
The only thing you have to take care of is to protect the tree from rain and other moisture. To do this, cover the piece of furniture with a thick layer of paint, stain or varnish. Or we can do it all together. Such a thing can even be placed on the veranda if it is on the illuminated side.
Such a novelty to the exterior of the site will make the dacha a very attractive and unusual place.
As such a flower bed you can use an old table, chair, ladder, construction pallets leaning against the wall.
Work supplies
Space subjects are made from everything that is at hand, that has fallen out of use or is prepared only for the process of needlework for crafts in a child’s home room, kindergarten, or school.
- Several spheres of different sizes.
- Supplies for drawing.
- Illustrations and newspaper strips.
- Wallpaper paste.
- Thin plywood, foam rubber.
- Thread and wire for loops to products.
- CDs.
- Plastic bottles.
- Plastic mass for modeling.
- Food grade aluminum foil and much more.
Unnecessary household items
Old kettles and buckets can, of course, be scrapped, or you can make fun flower beds out of them.
To make a “campfire” you will need only three sticks (they can be easily found in the nearest forest). Two of them should have spears, on which a third stick with a hanging pot, kettle, bucket, and mayonnaise bucket is hung. The container is filled with earth and hanging plants are planted there.
The fire itself is surrounded by fairly large stones, logs or cones are placed inside, and small red or orange flowers are planted. Scarlet scraps of fabric can also act as tongues of flame.
Unusual flower beds can be made even from unnecessary women's handbags or suitcases.
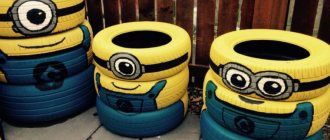
Old unused barrels can be painted in the form of nesting dolls or fashionable minions, patterns or colors. Anyone who is comfortable with brushes and paints paints entire pictures on such surfaces. If the Creator did not give such a talent, you can simply paint the barrel with multi-colored stripes horizontally, vertically or at an angle, creating a rainbow.
Such beautiful objects can be used as a warehouse for inventory (everything will be in sight) or trash cans for large garbage. Or take it out into the garden and use it as a high flower bed.
Even old water gutters are used. They can be used as a frame for paths or hanging flower beds on the walls of houses and gazebos or on tree branches, secured with strong ropes or chains.
Old shoes will wonderfully turn into fun flower beds. It is enough to paint it (bright rubber boots can be left without painting), fill it with soil and plant undemanding flowers. Such flower beds decorate garden paths, places along the fence or any free space in the garden.
From several pairs of old shoes you can make a funny dog or a cheerful giraffe that will greet residents and guests coming to the site. Cracked flower or kitchen pots can be laid on the ground and made into a flower river.
Huge globe made using papier-mâché technique
You will need: a fitness ball, PVA construction glue, film, rope, paper, newspapers, scissors, pencil, brushes and paints.
Master Class
- Wrap the fitness ball in film and tie a loop for further hanging.
- Wrap the ball with rope.
- Hang the ball to make it easier to work with.
- Cut the newspaper into pieces, dip the paper in water, then attach it to the ball.
- Cover the ball with pieces of newspaper in several layers.
- Cover the ball with pieces of white sheets in several layers and wait until dry.
- Draw the outlines of the continents and oceans with a pencil.
- Paint the globe with paints and wait until it dries.
- Deflate the ball through the top hole and remove it along with the film.
- Cover the hole and outline it.
A huge globe made using papier-mâché technique is ready!
Tree
This material will help decorate your summer cottage in the most unusual way.
The remains of the boards go to consciousness:
- decorative mill;
- a nice well;
- a funny house for a gnome;
- a bridge over a flowerbed or a dry stream;
- cars, carts or trains with flowers;
- a large cart with boxes of herbs;
- feeder or birdhouse.
You can decorate even an old stump beautifully if you make a hole inside for planting flowers.
Thin stumps can be transformed into cheerful fly agarics by simply attaching the bottoms of plastic bottles painted red with white spots on top. This idea will help you quickly and funly transform your garden into a lovely relaxation spot.
Creation
When constructing a galaxy system and depicting its realism, it is advisable to study tone and volume. Look:
- The sun is golden.
- Mercury – faded, gloomy.
- Venus is straw-colored with whitish streaks.
- Earth – dark blue with greenish.
- Mars is scarlet.
- Jupiter is red-orange with a whitish admixture.
- Saturn is bright yellow.
- Uranus is blue.
- Neptune is turquoise.
- Pluto is beige.
Plastic bottles
A huge number of crafts are made from such containers with your own hands. This:
- funny bumblebees and dragonflies;
- piglets and kittens with flowers;
- funny hedgehogs;
- swans, frogs, water lilies;
- hanging flowerpots;
- horses, donkeys, giraffes;
- exotic palms.
This is a good material for creating fences along flower beds and paths.
Plastic bottles are used to create ottomans for working in the garden, decorating a gazebo or country house, coffee tables or armchairs. To do this, they are made into blocks using strong glue or tape and covered with fabric.
Beaded globe box
You will need: a wooden blank - an opening ball with a stand, a simple pencil, beads - blue, light pink and gold, thick wire, thin fishing line, instant glue, acrylic varnish, glitter, scissors, a screwdriver with a thin drill, a hammer, acrylic paints and a brush.
Master Class
- Draw the outlines of the continents on the ball.
- Weave a belt into 2 beads: one row is gold - this is the equator, and the second row is colored. During weaving, you should constantly apply the fishing line to the ball and orient yourself along the intended lines, that is, blue beads are water, and pink beads are land.
- Sew the belt into a ring, apply glue to the edge of the box (the middle of the ball) and put on the beaded belt, then wait 15 minutes for the belt to stick well.
- Weave the next row in the same way: string blue beads in place of water, and pink beads in place of sushi, do not forget to constantly apply to the ball and try on the continental lines. Only after careful fitting should you glue the fishing line with beads to the ball. It is worth noting that it is necessary to give each row time to dry so that the rows do not move and the work does not deteriorate.
- Braid the entire northern hemisphere, then the southern.
- Braid the stand with golden beads, just leave a small gap unbraided for the future hole.
- Prepare a piece of thick but flexible semi-circular wire and tap the end with a hammer to flatten it.
- Drill a hole in the base and glue the flattened end in, then leave to dry.
- Paint the inside of the box pink and wait until dry.
- Mix acrylic varnish with glitter, cover the globe and leave to dry.
- Weave a square rope of golden beads the length of the wire tail, cover the wire with it, and cut off the excess end of the wire.
- Glue the golden bead so that the end of the wire is not visible.
The globe-shaped box is ready! I recommend watching this video!
3D PEN DRAW A GLOBE WITH YOUR OWN HANDS | HACKS FOR HANDMADE 3D SIMO MINI
Car tires
Also an excellent material for decorating a garden plot. The easiest way is to create round flower beds from them, filling the center with soil. Or you can beautifully paint them in all the colors of the rainbow, lay them out with a path or ladder, or make hanging vertical or horizontal flower beds.
Tire halves look good as borders near paths or playgrounds.
And the playground itself can be made using such items. It can be:
- sandboxes;
- bungees;
- obstacle courses;
- swings and rocking chairs;
- funny animal figures.
An unusual idea would be to create a small pond from a large tire and thick polyethylene. And it will be decorated with large stones or pebbles, decorative or herbs, and wooden bridges.
Photos of similar crafts will help you choose the simplest or funniest creation and start decorating your dacha.
Types of cards
There are different types of maps and globes.
The physical map contains a schematic image corresponding to the relief features of the planet. The waters of the world's oceans are shown using blue or cyan colors. Plains that are approximately at water level are indicated in green. Deserts and the surface of the earth above sea level correspond to a yellow tint. The mainland of Antarctica, glaciers and large islands at the poles, such as Greenland, are marked in white. And the mountain ranges are brown. The peculiarities of a physical map are that the shades help determine the nature of the relief of a particular area. Another common type is the political map. It can be used to determine the location and boundaries of various states. If the goal was to create a model of a globe with a political map, more shades of plasticine will be needed. In addition, this work is more painstaking, since it requires precision and accuracy when drawing images of different countries.
How to prepare tinder fungi for the winter
To prepare dishes from tinder fungus in winter, you need to preserve it in advance. To do this, place hot pickled mushrooms in jars and add 70% vinegar (1 tablespoon per liter). After this, the product is hermetically sealed with a metal lid.
Advice! If possible, pickled tinder fungi can be frozen in small containers.
You can also pickle mushrooms. To do this, they are first boiled and placed in a jar, alternating layers with bay leaves, garlic and pepper. The filled jars are tightly closed and stored in a dark place.
Drying tinder fungi is very easy. They are cut into small pieces, strung on a strong thread so that they do not touch each other, and hung to dry in the open air.
Unusual flower beds
A flower bed is always an excellent decoration of the territory. An unusual flower garden is doubly interesting. You can experiment not only with plants, but also with the look and shape of the flower bed. Multi-tiered, vertical variations always attract the most attention.
You can make a flower garden in an old chest of drawers, cart or bag. There are many ideas using water pipes and plastic containers. Interesting, unusual ideas always attract the eye.
Wire fence
If you decide to make a beautiful fence for the craft, then use wire. You can take the material without a shell, as in the photo below, or with a plastic wrap around the metal. The fence can be woven in a variety of ways. This includes a regular chain-link mesh, woven with diamonds or squares, and weaving with a beautiful pattern.
In our sample, the wire is cut into equal lengths and bent in half with an arc. They are assembled into a single structure by superimposing one part on another in two rows. The first level is assembled from arcs lying side by side, and on the other level they are laid in a checkerboard pattern. The new arc is located starting from the middle of the previous one.
All elements of the structure are connected together with a wire twisted from two segments. It is convenient to do this with pliers so that the turns are located close to each other. When the fence is ready, it is simply pressed into place in the chosen place. This craft is suitable for a foam base or mounting in a plaster base.
How to cook tinder
Before you start cooking the tinder fungus, it needs initial heat treatment for 40-45 minutes. After this, you can begin the cooking process:
- Cooking. The most important manipulation before further actions. Boil the mushrooms in lightly salted water for about an hour, after which the liquid is drained.
- Frying. Boiled tinder fungi are fried in sunflower oil for 10 minutes. If necessary, add sauce or spices, and it all simmers under the lid for another 10-15 minutes.
These are the main preparation steps - the remaining steps will depend on the chosen recipe.
Doll house
A doll house is every girl's dream. You can buy a ready-made house and make your child happy. But, believe me, the cardboard house craft that you make together will give you unforgettable moments of family happiness. You can use either individual sheets of corrugated cardboard or a ready-made box.
Depending on the size of your child's favorite doll and the size of the box, the house can be two or three stories high, with two, four or six rooms.
Recipes for preparing tinder mushrooms
To consume freshly picked mushrooms, you can use basic cooking recipes. You can prepare first and second courses from them. However, it is worth remembering that when cooking a mushroom, a not very pleasant smell may be released.
Cutlets made from tinder fungus
This option will require the following ingredients:
- fresh mushrooms – 1.5 kg;
- three cloves of garlic;
- white bread – 200 g;
- salt, spices - to taste;
- one chicken egg;
- flour – 200 g.
You can add cheese or meat to the minced meat, and use breading instead of flour.
The cooking process looks like this:
- The mushrooms are cleaned and soaked in warm water for 3 hours.
- The product must be cooked for 20 minutes, then drain the boiling water, rinse with cold water and allow to cool.
- The mushrooms are minced in a meat grinder in several passes. For the remaining ingredients, once is enough.
- Add salt, pepper, egg to the resulting minced meat and mix.
- Form cutlets, roll in flour and fry over low heat until cooked.