Crafts from saw cuts
The wood looks beautiful when cut. The simplest decor from saw cuts is an owl. The parts are connected with nails or glue.
Owl eyes are easy to make from bottle caps.
Original flower pots are made from saw cuts glued together in the shape of a vase.
Tall flower pots made from saw cuts are placed on the lawn
Another good option is a bookcase. Holes are drilled in the center of each cut with a drill, then they are put on a wooden pin. To prevent the shelves from sliding, a screw is screwed under each one.
Pots of flowers are placed on shelves made from saw cuts.
A cute decoration for the door is a wreath. Wooden circles are glued to a plywood ring.
Wreaths made from different tree species look beautiful
If you cover the saw cuts with wood impregnation, they will not be afraid of bad weather
The snowman's mouth and buttons are made of leatherette, his eyes are made of spinach seeds
Gallery: using saw cuts at the dacha
Benches made from saw cuts are placed somewhere in the shade or near the porch. A rough chair made from saw cuts is a reliable thing. A thick cut of an old tree is suitable for creating a table top. Tables made from saw cuts are an ideal solution for a veranda or gazebo. Any flowers look great in flower pots made from saw cuts. An interesting solution is to decorate the outside or internal walls of the house with saw cuts When cutting out the plywood outline for the Christmas tree, leave a spike at the bottom for attaching to the stand Beautiful decor for a country door - a decorative heart from saw cuts To get a candlestick, drill in the middle of the cut and gouge it out with a chisel Sand the beautiful saw cuts and use them as stands for plates Saw cuts - suitable material for New Year's decorations
Master class on decorating a wall with saw cuts - video
Device for cracking nuts
There are different methods for cracking nuts:
- jam in the door;
- split with a knife;
- break with a hammer.
To preserve the nut kernel using these methods, you need to make a lot of effort.
the Creates DIY YouTube channel, this kitchen accessory made from wood simplifies the process of cracking nuts and keeps the nut kernel intact.
This device is assembled from sawn boards without nails or screws, and the parts are fastened with glue.
Cutting boards for homemade products
First of all, 8 rectangles are marked on the board for the future device.
Board with markings
8 blanks are cut out according to the marks and laid out into an octagon. Each piece is marked on top.
Marking on octagon elements
The sides of all elements of the octagon are cut at 22.5 degrees.
After processing the elements of the device with sandpaper, they are connected with Moment glue into an octagon.
Gluing octagon elements
To make the octagon look more aesthetically pleasing, the thickness of the elements in the glued structure is reduced and then sanded.
View of the octagon after processing
The prepared octagon is placed on scraps of plywood, marked with a pencil and the bottom is cut out for the future structure. Using Moment glue, glue the bottom to the octagon.
Gluing the bottom to the octagon
A wooden partition is glued inside the octagon.
Pasting the partition
Two power elements are made separately from wood: a base with a rectangular hole and a handle that fits freely into the hole in the base.
Additional design elements
The manufacture of the device for cracking nuts is completed by gluing the power elements.
Type of device for cracking nuts
The nut is crushed due to the pressure exerted on it by the handle of the power element. There are two compartments inside the device. In one compartment they collect nut shells, and in the other compartment there are nuts that need to be cracked.
Using a nut cracker
Video about making a device for cracking nuts from scrap boards:
How to do it?
Once the material has been selected, a drawing and all the necessary tools have been prepared, you can begin assembly . When drawing up the drawing of the table, all its constituent elements, as well as fastenings, were highlighted. First of all, all the necessary elements are cut out and turned in accordance with the dimensions indicated in the drawings. Then, after checking and measuring after production, you can proceed to assembling the parts.
Important .
Tools may cause damage. Follow safety precautions. The assembly procedure is quite simple; general steps can be identified regardless of what model of table you plan to assemble.
The assembly steps are as follows: 1. Assembling the legs . The table legs, cut according to the drawing, are fastened with beams using self-tapping screws or nails. For greater reliability, the fastening points should be treated with glue and then tightened with self-tapping screws.
2. The tabletop . To do this, strips are marked on the tabletop that fasten the legs, then using self-tapping screws, nails, screws or fasteners, the tabletop is attached to the structure of the legs.
3. Installation of horizontal screed . Many table models require a tie between the table legs to prevent them from moving apart.
Swing
Crafts made from boards with your own hands can be very simple to make, but at the same time bring great benefits. One such option is a swing. In this case, a simple model is proposed that is easy to make yourself. It can be attached to any tree or special supports. If there is a small child in the house, then you should hang hooks above the doorway.
Before you begin the work process, you need to stock up on the following materials and tools:
- 2 boards 15*30 cm;
- 2 boards 3*20 cm;
- electric jigsaw;
- screwdriver;
- 4 screws;
- 2 ropes.
The creation algorithm is the following sequence of actions:
- On each of the 15*30 cm boards, make 2 drinks. One is in the center of the short edge, the second is closer to the edge on the long side.
- Make the seat by joining the material from the previous step. Secure the result using 3*20 cm boards, screwing them with self-tapping screws.
- Pull the ropes through the grooves.
Rack
DIY crafts made from boards can bring real benefits. For example, most families are faced with the problem of a lack of storage space for various household items.
You can solve the problem and at the same time engage your child in a useful activity if you make a shelving unit yourself. At the same time, it can easily fit into any interior by first choosing the right paint color.
Before you start work, you should prepare the following tools and materials:
- 6 wooden blocks 5*5*160 cm;
- 4 boards 25*60 cm;
- 8 wooden blocks 3*3*25 cm;
- self-tapping screws;
- screwdriver;
- dye.
Prepare the boards Cut the boards into posts Assemble the side supports
The rack can be assembled in a vertical position
The rack of boards is ready.
To make a rack, you need to follow the instructions:
- Make 4 marks on all long bars. The distance between them should be 40 cm.
- Take 3 bars. Place them on a flat surface, maintaining an interval of 5 cm between them. Connect the structure with small bars. Fixation should be carried out according to the marks.
- Repeat the previous step with the remaining wood blocks.
- Connect the 2 sides of the rack by placing boards on top of the small pieces. Securely secure the result using a screwdriver and self-tapping screws.
- Paint the product, paying special attention to small details and corners.
Hanger
Any boy over 10 years of age can make this product. The process must be supervised by an adult. Making a hanger is quite simple, and it will not only decorate the hallway for a long time, but also be useful.
To create a fake you need to prepare:
- 3 boards 10*70 cm;
- 2 boards 15*40 cm;
- 2 metal corners;
- 3 hooks;
- screwdriver;
- self-tapping screws;
- paint or varnish.
DIY crafts from boards: an example of a simple hanger made from three boards
Drawing of a hanger made of boards
The algorithm for making a hanger is the following sequence of actions:
- Carefully paint or varnish the boards on all sides.
- Take 3 boards, lay them out on a flat surface so that there is a gap of 5 cm between them. Place one of the boards measuring 15*40 cm on top of them. Use a screwdriver and self-tapping screws to secure the structure.
- Screw metal corners onto the sides of the horizontal board. Attach a free board to them.
- Screw 3 hooks under the top of the hanger with a screwdriver.
Willow weaving
Coastal thickets near the site - Klondike. There they obtain willow branches for crafts. The fences are made according to a simple scheme: pegs are hammered in, then rods with the bark removed are passed between them.
Willow, hazel, and aspen have the best branches for weaving
Nice decor - wicker baskets in which flowers are planted.
Baskets in flower beds give the area a rustic feel
You can knit the frame of any animal from strong branches, and then braid it with vines.
Unusual wicker decor - sea turtle
But the most interesting creation is the living tree. Chopped willow twigs are intertwined and rooted. All buds on the trunk are blinding, except for the top ones.
Rooted willow branches grow into a new tree resembling a palm tree
Gallery: vine products in the garden
For a special occasion, an arch made of wicker is installed. A hut on chicken legs is not only a decoration, but also a feeder for birds. Box beds are ideal for growing greenery. Any flower bed fenced with a fence changes its appearance. Armchairs made of wicker will transform a relaxation area. Canopies and openwork are woven from wicker backs for benches Modern garden decor - balls made of wicker Having achieved mastery in weaving, you can create the figure of a girl Children will like playful piglets made of wicker A hare made of wicker enchants at first sight
How to make a living tree from a vine - video
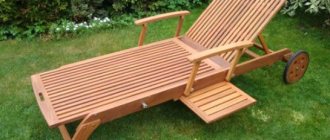
Where would a wooden table fit?
Of course, a table made of boards will look good not only in the garden. Also, a massive wooden table will come in handy in almost every room of the house. So if you are wondering how to make a dining table, the above instructions will also be useful, although the creation principle will be slightly different.
This type of furniture also looks great in the kitchen. A kitchen table made of boards will be a great place for eating and long conversations over a cup of hot coffee.
How about a wooden workbench? Great idea! If you want to make a table for the garage, it is better to use hard wood, such as oak. Pine is useful for garden and home furniture.
Table
A great idea for crafts made from boards is a coffee table. It will decorate any room and can be useful. For example, such furniture is convenient for gatherings with friends. The table can also act as additional storage space. As a result, the product itself looks very aesthetically pleasing, so it will easily fit into any interior.
Drawing of a classic coffee table Fastening the frame with screws Frame of a coffee table
In order to complete it, you need to stock up on the following set of tools and materials:
- 4 wooden blocks 5*5*60 cm;
- 1 wooden block 5*5*60 cm;
- 2 boards 10*100 cm;
- 2 boards 10*60 cm;
- 4 boards 15*100 cm;
- 4 wide metal corners;
- self-tapping screws;
- screwdriver;
- varnish
The algorithm for creating a table consists of the following sequence of steps:
- Make a rectangular structure. To do this, you need to take boards with dimensions of 10*100 cm and 10*60 cm. Connect them using metal corners.
- Attach 4 wooden blocks vertically to the inside of the resulting rectangle. This should create a table base with legs.
- Using a screwdriver and self-tapping screws, install the remaining wooden block perpendicular to the 10*100 cm boards.
- Make the tabletop. To do this, you need to secure 15*100 cm boards on top of the base of the table. During work, you need to make sure that the material fits tightly together.
- Cover the table with varnish. If desired, you can replace the varnish with paint of a color that matches the interior.
Shoe organizer
Often, a large number of shoes accumulate on the floor in the hallway. This situation really spoils the entire Internet. You can solve this problem by making an organizer out of ordinary boards.
In order to make a shoe rack, you need to use the following materials and tools:
- 6 boards 15*90 cm;
- 4 boards 5*45 cm;
- 8 boards 15*50 cm;
- 8 metal corners:
- hammer;
- nails;
- paint or varnish.
After everything is prepared, you can start working.
The process is the following algorithm of actions:
- Take 8 identical boards and arrange them in pairs. Attach them perpendicular to each other, additionally interlocking them with metal corners.
- Set the corners vertically. Make a mark on each of them located in the middle.
- Connect together 3 boards 15*90 cm. To do this, you need to nail a 5*45 board on each edge. Install this structure at the level of the marks of the wooden corners.
- Nail 2 5*45 cm boards on the sides of the top of the future organizer. Secure the remaining boards to them.
- Spread plastic wrap and place a shoe rack on it. Cover the product with varnish or paint.
Types and advantages of material
It perfectly smoothed out all the shortcomings of its predecessors and retained the best characteristics, including its attractive appearance:
- Anyone can handle the installation of lining, and the price has become much more affordable.
- This material has become widespread due to its excellent characteristics.
Note. The name “lining” comes from the fact that this type of lumber was originally used to close the gaps between the boards of freight cars.
Now this type of material is so widely used that there are already several basic types of lining:
- Regular or eurolining.
- Block house.
- American.
And in order to start making anything from lining with your own hands, you need to know the main characteristics of each of these types.
Characteristic
Ordinary lining is popularly called classical.
So:
- This is a long, narrow, flat board that has a groove on one side and a tongue on the other.
- It's pretty high quality.
- On the inside it is equipped with special grooves for ventilation. The width of one board is from 100 mm, the length is from 2 meters.
- The profile thickness is usually 12 mm.
In the photo you can see crafts made from the remains of classic lining:
Benches and stools, made simply but tastefully Small flower bed Beautiful coffee table Coffee table clapboard glass Kitchen furniture Interior or entrance doors
When laid, the house block imitates round logs:
- In fact, only one side is semicircular.
- The thickness is usually 36 mm, and the length is from two to six meters.
- But the width completely depends on the width and varies from 90 to 190 mm.
- This lining is made from coniferous wood.
An interesting option: a decorative well from the remains of a block house A beautiful shelf for flowers A decorative bench for a summer house A shower cabin Decoration with material Internal design using material
The last type, American, resembles a wooden beam:
- As the name suggests, this type came to Russia from America.
- The profile is made in the form of a rectangular trapezoid.
- One part is thick, the second is narrow.
- The thick one is from 22 to 40 mm, the narrow one is from 14 to 28 mm. It is mainly used for external laying of facades.
- It must be laid strictly from bottom to top horizontally. The wide part is installed overlapping, while the narrow part is on top.
Note. But in some types and styles of interior, American is also used. However, you need to know when and where it will be best to install it indoors.
Original flower stand
As described in the article on the website “ Hooks of Hands ,” one long board is used to make a piece of furniture that will be useful in any room where there are flowers. This design will complement any interior.
Stand board
The size of the legs is determined by the height of the stand. For good stability, legs in the form of triangles are not made in large sizes.
The selected planed board is sawn into 4 triangles for the legs and 2 rectangles for the base and table top.
Legs for stand
The blanks for the legs are sanded and then glued in pairs with Moment glue. For strength, the connection is reinforced with self-tapping screws.
Glued stand legs
Two structures of legs are connected into a single whole with glue and reinforced with self-tapping screws. The base and tabletop are also glued and then strengthened.
Reinforced stand base
The places under the screws are puttied, and then the assembled stand is sanded and covered with stain.
Flower stand
This design is used not only as a flower stand, but also as a small convenient coffee table.
Bed made of boards
This piece of furniture is also very easy to make yourself. There is an option to assemble a double bed measuring 200 x 160 cm.
Table. What will you need for the job?
| Materials, tools, fasteners | Photo |
| Boards and furniture board | |
| Self-tapping screws of different sizes | Self-tapping screws |
| Bolts 6 x 80 mm (with washer and nut) – 30 pcs. | Bolts |
| Metal corners: 40 x 40 x 80 mm – 4 pcs., 30 x 30 x 30 mm – 4 pcs., 70 x 70 mm – 8 pcs. | Metal corner |
| Alkyd-urethane varnish, liquid nails | Yacht varnish |
| Jigsaw, screwdriver, sander | Required Tools |
Prices for angle grinders (grinders)
Angle grinders (grinders)
Step-by-step production instructions
Step 1. Components are cut according to size:
- legs;
Legs for a future bed
- sidewalls;
Sidewalls
- slats for supporting the sheathing, lintels, strips for sheathing.
All parts must be treated with protective impregnation.
Step 2. Using bolts, the legs are connected to the sides.
The legs are connected to the sides
Step 3. Metal corners are screwed to the legs.
Screwed metal corner
Step 4. The slats on which the sheathing will rest are mounted to the sidewalls. In this case, in addition to hardware, it is recommended to use an adhesive connection (you can use liquid nails). This will increase strength and minimize the risk of squeaking in the future.
Laths for sheathing are fixed
Step 5. All four sides of the bed are assembled.
Bed assembly process
Step 6. The slats are screwed to the headboards of the bed. It is necessary to make cuts in them for jumpers.
The cuts for the jumpers are visible
Step 7. Jumpers are placed in the cuts and fixed.
Jumpers are fixed
Step 8. Corners are screwed to the jumpers for installing additional legs. Each bar should have two legs.
The jumpers are equipped with additional legs
Step 9. The sheathing is installed. Holes for self-tapping screws are pre-drilled in the planks. The size of the gap between the sheathing elements is determined individually. If the boards have not been sanded previously, they should be sanded after installation.
Lathing installed
Step 10. The structure is varnished. There are many types of varnishes. The material must be intended for indoor work. For these purposes, acrylic, epoxy, polyurethane or alkyd-urethane compounds are best suited.
Step 11. After this, all that remains is to choose a suitable mattress and the bed can be used for its intended purpose.
Externally, the assembled bed looks a little ascetic, but after placing the mattress, linen and a beautiful bedspread, it will look completely different . It is definitely suitable for a country house. If you use some carpentry skills, make the lines smoother and treat the surface with a decorative composition, such a piece of furniture can fit into the design of the apartment.
Wooden bed
Bed made from old boards
Stool
Another option for a wooden craft that is easy to do with your child. You can make several stools at once, add pillows to them, which you can also sew yourself, and get comfortable furniture.
Before work, you should prepare the following tools and materials:
- 2 boards 250*25 cm;
- Chipboard 25*30 cm;
- board 9*20 cm;
- edge for pasting;
- iron;
- screwdriver;
- 4 confirmations;
- hammer;
- knife;
- 5 chopiks;
- glue.
The work process is represented by the following algorithm of actions:
- Edge all materials for the stool. To do this, you need to get the iron as hot as possible and run it across the surface. Later you need to press the edge a little with a rag. Cut off all excess, turn the board or chipboard over and glue again on the other side.
- Screw the first leg to the crossbar, which will be a 9*20cm board. To do this, you should use 2 confirmations and a screwdriver. Repeat the same steps on the other side.
- Make 5 secret holes in the chipboard and in the base of the stool. Add a drop of glue inside and connect the seat with the legs.
Table 1. Sturdy and stable dining table for home
To make this table we will need tools such as a jigsaw, electric drill, screwdriver, and sander. You can, of course, do without some of the above “helpers” by using a screwdriver and a block with sandpaper attached to it - such a replacement will simply increase the time and effort spent on making the table.
The material for the manufacture of the tabletop is a tongue-and-groove board with a thickness of at least 30 mm. The tongue ensures a tight connection of the boards, increasing the service life of the table, since with this joining method the possibility of food debris getting into the gaps between the boards is practically eliminated.
To make the remaining elements of the table, take a regular 50 mm board.
- Boards, if they are not treated, must be thoroughly sanded - in addition to aesthetic considerations, this is required by basic safety and practicality: a sanded board is easier to paint, and much less paint is required for such a surface;
- Cut out the table parts:
- Grooved boards for tabletops, length 230 cm – 6 pcs.;
- Spacer board about 170 cm long;
- Bars for fastening the tabletop (their length should match the width of the tabletop, or be slightly shorter) - 4 pcs.;
- Bars for legs - 4 pcs., 2 pieces of board for their base.
Cover all parts with a layer of varnish and let them dry; Connect the tabletop boards tightly to each other (Fig. 1);
Attach 4 bars across the boards with self-tapping screws, placing them evenly along the entire length of the tabletop and retreating from its end by 20-30 cm (Fig. 2);
To improve the appearance of the product, file the ends of the fastening bars at an angle of 45 degrees, carefully cut off the tongues of the outer boards, and slightly round the corners of the tabletop using a jigsaw.
Using a template and a jigsaw, give the legs the same configuration, as shown in the figure below;
Reliable fastening of the legs is carried out in three stages: first, we attach the legs to the outer transverse bars connecting the boards of the tabletop; then we connect the legs with the spacer beam (Fig. 3). We finally secure the legs from above, through the tabletop;
We place the base boards on the lower parts of the legs and securely fasten them (Fig. 4); All that remains is to cover all parts of the table with another layer of varnish and let it dry thoroughly.
Feeder
DIY board crafts can be simpler than the options described above. The product will bring no less benefits, teach children to take care of animals and provide an opportunity to acquire new skills.
A bird feeder will help keep your child engaged not only while creating a craft, but also for a long time, it will be possible to regularly bring food and water for the birds.
Before you begin, you should stock up on the following set of tools and materials:
- 4 boards 10*25 cm;
- 4 boards 3*20 cm;
- 4 boards 5*20 cm;
- 4 boards 5*25 cm;
- 4 wooden blocks 2*2*20 cm;
- 8 narrow metal corners;
- screwdriver;
- self-tapping screws
To make a bird feeder, you must follow the instructions:
- Fasten 2 10*25 cm boards together. To do this, you need to use self-tapping screws and two 3*20 boards. This will create the bottom of the product.
- Make the sides. Fix 2 boards 5*25 cm along the length of the bottom, and 5*20 cm along the width. Additionally, fasten them to each other using metal corners.
- Make a roof for the feeder. To do this, you need to repeat the 2 previous steps.
- Connect the bottom of the product to the roof with wooden blocks.
Making furniture with your own hands is a useful hobby
Wanting to refresh the decoration of their home, add new, interesting accents to the interior, or simply make a necessary household item, many people think about making their own furniture. Comfortable and attractive designs can be made from various materials: metal, glass, plastic, wood and their combinations. Most often, the choice is made based on the style of the interior and one’s own preferences.
Materials for kitchen furniture
Main types of furniture materials
However, both before and now the most popular material for the manufacture of furniture is wood. It's easy to explain.
- The material is one of the most accessible.
- Timber and boards lend themselves perfectly to any type of processing; any structures can be made from them: from chairs and shelving to beds and walls.
Homemade rack with four shelves - Wood is durable and resistant to mechanical stress.
- Today many people are concerned about environmental issues. The use of new, technologically advanced materials often raises questions regarding their environmental impact. Wood is natural and environmentally friendly, it does not emit substances harmful to human health and nature and does not cause allergies.
Beds made of timber
- The tactile properties of materials are also important when in contact with objects. Wood products are very pleasant to the touch.
- Wood has a positive effect on the psycho-emotional state of a person.
Coffee table made from old boards - Wooden furniture goes well with almost all interior design styles.
- The tree is attractive to look at.
The variety of textures of different rocks allows you to choose interesting options from a design point of view. Wood species samples
The main disadvantage of wooden products is their susceptibility to deformation and destruction due to exposure to the external environment. But this problem can be overcome by a wide range of products containing antiseptics for wood processing.
Furniture from pallets in the country
Furniture can be made from various materials: solid wood, panel, MDF, plywood, chipboard, fiberboard. The most affordable and popular are solid edged or glued boards . You can purchase them specifically or use improvised means - material left over from the dismantling of structures, pallets, etc. When preparing the materials necessary for creating a structure, it is first necessary to take into account their moisture content. The boards must be dried. The moisture content of the wood from which the furniture is assembled cannot exceed 8%.
Scope of application of laminated furniture boards
To assemble interior items, you can use different types of wood, differing in texture, shade and characteristics. All of them are divided into 3 classes.
- Soft - most of the conifers, linden, alder.
- Hard - larch, ash, oak, beech.
- Very hard - yew, boxwood, acacia. These types of wood are rarely used in the independent production of interior items.
Wood species
When choosing a material, it is necessary to take into account that soft wood is easier to process, but it is less resistant to wear. And furniture, for example, made of oak will last a long time. However, it is also significantly more expensive.
Soft wood is easier to work with
What do you need to make your own furniture?
- Wish.
- Free time.
- Confidence in your abilities, minimal skills in working with wood.
- Product drawing, set of necessary tools, materials and accessories.
- Availability of space for work. Ideally, this should be a workshop that can be equipped in a country house or, for example, in a garage.
A specially equipped workplace will be required
Making furniture can take more than one month, but the result will definitely live up to expectations. You can make furniture for your apartment, country house, gazebo, garden, etc. with your own hands.
Bath products can be quite simple
Prices for construction boards
Construction boards
Kitchenware
There are a large number of crafts that can be made for the kitchen. The most functional of them is the kitchen board.
To create it you will need the following tools and materials:
- board;
- sandpaper;
- electric jigsaw;
- pencil;
- burner.
Next, you need to perform the following algorithm of actions:
- Use an electric jigsaw to give the board the required size. Carefully sand all edges with sandpaper.
- Use a pencil to mark the future drawing. If necessary, you can use a stencil.
- Use a burner to process the drawing.
A stand for various small items will look unusual in the kitchen interior. Such a product will add a touch of eco-style or emphasize it.
Before you start work, you need to prepare a set of tools and materials:
- many small boards that should be approximately the same size;
- bottle;
- hot gun;
- twine;
- lighter;
- big button.
The process of creating an eco-style stand is a sequence of actions:
- Place the bottle on a flat surface. Vertically press small boards against it, treating them together with glue using a hot gun. The result should be a glass made from boards. Dry.
- Wrap the stand with twine. For better adhesion, you can add a small amount of glue. Treat the ends of the rope with a lighter.
- Glue the button to the twine.
In any kitchen there are many tools that need to be hung. To solve this problem, you can make a special organizer.
To do this, you need to prepare the following set of materials and tools:
- board 5*25 cm;
- metal hooks;
- dye;
- pencil;
- brush;
- self-tapping screws;
- screwdriver
The work process can be represented as the following algorithm of actions:
- Paint the board. Dry.
- Make markings with a pencil.
- Screw on the metal hooks with self-tapping screws.
Boards of any size are a universal environmental material. You can use them to make many useful things, from small organizers to furniture. Children should definitely be involved in the process so that from a very early age they learn how to make various fakes with their own hands.
Article design: Natalie Podolskaya
Crafts made from bark and cones
Even fragile wood will serve the cause of beauty. Small crafts are usually made from the bark.
Birds will happily visit your feeder if you make it out of bark.
A birdhouse made of plywood will be transformed if you cover it with bark.
Birdhouses made from natural materials will attract birds to the garden
In order for a hedgehog to appear in the garden, you need to glue the pine cones to a plastic bottle wrapped with twine.
For naturalness, berries and acorns are attached to the hedgehog’s back.
Gallery: pine cones and bark at the dacha
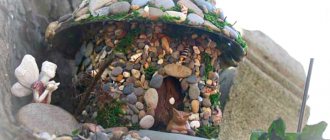
Cement pots are decorated with cones, pressing them into the solution. If you paste the box with cones and attach a handle from a branch, you will get a decorative basket. The basket is made by stringing cones onto a wire frame. To make a Christmas tree for the street, glue the cones onto a cone made of waterproof material. If you need closed cones for a wreath. , hold them for 30 seconds in wood glue To make the cones open, dry them in the oven Any corner of the garden will be decorated with a watchful owl made from bark Compositions with cones will decorate the interior of a gazebo or house Unique birdhouses are created from pieces of bark and scales of cones Ordinary plastic flowerpots can be pasted over with pieces of bark To make a basket made of bark, attach it with a stapler to a wire frame. Set up a hobbit house made of bark, branches and moss in a secluded corner with your children
Book shelf
Very functional and practical use of boards. After all, every home needs a hanging shelf to store books.
Materials and tools needed during the work process:
- 2 boards 10*50 cm;
- 4 boards 15* 70 cm;
- dye;
- brush;
- 4 metal corners;
- screwdriver;
- self-tapping screws
The process of creating a book shelf is the following algorithm:
- Paint all the material and let dry.
- Place 10*50 cm boards parallel to each other. Connect them at the top and bottom with two 15*70 cm boards.
- Attach metal corners. Install shelves on them and connect them with self-tapping screws.
We design garden paths
A garden path paved with wood will look atmospheric. Nowadays, most people try to pave paths or line them with fiberglass, but wood always remains the material that looks good on any site.
The popular bookmaker has released a mobile application for Android, you can follow the link absolutely free.
To implement the design idea, you will need the remains of timber and branches left over after cleaning the garden. Wood of any diameter is suitable, the main thing is to ensure that it is intact and not damaged by pests, mold and rot.
Stages of work:
- You need to cut the tree to the same length. The diameter does not matter, because this is a decorative decoration that includes the author's idea.
- Treat finished parts with a special agent that prevents rotting.
- Dig a trench where there are already markings for the future path.
- Pour a layer of sand into the bottom of the hole and compact it thoroughly. Install saw cuts.
- Fill the gaps with wooden blanks.
After the pieces of timber are laid out along the path, you need to fill the remaining space with sand. This creation looks very original, you won’t have to spend extra money, and you can use the path for several years.
Finishing
After the product is assembled, it must be processed. Treatment is necessary so that the product is resistant to the external environment and lasts many times longer than without treatment.
Processing a product means sanding it and then opening it with varnish . Most often, sanding and varnishing are done several times for greater reliability.
We invite you to admire the possible results of the work:
What else to remember
A garden table made of boards should be made of dry wood. If you are not sure that the wood is 100% dry, it should be left in a warm and dry place. If wet wood is used, the garden plank table, instead of lasting for many years, will crack and become unsightly after the first season.
It is worth remembering the golden rule - it is better to make the table slowly than incorrectly. At home, haste is a bad help. You need to be careful with the wood, work slowly and approach the process head-on, then everything will be fine.
Having made the wooden table of your dreams, it is advisable to place it indoors. Wood, even if it is impregnated, feels best in dry places that are not exposed to prolonged rain and moisture.