Features of the material
It is very easy to work with gypsum: just mix it with water, pour it into a prepared mold, or sculpt crafts from plaster with your own hands. But we must take into account that the plaster sets quickly, so add as much solution as can be used within a few minutes.
Gypsum, thanks to the fine powder fraction, is able to accurately reproduce all the details of the form. Easy to process. The dry model is pliable to the cutter and chisels. Large sculptures, decors of columns and portals are cast from it, but it is also quite suitable for small products. Crafts made from plaster for home and garden, toys, panels, souvenirs, decorations - there is room for applying creative energy.
To decorate gypsum products, any paints are used; you just need to know the nuances of preparing the surface for this type of painting. With certain skills, you can even disguise the model as a completely different material.
Gypsum is environmentally friendly, relatively cheap and accessible to everyone.
Original ideas for a homemade piggy bank
The easiest way is to make a homemade piggy bank from a jar or box: all you need is to make a slot and decorate the product beautifully. To create an original piggy bank, you need to use your imagination.
Modern craftswomen offer a selection of the following ideas for independent creativity:
- From Lego. Take a construction kit and make a box or product of the required shape from it. Leave a hole at the top for coins. To extract money, you just need to disassemble the constructor. Even banknotes can fit here.
- Made of wood. This material lends itself well to processing, so the creative process will bring pleasure. You can actually make the most unusual shapes of piggy banks from wood.
- From salt dough. The material is considered one of the easiest to work with - it can be sculpted into any shape and then painted with acrylic pigment.
- From wine corks. Using hot glue, all the plugs are glued into one structure, forming a box. You can make a hole on top for paper money and for coins separately.
Ordinary and polymer clay have shown themselves to be good for modeling: it is convenient to make a wide variety of products from this raw material. Don’t forget to bake the finished piggy bank in the oven and then decorate it.
Flaws
However, with all its advantages, gypsum has a number of disadvantages:
- You need to work very quickly with the prepared solution. Depending on the type of plaster, it hardens in 7 to 30 minutes.
- Repeated stirring, the so-called “remelting”, is impossible.
- Special conditions are required to work with plaster because the process is wet and dusty.
- It is inconvenient to work with gloves, and without them the skin dries out very much.
- Gypsum crafts absorb water well, so they must be varnished. And even a protective coating does not always save you outdoors.
- The products, although rigid, break easily and do not withstand mechanical stress well.
DIY piggy bank
- How to make a piggy bank yourself?
- How to make a piggy bank out of paper?
- DIY piggy bank for paper money
- DIY piggy bank from
- DIY dog piggy bank
How to make a piggy bank yourself?
How to make a piggy bank yourself without investing a lot of money in the product? In this article you will find the most interesting and useful tips that will help you make an accessory at home.
The storage container can even be electronic or with a secret - it all depends on your imagination.
Handmade items are highly valued. Therefore, you can safely give a beautiful and unusual homemade piggy bank as a gift for a wedding or birthday.
What can a money organizer be made of? Surely every home has the following materials:
- shoe box;
- tin or cardboard jars;
- jars, bottles made of glass or plastic;
- unnecessary toys.
Where to buy plaster for crafts
The easiest way to buy plaster is at a hardware store. In order not to get confused in the variety of its types, you need to be able to read the labeling.
The numbers after the letter “G” indicate compressive and fracture strength and purpose:
- G2...7 – building gypsum (alabaster).
- G13…16 – high-strength molding
- G22…25 – super durable medical
G6...16 is best suited for crafts. Next are the letters indicating the setting time:
- A – quick-hardening, 2 – 15 min.
- B – normal hardening, 6 – 30 min.
- B - slow-hardening, 20 minutes - several hours or days.
Next is the grinding fineness in Arabic or Roman numerals:
- 1 – rough
- 2 – average
- 3 – thin
For example, G-7 A1: gypsum, withstands 70 kgf/cm2, sets quickly, has large particles.
From cardboard
A piggy bank made of cardboard and laces looks original and is suitable for a gift. It is made in a few hours. To create it you will need:
- scissors;
- cardboard;
- lace
- stationery knife;
- rubber;
- nail;
- ruler.
Step-by-step instruction:
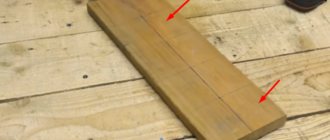
- A square with a side of 7.0 cm is cut out of cardboard.
2. Holes for the cord are made using a nail
3. Use a utility knife to cut out a hole for coins.
4. The workpiece is fastened with laces.
Piggy bank for paper money from a cardboard box
The simplest solution for creating such a money storage facility would be a simple shoe box. It is spacious and can have a large cutout for money.
For production you will need materials:
- shoe box;
- newspapers and magazines;
- glue;
- scotch;
- knife.
The step-by-step instructions are as follows.
- The lid is glued to the box so that money cannot be taken out before the scheduled time.
- The box is covered with newspapers and colorful magazine clippings. The more randomly they are placed, the better.
- A rectangular slot is made in the lid for bills. A stationery knife is used for this.
- All sides of the craft are covered with tape.
Small piggy bank with sticker
There are always small boxes in the house from which you can make a piggy bank. One of the options for decorating the product is an image of a pig.
The following materials and tools are needed to make such a piggy bank:
- small cardboard box;
- paper;
- glue;
- scissors;
- marker.
Step-by-step instructions consist of the following points.
- The entire box is covered with pink paper.
- A circle is cut out of paper for the muzzle, two triangles for the ears, and a small circle for the snout. Circles for the nostrils and eyes are cut out from black and white paper.
- The piglet's face is glued together.
- A smile is drawn with a marker.
- For the legs of the pig, 4 rectangles are cut out.
- The muzzle is glued to one side of the box. Legs are attached to the back and front of the product.
- A perky tail is placed at the back of the craft.
How to dilute plaster for crafts
Depending on the task, the solution can be of different thicknesses:
- Liquid – 1 kg of gypsum per 0.7 liters of water.
- Normal - 1.5 kg per 1 liter of water.
- Thick – 2 kg per 1 liter of water.
To prepare the solution, you need to take a suitable container. Fill with water first - this will reduce dust. Then slowly add the powder, stirring constantly. It is convenient to mix large quantities with a drill and whisk. There should be no lumps in the solution.
How to make a piggy bank at home
So, you decided to make a piggy bank with your own hands. In order for the result to please you, the work on creating a piggy bank must be clearly structured and planned. Follow the following work plan:
- The first thing you need to do is decide on the style of your future piggy bank. If the piggy bank will be a gift for someone, then take into account the age of this person, his field of activity, his interests and hobbies. Think about what technique the piggy bank will be made in. At this stage, it is advisable to make a small sketch on paper, a sketch;
- If you have decided on the style of the piggy bank, then you need to start selecting the materials and necessary tools. Find and prepare in advance what will serve as the basis of the piggy bank. If you use a plastic bottle, clean it thoroughly and degrease the surfaces. Prepare all the materials for decorating the piggy bank. You should also have scissors, a hammer, a stapler, a hole punch on hand - all the tools that you will need;
- The last stage is the process of making a money box itself. For convenience, you can use various instructions or video tutorials for creating a piggy bank that you can find on the Internet.
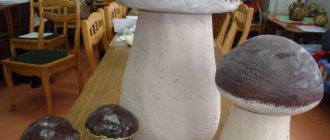
Master class on plaster crafts
If you have no experience working with plaster, then it is better to start simple. For example, for a personal plot, cast an entire family of mushrooms. To do this you will need the following materials and devices:
- Gypsum
- Plastic bottles
- Plate
- Food film
- Acrylic paints
- Varnish
Making a mushroom stem:
- The bottom is cut off from a plastic bottle (perfect for milk). Place the bottle on the table with the lid down.
- First pour in a small portion of a solution of medium consistency.
- To facilitate the construction, foam or cardboard is inserted into the center of the bottle.
- Add plaster.
- After about an hour, when the solution is already solid and very warm, the plastic is cut and carefully torn off along the bias.
Now the hat:
- Take a plate that looks as much like a hemisphere as possible.
- The bottom is covered with cling film
- Pour in the solution.
- As soon as the plaster begins to set, insert the stem of the mushroom into the center of the plate to form a monolith.
- After drying, the product is removed and the film is removed.
Until the model is completely dry, it is very easy and convenient to remove sagging and burrs with a stationery knife or just with your hands. Small defects can be covered with plaster or putty. The dry product sands beautifully.
After a day, having made sure that the mushroom looks good enough, is white in color and rings when you click on it, you can start decorating. First you need to prime it. Construction primers or simply diluted PVA are suitable for this.
It is better to paint in 2-3 layers, because gypsum is very porous, and the paint will still dry out. The finished model is coated with varnish for exterior use.
By selecting bottles and plates of different sizes, you can cast different types of mushrooms.
How to make a piggy bank with your own hands
Making a piggy bank with your own hands at home is not at all difficult. You can create it in different ways using various available materials. Let's talk about this in more detail later.
Interesting! Modeling figures from plasticine
Plaster piggy bank
If you have a desire to make a fairly strong piggy bank, then we bring to your attention instructions for making a plaster piggy bank in which you can store your coins.
So, let's start making a piggy bank.
•First we need to make a solution of plaster and water. They should be taken in proportions 1:1.
•Next, you should pour the resulting solution into an unnecessary plastic bottle, and put a balloon on its neck.
•Now we need to pour the solution into the balloon. It is important to hold the ball firmly on the neck of the bottle so that it does not slip off.
•Then we carefully rinse the neck of the balloon with water and inflate it. But there is no need to make it very large, otherwise it may burst.
•Next, tie the ball and carefully begin to twist it in your hands so that the solution spreads over all its inner walls.
•After some time, lower the ball into a container of water and continue to rotate it.
•When the gypsum solution inside becomes hard, you can get rid of the balloon.
Since we are making not just a piggy bank from plaster, but a cute pig, he will need to have legs made and then decorated.
We will also make the legs from plaster. But to make them we need plasticine. Next we do this:
•To begin with, we make molds for our pig out of plasticine and attach them to the figure. By the way, the bulge on the plaster mold is a patch, so you can fix the molds based on this.
•Then we make a new solution (it will take a little) and carefully pour it into the molds.
•Wait until the legs are completely dry, and then carefully remove the plasticine.
•Now we will need to make a slot for coins on the back side of the future pig. To do this you will have to use a drill and a small thin drill. Drill an oblong hole.
•After hardening, the plaster may not be very smooth. To correct the situation, use fine-grit sandpaper and work on the surface from all sides.
• Let's move on to decorating our craft. Since we are making a piggy bank, it is better to choose a soft pink shade of paint. We paint the plaster figurine and wait for the paint to dry completely.
•The only thing left to do is to draw a cute face for our piglet.
That's all, the plaster piggy bank is ready!
Beautiful piggy bank made of plastic
Now let's look at a way to create a piggy bank with your own hands from a plastic bottle at home. It is also very easy to do.
•Take a sharp utility knife and cut the plastic container into three parts so that the middle one is the smallest.
•Connect the bottom and top of our plastic bottle;
•You can then paint the plastic the color you like. You can use regular paints and a brush, but this is not very convenient. If possible, it is better to use a can of spray paint. We cover the entire surface of the product, including the lid.
•Now it is important to wait until the paint is completely dry.
•Next, we again take a stationery knife and make a rectangular slot in the middle of the bottle - this is where we will drop the coins.
•It's time to revive our piggy bank. You can decorate it the way you want. Or turn, say, into the same pig. The eyes can be glued on purchased ones or made with your own hands from paper. Another option is to draw them. The ears can be made in the form of triangles made of corrugated paper. Draw two vertical stripes on the cork with a black marker to create a patch.
Interesting! Making an envelope from paper without glue
That's all. Children will definitely like this piggy bank, and they will be happy to store their coins there.
A simple container for storing money from a box
To create a piggy bank with your own hands from improvised materials, a cardboard box is perfect. Moreover, such a container can have any size and shape. For example, you can take a package of baby cereal, cookies, and so on.
Now let's look at the step-by-step instructions. Let's also make a pig as an example.
•First you need to prepare everything you need for work. We will need colored paper, scissors (preferably sharp), double-sided tape or glue, a black marker or felt-tip pen. And, of course, the box itself.
•We cover the box with colored paper on all sides. In our case, we use a soft pink color of paper, and you can use the color that you like as you work.
•Now let's move on to creating a face for our cardboard pig. Cut out a circle from paper (it should fit on one of the sides of our piggy bank). Next, cut out small triangles that will serve as ears. Next, we make a small circle for the snout, and two even smaller ones for the nostrils. Eyes can be cut out of white and black paper, or you can use plastic ones that are sold in the store.
•Glue all the elements of the muzzle, and draw a smile using a marker.
•You also need to cut out 4 rectangles from pink paper, which will serve as legs for our pig. We fix them on the box on the front and back on both sides. Next, on each leg you need to glue small gray stripes cut out in advance - hooves.
•Glue the finished piglet’s face to the body (box). To make the pig more realistic, you can cut out a tail from paper and glue it to the back of the box.
•All that remains is to cut a hole on the top side of the box so that you can throw coins in there.
The cute piggy bank is ready out of the box.
An interesting container for saving money from a glass jar
You can also easily make a piggy bank from a glass jar at home. A minimum of available tools, and the result is wonderful. It’s clear that it’s enough to make a slot in the lid of a glass jar to save money there, but since we want to create a beautiful piggy bank, the work process will be a little more complicated.
•So, first of all, we make a slot in the lid.
•Next, cut out two strips from cardboard. The length of each of them should be equal to the sum of the height of the can, multiplied by 2, and the diagonal of the bottom of the can. As for the width of the strip, it should be the same as the width of the can.
•We place the strips perpendicular to each other. The place where they connect will become the place where the bottom of our jar will be located. The strips must be fastened together in this place using a stapler.
•Then we take another sheet of cardboard and place the first blank on it. On each side of this workpiece you need to add 1 centimeter. However, long strips are not needed, which means we leave 4 centimeters on each side.
•Now we cut out the second blank, and in its center we draw a circle with a diagonal equal to the diagonal of the lid on our jar. Then we cut a hole in it.
•Place the can in the center of the first piece, and bend the long strips upward.
•The second blank must be placed on top of the jar, and the edges lowered down.
•Take a stapler and connect two blanks together in all possible places, as if giving the jar the shape of a rectangle.
•To give rigidity to the entire structure, you need to wrap our craft with tape on all sides.
•Now let's create a decorative surface for the piggy bank. For this we will need paper towels - they need to be cut into strips approximately 2 cm wide.
•Next, take PVA glue and dilute it with water. Ratio 1:1. You can use a small container for this.
•Dip strips cut from paper towels into diluted glue and crumple them to form folds. These strips will need to be pasted over the outer sides of our cardboard blanks. Moreover, this can be done in several layers to make it even more beautiful. Just wait until the first one dries before gluing the second layer. We are waiting for all layers to dry completely.
•Now choose an interesting paint color and start painting the piggy bank. We do this carefully - there should be no bald spots left. Waiting for it to dry.
•We decorate the place where the cardboard blank meets the can. We coat this area with PVA and wrap it with twine. The lid can also be decorated using thread.
Interesting! Beautiful topiary made from artificial flowers
The piggy bank is ready!
As you can see, making a piggy bank with your own hands at home is very easy, just follow the step-by-step instructions with photos, and you will succeed!
Children's creativity
Young children enjoy working with plaster. There are many molds for sand, snow, and baked goods in which you can cast plaster crafts for kindergarten.
The technology is simple enough even for a child:
- The mold is first lubricated with a mixture of liquid soap, vegetable oil and water in a ratio of 2:1:5 to make it easier to remove the finished product.
- Pour in the solution. You can mix it with the addition of any color.
- Use a ruler or spatula to run along the edges of the mold, cutting off excess.
- If you plan to hang the toy, then stick a cocktail straw into the right place.
- If the figurine has two front sides, another identical one is cast, so that later they can be glued together with the back sides.
PVA glue, liquid nails, “Titan”, “Moment” are suitable. The joint area is sanded. If necessary, lubricate. Coloring is limited only by the child's imagination.
Unusual shapes
If many people are already tired of standard piggy banks and crafts from a box, then there is always a demand for unusual shapes of products.
Original ideas for creating piggy banks of different shapes include:
- Safe – made of boxes or plaster, it will delight even an adult, especially if it has a lock.
- A house - you can make it out of cardboard, make a slot in the roof for money.
- Owl piggy bank – made of plaster in a special mold.
- Cylindrical hat - for work you need a disk and cardboard.
- With a secret - a mirror is placed in a plywood box at an angle, decorative items are mounted under it: when a coin is placed inside, it visually disappears.
Such simple and original ideas will help you create creative piggy banks for any occasion: as a gift or for yourself. Handmade things always warm you with the warmth of human hands and the soul put into the work.
Simple and tasteful
A wonderful gift for women would be a plaster model in the shape of a hand on which you can hang jewelry. To do this, you will need a thick rubber glove - it holds its shape better:
- The bottom is cut off from a five-liter plastic bottle.
- The glove is inserted into the neck with the edges turned outward. The neck is wrapped with an elastic band so that the glove is securely fastened.
- The solution is poured into a hanging glove. Slowly so that the air has time to escape from the fingers.
- After pouring is finished, you need to shake the glove again by sticking your hand into the bottle through the bottom.
- After 1 - 2 hours, the model is removed, the rubber is cut off and cleaned.
- After complete drying, the hand is painted and decorated with decoupage.
- Having glued it to a suitable base, hang the beads, string rings, etc.
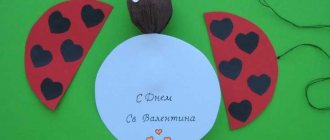
With a little practice, you can move on to more complex forms: sculptures, vases, piggy banks. But even without skills, New Year’s crafts from plaster or hearts for Valentine’s Day will be easy to come by. It all depends on the desire and imagination that everyone has.
Paper piggy bank
A paper piggy bank is often made using the papier-mâché technique. The essence of the method is that any form is pasted over with pieces of paper in several layers.
The following materials will be needed to make a piggy bank:
- newspapers and paper;
- balloon;
- paste;
- glue;
- cardboard;
- egg tray;
- lace 5–7 cm;
- an empty roll of tape;
- acrylic paints;
- tassels;
- glue;
- pencil.
When making crafts, step-by-step instructions are followed, which are as follows:
- The ball is inflated to the desired size.
- The newspaper is torn into small squares.
- The bubble is smeared with paste.
- 5 layers of newspapers are glued to the product.
- An empty roll of tape is placed in place of the patch.
- A circle is cut out of cardboard and the hole in the coil is closed with it.
- The egg cells are attached with tape to the bottom of the body, forming the piglet's legs.
- 2 ears are made and glued to the ball.
- The product is coated with paste and pieces of white napkins are placed on it.
- The tail is made from lace coated with glue.
- The entire piggy bank is painted pink. The paint is applied 2 times.
- After the product dries, a hole for coins is cut on the back.
- Eyes, nostrils and decorative elements on the body are drawn with acrylic paint.
It turns out such a beautiful little pig
Photos of plaster crafts
Progress:
1. First you need to select molds for hardening the plaster ; we used a set of children's dishes - frying pans with lids.
And to make a depression, use empty yogurt bottles.
2. Dry plaster was diluted with water . The diluted mixture was poured into the mold so that the dried plaster could be easily removed ; we lined the mold with film.
Gypsum hardens quickly , so you need to work very quickly!
3. The mold for the box is ready !
4. The next step will be coloring. For quick painting, we used gold spray paint, but you can also use acrylic paints.
This is what the boxes looked like after painting :
5. My children and I really love beadwork, and we made beaded dragonflies the box
6. The painted box was decorated with rhinestones . And they glued a dragonfly to the lid.
7. The box is ready!
8. We decorate the gift - the gift bag is tied with a beautiful ribbon!
9. That's it! I think our mothers will be very happy with such an unusual gift!
Children's master class “Ball gown for your beloved mother” Good day to everyone who has visited my page! Dear women, I want to congratulate you on the most joyful, bright and tender spring. Children's master class "Flower for Mom" Children's master class "Flower for Mom" Purpose: making a gift for the holiday, decorating the premises. Goal: develop creativity. Children's master class “Basket for Mom” Today, on March 8th, May the sun shine brightly, May it bring joy and happiness, May success not pass you by, I wish you good health. Children's master class on making a gift for mom “Violet in a pot” Our favorite spring holiday, March 8, is approaching! We teachers have a lot of trouble making gifts. I offer you, dear colleagues,... Children's master class on paper crafts “Postcard for Mom” The sun is increasingly peeking out and warming up outside, which means spring will come soon and will bring with it a great and positive mood. Children's master class “Congratulations for Mom” Materials for completing the master class: printout of a double postcard template with a picture of a flower, watercolor paints, brushes, scissors. Children's master class “Topiary for mom for the holiday” Mother’s Day is celebrated all over the world. It is celebrated annually on the last Sunday of autumn. Among the huge number of holidays is this one. Children's master class “Vase with flowers for your beloved mother” Good afternoon, dear colleagues! Today I propose to watch the master class “Vase with flowers for my beloved mother” with my pupil Vika.