Natural materials for autumn crafts
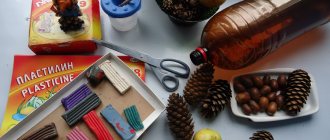
You can create beautiful and original autumn crafts with your own hands from the following available natural materials:
- Dried leaves, berries, twigs of trees and bushes;
- Pumpkin seeds, sunflower seeds;
- Chestnut fruits and shells;
- Walnut shell;
- Pumpkin;
- Acorns.
You can also use pine cones, bird feathers, flowers...
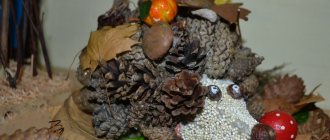
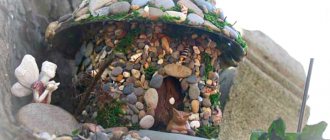
Blooming tree of happiness
To make an autumn topiary, we need its base - a foam ball, they are sold in all craft stores. Buy a beautiful ceramic pot or use any plastic bucket, then you need to decorate it too. An unusually shaped stick or thick wire braided with grass stems will become the trunk.
To firmly strengthen the trunk of our tree of happiness, use a liquid plaster solution, polyurethane foam, or simply lay stones tightly around it, generously lubricating each layer with glue.
You can decorate the flowering ball itself with dried flowers or cones, large rowan berries or rose hips. Chestnut fruits and acorns also look very decorative. Use glue to secure it. Help your child create and strengthen the foundation technically, and he will be happy to do the artistic work himself.
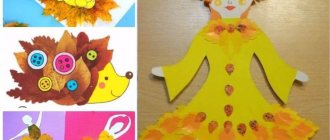
Autumn crafts for kindergarten
As a rule, autumn crafts for kindergarten are created more simply, using one or two techniques. As the main material you can use colored paper, plasticine, cardboard, cotton wool, but it is more interesting to work with natural autumn materials.
Basic autumn-themed crafts for kindergarten:
- Thematic applications;
- Panel;
- Image of autumn composition;
- Herbarium.
Autumn composition of natural and non-natural materials.
Crafts made from autumn materials can be supplemented with other non-natural materials, such as plasticine.
Quite often, whole colorful compositions are created for autumn exhibitions in kindergartens.
There is one good composition that looks very interesting and pleases with a pleasant aroma; to make it you need to prepare:
- Fresh and slightly dried tree leaves;
- Apples are red in color and small in size;
- Rowan berries;
- Plasticine;
- Matches;
- PVA glue;
- Sheet of cardboard.
Step-by-step instructions for creating this composition:
- Glue tree leaves around the entire perimeter of the cardboard.
- Take 5 apples and put them in one line, fasten them together with matches.
- Take one apple and use a match to attach it to the first apple in the row, but only diagonally upward.
- Thus, 5 apples are the body of the caterpillar and 1, which is placed diagonally upward, is the head.
- Form the eyes, mouth and nose of the caterpillar from plasticine and attach to the head.
- Break the match into 2 even parts and stick it into the head so that the horns come out.
- String rowan berries and small balls of white plasticine onto matches, in alternate order.
- Attach a match to the sides of the apples, which act as the body, and string a rowan berry on them, thus creating legs.
- Make ladybugs from plasticine and place them around the perimeter of the cardboard.
- Place a bunch of rowan berries on the side of the composition.
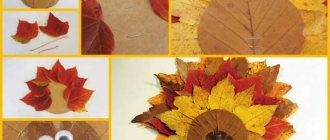
Unusual picture
Recently, various framed images of leaves have become very popular. But their cost is very high. Therefore, we suggest experimenting a little and making such a picture with your own hands.
Let's prepare the following:
- white paper (can be any size);
- large green leaf;
- frame of suitable size;
- acrylic paints of any color;
- brush;
- newspapers;
- small size container.
First, we put newspapers on the table so as not to stain it during work. We prepare the paints in a special container.
Very quickly, but at the same time, carefully paint over the green leaf.
We print a sheet of paint on white paper. To get a more even and clear drawing, you can place several books on top for a minute.
Carefully remove the sheet from the paper. If desired, you can highlight the center lines using a thin brush and remaining paint. Leave the drawing until completely dry.
We put the picture in a frame. A stylish decor item is ready!
Aquarium with goldfish
This craft is great for preschool or elementary school students.
In order to make such a children's autumn craft, you should prepare:
- A sheet of blue cardboard;
- Pencil;
- Scissors;
- PVA glue;
- Plasticine;
- Dried leaves of different sizes;
- Dried grass;
- Seashells.
Step-by-step work plan:
- Draw a round aquarium on cardboard and cut it out.
- Roll a small ball of yellow plasticine and smear it on the bottom of the aquarium so that the sand comes out.
- Attach several pieces of shells to the plasticine bottom of the aquarium.
- Form several small pebbles from plasticine and attach them near the shells.
- Attach a sprig of dried grass to one of the pebbles.
- Form several flat circles from blue plasticine and place them from the bottom of the aquarium to the top.
- Glue a yellow leaf with a more rounded shape to the center of the aquarium.
- Make an eye out of plasticine and attach it to the glued leaf.
- Take a leaf of a more curvaceous shape, preferably maple, and glue it as a tail.
- Pick up a small leaf and glue it on top of the large round one as a fin.
Recommended Manufacturers
The most popular among consumers are building materials from German companies with a high reputation.
"Knauf"
German founded in 1932. The headquarters is located in Northern Bavaria (Iphofen). Currently, the company is the world's leading manufacturer of gypsum-based building materials and components for performing work.
"Volma"
Russian manufacturer operating on its own raw material base. Headquarters - in Volgograd. It is a leader in the production of gypsum boards and dry construction mixtures in Russia and the countries of the Eurasian Economic Community.
"Henkel"
German chemical company specializing in the production of cleaning and adhesive products. The headquarters is located in Düsseldorf. Subsidiaries operate in 70 countries, the total number of enterprises is 340.
Autumn crafts for school
Autumn crafts for school can be made more original and unique than for kindergarten, because the student has a wide variety of techniques and can work with a large amount of material.
Some of the popular types of autumn crafts for school are:
- Volumetric applications;
- Panel;
- Herbarium;
- Thematic wreaths;
- Various volumetric compositions;
- Candlesticks;
- Fairy lights;
- Photo frames.
Bright picture
To make an original picture, it is not at all necessary to look for ideally shaped leaves. After all, you can use them in completely different ways.
For this job we will need:
- white paper;
- leaf, twig or flower;
- spray paint;
- beautiful frame.
If desired, you can apply a special liquid to the paper that will protect it from paint. But this is not at all necessary.
Place the plant on the paper in a suitable position. Carefully spray the paint so as to fill all the empty space. It is very important not to move the plant at this moment. After all, this is the only way to get a clear drawing.
Remove the leaf and leave the painting until completely dry. If you covered the edges with a special liquid, then carefully remove it.
We put the picture in a frame and hang it on the wall. If desired, you can make such images of a wide variety of plants. It looks really very cool.
Autumn wreath
In order to make a themed autumn wreath, you should prepare:
- Large diameter disposable plate;
- Glue;
- Tree leaves of different tones;
- Decorative tape;
- Scissors.
Plan for how to make this type of autumn craft:
- Cut the bottom out of a disposable plate.
- Glue tree leaves around the entire perimeter of the plate so that there is no gap.
- Glue the leaves on the other side of the wreath as well.
- Cut a small piece of ribbon and tie it to the wreath as a loop.
To make the wreath more voluminous and fluffy, the leaves should be glued only by the tips, so that the edges are free, and can be supplemented with various decorative elements.
Decoupage technique
Decoupage itself involves gluing a selected pattern onto a prepared surface. Of course, not everything is so simple, and decoupage is only partially reminiscent of appliqué.
But the technique is not as complicated as it might seem when looking at photos of decorated objects.
Decorative and applied arts originated in the 17th century, and for a long time this method of decoration was considered accessible only to rich people.
Today, anyone, regardless of income, can purchase materials or use available materials.
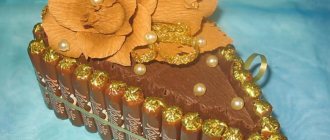
Candlestick with an autumn theme
Candles are one of the popular decorative elements during the cool season. In order to convey the atmosphere of autumn as much as possible, it is worth decorating a candlestick in this theme. A simple, but original and interesting version of an autumn candlestick using dried leaves.
For this craft you need to prepare:
- Glass jar;
- Alcohol and a piece of sponge;
- Dried leaves;
- Glue;
- Scissors;
- A couple of branches of hay.
Step-by-step plan for creating a candlestick.
- If there are any stickers on the jar, you should wash them off.
- Degrease the jar with alcohol.
- Choose the leaves you like best, cut out small stars or tree leaf shapes inside them.
- Glue the blanks in a fairly orderly manner on all sides of the can.
- Tie the neck of the jar with sprigs of hay and form a small bow.
For such a candlestick, a tablet-shaped candle is best suited.
How to dry leaves and flowers
Method 1. This method is suitable if you want to create panels, appliqués or other non-voluminous crafts. Place leaves or flowers between the pages of the book at a distance of about 3 mm from each other and move them to other pages every day (also maintaining an interval of 3 mm). Within a week, the paper will absorb all the moisture from the plants, and you will be able to use them for creativity.
Method 2. If your craft does not involve the use of flat leaves, then you can dry them by simply collecting them in a bunch and hanging them upside down in a dry but ventilated area. At the same time, keep in mind that the leaves will lose their color completely in the sun, but will retain their color in the shade.
Method 3. This method is suitable for drying and preserving the color of leaves and cornflowers. Blot fresh, just picked leaves/cornflowers with a napkin if they are wet. Place each sheet between two layers of wax paper, and place a paper towel on top of the resulting “sandwich.” Preheat your iron and make sure the steam setting is off. Using pressure, iron the paper towel for 2-5 minutes. Turn the sandwich over and pat it again through the paper towel, then carefully remove the wax paper.
- To prevent dried leaves and flowers from breaking, they must be dipped in a solution of water and PVA glue, diluted in a ratio of 4:1, and then left to dry.
Support the project - share the material with your friends on social networks:
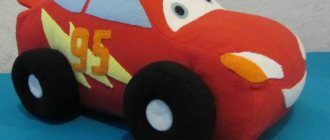
Vase of pumpkin and bouquet of leaves
This craft is very easy to create, the main thing is to work carefully with the knife.
So, for it you need to prepare:
- A small pumpkin, more or less regular in shape;
- Beautiful tree leaves;
- Bunches of rowan;
- Spikelets of wheat;
- Knife;
- Jute.
Step-by-step instructions for creating this composition:
- Cut the tail off the pumpkin and carefully cut out the core so that you can place a bouquet in it.
- Form a bouquet from leaves, spikelets and bunches of rowan, secure it with jute.
- Place the bouquet in a pumpkin vase.
In this simple way, you can create a colorful and themed autumn craft from natural materials.
How to glue felt
To work with felt, you need to choose an adhesive component based on the characteristics of the base on which the decoration is attached.
To the felt
Two elements made of the same felt can be joined together with hot glue. In this case, the adhesive can be in the form of gun cores or powder for joining with an iron.
Before using the iron, test the heat resistance of the felt material in an inconspicuous area.
To use silicone rods you need a heat gun. This silicone hardens quickly, does not penetrate deep into the fibers, and provides a strong connection. Not suitable for large areas, after cooling it is safe for children.
To cardboard
How to glue felt to cardboard:
- PVA. But you need to remember that ordinary stationery PVA will not work. It is too runny and leaves yellow stains. Therefore, you need to choose the option marked PVA - MB and PVA - M.
- All Purpose. The composition contains synthetic resins that provide high adhesion and viscosity. Does not deform the base and does not shrink.
- Power is an especially strong solution for joining felt with cardboard, wood, cork, rubber, glass, and plastic. After curing, it remains elastic. Not destroyed by oils, acids, water.
To paper
To glue felt to paper, you need a compound that does not deform the paper and does not crack when the base is bent. Forms a colorless layer, without greasy traces.
These solutions include:
- Universal Alleskleber. Available in a 7 g tube based on synthetic resins. Insoluble in water, gasoline, and alkalis. Has a convenient dispenser for spot application.
- Kraft. Composition based on polyurethane. After drying, it does not shrink, does not crack, and is resistant to temperature changes. Can be ironed at medium temperature.
To the fabric
To adhere to another material, the adhesive component must create a soft, flexible layer. Have a dense structure so as not to seep between the fibers and withstand several washing cycles. Suitable for this purpose:
- Fabric glue "Second". A special one-component textile composition, compatible with natural fabrics from cotton, wool, leather, and synthetic materials. Creates a transparent, waterproof, elastic seam and does not leave a hard crust after drying.
- "Textile Moment". Resistant to washing and detergents. Has adhesion to jeans, cotton, cloth, synthetics.
Photos of autumn crafts
0
Herbarium
You will need: a thick book, autumn leaves, an album for dried plants.
Master Class
- Collect fallen leaves.
- Flatten each piece of paper and place it between the pages of the book.
- Close the book and leave it closed for 2 weeks so that the leaves dry thoroughly.
- Carefully remove the leaves from the book, as dry leaves are fragile material.
- Place the leaves on the pages of the album and sign their name.
- Store the album in a bright, dry place.
The herbarium is ready!
Final color correction
Step 1
Above all the previous layers, add a Curves and adjust the Blues :
Step 2
Add a fill Layer – New Fill Layer – Solid Color (Layer – New Fill Layer – Color) and select color #170900. Switch the blending mode of this layer to Exclusion (Exception) with opacity 100%.
Step 3
Add another fill layer and select the color #01051f for it. Switch the blending mode of this layer to Difference (Difference) with opacity 100%.
Step 4
Add a Color Balance and adjust the Midtones and Highlights . Using a soft black brush with an opacity of about 10%, edit the mask and remove the effect in the lower central part of the composition.
Step 5
Create another adjustment layer Curves (Curves) and darken the edges of the canvas. Edit the layer mask and remove the effect in the central part of the composition, where our light source is located.