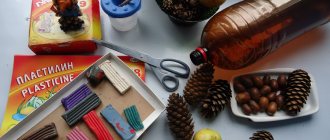
We will need:
Cardboard Stapler Scissors Glue Leaves Eyes
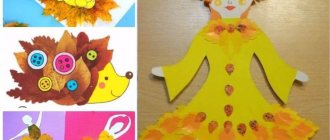
You need to cut out about 5-6 circles of different diameters from cardboard. Remove the stems from the leaves, except for two leaves. We will need them for the turkey legs. Attach each leaf to a cardboard circle. Stack the circles on top of each other using glue or a stapler. Glue a brown leaf to the back of the largest circle. A triangle is cut out of a leaf to make a beak. It must be glued to the center of the first sheet. Attach eyes to your turkey. Using colored paper and leaves you can make a cheerful family of owls.
What to make from maple leaves on an autumn theme for kindergarten and school?
Important: Autumn nature is rich in materials from which you can make real masterpieces.
It would seem like maple leaves... Is it possible to make an interesting craft from this simple raw material? It turns out that it is possible.
Here's what you can make from maple leaves:
Herbarium . Beautiful multi-colored maple leaves will look good in tandem with other leaves. bizarre shapes form a beautiful picture.
Herbarium of autumn leaves
Bouquet of flowers . Leaves rolled using a special technology can turn into an original bouquet of flowers. Clusters of viburnum or rowan, dried flowers will add color to your bouquet.
Bouquet of autumn leaves
Applications . Glue a maple leaf onto a white or colored sheet of paper and make a muzzle from scrap materials. You can also make an applique in the form of a still life or landscape.
Applications from maple leaves
Composition from autumn material
Autumn is rich in natural material in the form of leaves painted in different colors. You can use them to make an amazingly beautiful rose. You need to prepare fresh leaves with a long stalk. Dry leaves will bend and break, so they are not suitable for crafts.
Required material: 5-7 leaves of different sizes, threads.
Read also: Why can’t you sit after childbirth?
Crafts from maple parachutes for children: photos
Important: The imagination of creative people is limitless. In the process of creating crafts, not only maple leaves are used, but also parachutes, or earrings, they are called differently.
Craft “Dragonfly”
A very simple craft that even the little ones can handle (with the help of their mother, of course).
Dragonfly from maple parachutes
For production you will need:
- Maple parachutes
- Paints
- Brush
- Glue
- small twig
Paint the parachutes with paints, then let the paint dry. Then glue the parachutes onto the branch. The craft is ready!
You can make a whole collection of colorful butterflies, dragonflies and other insects this way.
Insects from maple lionfish
Crafts from maple parachutes
Applications from maple seeds
It's easy to make a hedgehog from maple seeds. Draw a hedgehog on a piece of paper; you can also print the finished picture. Instead of needles there will be maple parachutes.
Hedgehog from maple seeds
In addition to the hedgehog, you can make any other applique. For example, an owl .
Owl from maple seeds
Owl applique
To make such an owl, you should prepare:
- Colorful leaves;
- Cardboard;
- Grapevine branch;
- Rowan berries;
- Glue, plasticine;
- Scissors.
Here are the step-by-step instructions:
- Select leaves of the required shape.
- Set aside a yellow piece of paper for the owl's body. Give it the desired look using scissors.
- Place a drop of glue on the green leaf (future head) and glue it to the cardboard base.
- Sculpt the eyes using plasticine in white and black tones.
- Attach them to the owl's head.
- Cut out a beak from a red-orange leaf, and eyebrows from a yellow leaf. Glue everything.
- Select a pair of green leaves of the same size and attach them with glue. These are paws.
- Insert a grape branch decorated with rowan into them.
- Place the finished product in a frame and hang it on the wall.
How to preserve maple leaves for crafts, how to process them?
Important: Autumn foliage is a short-lived material; the leaves quickly darken and curl. Therefore, many people ask the question - how to preserve leaves? It turns out there are several ways.
Method 1 . Dry the leaves in a book under pressure. Method 2 . Iron the leaves between two sheets of paper. A solid base must be laid down.
How to Preserve Maple Leaves for Crafts
Method 3 . Dip the leaves into melted paraffin. The temperature of the melted paraffin should be medium so that the sheet does not turn black. This is done as follows:
- Melt paraffin in a wide bowl
- Dip the sheet into warm paraffin
- Place the maple leaf on a piece of paper to dry
Method 4 . Soak the leaves for several days in a solution of glycerin and water. The solution should be in the following proportion: 1 part glycerin, 2 parts water.
Preparing leaves for crafts
To make any craft from leaves, you only need well-dried material; fresh leaves are not suitable. Preparing the leaves takes a long time, so you will have to be patient. In addition, the material needs to be dried correctly, here are the basic rules:
- If the evenness of the leaves is not important for the craft, they can be placed in a spacious container (for example, a large wicker basket) and left in the fresh air. This will allow the leaves to dry quickly and allow air circulation to prevent mold from developing.
- To get perfectly smooth leaves, you need to place them between book pages or album sheets under a press. Carefully place the material between the sheets of books or albums. It will take at least 14 days for the material to completely dry and be ready for use.
- If you don't want to wait a long time, you can use a special herbarium press. To do this, fold a stack of leaves, alternating each layer with newsprint or scrap sheets. In a few days, the material for the crafts will be ready.
Craft: bouquet of maple leaves
Important: Maple leaves can turn into a luxurious bouquet if you work hard.
First you need to learn how to roll a rose.
Step-by-step making of a rose from maple leaves
And this is what bouquets you can end up with.
Bouquet of maple leaves
Crafts from maple leaves Roses from maple leaves
Pumpkin vase
Pumpkin is a great base for creating a vase for a fall arrangement. The shape of the pumpkin can be either more round or elongated, the size depends on the bouquet itself. When creating such a vase, you must work very carefully so as not to get hurt.
To create, you need a pumpkin and a sharp knife. It is enough to cut off the top of the pumpkin, carefully remove the core and, if desired, cut out various patterns and shapes for decoration. In such a vase you can place a bouquet of dried leaves, sprigs of berries, spikelets...
Craft: maple leaf wreath
A wreath made of autumn leaves can be an effective decorative element.
You can combine a wreath of maple leaves with many other natural materials:
- Bunches of rowan
- Cones
- Spruce branches
Autumn wreath
Wreath made of autumn materials
Wreath made of maple leaves
To create such a wreath you will need time and perseverance, as well as available materials:
- Willow twigs, wire or any other available base for the frame
- Scotch tape or thread
How to make a wreath from maple leaves:
- First make a round base from willow twigs or hard wire
- After this, twist each maple leaf onto the base with its tail.
- To keep the leaves in place, secure them with thin wire or thread
- Add decorations as you weave the wreath
Step-by-step creation of a wreath from maple leaves
Another option for a wreath base is cardboard :
- Cut out a ring from cardboard
- Carefully wrap the circle with knitting thread
- After which you can start decorating the wreath with leaves, fixing them with PVA glue
Application "Fish" from autumn leaves
You will need: blue cardboard, autumn leaves of different colors, scissors, PVA glue, doll's eye.
Master Class
- Glue a yellow piece of paper in the center of the cardboard as the body of the fish.
- Glue 2 red leaves as a tail.
- Cut out a heart from a red sheet and glue fish as sponges.
- Cut part of the red leaf in half and glue it as fins.
- Glue the eye.
- Prepare twigs with green leaves.
- Glue them at an angle as seaweed.
Crafts from maple leaves: vase
In order to make a vase from maple leaves, you will have to tinker.
Vase of maple leaves
You will need:
- PVA glue
- Brush
- Balloon
- maple leaves
Preparation method:
- Inflate the balloon. Please note that the vase will eventually take the shape of your ball.
- Dilute PVA glue with water in a 1:1 ratio. Coat the ball with glue.
- Glue leaves in any pattern.
- Leave the ball to dry. When the glue dries, you can pierce the ball with a needle and remove it from the vase.
Master class on making a vase from autumn maple leaves
Tatyana Titova
Master class on making a vase from autumn maple leaves
Read also: Why does a meat grinder chew meat?
Welcome blog guests! Continuing the autumn theme, I propose to make a vase from autumn maple leaves.
Materials: maple leaves, PVA glue, balloon, bowl, brush.
Description of work:
1. Prepare maple leaves: cut off the cuttings.
2. Inflate a round balloon. Place it in a bowl.
3. Lubricate the leaves with glue and glue one leaf at a time onto the ball.
Craft: maple leaf plate
As mentioned above, the leaves take the shape of a balloon if you stick them on it. This way you can make narrow vases or flat plates as you wish.
How to make a plate from maple leaves
The plate is made similarly to the vase. First, you inflate the ball, then spread it with glue, glue the leaves and voila - the plate is ready.
Plate of maple leaves
Photo frame in autumn style
Children love decorating the walls of their room with their drawings and favorite photographs. A craft made from leaves in the form of a frame is perfect to complement the design of the room. Help your child decorate a frame with autumn leaves, where he will then place his favorite photo.
For the craft you need:
- thick cardboard;
- glue;
- leaves you like;
- pencil;
- scissors.
How to make a frame:
- Cut a square or rectangular frame of the desired size from cardboard. The center of the frame where the photo will be placed needs to be cut slightly smaller than the size of the photo.
- To wrap a frame with leaves, first soak them in hot water, this will soften them and prevent them from tearing or breaking in the process.
- Glue the leaves onto the frame.
- Wait for the product to dry.
When the frame is ready, insert the photo into it, securing it with glue or tape.
DIY maple leaf crown
Important: If your daughter will perform at an autumn festival in kindergarten or school, and you don’t know how to decorate her themed outfit, make a crown from maple leaves.
Crown of leaves
- Collect smooth, beautiful maple leaves
- Use scissors to trim the tails of each leaf.
- Pull the tail of one sheet through the other, as if making a stitch
Step-by-step making of a crown from leaves
Fold the leaves in this way until the chain reaches the desired length. Finally, secure the sheet to the front.
Step-by-step making of a crown from leaves
The crown at the matinee can be replaced with a wreath of leaves. Decorate it with bright bunches of rowan berries to make the wreath sparkle with color.
Maple leaf wreath
Vase made from a plastic bottle and spoons
Crafting a vase from a plastic bottle has been popular since elementary school; there are a sufficient number of ideas for decorating it. A rather interesting way is to decorate it with plastic disposable spoons. For such a craft you should prepare:
- 2 liter plastic bottle;
- plastic disposable teaspoons;
- glue gun and rods for it;
- acrylic paints and brush;
- stationery knife and scissors.
Step-by-step action plan:
- Cut the neck off the bottle to create a container approximately 15-18 cm high.
- Carefully cut off the handles from the spoons; they are not needed for the craft.
- Using a glue gun, carefully glue part of the spoon to the bottom of the bottle, with the convex part facing up.
- Repeat the previous step until the entire bottle is filled; there should be no gap between the spoons.
- Paint the spoons the desired color, let dry and then apply another coat of paint.
For a more durable effect, it is recommended to cover the product with a layer of acrylic varnish after complete drying. This vase can be used for artificial or live bouquets.
Craft: hedgehog made from maple leaves
We have already talked above about how to make a hedgehog from maple leaves. Here are some more options for the “Hedgehog made from maple leaves” crafts.
A hedgehog made from maple leaves is a simple craft that will take you very little time. This activity will keep your child engaged for a long time.
Leaf applique: hedgehog Hedgehog made from maple leaves
Children's crafts: hedgehog
Crafts made from maple and oak leaves
Important: Oak leaves can also be used for crafts. If you combine oak and maple leaves you will get an interesting combination of colors and shapes.
Oak leaves are suitable for applications.
Oak leaf craft
Take the following interesting idea as an example. You can glue any leaves, including oak and maple.
Crafts made from oak and maple leaves
More options for applications from various leaves:
Crafts for kindergarten and school: leaf applications
Leaf applique: squirrel Leaf applique: cat
How to make a decorative autumn wreath
You can weave a beautiful wreath from bright autumn leaves to decorate windows, doors, walls, etc. A wreath attached to the front door will delight not only you, but also your guests.
What you will need for the craft:
- flexible branches of any tree;
- dried leaves of different colors (contrasting combinations, for example, yellow and red, look best);
- bunches of red berries (rowan, viburnum, etc.);
- physalis;
- glue;
- spool of strong threads;
- decorative metallized threads;
- small bird figurines for bouquets.
How to weave a wreath:
- The branches will serve as a frame - make a round or oval wreath out of them.
- For strength, secure the structure with thread in several places.
- Wrap the frame tightly with gold thread, leaving small branches free.
- Glue the leaves to the branches.
- Attach the berry clusters using thread.
- Glue or wrap physalis with threads.
- Finally, attach the birds to the wreath.
A finished craft made from leaves in the form of a wreath can be hung anywhere in the house; it will delight you with its beauty for a long time and remind you of the most colorful time of the year.
Beautiful autumn leaves can be used not only for simple children’s crafts, but also for complete interior decoration. One such product is a fruit bowl.
To make such a vase you need:
- glue and brush;
- inflatable ball;
- petrolatum;
- scissors;
- maple leaves.
Step-by-step instructions:
- Inflate the balloon to the size you need.
- Lubricate the surface of the ball with Vaseline, this is necessary so that the leaves do not stick to it during the process and are easily separated from it.
- Fix the ball in a stationary state, this will make it more convenient for you to make your vase.
- Glue maple leaves to the ball, having first generously coated them with glue.
- To make the vase strong enough, you will need several layers of maple leaves.
- As soon as the last layer is completed, carefully coat the product with glue again and leave for 3 days.
- Burst or deflate the balloon and remove any remaining residue from the product.
The original interior decoration is ready.
Craft: maple leaf tree
You can make an original tree if you use your imagination. For the Maple Leaf Tree craft, you will need the smallest leaves so that they can fit on a small sheet of paper.
craft tree
Craft maple tree
Bouquet of flowers from leaves
You will need:
- autumn leaves of different colors (30-35 pieces)
- floral wire
- green adhesive tape (scotch tape) or floral tape
- scissors.
1.
Place your leaves on a flat surface in order, from small to large. Clean them from dust and dry them.
2.
Use scissors to cut off the leaf stems.
3.
Take the wire and cut it into small pieces, about 10 cm long. Each piece will be used for a separate sheet.
4.
Take floral tape or regular adhesive tape (scotch tape) and cut or tear off several 5 cm pieces.
5.
Take the second largest sheet and use wire to make a hole in it 0.5 cm from the edge. After this, bend the wire and twist it. This must be done carefully so as not to tear the sheet.
Back view:
6.
Use duct tape to wrap the wire. You need to attach the tape to the edge of the leaf and begin to carefully wrap the wire.
7.
To attach the wire to the smallest sheet, you need to twist it and only then insert the lower part of the wire into it.
Make a stem out of wire to form the core of the flower.
Wrap the wire with duct tape.
The core and petals are ready and can be connected.
8.
Wrap the second leaf around the core and add a second leaf, a third, etc.
* Petals should not lie tightly. They can be bent so that the flower is more magnificent.
9.
Keep your legs together. You can twist them a little to help them stick better.
When the leaves dry a little, you will get this, even more beautiful, rose:
Crafts from chestnuts and maple leaves
Important: Chestnuts grow in many cities, towns, and villages. Finding a chestnut for crafts and finding a use for it is not a problem, there are plenty of ideas.
By the way, you can use not only chestnuts, but also their prickly peel. Look how cute the hedgehogs in the clearing are made from dried chestnut peels.
Crafts made from maple leaves and chestnuts
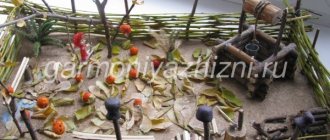
You can make a whole autumn composition using chestnuts, maple leaves and other materials.
Composition from autumn natural materials
Vase from a disposable cup
A vase made from a plastic cup is a quick craft, but it looks very unusual and can decorate any interior. For a vase of this type you need:
- plastic glass 0.5 l;
- glue gun and rods for it;
- Knitting.
In order to make such a craft, you don’t need any special skills and many steps; you just need to carefully lubricate the glass with hot glue and wrap it with threads.
The threads should be pressed tightly against each other so that there is no gap between them. If necessary, you can wrap the workpiece in several layers. Decorate if desired.
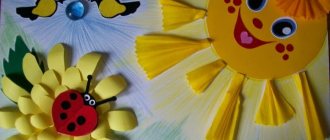
Sun made from maple leaves: crafts
Making a sun out of maple leaves is not a difficult task.
You will need:
- A4 sheet of paper
- Paints
- Markers
- Yellow maple leaves
Draw a circle on a piece of paper. Paint it with yellow paint; when the paint is dry, draw eyes, a mouth and a nose with a felt-tip pen. Or stick it from colored paper. Maple leaves will be rays, so it is best to choose bright yellow leaves.
Sun made from maple leaves
Craft sun
Crafts with children
Autumn craft with leaves, rowan berries and physalis flowers
Parents of schoolchildren often have to make various autumn crafts with their children with their own hands. Natural materials are used for them, in winter - imitation snow from cotton wool, polystyrene foam, spruce branches. I propose to make an autumn composition “Pear on a plate”.
Autumn craft with leaves “Pear on a plate”
For it you will need:
- An oblong shaped balloon;
- wool threads - not too thin, but not thick;
- PVA glue;
- cotton pad;
- glycerol;
- cling film;
- shallow saucer or plate;
- dried leaves of different shapes and colors;
- for decoration: rowan berries, physalis flowers;
- a piece of colored paper (brown, black).
The operating procedure is as follows:
First we make a “pear”. To do this, inflate the balloon and tie the tail tightly. Lubricate it liberally with glycerin or any vegetable oil - so that later you can easily separate the product from the base.
We soak the threads (I have pink ones, but you can use others) in glue with your fingers (alternatively: thread them into a needle and pull them through a bottle of glue) and wind them around the ball.
We wind it tightly, in different directions, creating fancy webs. When ready, securely fasten the end of the thread, forming a tail.
The next step is to hang the “pear” and let it dry thoroughly. The process took me 24 hours. After this, we pierce the ball and carefully remove it through the lace. We hide the tail under a braid of colored paper.
Now let's make a plate. To do this, take a saucer of suitable size and wrap it with cling film on the outside.
We lay the leaves on top of the film, lubricating them well with glue. We apply the leaves in several layers to make the “plate” strong and reliable. It is worth remembering the beauty of the product, so we create the edge of the plate from small maple or other suitable leaves.
When the product dries and takes shape, carefully separate the saucer and remove the film. The glue under the film did not harden, so I laid more leaves on top.
Now you can assemble the composition: place the pear in a plate (preferably secure with a drop of glue). We glue several leaves near the tail, and on a plate we attach rowan berries and physalis flowers (I divided one of them into petals).
This craft will bring pleasure to both mother and child. I made it together with my first-grader, so he picked up the leaves, said what colors to use, unwound the ball and proudly carried the product to school for the competition. Of course, you need to tinker a little and take some time, but the result is worth it!
The most interesting articles
Article rating:
Loading…
ipodelka.ru
Crafts from rowan and maple leaves
Important: Red rowan goes well with leaves. The color scheme is bright and juicy.
Rowan can be added to bouquets.
Combination of rowan and maple leaves
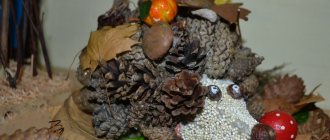
And again the hedgehog. Only on his back is a bright bunch of rowan berries.
Crafts from rowan and maple leaves
Rowan looks gorgeous in bouquets.
Autumn wreath with rowan and leaves
Autumn is not the time to be sad and mope because of rainy weather. Don’t forget that autumn also gives us a time when we can fully admire the beauties of multifaceted nature.