Nowadays, smartphones, phones or communicators with a built-in Wi-Fi adapter are quite often produced. And the range of Wi-Fi is about one hundred meters, but phones that are equipped with Bluetooth transmit and receive files only at a distance of no more than ten meters. If you have USB-blutooth for your computer, as well as a phone with bluetooth, but you would like to increase the reception range. All this is quite possible, but usb-bluetooth needs to be improved.
Well, let's begin. We disassemble the bluetooth adapter for the computer, after that you need to debug the bluetooth case and very carefully inspect the adapter board.
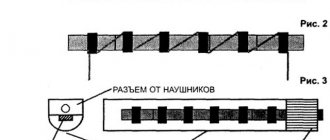
In all adapter models, at the end of the board there is a copper contact that looks like a spiral, in the photo it is number 1. This spiral is a bluetooth antenna, and it is to it that an additional homemade antenna will be soldered.
We will need a single-core copper wire with a diameter of 0.4 to 0.8 mm. The wire is covered with varnish insulation, and there is no need to get rid of it completely. Let's twist the wire as shown in the photo, then treat the tip of the copper wire with rosin, then with tin. The same procedure must be carried out with a copper spiral in Bluetooth, do not overheat the adapter board, do all the work very carefully.
Then, you need to make a hole in the case itself for the bluetooth adapter, where the homemade antenna exits. Now let's very carefully close the board in the case. Now the upgraded bluetooth is ready, which increases the reception range by 4 times.
To further increase the reception range, you can take a stranded wire that is long enough, which will be covered with insulation, you need to strip the tip and attach it to the antenna, the second tip can be attached to a small nail driven into the wall.
Purpose
The adapter for the radio has several main purposes:
- Bluetooth for a car radio acts as an intermediary between the file storage device (tablet, smartphone, laptop) and the audio system.
- By installing the adapter in the car, the driver provides wireless communication with the gadget, freeing his hands.
- The car Bluetooth adapter allows you to exchange files, play videos and listen to music; in addition, it is also suitable for radio.
Some Bluetooth adapters for car radios are equipped with more extensive functionality, which depends on the model.
Working principle and application
In the cases described below, there are several ways to organize sound transmission - through an FM transmitter, using Bluetooth Flash, as well as through a Bluetooth to AUX adapter, and power will be provided via USB. Each of these options has its own advantages and disadvantages.
For example, an FM transmitter is a bulky device. It is inconvenient to use, especially for smokers, since it constantly occupies the cigarette lighter socket, so it precludes its use.
In addition, it has other disadvantages - for example, at a short distance from the car in which it is installed, they will also be able to listen to this music, simply by setting the appropriate settings in the receiver.
The second solution is Bluetooth Flash. It also has its downsides. For example, it cannot provide stable communication. This causes the sound to drop out or be intermittent. In addition, the device is not compatible with all devices.
Experienced motorists believe that a Bluetooth adapter for a car radio is the best solution. It is an inexpensive but versatile device. AUX outputs are available in any model, so there is no need to assemble or disassemble anything, you just need to connect it to the appropriate connector.
At the same time, such a Bluetooth adapter for a car helps the driver solve several problems at once, i.e. it will be able to receive phone calls and play music from a flash drive or smartphone through standard speakers.
A Bluetooth module is often called an SD to USB adapter. And this best describes the principle of its operation. Once connected, digital audio is transmitted and at the same time, through the connection, the device receives power for its operation. That is, in some ways it resembles wireless charging, although they perform different functions.
It should not be confused with a module such as a CAN adapter.
The need for the latter is due to the fact that most modern cars equipped with electronics have a CAN bus in their architecture.
From it, information is sent to the car radio. And this makes it easier for the driver to control the car.
If the CAN adapter for WV is not connected, then the radio becomes more difficult to control. For example, it will not change the backlight level at night. But the adapter does not affect sound transmission. And a standard device is used for these purposes.
Types of adapters
Bluetooth modules come in two types:
They differ in functionality and connection method.
The first type of receivers is most often used to interact with personal computers, laptops, acoustic equipment, etc. It’s clear from the name that they are mounted inside the main device, and not every person can handle these - you need the appropriate knowledge. But these Bluetooth adapters are durable and practical.
External modules are oversized devices that connect to electronics, TV equipment and other devices via an external port, such as USB, TRS or RCA. They are easy to connect and configure, they are safe to use, and they are inexpensive.
Such a device will be an excellent solution for creating wireless local networks.
Models with battery
Some Bluetooth adapters are supplemented with an internal battery, thanks to which they provide some autonomy for 8, 24, or even more hours of continuous operation. Such devices can be used not only stationary, but also while traveling. They do not require a constant power source (for example, an electrical network).
Of course, such modules are more expensive than regular ones, so it’s worth considering whether you’re willing to overpay for a necessary/unnecessary option.
USB models
Cheaper models of Bluetooth adapters connect to the main equipment via a USB connector. Despite the low price, such products are strong and durable (if from a reliable manufacturer). They are small in size (smaller than battery-powered ones).
There are models powered by a TV, as well as by a portable charger connected to the mains.
Obvious disadvantages
The described adapter for the radio also has its advantages and disadvantages. Its main advantage is that it reproduces high-quality sound.
Other benefits include the following:
- stable work;
- high quality of information transmission;
- the ability to work with any car radio (provided that they have a working radio output);
- relatively small size of the device.
The latter is especially important, because thanks to this the USB adapter does not take up much space and does not interfere with driving.
But this device also has obvious disadvantages. For example, a higher price (but only in comparison with other devices). Although, given the sound quality, it is justified.
Not all motorists consider the device aesthetically pleasing. For some, this moment does not matter. But there are also those who believe that an adapter for Japanese car radios should be as stylish as the car. Therefore, this point must be taken into account. Also, the USB Bluetooth adapter is a constantly busy audio output for the radio.
This device does not have many disadvantages, and they are fully compensated by its advantages.
Bluetooth FM transmitter
These devices have become very popular because with their help you can significantly expand the functionality of even the most outdated radio.
Here you just need to tune the audio player to the frequency of the operating transmitter. This will allow you to listen to tracks directly from your smartphone.
The device itself is powered by a cigarette lighter. It has the usual set of functions of an MP3 player that can play information from flash cards. For this purpose, there is a full-fledged USB port and a slot for SD cards. In this case, music playback is controlled directly on this device.
The FM transmitter has the following characteristics:
- Some models play music, read USB flash drives and SD cards. In addition, they can serve as devices for remote communication.
- Suitable for working with old radios without a Bluetooth module or AUX port.
- Powered by cigarette lighter or USB input.
To activate the device you need to follow the following algorithm:
- connect the translator to a power source;
- select Bluetooth mode using the switch on the case;
- establish a connection with an FM device by selecting its name from the smartphone list;
- tune the radio to the FM frequency at which the transmitter operates.
After completing the settings described above, the device will be fully connected. Then you can easily select the desired song through any player on your smartphone and enjoy the music.
Tips for choosing
Not everyone understands how to choose Bluetooth in a radio. First you need to understand what the main criteria are here.
Most of these devices are universal. USB adapters for standard radios can often be found in car dealerships. The advantage of such a device is that it will fit into any device if it has the appropriate audio output. Therefore, the main point is compatibility with a smartphone.
In addition, the gadget must have all the basic functions. This includes voice dialing and the ability to update software.
In addition, for the system to work correctly, the device must support the Russian language and display the Cyrillic alphabet.
Otherwise, questions will arise later on how to set the Russian language, you will have to redo some settings, and this is not always possible. Even if you only need the adapter for music, it's still important. The device must have an authentication function.
The adapter for the car is purchased from popular manufacturers, since such devices already have all the listed functions as standard.
general information
The article describes some methods that involve disassembling the adapter, replacing its parts, or modifying it by soldering, which may not be suitable for everyone. If you do not understand electronics, are not very agile in using a soldering iron, or your device is under warranty, then please avoid such methods.
Complementing the adapter
The simplest, but not the most effective method for increasing Bluetooth speed is to add a reflector to the adapter, which will direct the signal in a certain direction, rather than enhance its propagation throughout 360 degrees.
You can try to make such a reflector from a tin beer can by cutting off the top and making a few more slits: from top to bottom and then slightly to the sides, as if slightly separating the bottom of the can.
The Bluetooth adapter is attached in the center with whatever you like and connects to the computer with a USB adapter.
Something similar can be built from cardboard with foil glued to it.
Another option that may work is to cut off just the top of the can, then make a slot for the housing towards the bottom of the can and insert the adapter in with the antenna side on it. Then, again, we fix it using a method convenient for you and connect it via an extension cord.
Device Compatibility
A good option for a car is an MP3 adapter for the standard radio. But it needs to be compatible not only with a playing device, but also with a smartphone. Therefore, you must carefully read the instructions and description.
This does not mean that the adapter for Japanese car radios is not suitable for Chinese smartphones, but it is recommended to check.
DIY Bluetooth
Technological progress is moving forward by leaps and bounds, now even preschoolers have a mobile phone and know how to access the Internet, and seeing a person talking to himself on the street, no one will twirl his finger at his temple - everyone is already familiar with a Bluetooth headset, which is a wireless technology. This transmitter operates using encrypted signals, which, in addition to convenience, allows you to protect personal data. The wireless module allows you to establish communication among several devices.
Connection to car radio
Few people know how to install a Bluetooth adapter on a car radio. But everything is simple here - you just need to connect it to the appropriate connector.
The most difficult (and comparatively) part of the work is setting up the appropriate parameters on the smartphone, to which the device is also connected via a connector. You can listen to songs stored in memory or search for interesting Internet radio. Those. A Bluetooth adapter will expand the capabilities of the motorist.
Some people wonder how to make an adapter themselves. There are craftsmen who disassemble Bluetooth headsets and assemble similar devices. But there is no guarantee that such devices will work well for a long time and maintain stable sound.
How does transferring contacts via Bluetooth work?
Bluetooth is a miniature chip installed in a gadget. Depending on the class, the module is capable of operating in the range from 1 to 100 m. With its help, it is possible to exchange data between devices without using a cable.
You can transfer information via Bluetooth on gadgets with the Windows or Android operating system. An important condition for wireless data transfer: all contacts must be stored in the memory of the old phone.
Sometimes users have problems finding devices. The fact is that by default the phone is hidden from other gadgets. To make the receiving device visible, you need to:
3. Check the box next to the receiving device.
After these steps, the radio module will automatically begin searching for active connections. Such synchronization is performed once. Further connections will be configured automatically.
Sometimes, if you need to transfer data via Bluetooth, you need to enter a single password on both phones.
How to send an address book via Bluetooth:
3. Click on the “Options” button to open an additional menu.
4. A list will appear, select “Exchange” from it.
5. Select the checkboxes for the contacts you want to share.
6. Click on the “Exchange” option.
7. In the next tab, select Bluetooth (if you have not enabled it previously, the system will prompt you to do so - click “Yes”).
8. Find devices within Bluetooth range.
9. Select your smartphone and activate the transfer.
What can it be made from?
At home, the speaker body can be made from almost anything. In action are:
- housing from a failed car radio;
- the body of a glowing cube in which the backlight has burned out;
- the “egg” column is made of paper, folded into many layers and impregnated with glue (for example, epoxy);
- remnants of laminate or parquet - after re-flooring;
- Chipboard, MDF material, fiberboard, natural wood;
- for portable speakers, a PVC pipe (or polypropylene) of the largest diameter is suitable - like what is used to install an interfloor drainage channel for bathrooms throughout the house;
- plywood - be careful when sawing it: it easily chips and cracks, and bends over time.
Having decided on the supporting material of the case, take care of the remaining parts and consumables.
What will be needed for production?
In addition to the material from which the housing is made, an active speaker requires:
- one broadband, or 2-3 more narrowband speakers;
- ready-made or homemade power supply;
- ready-made or homemade audio power amplifier;
- regular wire or cable;
- winding wire;
- plastic pipe of suitable diameter;
- rosin, solder and soldering flux;
- adhesive sealant;
- epoxy glue or furniture corners.
Tools needed:
- pliers;
- side cutters;
- flat and shaped screwdrivers (a set of screwdrivers is best);
- wood hacksaw;
- file or chisel;
- hand drill and set of drills.
To speed up the work, use a power tool: an electric drill, a grinder (you need cutting and grinding wheels for wood), a screwdriver and a jigsaw.
The functions of a drill are also performed by a screwdriver turned on at high speeds.
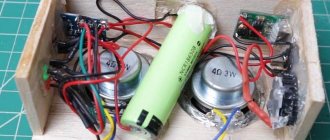
Electronic component of a Bluetooth speaker
The basis of the future device for wireless sound transmission will be the Bluetooth module. Without it, you won’t be able to assemble a Bluetooth speaker yourself.
As an example, the BLK-MD-SPK-B module would be an excellent choice. When choosing a device, you should pay attention to the presence of a 3.5mm Mini Jack connector and plug. Also included, as a rule, are the multi-colored wires and switching device necessary for further work.
The board should be selected based on the type of speaker. Almost any electrical online store offers dozens of ready-made audio amplifiers to choose from. Next we will talk about how to make a Bluetooth speaker with your own hands.
How to choose a Bluetooth adapter for your TV
Most Bluetooth adapters are either transmitters or both a transmitter and a receiver. Transmitters allow you to connect a non-tech TV to Bluetooth devices, while receivers allow you to stream music and play stereo audio from your smartphone to your home entertainment system. Two-in-one adapters are the best options, but if you want a quick, cheaper solution, a transmitter adapter will suffice.
When choosing a Bluetooth adapter for TV equipment, you need to focus on quality and functionality characteristics. Here are some guidelines to consider during the purchasing process:
Remember to double check that the adapter has the same type of audio output as your TV.
All of the above parameters are described in the technical specifications of each module. Pay attention to the warranty, equipment, connection options, evaluate the reliability of the manufacturer. This will help you choose a device that suits the purpose of use with a long service life without breakdowns.
Power switch and connector
Drill a hole in the case for your existing power button, if it is not provided for by the design. Glue it with reliable glue and do the same with the 3.5 mm jack. Drill the plastic at low speeds so as not to overheat it and melt it.
Connecting the wireless module
The image shown shows a chip for assembling a Bluetooth speaker with your own hands using BLK-MD-SPK-B. Pins 3 to 5 will be used for audio output, 13 and 12 for power.
3 - Speaker common wire.
4 - Positive wire left.
5 - Positive wire right.
12 - Power (+).
13 — Power (-).
The contacts of the module that I used are very small, so I had to solder very carefully so as not to damage them. The soldered board can be mounted inside the structure.
How to make an internal bluetooth module for a laptop?
For an active person, it may be inconvenient to use an external Bluetooth adapter. Some craftsmen suggest modifying it with your own hands into an internal one by soldering the device to a USB connector. This option is suitable only for those who are familiar with a soldering iron and have experience in assembling and disassembling laptops.
Work on improving the gadget with your own hands is carried out in several stages:
- The laptop comes apart neatly.
- Free space is selected to accommodate the module and wires.
- The working adapter itself is disassembled using a knife or other sharp object.
- The selected USB connector is unsoldered.
- 4 wires are soldered to the Bluetooth transmitter, then connected in series with the USB contacts. It is important to follow the sequence correctly.
- Install the module in the prepared place and assemble the laptop.
- Install the necessary drivers on your computer.
If everything is done competently, the device should work.
Battery connection
The next step is to attach 3 wires to the battery: a positive contact, a negative one and another wire to control the charge. All three will go to the 3.5 mm power connector, and the positive one will also go to the second contact on the power button.
Important! For charging, a constant voltage of 3.5-4 V and a charging current of at least 500 mA are suitable. You can use any suitable charger from an old mobile phone.
We use a third-party application
As a rule, users use utilities when they cannot exchange contacts from “Samsung” to “Samsung”, from “Nokia” to “Nokia” or from other phone models using the built-in tool. In this case:
- Install the Bluetooth File Transfer program (can be downloaded for free on Google Play).
- When you open it, you will see a list of folders that are on your smartphone.
- Click on the “Options” button and a menu should appear.
4. Select "Advanced".
6. Click on the “Send contacts” line.
7. Open group lists and highlight contacts.
8. Select whether contacts will be sent as one file or individually.
9. From the list of devices, select Options and Search to scan for available gadgets.
10. Select the smartphone to which the information will be sent and activate the transfer.
Functionality check
Once the assembly is complete, it's time to turn on bluetooth on your phone or other source and start searching for wireless equipment nearby. If you are asked for a password when connecting to a new gadget, use the standard four zeros.
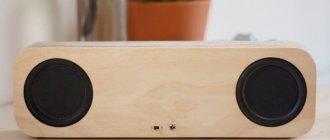
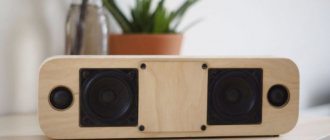
That's all, you've made a fairly powerful Bluetooth speaker with your own hands, and then a new life begins without wires.
From paper
Making a column from plain paper is not as easy as it seems. You will need glue containing a hardener - the layers of paper are impregnated with it. Epoxy is best suited for this - coils and printed circuit boards are often made from it (the material resembles getinax). Do the following.
- For a square column, mark and cut sheets of paper according to the template of each of the walls. In the sheets from which the front edge of the speaker is glued together, cut out holes for the speakers and the bass reflex output. For the back there are holes for audio connectors and a power socket.
- Dilute and apply some epoxy glue to the sheets that serve as the first layer. Glue two layers for each wall and leave them to dry.
- The next day, glue the third layers to each wall. Add one every day. The interval between stages can be reduced from one day to several hours to speed up the process. But in this case the quality may suffer. Repeat these steps until the thickness of the walls of the future column reaches at least 1.5 cm. Instead of paper, you can use thick cardboard.
Once the speaker walls are ready, mount and connect the speakers and other parts according to one of the instructions above.
Disadvantage - evenness and accuracy when gluing sheets is important, otherwise the structure will lead to the side. The advantage of the method is the use of paper from old magazines and newspapers, cardboard (except wavy cardboard, with voids inside).
A round body will speed up the process: a roll of paper is wound onto a piece of pipe with a wide clearance, soaking as it goes. Secure the starting winding line with tape. The development looks interesting, in which the role of a voice coil is played by a strip of metal foil, and the role of a diffuser is played by a sheet of paper. Do the following.
- Apply metal tape or double-sided tape with foil to a sheet of paper. Place the coils so that they do not touch.
- Bring the ends of the tape or foil to the sound source.
- Place a magnet under a sheet of paper, connect the gadget and turn on the music.
You won't get high volume - the amplifier in the gadget is too low in power. Mid and low frequencies will be added to the “rustling” sound. Powerful speakers use a multilayer design - an electrostatic membrane, designed for high amplifier power.
From a tire
A speaker made from a tire cannot be compared in terms of coordination and amplitude-frequency response with branded or homemade rectangular systems. The rigidity of the walls is insufficient - rubber and hard rubber dampen low frequencies due to excessive elasticity. A stereo music system needs a large speaker - its diameter should be fixed in the tire, but not fall inside. The other side of the tire is covered with plywood or a board made of other lumber, placing the power supply and amplifier on it.
The tire itself should not contain holes or holes - but surface cracks do not affect the sound quality.
A more advanced design will be the part of which on the speaker side is closed with a wooden ring cut from the same plywood. The speaker is not mounted on the tire itself, but on a plywood ring, which can be connected to the back, where the blank plywood wall is located, using long through-tapping screws or bolts. Such a column can be rolled along the road. But it contains only one speaker, since it is difficult to place two or more in a flat and limited space. The amplifier, power supply and filters are located on the rear wall.
From a Pringles can
The simplest, but unusual option is to use aluminum, cardboard, plastic cans and glasses as speakers, making slits and inserting a smartphone into them . A more “advanced” option is to place a speaker of suitable diameter in a can of chips or a glass. The principle of any such speaker is based on the fact that the sound, reflected from the walls, acquires additional volume. But without an amplifier and a high-quality speaker, you won’t get good, bright, beautiful sound. Making an upward-firing speaker from a Pringles can is similar to any design that uses a piece of PVC sewer pipe as the body.
From headphones
A headphone column is an option in which, instead of a dynamic head, which is not designed for decent volume at a large distance from the listener, any modern speaker is used. The headphone space is sharply limited to accommodate the amplifier and power battery. In such a column, a piece of the same PVC pipe is used. However, when the column is passive, the process speeds up significantly. The step-by-step instructions are as follows.
- Disassemble the headphones and remove the heads with membranes.
- Insert speakers in their place. The speaker is chosen as thin and flat as possible.
- Connect the wires that previously supplied high-frequency voltage to the membrane heads.
- Secure the speakers using self-tapping screws.
- Close (if possible) the mesh inserts.
It is possible to turn headphones into speakers if they were initially large enough to completely cover your ears. If the speakers do not insert completely and do not close, then use an equivalent replacement made as follows.
- Remove the membrane heads from the headphones.
- Cut holes in the bottom of a plastic or cardboard glass, slightly smaller in diameter than the heads themselves.
- Insert and glue the membranes.
This option is very easy to make. The disadvantage is that the sound volume is no more than 30 decibels. This sound is comparable to a radio point and is used in rooms where there is little noise from outside.
Such acoustics are more of a joke - they are not designed for professional use. For full-fledged speakers you need speakers. If it was not possible to insert small-sized speakers instead of headphone membranes, the cylindrical design that is already familiar to you will be suitable as a basis.
- On the back of the headphones, cut a hole into which the magnet on the back of the speaker will fit. The hole should be much larger than the magnet itself - only the side supporting structure will remain from the headphone body. The back (outer) wall of the earphone will be cut off entirely.
- Using hot glue or Moment-1, glue the earphone to the piece of PVC pipe you just made.
- Place the power supply (or lithium-ion battery with a charge controller) and the amplifier itself inside the pipe. The result is an active column.
- Similarly, make a base for another earphone and place the speaker in it. The result is a passive speaker. In stereo systems, only one of the speakers is active.
- Remove the audio cable from the passive speaker and solder a plug with a standard diameter of 3.5 mm to it.
- Insert the same connector into the active speaker to connect the passive one. Connect one of the amplifier's stereo outputs to it. The second is directly to the speaker of the active speaker.
- Insert another connector into the active speaker - to connect an external sound source (for example, a smartphone), connect it to the stereo input of the amplifier.
- Connect the power supply to the power input on the amplifier.
- Check that all parts and assemblies are securely fastened, close both columns with a plug.
If the speakers are powered by a battery, instead of the power supply, connect the battery to the discharge controller, and the controller itself to the power terminals of the amplifier. Connect the charge controller to the battery by cutting its connector into the round walls of the active speaker. If you need a wireless connection, purchase and install a Bluetooth audio card in the active speaker.
From the bottle
Any plastic or glass bottle will do. It is safer to cut and drill plastic. For glass, you will need diamond drills and a crown, and the process itself is performed under water for safety reasons. Do the following .
- Using a hole saw, drill a hole in the bottle for the speaker.
- Drill mounting holes for self-tapping screws. The bass reflex will be either an open neck or additional holes drilled with a smaller diameter crown for a piece of plastic pipe.
- Fill the holes with sealant and install the speaker with pre-soldered wires. Tighten the screws. You cannot screw them “dry” into glass - the bottle will crack and shatter into pieces.
Do not use bottles made of tempered glass - it cannot be processed and will immediately break into small cubic fragments with dull edges.
Portable speaker made from old computer speakers
- Disassemble the column and immediately unsolder the power wire and transformer. They won't be needed anymore.
- To power the future speaker, you will need a lithium-ion or lithium-polymer battery , depending on what you have available.
- To charge the battery itself you will need a charge controller . You can order it inexpensively on AliExpress. Choose one that has deep discharge protection. The battery is connected to the terminals marked B+ and B-, and the load is connected to OUT- and OUT+.
- in the base of the speaker for the charging port located on the charge board. The board itself can be glued with double-sided tape, but for reliability, secure the port with hot glue.
- In standard speakers, the power wire is connected to the transformer, and from there to the diode bridge. We solder all 4 diodes.
- We solder the wires from the charge controller directly to the diode bridge, observing the polarity.
- We didn't touch the power and volume buttons for the acoustics, so you won't have to fiddle with them. We simply glue the board to the bottom of the speaker, and the battery and charge controller to the back wall.
- All that remains is to assemble the column . It will work via the AUX wire. If you need it to work via Bluetooth, you need to add the appropriate element to the system.
This is the easiest way to make portable speakers due to the fact that virtually nothing needs to be soldered. If the sound quality of the “native” speakers of the speakers does not suit you, you can always replace them with more powerful ones.
Making a column from PVC pipe
- Disassemble the Wi-Fi modem case. It will serve as a housing for the future speaker.
- At the edges of the upper part , make two holes for the switches, as in the photo.
- If you wish, you can make a couple of holes in the upper part of the pipe and fix the antennas from the router in them . Subsequently, they can be used as a signal amplifier.
- Make holes in the cover of the router case and in the pipe through which the wires will pass, as well as 2 additional ones for attaching the pipe.
- To ensure that the speakers are not damaged during operation, they will need protection. You can either purchase it separately or make it yourself from a special mesh trim for car windows. Place the speakers on the grid and make a circle around each of them with a distance of about 3-4 cm from the edge of the speaker.
- Cut them out . Using a thick thread and a needle, tighten the mesh around the speaker so that tension is felt on the front of it.
- The speakers can be secured in the pipe using hot glue or small self-tapping screws, if the diameter and thickness of your pipe allows this.
- Solder the audio wires to the speaker terminals. They are usually glued in pairs, so they are easy to recognize.
- As for the electronic part, everything is simpler here . In the front part of the router case we cut out a place for the mp3 module and attach it in any convenient way.
- Solder all electronic components together as shown in the diagram.
- Now you need to install the connector for powering the system . You can put it in the hole where the router's power port was, if it fits, or cut a new one.
- Now it's time for the speaker on indicator. To do this, we take a resistor and a diode. We solder one end of the diode to the resistor, and the other to the battery. We connect the resistor to the power button. It is needed in order to regulate the brightness of the diode. Install the diode into the hole provided for it.
After you have soldered everything, check the column for functionality and assemble the housing. As a result, you will get an original speaker assembled with your own hands.
Sources
- https://omagnitolah.ru/podklyuchenie/blyutuz-adapter-dlya-avtomagnitoly.html
- https://AutoTuning.expert/magnitola/bluetooth-adapter.html
- https://stroy-podskazka.ru/portativnye-kolonki/akusticheskaya-svoimi-rukami/
- https://svoimirykami.guru/blyutuz-kolonka-svoimi-rukami/
- https://besprovodnik.ru/kolonka-bluetooth-svoimi-rukami/
- https://stroy-podskazka.ru/portativnye-kolonki/svoimi-rukami/
- https://bestdiy.ru/prostaya-portativnaya-bluetooth-kolonka-iz-fanery-svoimi-rukami.html
- https://SdelaySam-SvoimiRukami.ru/5058-kak-samostojatelno-vstroit-bljutuz-v-ljubuju-avtomagnitolu.html