Experience shows that there is no need to rush to throw away old things. If you have at least a little imagination, a little experience in working with threads, needles and scissors, then you can make unique things from items that have long gone out of fashion. This will help update your wardrobe and save a lot of money. Let's take, for example, an old, worn fur coat. It will no longer be possible to use it for its intended purpose. But it can still serve well. And it doesn’t matter whether the fur coat is made of natural or artificial fur. You can make many interesting products from it with your own hands.
Mittens from an old fur coat
This is a necessary item for any wardrobe. Mittens are a great addition to winter boots, handbags, hats, and scarves. Good specimens in retail outlets are quite expensive, since to produce such a product you need to have at least two animal skins. But an old, worn fur coat will save you from unexpected expenses.
Making a pattern for mittens is quite simple. It looks like this:
This is a scaled version that can be enlarged to the size you need. Cutting is carried out in two copies. What should you not forget? Mittens are worn on the left and right hands, so they should be mirror-like in appearance. Due to the similarity of the parts, you should sign them with the letters “l” and “p” so as not to get confused later.
Sewing mittens is not difficult. The following must be taken into account:
- It is necessary to cut out the parts in such a way that the mittens fit freely on your hands;
- It is imperative to leave seam allowances;
- if you plan to put only a collar on the mittens, then there may not be enough fur, so the palms can be cut out of another warm material (leather will do);
- Fur gloves are worn not only by women, but also by men. The stronger sex prefers to fish and hunt in them in winter. To make mittens look more respectable for men, they should be sewn with fur on the inside.
Necklace
If you string large beads with edges and fluffy pompoms mixed on a fishing line, you will get an original neck decoration that can be worn in the winter cold even on a sweater.
You already know how to make fluffy pompoms from natural fur; just stitch a circle of fur with strong nylon thread and tie it into a knot. It is interesting to make all the pom-poms for the necklace the same diameter, but the craft will look beautiful if the size decreases as it moves away from the center point of the decoration. The necklace is decorated with fur only on the front. The back is a chain with a clasp.
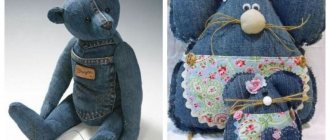
Fur bag
A fairly common item among fashionistas, especially considering that such beauty is made in a single copy. The handbag can be either miniature or quite spacious, solid or with patchwork inserts. This piece will also be decorated with fur accessories that never go out of style.
To make a bag you need to get:
- fur patches;
- a sheet of cardboard or whatman paper;
- zipper;
- chalk or soap (for drawing details);
- lining fabric;
- scissors;
- thread and needle.
A pattern is made from whatman paper. It is good to use pieces of leather, which are perfectly combined with fur patches and make the handbag more durable.
The instructions for making such a product are elementary. A pattern is prepared in the sizes you need. Pieces of fur with seam allowances are cut out using patterns. Heavily worn and holey places are avoided. All flaps are sewn together, the lining is sewn on, taking into account the handles and zipper. If the fur interferes with fastening the snake, it must be cut short in that area. You can decorate the handbag with other pieces of fur, straps, clasps and other decorative details.
Materials for making crafts
There are so many handmade masterpieces out there, you never know what you might need for them. Pieces of leather from an old, unwanted bag can be used just as well as from gloves or high-top boots. Jewelry from past years will provide a variety of accessories: brooches, beads, rings and earrings, all of which will serve to create something new.
Typically, nylon ribbons, braid, lace, beads, beads, as well as decorative buttons and rhinestones are excellent for creating flowers.
All of the above is a small amount of materials that can be used in your needlework; you can use anything in your work, and most importantly, what you like.
Rug made from an old fur coat
A very necessary thing in the house. Moreover, rugs can be both large and small, of regular geometric shape or completely free of it. The most correct option is to place such a rug next to the bed so that when you wake up, you place your feet not on the cold floor, but on a warm and soft bedding. This will not only lift your spirits, but also make the climb more enjoyable.
Carpets can be made oval, square, round, in the shape of flowers or hunting trophies. The set of tools should be the same as in the previous version. The scraps are cut out, sewn together, and a lining is made. You can even leave worn areas. They will give the product a certain charm.
Bracelet
To work you will need:
pieces of thick white leather and white fur;
elastic band across the width of the wrist;
knife-jamb,
threads with a needle,
glue "Moment".
Instructions:
Measure the circumference of the wrist and divide the result in half. For example, 18:2 = 9 (cm). This will be the total width of two (optional - three) hearts - large and small. Two hearts are drawn on paper: one 4.8 cm wide, the second 4.2 cm.
2 parts are cut out of leather and fur, and 4 circles with a diameter of 3 cm are cut out of the leather. 0.7-1 cm are measured from the left and right edges of the circle and 2 parallel cuts are made with a knife-cutter along the width of the elastic band. The underwear elastic is passed through the slots of each circle.
The heart parts are smeared with glue from the inside out, and the circles from the side where the elastic passes through the center of the workpiece. The ends of the elastic are sewn end to end. Circles and hearts are glued together.
You will need
- - pieces of fur;
- - pieces of leather;
- - small colored feathers;
- - cardboard;
- - short scissors;
- - awl;
- - needle;
- - durable cotton threads;
- — glue “Moment”, 88 or BF;
- - safety pin;
- - pieces of thin paraplene;
- - shoe knife.
Instructions
For a fur flower, no matter how it is attached, you will need a base. Find a suitable picture. If you are not confident in your artistic abilities, print it out after adjusting it to size. It doesn’t matter at all whether the picture is in color or black and white. It is necessary that the flower petals are the same size. Apple blossoms or wild carnations are most suitable. Transfer the outlines onto cardboard or paraplene.
It is better to choose thin but hard cardboard for the base. Cut out the flower. If you want to make it flat, then you don't need to do anything else with the cardboard. Transfer the pattern to the wrong side of the fur. The most convenient way to do this is with a ballpoint pen. Cut the flower along the contour with short scissors; you can even use well-sharpened manicure scissors.
If you want the flower to have some volume, draw a middle line on each petal from the edge to the middle. Cut the petals along these lines approximately to the middle and make something like recesses. They can be used with strong cotton threads or glued together. For strength, you can sew, and then coat the seams with glue. In this case, cut the fur petals exactly to the size of the pattern. The excess can be trimmed off later.
Spread the underside of the fur with glue, attach the piece to the cardboard base and press. Wait for your flower to dry. The middle can be made of leather or other fur. It is better to cut the pile on an existing workpiece almost to the base. Cut a circle of the required size from a suitable material and glue it to the center of the flower.
The base can also be made from paraplene. Transfer the drawing onto it and cut out the blank. This is quite thick material. In this case, paraplene is easily cut in all directions, so you don’t have to make recesses. Draw the inner contours of the petals somewhat closer to their centers. Make oblique cuts along the contours of the petals in the direction from top to bottom. The knife must be very sharp. It's okay if some minor unevenness remains. Glue the fur blank onto the paraplene, carefully smoothing and pressing the edges of the petals. Make the middle exactly the same as in the first case.
The leaves can be made from leather. Cut out the blanks. To make the petals convex, you can warm them up a little. Place them in a frying pan and place over low heat. The pan must be perfectly clean. Watch carefully to ensure that the leaves only slightly change shape. They must not be allowed to shrink. Glue them with the same glue to the back side of the cardboard or paraplene.
If you want to make a brooch, you can slightly change the order of work. First, glue the leaves onto the base between the petals of the flower, and only then the fur blank. Decorate the flower. Attach a small safety pin to the back. It can be smeared with glue, pressed to the base, and sealed on top with a thin piece of paraplene.
Man has learned to decorate himself since ancient times. The very first jewelry was made from leather and fur, as these were the first materials processed by man. Jewelry made from leather and fur is still in demand today. They are stylish and original. A wide variety of such things are sold in stores. These unique products are easy to make yourself at home.
Leather is an excellent material for making jewelry. For leather accessories it is not at all necessary to purchase new expensive material; Old leather items that can be found in every home are also suitable. These can be jackets, bags or soft belts. To work you will need:
First, patterns are drawn on paper. If the decoration is in the shape of a flower, then it is better to make 5 templates. Each tier has its own pattern. The shapes are placed on the back of the leather pieces and outlined. The blanks are cut along the lines. Now the cut out shapes need to be slightly heated in a frying pan until they shrink in size.
Vein patterns must be applied to hot leaves and petals using a blunt metal heated object. After this, the elements can be painted with paint using a foam sponge. The flower elements are assembled in order and glued together with hot glue.
A plastic bottle is useful for making a bracelet. It is done like this: a ring of the required width is cut from the bottle, it is opened and covered with leather. After the glue has dried, paint is applied to the skin.
Metal rivets are needed to make clips. They are also attached with hot glue to the finished flower.
Fur insoles
There is nothing easier than cutting out insoles from an old fur coat. Moreover, even a personal pattern is not required. You just need to take any old insoles and, using them as patterns, cut new ones out of fur. The speed of making insoles lies in the fact that there is no need for sewing. And no lining is needed. The quality of the fur also does not play a special role. The main thing is that there are no holes.
It is worth paying attention to the main nuance. Fur insoles take up quite a lot of space in shoes, so they can be used when your shoes are a little big. Otherwise, you may end up with calluses. The fur, of course, can be trimmed, but this will not provide the proper warmth.
DIY pompom rug
A beautiful thing made with your own hands from an old fur coat. When making it, you can use even the smallest scraps.
Set of necessary tools:
- large needle;
- scissors;
- saucer;
- yarn;
- Crochet hook;
- plastic mesh to create a base;
- sheet of cardboard.
Place a saucer on the cardboard and trace it with a pencil. A circle is cut out along the contour and used as a template. Pieces of fur are cut out using the template. Using a needle and yarn, the fur patches are gathered along the contour and pulled together. The thread is tied tightly. You get pompoms.
Using a plastic mesh, a base for the carpet is made. It can be given a rectangular, round, square, oval or any other shape. Take the first pompom and place it on the edge of the base. Using a hook, the yarn on which the pompom is assembled is pulled to the wrong side. Tied with a double knot. All other pompoms are attached in the same way. If the rug is made for small children, then it can be depicted in the form of a lamb, sun, or bear.
Statement ring with button
A stylish ring can be made from the simplest materials, such as buttons. For craftswomen, the button department is a real paradise, a flight of fancy in needlework.
Beautiful ring with a button on a metal base
Buttons are used to decorate clothes, accessories, shoes, and make unusual jewelry. You can make a button ring very quickly. To do this, we take the base for the rings; you can buy it at any jewelry accessories store. In our case, a button will replace a precious stone, and in a completely new way. Simply glue a beautiful button to the metal base, and the ring is ready! To add a touch of sophistication, you can make a beaded edging for the button and glue beads into the middle.
In this ring the base is made of beads
The world of creativity is full of surprises. Don’t rush to spend money and buy jewelry in stores. Using the example of master classes, you can learn how to make a luxurious and original decoration with your own hands from the simplest materials.
Vintage button ring
Cat button ring
Blanket made from an old fur coat
Currently, the mouton fur coat is out of fashion. But this does not mean that she needs to be retired. This fur makes bags look bad, but the blanket will be delightful both in appearance and in its warmth. There is no need to spend a lot of effort and free time to make a blanket. It is enough to rip the fur coat apart at the seams without touching the side seams. If there are damaged areas, they should be removed and new patches sewn in their place. The result will be a wonderful canvas.
It is necessary to sew from the wrong side so that the seams are not visible. The shape of the blanket can be varied, depending on your preferences and imagination. To keep the edges from fraying and look neat, you should sew bias tape to them.
Vest made from an old fur coat
An irreplaceable thing in winter, when the house is cool. To make it, you will need a worn fur coat, in which, as a rule, the sleeves are very frayed. The vest is made quickly and with minimal experience in this matter. The sleeves are torn off from the fur coat, and the seams are treated with either leather or thick fabric. Much attention must be paid to the lining. As a rule, it already looks unsightly and needs to be updated.
Before you start sewing a vest, you need to make sure that both the outer and inner sides of the fur coat are in good condition. If there are problems with this, then the transformation into a vest may not take place. In this case, even a master will not help. If the fur coat was too long, then it is worth shortening it to the required length. You can gird yourself with a neat strap made of suede or leather. You need to get a little creative with the neckline and also pay attention to the clasp.
Hat made from an old fur coat
An outdated mink coat can, in skillful hands, turn into a beautiful mink beret or kubanka. To do this, you need to make a pattern for the headdress on a sheet of whatman paper. Transfer it to the fur and cut out the product, not forgetting the seam allowances. The beret is carefully sewn from the wrong side, turned inside out, and the lining is sewn to it.
Mink can also be used to trim hoods on jackets, cuffs on coats or any other outerwear. A piece of mink will perfectly complement the color of a fashionable leather handbag.
Painting leather parts
You can use nitro paint from spray cans, but a better option would be oil paints; artists constantly use them, in which case the flower becomes more realistic. Before starting work, take a look at the photos of leather crafts in advance.
When working with halftones, you will need to additionally use solutions for etching the product; it would be more correct to apply it with a squirrel brush, since it will be softer than others. You can finish painting with furniture varnish.
Stoles, capes, coats
Before you start updating your old nutria fur coat, you need to understand the quality of the fur. The new nutria item is very warm and durable, repels water perfectly and is not afraid of wet snow. But over time, these wonderful properties may disappear. The main thing is that the long fur and underfur remain of high quality.
The possibility of transformation will, first of all, be influenced by the dressing of the fur. If it is shorn or plucked, then its structure remains plastic and soft, which makes it possible to make any products from fur, including jackets, waistcoats, jackets. Nutria goes well with leather, suede and knitwear, as well as other furs.
One cannot help but pay attention to the capes, coats and stoles made from nutria. This is quite a long and painstaking job of making them, but the result will exceed all your expectations. If you have never worked with fur, then it is best to contact a specialist in this field, since for such work you need not only to have sufficient experience, but also to know the technology, and to master the nuances of using long-haired and short-haired fur.
It is worth noting that nutria fur is very easy to dye, so any “new” product can be given the necessary rich shade. But it is not recommended to do this at home, and it is best to go to a dry cleaner.
Creating an artificial flower
Most often, it will be more convenient to refer to a ready-made master class on how to make a leather craft.
To perform the technique you will need:
- A stationery knife, its ability to quickly replace a dull blade is perfect for working with leather;
- A wide metal ruler, it will be most convenient to use, and most importantly safer;
- A support on which to cut the leather, such as a cutting board;
- Scissors, it is best to use tailor's scissors that cut leather;
- French knife, it is used to thin the skin, this process is called cheffing;
- Bulbs, with their use, will be given a three-dimensional shape and wavy lines will be created;
- Punch-tubes and hole-punch-tongs, thanks to them, holes are made along the edges and in the central part of the elements of the future flower.
Fur pillow
This beauty will decorate any sofa. And don’t despair if you don’t have cutting and sewing courses under your belt. There would be desire, patience, free time and an old fur coat. You need to choose the shape and size of the pillow yourself.
The list of everything needed is as follows:
- thick paper;
- scissors;
- needle;
- threads;
- ruler;
- snake;
- stuffing material;
- sewing machine;
- decorative details;
- pieces of fur, leatherette or leather, felt, fleece.
Before making a pattern, you need to decide on the dimensions of the finished product. It is worth keeping in mind that the stuffed finished pillow will be smaller than the pattern, so you need to add 3-4 centimeters to each edge, not counting the seam allowances.
A pillow of the correct geometric shape is cut out quite simply. A figure with the appropriate dimensions is drawn on thick paper, cut out and applied to the fur. Three sides of the figure are sewn on a machine, the fourth is left for sewing in the snake. Afterwards the pillow is filled with padding polyester or foam rubber. If you have feathers, you can use those too.
Square pillow pattern
In the same way, you can make a pillow from thick fabric, decorating it with fur inserts or decorative elements.
Fur scarf
It looks very interesting and is done very quickly. Especially if you still have an old fur coat that has long gone out of fashion or is too worn out. And it doesn’t matter whether it’s made of faux fur or natural fur. The scarf will look chic.
Required tool:
- pins, threads, needle;
- centimeter;
- scissors or furrier's knife;
- chalk or pen;
- sewing machine.
You set the parameters for the scarf yourself, based on your wishes or a real piece of fur. We cut out a rectangle 30 centimeters wide and 140 centimeters long. If there is no such length of fur, then you can cut out several parts and then sew them into one. The strip is folded in half (so that the width of the product is 15 centimeters) and all sides are sewn together, except for one small one. It is needed so that the scarf can be turned inside out. You can sew either by hand or by machine.
After turning the unsewn edge, it is sewn up manually with a hidden seam, constantly straightening the bent fibers. The finished product is very thick and difficult to tie. Therefore, you can make a through cut in the scarf, stepping back from its narrow side by 25 centimeters. The second end of the scarf is threaded through the hole. You can also use decorative pins and loops to secure the product.
Master class on making necklaces
The easiest option for creating a necklace is to weave a leather rope and attach a ready-made pendant or pendant to it. More complex necklaces require the use of expensive materials and complex processing techniques.
The braided leather cord is ideally combined with both pendants made of precious metals (gold and silver), and with pendants made of artificial stone , epoxy resin and natural wood. To weave it, you will need a piece of leather, the length of which should be slightly larger than the length of the expected size of the product at the end. Usually this is 50-55 cm. Along a piece of leather you need to draw 4 straight lines of approximately 3-5 mm.
Fur toy made from an old fur coat
All kids love something unusual. So why not give them pleasure by making a toy with their own hands. Maybe an old fur coat can make a great bird. To do this you need to take the following steps:
- cut out all the details of the future toy;
- sew together all the details of the head, including the forehead, eyes, eyebrows, beak, carefully process the undercuts;
- side wedges are inserted into the chin, ears and head;
- the abdomen is sewn together from parts;
- feathers are sewn to the wings;
- then the tail, abdomen, back, and wings are sewn together;
- wings, tail and head are sewn to the body;
- eyes are attached to the head (you can use glue);
- The paws are made of fabric and claws are attached to them.
The feathered friend is ready!
In a similar way, you can make any other soft toy: from bunnies and bears to cars and houses.
LiveInternetLiveInternet
—Categories
- crochet (2096)
- summer, crochet tops (640)
- crochet jackets, sweaters (327)
- crochet vests (259)
- crochet patterns (219)
- crochet pullovers (190)
- dresses, sundresses (167)
- crochet tunics (155)
- bolero, crochet corsets (153)
- crochet skirts, trousers (88)
- crochet decorations (75)
- crochet bags (66)
- scarf, stoles, shawls (63)
- home knitting (58)
- hats, mittens, gloves (54)
- crochet lessons (38)
- crochet shoes (37)
- crochet swimsuits (25)
- useful crochet items (4)
- yarn (3)
- ideas (2)
- knitting toys (1088)
- fantastic (110)
- little men (106)
- seals, cats, kittens (87)
- bunnies, bunnies (82)
- bears (81)
- from cartoons (68)
- lessons, tips (58)
- birds (56)
- for the New Year (49)
- mice (47)
- miscellaneous (46)
- insects, snails (42)
- snakes, lizards (40)
- dogs (40)
- monkeys, giraffes (28)
- horses, ponies (25)
- elephants, hippos (25)
- sheep, lambs (22)
- tigers, lion cubs (21)
- fish, whales, sea (18)
- turtles (14)
- for the holidays (13)
- transport (12)
- computer, emoticons (11)
- bulls, cows (11)
- hedgehogs (11)
- piglets (10)
- accessories (9)
- vegetables, fruits (8)
- foxes, wolves (8)
- raccoons, lemurs, moles (7)
- magazines (7)
- frogs (6)
- squirrels (5)
- moose, deer (4)
- crocodiles (3)
- donkeys (3)
- kangaroo (2)
- knitting (886)
- pullover, knitted jumper (230)
- summer, knitted tops (176)
- knitted jacket (163)
- dresses, tunics knitting needles (115)
- knitted vests (91)
- knitting patterns (76)
- boleros, knitted corsets (45)
- hats, mittens, gloves (42)
- scarves, stoles, shawls (40)
- knitted bags (39)
- Knitted skirts (24)
- knitting lessons (10)
- shoes (10)
- home knitting (10)
- magazines (5)
- knitted linen (4)
- yarn (2)
- knitting Ireland (452)
- products (268)
- patterns (118)
- lessons, tips (77)
- ideas (61)
- cross stitch (451)
- flowers (126)
- pillows (72)
- for home (41)
- miscellaneous (39)
- animals, fish (25)
- fruits (24)
- still life (22)
- fantasy (17)
- birds (15)
- small diagrams (12)
- paintings (12)
- triptych (8)
- holidays (8)
- landscape (8)
- butterflies, insects (7)
- useful tips (4)
- people (1)
- links (1)
- beads (411)
- necklace, necklace (82)
- pendant, keychain (50)
- bead lessons (46)
- beads, strands (38)
- flowers (37)
- bracelets (35)
- earrings (30)
- brooches (29)
- butterflies, toys (27)
- miscellaneous (25)
- trees (20)
- bead embroidery (18)
- cabochons (11)
- ideas (beads) (4)
- links (2)
- cooking (282)
- salads (91)
- pizza, kebabs (58)
- winter preparations (48)
- sweets (30)
- chicken (22)
- fish (18)
- pies (17)
- meat (15)
- drinks (12)
- useful tips (8)
- Main courses (5)
- microwave (3)
- first courses (1)
- sauces (1)
- sewing (249)
- sewing toys (139)
- sewing for home (56)
- sewing accessories (44)
- sewing clothes (43)
- interesting handicrafts (208)
- miscellaneous (62)
- papier-mâché (57)
- made of paper (36)
- fabric (32)
- modeling (28)
- from threads (17)
- newspaper weaving (3)
- Magazines, books (196)
- Doublet (51)
- beads (36)
- ZhM (31)
- Books, patterns (26)
- sewing toys (15)
- Japanese, Chinese (12)
- embroidery (9)
- handmade (9)
- Interior, renovation (7)
- Knitting (4)
- Health (3)
- Wonderful moments (3)
- Little Diana (2)
- Culinary (2)
- Sandra (1)
- Dragons, dinosaurs (156)
- for home (131)
- beauty (107)
- Crochet and knitting (84)
- soap, home cosmetics (77)
- decor (76)
- miscellaneous (69)
- history, museums, countries (23)
- pictures, postcards (16)
- church, fortune telling (12)
- translator, legal (7)
- music, television (6)
- miscellaneous (5)
- paintings miscellaneous (3)
- diary (62)
- Health (45)
- unconventional (35)
- medicinal herbs (24)
- traditional (4)
- floriculture, gardening (43)
- knitting and fur (31)
- interior (29)
- broken (25)
- useful things for needlework (25)
- computer (24)
- knitting and fabric (22)
- links (18)
- useful tips (18)
- freeform crochet (15)
- freeform products (9)
- lessons, freeform patterns (8)
- aromatherapy (15)
- encyclopedias, libraries (13)
- decoupage (12)
- video (4)
- photoshop (2)
Pet bedding
To ensure that animals sleep comfortably on the floor, bedding must be provided. They can be very diverse. But fur rugs are popular. And it doesn’t matter if it’s an old fur coat made from a rabbit, fox or mouton. Pets feel comfortable on such a bedding.
Fur bedding is made as follows:
| Preparatory stage | Buttons or other fasteners and the lining are torn off from an old fur coat, and the sleeves, back, hood or collar are separated. All pieces are carefully washed and checked to ensure that the fur is not showing too much. Fur flaps are dried and combed. |
| Stage one | We cut out a rectangle of thick fabric 60 x 70 cm and the same from fur. We process the edges using an overlocker. |
| Second phase | We sew the three edges of the two rectangles and turn the product inside out. The fourth side is equipped with a zipper. This is necessary so that something like a pillow or a small amount of filler can be placed inside. |
Fur headphones
To make these headphones you will need:
- scissors;
- black rim;
- felt fabric;
- artificial fur;
- hot melt adhesive.
Using scissors, cut out two interconnected circles from the fabric. Fur is applied to only one side of the circle. The eights are folded and the batting is placed inside. The rim is glued along the contour. The headphones are ready. They can be decorated with a brooch, rhinestones, bows.
DIY fur coat blanket
For these purposes, you may need not one, but several old fur coats. It all depends on the size of the bedspread. In addition to fur, you must have:
- blade or sharp scissors for ripping seams;
- ruler or centimeter;
- marker or chalk;
- knife;
- sewing machine;
- lining fabric;
- threads;
- liquid sealant.
Step-by-step instructions for making a fur blanket.
- We only take clean fur. If you have doubts about its cleanliness, then you should resort to dry cleaning.
- The fur coat is separated from the lining and sleeves, and all existing seams are ripped out.
- The size of the bedspread is determined. This will depend on the quality of the fur coat and its size. You can use the patchwork method, then the dimensions will be more impressive.
- The top of the product is measured using a ruler or centimeter. Lines are drawn on the wrong side.
- The fur is cut along the drawn lines using scissors or a special knife.
- All newly formed seams are treated with liquid sealant.
- If the bedspread consists of many shreds, then they are sewn together manually or using a sewing machine. In this case, special threads and needles are used for sewing fur.
- The lining fabric is sewn to the resulting bedspread.
DIY fur coat cover
Many people prefer to have this luxury in their car. The seat is comfortable and not cold. The cover can be used not only for seats, but also for the backrest. Making covers - capes from fur is quite simple and does not require any special financial costs.
Before you start work, you need to acquire:
- scissors;
- dense natural fabric;
- a needle;
- threads;
- pins;
- chalk or marker;
- sewing machine
There is no need to make patterns for sewing fur covers. Enough:
- disconnect the headrest;
- spread the fabric over the seat and back with a 10cm overlap;
- make two holes for installing the headrest;
- put the headrest in place, thereby fixing the upper part of the fabric;
- the flap is leveled along the seat and slightly stretched;
- excess edges are folded inward and secured using pins;
- places on the flap are determined for fastening elastic bands or laces;
- the fabric is removed and stitched along the intended contours;
- The cape cover is attached to the seats using an elastic band or strings.
Heart to the beloved
This cute accessory will not only be pleasant as a holiday gift, but will also warm your loved one’s hand in your pocket on cold February days. You can sew a fur heart from both natural and artificial material. It is more convenient to use a template for cutting fabric. Cut out two identical elements and sew them together with a seam over the edge. To prevent the fur from interfering, it is carefully straightened. If it accidentally gets between the stitches under the thread, it is removed with a needle.
Sew two cut out hearts along the wrong side, leaving a small hole for the filling. Then they turn the workpiece inside out with the fur on top and fill the internal void with padding polyester. All that remains is to sew up the hole and attach a ring for hanging the keys.
Fur stool cape
Kitchen stools will look more impressive if you sew fur capes on them using long-forgotten fur coats. Such covers not only add softness to the chairs, but also keep them in their original condition. These capes wash well.
Necessary materials:
- a piece of fur;
- elastic or lace;
- strong thread;
- chalk for marking;
- pins;
- needles;
- ruler;
- sewing machine.
Using a ruler and chalk, the dimensions of the future cover are drawn on the reverse side of the fur flap. This takes into account the thickness of the seat and seam allowances. The figure is cut out using scissors or a special knife, the edges are folded and hemmed, leaving 2 - 3 cm of free space for retracting the elastic or lace. The elastic band or cord is pulled in, the cover is put on the stool, the elastic band is tightened well so that the cape fits tightly on the stool. The edges of the elastic are sewn together.
Fur hair scrunchie
This product belongs to the hand-made category and perfectly decorates hair. This type of elastic can be made using a piece from an old mink coat. For work you will need the following materials:
- manicure scissors;
- thick elastic band;
- a piece of mink fur;
- beads or beads;
- felt;
- voluminous button;
- a needle with a thin eye;
- threads;
- middle needle;
- glue "moment".
The stages of making jewelry are as follows:
- A flower is made from a piece of mink to decorate the hairpin. Petals should be voluminous. This is possible thanks to darts.
- Using a felt-tip pen or pen, we mark the outline of the future elastic band. We cut out the workpiece using a knife or scissors.
- The petals are first sewn up with a dart, and then the edges are joined with a seam. The bottom edge remains unstitched. This makes it easier to sew or glue the petals.
- A circle of the diameter you choose is cut out of felt or leather. All manufactured petals are sewn to it. There can be from 7 to 10, depending on the size.
- We cut out a circle with a diameter of up to 4 cm from felt. The core is decorated with beads or beads.
- This piece of fabric is used to wrap a button. It will resemble a ball with embroidery.
- This decorated core is sewn onto a leather circle. The fur flower is ready. Now you need to sew it to the elastic band and you can tie your hair with the decoration.
The easiest way is to tie or sew a piece of fur onto a regular elastic band.
Medium difficulty level
In the master class for a leather necklace with your own hands, you can master the process of creating a necklace of medium complexity. This model will imitate an autumn composition made up of colorful leaves, berries, spikelets and flowers. To work you will need to prepare:
natural leather material;- beads of suitable colors;
- thin and thick wire;
- paints of the required colors;
- clasp;
- glue;
- scissors and cardboard;
- brush.
First you need to make a drawing of the product on paper. After this, 2 identical crescent moon figures are cut out of cardboard and leather - they will be the basis of the future necklace. They need to be glued together. The paper side will become the wrong side, and the leather side will contain berries and herbs.
To make autumn herbs, material in yellow and green shades is taken and cut into thin strips. The stalks of the spikelets are made of thin wire and covered with light brown leather. Their fleecy part is made from fabric with pile.
Autumn flowers are made small; the dark red color of leather material is more suitable for them. For the stems, a wire is used, which is covered with green material. Now you need to glue all the blanks to the base of the decoration, laying them out beautifully. To add naturalness, you need to shade a little paint on the stems.
A good finishing touch to an autumn necklace would be a twig with berries and autumn leaves. For the leaves, templates are first made, and leaves are cut out from them. Bunches of berries are made from beads strung on a thin wire. The branch on which they will be located is formed from thicker wire. It is wrapped in brown leather material. Once the berry clusters and leaves are attached to the twig, it is glued to the necklace. To imitate raindrops, colorless and transparent beads are attached to leaves and grass.
Earrings with fur
To do this you need to have:
- a thin strip of mink fur;
- a couple of beads in the form of rings;
- a pair of brightly colored beads with edges;
- two 2 cm wires to secure the fur circle;
- 2 earrings;
- round nose pliers;
- threads;
- a thin needle.
This type of work requires perseverance and attentiveness. The procedure is as follows:
- The mink strip is folded into a circle and secured with a needle and thread.
- We cut off the excess fur with scissors.
- Carefully tuck the fur tip into the circle.
- To the resulting circle we first apply a bead in the form of a ring, and then a ribbed one. Two beads are sewn to the fur.
- We make a bend at the end of the wire and thread it into the fur circle so that the circle hangs evenly on the wire.
- We also bend the second end of the wire.
- We fasten the rounded end of the wire to the earring ring.
- We make the second earring in the same way. Now you can wear this beauty.
For beginners to learn
Beginners can better make jewelry with their own hands by following step-by-step descriptions and examples. You need to create your own exclusive models with experience.
The simplest DIY leather jewelry for beginners is a bracelet. Using his example, it is necessary to begin the learning process. For this you will need:
- rectangular leather strip;
- scissors;
- clasp;
- scotch.
The first bracelet is very simple to make: a strip of leather material is attached to the table with tape, several cuts are made along the edges that do not reach the edges, and thin cut strips are tied into a knot in the middle. After attaching the clasp, the bracelet is ready.
The second version of the bracelet will be a little more complicated and will require more beads or rhinestones. Fabric pieces are glued to the back side of thin strips of leather about one and a half centimeters long. A pattern of decorative elements is attached to the front side. At the end the fastener is glued. The bracelet is finished. Horizontal pieces of threads with small beads strung on them will look more stylish on it.
Beginning needlewomen will also be able to work on a necklace made of natural leather material . It will require:
Cut out several tiers of flower petals. The wire is covered with leather material. Then you need to collect the flower, starting from the bottom tier. In this case, the lower petals are immediately glued to the wire, and all the rest are attached to them. The center of the flower is decorated with a shiny stone or bead. All the flowers need to be glued in a similar way. Hide the remaining ends of the wire under the beads strung on them. After securing the clasp, the necklace will be ready.
Fur inserts will add originality to accessories made from leather. For leather and fur necklaces you will need:
- pieces of leather and fur;
- fabric, fishing line and glue;
- scissors and glass beads.
Templates are cut out of paper, and according to them the components of the accessory are made of leather, fur and fabric. Fur and leather figurines are placed in a row, alternating with each other, with the back side up. Several long pieces of fishing line with beads attached are glued to them. Now the leather and fur blanks are sealed with pieces of fabric of a similar shape. The new necklace will be ready once the clasp is attached.