Most people throw away candy wrappers. But you can make a huge number of different and unusual crafts from them. Adults and children can be involved in such a creative activity. After all, children love not only to eat candy, but also to look at beautiful candy wrappers and collect them.
Combine business with pleasure, spend time with your child and create a small or large craft from candy wrappers. Make your own toys from candy wrappers to decorate the Christmas tree, crafts for school and kindergarten, or decorations for any other holiday. DIY crafts made from candy wrappers will delight you with their originality, beauty and ease of use.
Materials and tools for work
To make crafts from candy wrappers with your own hands, you will need the following materials:
- Candy wrappers. Their number depends on the type of craft, large or small;
- Threads;
- Needle;
- Scissors;
- Stationery knife;
- Dry glue;
- PVA glue;
- Paper clips;
- Wide double-sided tape;
- Colored paper;
- Cardboard;
- Colored paper;
- Hole puncher;
- Food foil or chocolate foil;
- Beads;
- Thin wire.
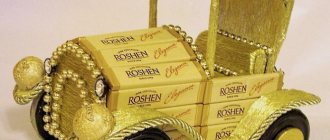
Christmas tree with champagne
How to give your friends a bottle of alcohol for the New Year in an unusual and stylish way? Yes, you just need to arrange it like this. Everyone will love this champagne and sweets tree.
To make it, take double-sided tape and wrap it around the bottle in a row with a charge. Next, sequentially attach the candies to the tails.
And here is another design option. Watch the video to create such a beautiful New Year tree. Shall we watch it together?
New Year's decorations made from candy wrappers
New Year is a wonderful holiday when you want to decorate your home and Christmas tree with the most original, unusual decorations. For an original Christmas tree decoration, making crafts from candy wrappers with your own hands is not difficult. Let's consider several original New Year's decorations - an angel, garlands, a star, a snowflake, a Christmas tree.
Angel
To make an angel you will need:
- 2 candy wrappers,
- bead or food foil,
- threads,
- stapler,
- thin wire.
Performance:
- Take 2 candy wrappers. We fold each candy wrapper like an accordion, so that one is large - this is the body of the angel, the other is smaller - the wings. If the candy wrappers are rectangular, then we make one accordion along the length and the other along the width of the candy wrapper;
- We fold the prepared accordions in the center of each, edges down. We tie it with thread;
- We glue the edges of the bottom wrapper with glue or fasten it with a stapler on the back side of the wrapper and straighten it;
- We apply glue to the edges of the second candy wrapper, glue it to the body, straighten it - these are the wings of a Christmas angel;
- Roll a small ball out of foil - this is the head of an angel, or take a bead. Sew a bead or ball of foil to the body with thread or glue it with glue;
- We make a halo for the angel from wire, thread the lower part of the wire into a bead, and make a small knot at the bottom so that the halo does not fall off;
- In order to hang the angel on the Christmas tree, glue a thread to the back or glue a piece of New Year's rain. Angel is ready.
You can also make a garland from the angels by connecting each subsequent angel by the wing and body.
Garland
Masters of crafts made from candy wrappers with their own hands make a lot of options, limited only by the imagination of the performer. Let's look at 4 options for DIY candy wrapper garlands. The sequence of actions is maintained when creating any type of garlands. To create you will need: candy wrappers, a needle and thread.
Expert advice: It is better to choose a harsh or simple thread for the garland, fold it 2-4 times. A garland 1.5m - 2m long will look more beautiful.
1 type. Garland “Accordion”:
- We select candy wrappers and fold each one individually like an accordion;
- We put 5 candy wrappers together, find the middle of the accordion and sew one loop with a needle and thread;
- At the beginning of the garland, leave a loop, which will be needed to secure the garland to the tree;
- Step back 1 cm from the candy wrappers and tie a loop. This will make it possible to fix the candy wrappers in this gap so that they do not move along the entire thread;
- We repeat the steps again. We string 5 candy wrappers with an accordion and secure with a loop;
- And so the actions are performed along the entire length of the garland;
- Leave a loop at the end of the garland to secure the garland to the tree.
2nd view. Garland “Tube”:
Creating a piece of candy wrappers with your own hands in the form of a garland of tubes is not at all difficult. The creation process is repeated, as with the accordion garland. Only instead of an accordion, tubes of candy wrappers are twisted.
The tubes are lightly pressed in the middle to make a loop. Once the loop is made, the tubes are straightened so as not to lose their shape. The garland turns out voluminous and very beautiful.
The next type of candy wrapper garland is the easiest to make.
3rd view. Simple garland:
- The candy wrapper is folded into 4 equal parts and cut. They do this with all candy wrappers, cutting them into 4 equal parts;
- Collect 10 pieces and string tightly on a needle and thread;
- Every 3 cm of the garlands make a small loop to reduce the mobility of the candy wrappers along the length of the thread;
Such a garland can be made by cutting out any identical geometric shapes from candy wrappers - circles, stars, hearts and others.
4th view. Garland with balls:
- Roll small balls from food foil or chocolate;
- Fold the candy wrappers into an accordion shape;
- Prepare a thread and a needle;
- String the ball one by one, piercing it in the middle, then an accordion-shaped candy wrapper (in the middle or on one edge);
- We string until the thread runs out.
Advice from craftsmen: The garland will turn out lush and neat if you string it in the middle of an accordion
Star
A star from candy wrappers can be made in two versions. One simple 8-pointed, the second 16-pointed asterisk. For a 16-pointed one, you will need 16 candy wrappers, scissors, a cardboard circle or a laser disc.
Performance:
- Fold the candy wrappers diagonally, cut off the extra piece. If you now unscrew the corner, you will get a square wrapper;
- Fold (inside the wrapper) diagonally, first on one side, then on the other. On each side we smooth it well with a fingernail so that bends are formed, at the intersection of which the middle (the center of the wrapper) will be visible;
- Expand the diagonal. We fold 4 corners to the center of the square in turn. The result will be a smaller square;
- Fold it diagonally;
- Fold the entire figure in half on the side of the large triangle. The result is a right triangle with a tongue;
- We carry out the same actions with the rest of the candy wrappers;
- When all the candy wrappers are folded into separate rays of the star, they need to be glued with a tongue into a right triangle.
For the 16-pointed star, the process of creating the rays is the same, but in the end one star is glued on one side to the cardboard or laser disk, the second on the other side.
Expert advice: For star-shaped crafts, it is better to choose paper-based candy wrappers; they are easier to fold and glue.
Snowflake
It’s very easy to make a snowflake using candy wrappers. Do it yourself or involve children, friends, and loved ones in such an interesting activity. The result is bright and unusual snowflakes. The easiest option is to cut out snowflakes from candy wrappers according to a template, but it will not turn out voluminous. For a three-dimensional craft in the shape of a snowflake you will need 3 candy wrappers, a stapler and thread.
Performance:
- Fold the candy wrappers diagonally, cut off the excess so that you get square candy wrappers;
- Starting from one corner to the opposite, fold the candy wrapper like an accordion; do the same with the rest of the candy wrappers;
- Connect all 3 candy wrappers in the middle and tie with thread;
- Fasten the edges of the candy wrappers together with a stapler;
- Straighten the snowflake a little and glue a thread to hang the snowflake on the Christmas tree.
A beautiful and fluffy snowflake can also be made from candy wrappers twisted into a tube.
It will require 5 candy wrappers:
- Twist all the candy wrappers into a tube;
- Gather everything together and press a little in the middle, tie tightly with a thread;
- Carefully, without unrolling, spread the edges of the tubes around the entire circle of snowflakes.
Tip: On accordion snowflakes you need to make small cuts or cutouts.
You will get an openwork snowflake. To decorate it, glue beads, sequins and New Year's tinsel on top of the snowflakes.
Herringbone
The New Year tree is made not only from sweets, but also from candy wrappers.
Performance:
- Fold a cardboard cone in advance and glue it well;
- Cover the cone with double-sided tape;
- Make tubes or bags from candy wrappers (as for seeds);
- Prepared candy wrappers should be glued from bottom to top;
- Attach a star or a cone of candy wrappers to the top of the Christmas tree;
A simple version of the New Year tree is made using a sushi stick, a hole punch and candy wrappers of different sizes, and a plastic cup with sand or plasticine.
Performance:
- Sort the candy wrappers by size (small, medium, large);
- Use a hole punch to make a hole in the middle of the candy wrappers;
- Insert a sushi stick into a glass with sand;
- String candy wrappers onto it, starting with the big ones. Ending with the smallest;
- Glue a star, bead or cone to the top.
Crafts for children
In addition to the sphere of decor and interior design, crafts are used for kindergartens. First, children develop a developed imagination. Things that at first glance seemed out of place find their place.
As mentioned earlier, during development, imagination, concentration and sensorimotor are involved. Sensorimotor is the knowledge of controlling movements and emotions by balancing the eyes and ears with movement.
Butterfly
We have all seen butterflies and been amazed at their attractiveness more than once. The wings are colorful and pleasing to the eye. Now we will look at how to create an equally attractive butterfly.
Fold the two wrappers diagonally into an accordion shape.
Next, fold the labels in half and connect them with thread at the fold, which is also the antennae.
We straighten the wings and glue the antennae at the junction of the upper wings and find a charming butterfly.
This method is similar to origami. Therefore, we can safely call creating origami from candy wrappers.
Dress for a doll
It would be a good idea for girls to make a dress for a doll. You can make colorful, exclusive, lush clothes. Before making, you need to purchase double-sided adhesive tape, bright wrappers, scissors, and candy molds.
Scheme for creation:
- First you need to edit the candy molds to match the desired dress;
- Then we will attach the double-folded light yellow part of the wrapper to the tape at the bottom of the outfit. In the same place we will fix the frills;
- Remove the bottom layer of adhesive tape and attach to it the first layer of corrugated strip of fabric sewn in the center.
- Before applying the final touches, you should assemble them, using this diagram to process the entire length of the dress.
Fish
One of the decorations for a children's room is an applique made from candy wrappers. For example, a fish:
- Before gluing begins, you need to prepare the base.
- You can either draw a picture or create a scene using candy wrappers.
- For the fish themselves you will need a glue stick, fishing line and candy wrappers.
- Cut the candy wrapper to make it square. From the excess part we fold a narrow strip for a sharp tail, and fold the square into a triangle.
Flowers
When decorating a room, flowers help solve important problems. They can easily highlight advantages and disguise disadvantages. Plus, they make a great gift. Simple and beautiful.
To create flowers we will need candy wrappers, scissors, and a glue stick. Usually a thread and a needle are also used, but since this is unsafe for children, there is an alternative creation option, which we will now consider:
- We fold the wrappers into an accordion;
- We glue their centers together in a chaotic manner;
- Glue the stem to the center;
- A leaf to the stem.
Just four points and the flower is ready.
Dress made from candy wrappers
Creating a beautiful dress from candy wrappers is a painstaking task that requires perseverance, creative talent and quite a bit of money to buy candy. To create a dress for a child 8-10 years old, you will need at least 5,000 candy wrappers. In order to quickly collect the required amount of candy wrappers, involve your friends, relatives, and acquaintances.
Before making a dress, you need to decide what technique the dress will be made in? Based on the type of basket weaving, such a dress will be strong and suitable for frequent wear. The dress will be very light and not durable if it is glued together with glue. As an option, they use candy wrappers in the form of lining a finished fabric dress.
When creating an exclusive dress for a child, you must adhere to the following steps:
- Select the model of the dress that will be created;
- Decide on the technique of creating a dress from candy wrappers;
- Before starting work, sort the candy wrappers by color, shape, thickness;
- Carefully smooth out all the candy wrappers through gauze or a thin rag at low temperature;
- We fold the prepared candy wrappers 8 times (one candy wrapper 3 times in half);
- We fold the ends of the candy wrapper into the middle and fold them in half again, so that the ends are inside the workpiece;
- We put the blanks into each other, intertwining them with each other. It turns out a zigzag row;
- We sew each row together with a strong thread of a suitable color. Gradually, a canvas will be obtained from which a dress will be formed to the required size.
Decorating photo frames
From classic modules you can make an original version of a photo frame. It is better to assemble the modules from bright and multi-colored candy wrappers so that the frame acquires a stylish design. An excellent way to attach decorative elements is in the form of interesting scales.
Using candy wrappers you can decorate not only old frames, but also mirrors in the bedroom. You can also show your imagination and create an interesting panel on the wall from bright modules.
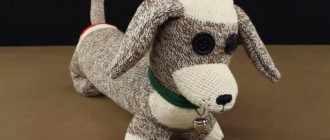
Toys
Developing children's imagination, incredible toys are made from candy wrappers. The simplest ones are fish, butterflies, and pupa.
Fish
To create a fish you will need 3 candy wrappers. The large wrapper is the body of the fish, the small wrapper is the fin, the medium wrapper is the tail of the fish. Fold all the candy wrappers into an accordion shape and bend them in the middle.
Place the middle one in a large candy wrapper and glue it together. Once the glue has dried, straighten the candy wrappers a little and glue the fin to the large candy wrapper.
Butterfly
For a craft - a butterfly, choose 2 square wrappers. Fold the candy wrappers like an accordion from one corner to the opposite corner. Bend 2 candy wrappers in the middle and tie with thread.
Bend one candy wrapper up and spread the wings, bend the second one down and spread it. Cut a thin long ribbon of colored paper or candy wrapper. Tie it to a butterfly - these will be antennae.
Doll
A doll made from candy wrappers is a very beautiful, simple and miniature toy for a child. You can involve a 3-4 year old child in its creation. Choose 2 identical candy wrappers. Fold the first candy wrapper 8 times to form a thin strip. Fold the second one like an accordion. Fold a loop from the strip of the first candy wrapper - this will be the doll’s head and arms.
Thread the second candy wrapper into the loop, folding it in half. Tie the dress with thread under the doll's arms. Straighten the doll's dress, bending it slightly from the inside, like a bell.
Modular Christmas tree for decoration
Modules for the New Year tree are prepared according to a different scheme - similar to folding fish. To create a beautiful Christmas tree, you need to use several wrappers of different sizes, the folds of which differ in the amplitude of their span.
As a frame, you can use an ordinary wooden skewer, onto which the modules are attached using glue.
Keychain
Candy wrappers are used to make beautiful keychains using the quilling technique - for a bag, keys, mobile phone or pen case. Snowmen, flowers, and an owl turn out beautifully. You will need: glue, candy wrappers, a thin wooden stick.
Performance:
- Smooth out the candy wrappers well;
- Roll up the tubes;
- Cut into 1 cm strips;
- On one side of the ribbon, glue is applied pointwise and wound on a wooden stick;
- The resulting circle is carefully removed from the stick and glued to other similar figures, forming them into a finished product - a keychain. Thread a beautiful chain, cord or thread through the middle of the product.
Fish
Candy wrappers can be used to decorate a nursery, for example, to make an aquarium-shaped picture or hanging accessories out of them. In addition to candy wrappers, you also need to prepare fishing line and glue.
Procedure:
- Cut the wrapper into a square piece.
- Make a tail from the cut strip, and a triangle from the square.
- Insert one element into the other and secure with glue.
- Having made several figures, place them on a fishing line, adding beads as a weighting agent, and hang them on the chandelier.
Flower
To make flowers you will need: glue, candy wrappers, threads, wire, twigs or a wooden stick, stapler.
Performance:
- Prepare 4 candy wrappers, fold each one like an accordion;
- Fold everything in half;
- Glue all the candy wrappers at the edges together with the bend towards the center;
- Place a piece of cotton wool inside one wrapper and apply glue - this will be the middle of the flower;
- Glue the candy wrapper with cotton wool to the branch;
- Place the flower on the branch in the middle and secure it with wire from below.
You can also create a flower by folding it out of candy wrappers like a bag for seeds. You need to fold 10-12 such bags (these will be petals), then the flower will turn out to be voluminous. Prepare the middle with the branch, as in the previous flower. Attach the bags - petals should be with the corner down, one at a time using a strong thread.
Topiary using forfeits
Topiaries are objects of shrub sculpture - small trees used to decorate interiors and dining tables. List of materials:
- newspaper;
- glue;
- threads;
- the forfeits themselves.
Master class with step-by-step instructions
The first 3 items are required for the ball. Take a crumpled newspaper and wrap it with threads. Tear the remaining newspaper into small pieces, coat with glue for subsequent gluing of the ball. Wait until completely dry.
Proceed to decorating the ball with candy wrappers: cut them into 2x2 squares.
The crown of the future tree should be coated with glue. You can start gluing with phantoms.
Prepare a yogurt cup as a flower pot: prepare a solution with alabaster (construction plaster), brought to the state of thick sour cream, pour it into a jar and wait until it thickens. To decorate a flower pot, use a sheet of corrugated paper: place the jar in the middle, then wrap the paper around it and cut off the excess.
The edges of the cup must be coated with glue to glue the ball. The topiary is ready.
Basket
For the holiday of Christmas, you and your child can make a good craft in the form of a basket of candy wrappers with your own hands to collect sweets and gingerbread cookies after carols. The number of candy wrappers depends on the size of the basket; you will need thread with a needle and cardboard.
Performance:
- Smooth out the candy wrappers, fold them in half 3 times;
- Bend the edges inward and fold in half so that the ends are inside the workpiece;
- This is how all candy wrappers are rolled up;
- We put the blanks into each other, intertwining them with each other. It turns out a zigzag row - a tourniquet;
- For a small basket, each bundle should consist of 35 candy wrappers; You can calculate the approximate size as follows: each rolled candy wrapper is 1 cm, a bundle of 35 candy wrappers is 35 cm, if rolled into a ring, the diameter of the basket will be about 10 cm;
- The depth of the basket is adjusted by the number of bundles made. One bundle is 1 - 1.5 cm wide. For a shallow basket, you need to make 10 bundles;
- The strands are sewn together, then rolled into a ring and sewn again with strong thread;
- Cut a circle of suitable diameter from cardboard and cover it with candy wrappers;
- Sew the bottom with a thick thread - an overcast stitch;
- For the handle of the basket, it is better to weave 2-3 strands;
- Cover the edges of the basket and handle with a beautiful thread or braid.
Beautiful sunflower made from candy wrappers
You need to prepare:
- 5 wrappers (4 yellow, two green);
- scissors;
- colored cardboard/paper;
- threads;
- scotch;
- stapler
Fold the yellow wrappers like an accordion, then gather them together and tie them with thread.
The edges of the accordions are connected with tape/stapler, then the flower is straightened.
Cut out the middle of the cardboard and fix it.
Green forfeit is useful for leaves. We fold it diagonally into an accordion, then bend it in a ratio of 1:3, tie it with thread, then smooth it out.
The second green wrapper acts as a stem connecting the leaves and the flower.
If desired, decorate the sunflower with ladybugs.
Hat
A great idea for creating a craft from candy wrappers is a hat. A child can create a hat for himself or for a doll with his own hands, while developing creativity, perseverance and patience. Such creative work between mother and child will allow you to spend more time together.
The following materials will be required:
- candy wrappers,
- threads,
- needle,
- cardboard,
- centimeter,
- scissors.
Performance:
- We measure the child's head with a centimeter;
- Iron candy wrappers through cheesecloth;
- We fold the candy wrapper 8 times, bend the edges inward and fold it in half so that the ends are inside the folded candy wrapper;
- We form bundles of the required length by placing one candy wrapper into another candy wrapper;
- Determine the desired depth of the hat. For example: 10 strands are 10-12 cm, which means the depth of the hat will be 10-12 cm;
- We sew the bundles together to create a small fabric. Roll it into a ring and tie it tightly with threads, or with a bright, beautiful ribbon - this will be the back side of the hat;
- We measure the diameter of the resulting ring. To this diameter we add the width of the hat brim. For example: The diameter of the ring is 12 cm, the brim of the hat is 10 cm. Then you need to cut out a circle from cardboard 12 cm + 10 cm (front) + 10 cm (back) = 32 cm; Inside the hat, cut a circle with a diameter of 11 cm, i.e. 1 cm less than the diameter of the ring of strands;
- On the inside of the cardboard circle, make cuts along the diameter at a distance of about 1 cm from each other. Bend these cuts upward and sew them inside to the hat from ropes;
- For the brim of the hat, prepare strands of candy wrappers and glue them with glue;
- For the top of the hat, cut out a circle of the required diameter from cardboard, cover it with strands or just candy wrappers.
Crafts masters advise: Sew all the details of the hat using an overcast stitch and thick, strong thread.
How to make a wreath
Just like an angel, a wreath can brighten up the New Year holidays. List of required materials:
- wrappers (20 pieces);
- foam ring (diameter from 12 cm);
- ball pins;
- artificial flowers;
- scissors.
Squares are cut out of the wrappers: the phantom is bent diagonally, the excess part is cut off.
The top of the workpiece is applied to the foam, the ring is wrapped in a phantom. To secure the side corners, you will need pins, and the latter should not come out.
Attach another one to the secured wrapper, making a small indent from the top.
When each triangle is fixed, the flowers are fixed on the first and last triangles.
Bookmark
To make a bookmark from candy wrappers you need: candy wrappers, scissors, tape or dry glue. Bookmarks are made in two ways.
The first method “Weaving a tourniquet”:
- Fold the wrapper 8 times;
- Fold the ends of the folded wrapper inward toward the middle;
- Fold the wrapper again in the middle, the ends should be inside the wrapper;
- Make 15 such blanks, fasten them by inserting one into another.
The second method “Braiding”:
- Cut 1 candy wrapper into 16 strips of equal width;
- Secure 2 strips in length with tape;
- Glue a second strip parallel to the first strip on top;
- Glue the third to the first strip on top of the parallel second strip;
- Glue the fourth strip in parallel to the first strip on top of the third strip;
- Next, we intertwine the strips according to the pigtail principle;
- We bend the second parallel strip perpendicular to the first, butting it;
- Then we bend the strip on the opposite side;
- We weave to the end of the strips, fasten with tape or glue.
Steps towards the finished product
Stages:
- First, prepare 4 paper wrappers;
- roll them into a rectangle shape;
- fix the edge with glue;
- Glue the two resulting rectangles together crosswise;
- glue the next pair together in the same way;
- fasten the two parts together;
- tie a string to the base of the entire fastener.
Stained glass
To make a stained glass window with your own hands from candy wrappers you will need: cardboard, marker, candy wrappers, a stationery knife, scissors, glue, tape. For crafts, think through the drawing in advance. To create a stained glass window with a 3-year-old child, you should choose simple designs with large details - a flower, a fish, a ball, a turtle, a boat.
Performance:
- Draw a drawing on the cardboard with a marker;
- Cut out the design with a stationery knife;
- Cut out the details of the stained glass window from candy wrappers;
- Alternately glue candy wrappers to the edges of the stained glass pattern;
- Insert the prepared drawing into a frame under glass.
Pansies
A beautiful flower is created very simply. This craft can also be done by preschool children. It is advisable to use beautiful, bright candy wrappers in your work, creating the image of a delicate flower. A composition of several buds will look especially impressive.
To work you will need:
- Stationery glue;
- scissors;
- candy wrappers of various shades;
- cardboard.
Panel
It’s very easy to make a panel from candy wrappers:
- cardboard,
- candy wrappers,
- glue,
- scissors,
- colored paper.
Performance:
- Glue a background of colored paper onto thick cardboard;
- Come up with a plot to create a panel from candy wrappers;
- For the painting “Sea World” you will need to create several fish, an octopus, a starfish, and algae;
- Sort the candy wrappers by color and smooth them out well;
- To make seaweed, you need to roll the candy wrappers into tubes;
- Octopus. Wrap a piece of cotton wool in the middle of the wrapper, tie it with thread, and cut the edges of the wrapper into 8 pieces. Glue to the background with glue;
- Create a fish from 3 candy wrappers of different sizes. Fold the wrappers into an accordion shape and fold in half. Place a medium-sized candy wrapper into a large wrapper with the folded middle and glue it together. Make a fin from a small candy wrapper and glue it on;
- Cut out a starfish from a candy wrapper and glue it to the panel;
- Roll the candy wrapper twisted into a tube using the quilling technique - you will get a beautiful shell.
Sequential steps to perform a butterfly
Stages:
- To create the body of a small butterfly you will need a ball of plasticine;
- it must be rolled out into the shape of an elongated oval;
- glue tiny eyes onto the resulting shape;
- Next, small front wings are made;
- you need to trim the edges of the candy wrappers to create a beautiful outline;
- one edge of the candy wrapper is crowded;
- subsequent larger wings are made in the same way;
- one edge of the large wings curls in the same way as the two small ones;
- the body of the butterfly and 4 wings are held together using small pieces of plasticine;
- At the end, antennae are made from small paper ribbons.
Curtain
You can create a curtain from candy wrappers in 2 ways: by weaving strands and using paper clips.
Performance:
- To weave from strands, the candy wrapper is folded 8 times, the edges are folded inward and folded in half again. All candy wrappers are held together by placing one inside the other; The prepared strands are sewn on top in one row or sewn to the braid;
- To weave using paper clips, the wrapper is folded 8 times, the edges are folded inward and folded in half again. Insert a paperclip into the middle, securing the edges of the folded candy wrapper;
- The edges of the paper clip should protrude slightly from the candy wrapper, for ease of fastening them together;
- The number of paper clips and candy wrappers depends on the length and width required for the curtain;
- Prepare loops from braid or ribbons and sew them to the top clips to make it convenient to hang the curtain on a curtain rod or clothespins.
Wrap pupae
Hanging toys will brighten up your wall, Christmas tree, or any other space. One doll will contain three multi-colored forfeits.
We twist each forfeit like an accordion and fold it in half. One edge bends upward, the “skirt” looks down. You need several such triangles: the largest of them will act as a skirt, and spend the other on the sleeves. For the head, a ball made from any raw material, including polystyrene, will do.
The smallest forfeit will be suitable for a bow. Glue the parts together and attach a ribbon - it will be like hanging a doll.
Handbag
Materials for creating a handbag:
- candy wrappers,
- fishing line or elastic threads,
- Polish for hair.
Performance:
- We fold the candy wrapper 8 times, bend the edges inward and fold it in half so that the ends are inside the folded candy wrapper;
- Place the candy wrappers one into the other;
- Make bundles of the required size that need to be sewn into fabric;
- Make 4 canvases. 2 wide canvases and 2 narrow ones are the sides of the bag;
- Make 5 canvas - this is the bottom of the bag;
- Sew all parts with an overcast stitch using elastic thread or fishing line;
- Sew handles from an old bag or from manufactured harnesses;
- Sew on a zipper or buttons so that the bag can be closed;
- Spray the finished handbag with hairspray, especially the seams. Leave to dry.
Frame
Creating a photo frame or decorating an old one with your own hands from candy wrappers is a painstaking task.
It will require materials:
- candy wrappers,
- glue,
- cardboard,
- colored paper.
Performance:
- Cut out a rectangle from cardboard that will be larger than the photo;
- Paste colored paper - this will be the background;
- Make corners from colored paper so that the photo holds well;
- Make small ropes from candy wrappers. Fold the candy wrapper 8 times, fold the edges inward and fold in half again. All candy wrappers are held together by placing one inside the other;
- Glue 2 candy wrappers lengthwise with tape and twist them into tubes using a thin stick. Glue the tubes onto the photo frame;
- Cover the edges of the photo frame with candy wrappers;
- You can make butterflies, fish, flowers from candy wrappers and glue them to a photo frame.
Christmas tree made of chocolate and waffle candies
Rectangular chocolate-wafer candies in multi-colored pieces of paper make a very funny fluffy Christmas tree. You don't even need glue - just a thin piece of tape around it is enough.
Photo: fotostrana.ru
DIY felt bull: 8 ideas for New Year's toys (patterns)
Beads
Making beautiful beads from candy wrappers with your own hands will be interesting even for the smallest child.
1st option:
- Glue together several candy wrappers with double-sided tape;
- Screw the sticky edge onto the handle to create a long tube. Cut it into small rings;
- Thread the rings onto a ribbon or strong thread.
2nd option:
- Roll up circles from candy wrappers - make several of these beads;
- Roll up some cotton wool in the center of the candy wrapper, tying it with thread to prevent it from falling out. You will get a kind of bead with a train;
- Thread the resulting beads onto a needle and thread.
Angel as a New Year's toy
Angels will serve as a colorful and interesting Christmas tree decoration. To create one such figure it will take 2 bright forfeits and a bead. Wrappers need strictly different sizes.
Each phantom is folded into an accordion and bent in the middle. This is followed by placing the forfeits on top of each other and connecting them with wire or a paper clip.
Place the bead in the center, tie the wire with a loop.
Straighten the accordion and glue the lower ends to the upper ones.
Bracelet
Performance:
- Divide the candy wrappers by color and iron with a warm iron. For the bracelet you will need 25 candy wrappers;
- We bend the edges of the first wrapper inward and fold it in half lengthwise, so that the edges are on the inside. (The rest of the candy wrappers are also rolled up);
- Fold the resulting strip in half crosswise;
- Connect 2 blanks by inserting the first into the second. The result is a loop that should be slightly larger than the width of the strip made. On the other side there will be 2 edges of the workpiece; DIY crafts made from candy wrappers can be combined with various beads, chains and other decorative items.
- Turn the first edge parallel to the second strip - you will get a corner that needs to be folded on top of the second strip;
- The same actions are performed with the second edge. If the workpiece is turned sideways, the folds will look like an airplane. Secure these folds with a paper clip or clothespin;
- Do the same steps with the second strip - you get 2 airplanes, the wings of which must be tucked into the first strip;
- Next, insert the subsequent strips one by one and carry out the same actions;
- Having finished weaving the strips, we roll the bracelet into a ring. We remove the clothespin from the first strip and tuck the airplane wings into the last strip, thus connecting the entire bracelet.
DIY crafts from flagella based on candy wrappers
To implement it, prepare more candy wrappers - bright, multi-colored, from paper of different textures. Such products will look especially interesting. Let's make the basis for future crafts, namely strands of candy wrappers.
There is nothing simpler:
- Roll each wrapper into a strip about 1cm wide
- Place a thin wire of the same length inside
- Fold each flagellum in half - and here is the basis for the craft.
Lapti
Expert advice: Sandals from candy wrappers are made from 2 parts. 1st toe-foot, 2nd side-heel.
This is one of the most interesting DIY crafts made from candy wrappers.
Performance:
- Smooth out the candy wrappers, fold 8 times;
- Bend the edges inward and fold in half so that the ends are inside the workpiece;
- This is how all candy wrappers are rolled up;
- We put the blanks into each other, intertwining them with each other. It turns out a zigzag row - a tourniquet;
- The toe-foot part consists of 3-4 strands, they are sewn together with strong thread;
- The side-heel part consists of 2-3 strands, which are also stitched;
- Sew a ribbon or strap to the toe-foot piece to secure the leg. Sew the second side-heel piece on top of it.
Butterflies from improvised means
The candy wrappers are leveled and folded diagonally, then compressed into an accordion and glued together. All that remains is to spread your wings.