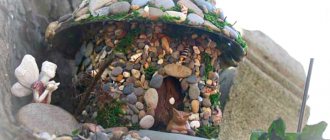
Pot for indoor plants
You can use the construction set to assemble a flower pot. The convenience is that you can:
- build and rebuild as the plant develops;
- carefully disassemble without damaging the root system;
- combine with other similar pots to create a single composition.
: Epoxy resin
Mix one portion of resin (according to the instructions on the package) in a disposable cup and stir the mixture with a spatula.
Let's add decorative material to the epoxy. I really liked the powder and glitter.
Pour the resin into the mold. Filling should be done with extreme caution. Don't pour too much because the resin will stick out through the top of the mold.
The resin will shrink slightly in size after drying.
Educational games
It has long been known that modern children learn fractions well using Lego cubes as an example. You just need to select a suitable part to represent the whole number, two smaller parts to demonstrate one second, one fourth.
It is convenient to teach children to put letters into syllables, and syllables into words. To do this, cubes of the same size but different colors are selected. You need to write letters on them with a marker - and the didactic material is ready. It is advisable to make several of the most popular letters.
Transferring a drawing
When the plywood is prepared, it's time to choose a pattern. If you look at modern backgammon, you will notice that ornaments with dragons, plants or arabesques are very popular.
The choice should be approached with special attention so that the design matches the plane of the future board. It is necessary that symmetry, so important for the game, be maintained. On the outside, the ornament can be large in size, but on the inside you shouldn’t do this, because there should be room for points.
The drawing is transferred to plywood using carbon paper. To do this, place a copy and a sheet of paper with a drawing on the board. All this is secured with tape and the outline is outlined with a simple pencil. If some parts of it remain undrawn, you should complete the image completely.
The points must be measured well using a ruler. They must be the same size. You need to draw them with a pencil on the inside of the workpiece.
Lego as a decor for liquid soap
Your favorite construction set will help persuade your child to wash their hands regularly. In a transparent container with liquid soap, the design parts look fascinating. To some, they even resemble fish in an aquarium.
All you need to do is buy a colorless transparent container and remove the stickers from it. Put the details inside, giving preference to bright ones.
It is better to hold the Lego parts in hot water for a while beforehand, this will remove dirt from them.
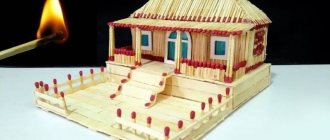
Unusual Christmas wreath
This wreath can be used to decorate the door to a children's room before Christmas. On the one hand, it will perfectly complement the atmosphere of the upcoming holiday, on the other hand, it will bring spontaneity to the child’s room.
How to make a Lego craft is described below:
- Cut a wide ring out of cardboard and cover it with foam rubber or other soft insulation.
- Drape it with fluffy green fabric to imitate pine needles.
- Attach red (or orange) and white Lego pieces using a glue gun.
- On the back side of the wreath, consider securely mounting it on the wall.
The wreath is ready.
Description of dice
One of the most popular sources of randomness in board games is dice. From the English word "dice" meaning "give and play". A dice for the game is a small object that, when it hits any plane, falls upward with only one side. Used to generate numbers.
What does a dice look like?
There are many different options available. They may differ both in form and in their content. A standard dice represents a figure that has sides of 1.5 cm. Each side contains numbers from 1 to 6, and the opposite ones add up to a value of 7.
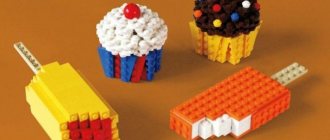
Vase made from designer parts
By finding many different types of parts, you can create an original and quite functional vase.
For the base you will need an old PET bottle with a wide neck or a regular glass. The sequence of actions is as follows:
- sort Lego elements by color and size;
- create a base-stand for a glass from flat parts;
- along the side parts of the stand, build up the walls of the vase, using parts of different colors;
- you can lay them out in rainbow order or put them together in a name/pattern.
Sales of products
Being quite experienced in woodworking, an entrepreneur can start selling cubes in just two days.
You can sell them on the local market, create your own kiosk of children's toys and sell independently created products, or negotiate with the owners of toy stores.
The last option may be the most profitable, since you will not have to spend a lot of time on sales or pay for the work of an employee, dealing exclusively with production.
Cubes can be sold individually or in sets, creating your own colorful packaging for them from plywood or cardboard, or purchasing fabric bags at wholesale prices.
In order for the products to look as attractive as possible to parents, it is preferable to produce different variations of the products.
As an example, there are several options:
- unpainted products – sanded very high quality, made from wood with a beautiful texture;
- multi-colored - all sides of the cubes are painted in different colors, which will allow children to show their imagination while playing;
- same type - all sides have the same shade;
- of various sizes - sets are created consisting of a variety of cubes that can be used to build “houses”.
A beautiful company logo, recreated on each product with gold or silver paints, will significantly improve their appearance and emphasize the prestige of the company.
Night light made of transparent parts
If there are a lot of transparent parts, you can make a portable night light with your child for his room.
The parts are folded into a box, and an LED lighting source is placed inside. This night light has a wonderful ability - you can reassemble it every day, changing patterns, sizes and colors.
You can make a night light with a regular cartridge. In this case, be sure to ensure that the light bulb does not heat the homemade night light body.
Lego style decorations
From bright elements, needlewomen make original handmade Lego crafts in the form of jewelry - beads, earrings, pendants. Small round multi-colored details are well woven with beads in brooches and even paintings.
Schemes of Lego crafts are presented below. To create jewelry you will need:
- dense thread or wire;
- accessories (clasps, locks);
- beads and seed beads (preferably in neutral colors).
You need to make neat holes in the Lego pieces and string them, alternating with beads. The simplest version of the necklace is ready.
Holders and stands
Lightweight and portable stands help you store neatly and never lose:
- mobile phone and charger;
- remote controls for air conditioning, TV, lamps;
- gaming joysticks;
- shaving accessories.
For office supplies on your desktop, you can assemble a cup with compartments for paper clips, buttons and other small items.
Flash drive update
You can make a unique and inimitable flash drive from several construction bricks. To do this you need:
- disassemble the flash drive and remove it from the old case;
- cut a hole in the Lego piece for the connector;
- insert a flash drive into it and fill it with glue;
- close with the second piece.
The flash drive cover is glued using the same principle. On the main body (optional) you can add airplane wings, a house roof, and more.
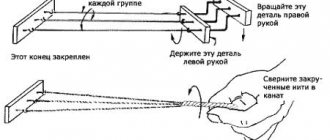
Start by preparing the veneer
1. To create the board playing field, cut strips of walnut and maple veneer measuring 38x191 mm, making 30 pieces of each color. Quick tip! To carefully cut the strip using a sharp knife along a metal ruler, place a flat piece of hardboard or plastic underneath.
2. From scraps of 13mm thick hardwood, cut four top plates measuring 38x254mm and four bottom plates measuring 51x254mm. In the four top plates, make mounting holes with a diameter of 4 mm at a distance of 25 mm from the ends.
Interesting key holders
The coolest Lego crafts will perfectly help children (and many adults) not to scatter their keys in different places in the apartment. To make a key holder you will need:
- wide flat base of the constructor;
- double-sided tape or nails to attach it to the wall;
- Lego parts with holes for keychains;
- consent of all household members to walk with a Lego keychain on their keys.
The base of the constructor must be attached in a convenient place on the wall or cabinet door. The keys of everyone who returns home are perfectly attached to it.
History of dice
The origins go back to ancient times, but how many years the cubes have existed is unknown. People really wanted to know what awaited them in the future, and for this they created special fortune-telling bones. They were thrown up and tried to determine the meaning of the combination that appeared on them. Later they began to use the fruits of the trees. For some time, dice were made from animal bone.
Asia is considered the birthplace of bones. Scientists and archaeologists still find during excavations roughly finished pieces of wood or fragments that were used for magical purposes. Dice made of stone were discovered in a place called Nectaris. The items found date back to the 6th century BC. The fact remains that gambling has been part of people’s lives since time immemorial.
Objects found in the 6th century are not the most ancient. For example, the British Museum contains astragalus, which have four sides with small indentations and markings. The Theban remains date back to 1573 BC. From Asia, dice for the game gradually migrated to Italy, Spain and France.
Watch
Having a working clock mechanism, you can decorate it with Lego. A dial with a hole in the middle is assembled from flat parts, and the mechanism is glued into it. The numbers on the dial are also laid out from the designer.
The hands are decorated only if this does not make the mechanism too heavy and the watch will function accurately.
We hope that the prepared material was interesting and useful to you. All the best!
DIY flip photo cube
How to make your own flip photo cube - an original photo album in the shape of a cube with 12 pictures. Will serve as a memorable and versatile gift for any occasion.
A regular photo cube is a cube with a photo on each side, six in total. The reversible photo cube is designed in such a way that it can be “turned” inside out, and six more photographs will be revealed there—twice as many. Such an original and useful thing can serve as a wonderful gift for any occasion. The inverted cube is made by only one (at least in the spring of 2008, I was able to find only one) company, for two weeks and half a thousand rubles. The amount seemed too high to me, but most of all I didn’t like the timing, since there was a week left before the next holiday, I decided to make the toy with my own hands. In addition, a homemade gift will bring much more joy to both the congratulator and the congratulated.
We will need:
- 8 small children's cubes, the kind that are put into pictures
- 12 photos
- glue
- strong tape
- three hours of free time
It is better to take plastic cubes, they are much lighter than wooden ones. The standard size of such cubes is 4 cm, which fits well with the 10x15 photograph format. The pictures on them should stick well, if they don’t stick well, tear them off completely and lightly sand the surface, we’ll glue them directly onto the plastic. In this case, it is better to take an appropriate glue, for example “Moment”, but if we are gluing photographs onto paper, then we use regular PVA.
Photos for the cube need to be prepared for printing in a special way: everything you want to place on the photo cube must fit into a square twice the size of the side of the children's cube (for cubes with an edge of 4 cm, we get a plot part measuring 8x8 cm). It is advisable to step back from the edge of this square a few millimeters in case the photo lab stretches or shrinks the frame a little when printing.
We send the prepared photos to the laboratory for printing or print them ourselves on a photo printer. By the way, right now there is a promotion where you can order photo printing for your cube absolutely free
. Details are at the end of the article.
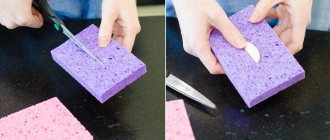
Let's start preparing the base of the photo cube. In order for it to turn inside out, the cubes from which it is made must be hinged to each other. For this we use tape.
Look at the picture: a strip of tape is glued to two cubes and they can be thrown around a common edge. On the other side, exactly the same strip is glued, for greater strength of the hinge. Attention
When gluing, do this: place two cubes (or blocks of cubes) side by side, laying strips of unnecessary pieces of photo paper between them in two layers, and lightly pressing the cubes together, glue a strip of tape.
If you don't put photo paper, then when the photo is pasted onto the cubes, they won't be able to fold tightly! If you will be printing photos on an inkjet printer, use strips of appropriate paper. Strips of tape should be approximately half the length of the edge of the cube, and one and a half times longer. Then, when sticking photographs, they will hold the tape and hold on to the cube themselves - this will increase the strength of the entire structure. Alternatively (I haven’t tried it), you can take a good double-sided tape and glue it along the entire length and width, and then remove the protective layer and stick photos on the tape. If you are printing with an inkjet on thin paper, this should work.
The main thing when gluing is to glue it correctly, otherwise the photo cube will not unfold correctly. Look at the diagrams and everything will work out for you! To better understand the order of gluing, I painted the tape in different colors: the one we glued first was yellow, the second was blue, and at the end it was red.
- Glue 8 cubes into 4 pairs. It is clear that you can glue along any edge.
- We take two pairs and glue them into one four. We are guided by the yellow tape that was pasted earlier. Then we take the remaining two pairs and glue the second four in exactly the same way.
We fold two fours (we use the blue tape as a guide, the yellow tape is not visible, it’s on the back side) and glue the final photo cube.
Don’t forget to layer the photo paper when gluing and glue each “hinge” on both sides.
If something is mixed up during the process, the tape can be easily removed and the process can be repeated. The result should be a cube that turns inside out (you can mark one side of one cube and make sure that it is visible in one position and not in the other).
We take the photos from the lab and move on to pasting them. From each photo we cut out a square the size of the side of a photo cube, so that the intended frame fits into it. For framing, it is convenient to make a stencil from a transparent thick film, cutting out a square of the desired size. To cut, apply the template to the photo, then press the ruler along the side of the template and cut off the paper with a sharp knife.
Now we cut each photo square into 4 equal photo square parts and glue them onto the edge of the photo cube. We pasted over all six edges, let the glue dry, turned the photo cube inside out and continued pasting it “from the inside out.” This work is much simpler and clearer than gluing cubes with tape, but it requires more time, patience and accuracy; the final result largely depends on the quality of its execution. Do not allow glue to smudge; they can glue your photo cube in one position and it will not be able to unfold.
Let the glue dry completely and check the photo cube. I hope you like the result!
In this video, which we shot together with Stas Savin, you can see the entire process of making the cube with your own eyes.
This video is on YouTube
To print photos, including when making a photo cube, I recommend contacting the photo service NetPrint.ru
. Its obvious advantages: sending an order directly via the Internet, receiving it at pick-up points (available in every major city in Russia) or by mail, high quality of work and a wide selection of services.
And most importantly: right now NetPrint is giving every newly registered user a free print of twenty photos! Therefore, you can print not only 12 photos for free to make a photo cube, but also 8 additional photos, for example, as a gift. Get a certificate for free photo printing!