Interest in space and its mysterious beauty evoke a desire to create.
A large number of crafts on this topic coincide with the celebration of Cosmonaut Day.
This holiday gives you the opportunity to believe in your dreams. After all, man has long wanted to learn how to fly high in the sky, and now, as if in a fairy tale, such a dream has come true.
People continue to conquer the vastness of the universe.
The benefits of making crafts
By involving children in making crafts that can be used to decorate a home, group, classroom, or formal hall, an adult creates in children satisfaction from collective festive activities.
It wouldn’t hurt to mention the world’s first cosmonaut, the creators of rockets, and walking on the moon. Let children know from an early age who made the dream come true.
In addition, the child learns a lot of new things: how a rocket works, what kind of work astronauts do, what the solar system is, what the planets are made of, how many civilizations exist, how they go into outer space.
Children have the most incredible questions.
We can satisfy their curiosity, because the desire to be explorers and discoverers grows in little people. And there are still so many mysteries of space.
Pirate
When a child wants to feel like a real sea robber, it will be useful to learn how to make a paper pirate hat with your own hands. In fact, the algorithm is simple:
- Cut out a square from black paper.
- Fold the sides inward to form a circle.
- We make the fringe: fold a strip of white paper in half, make small cuts along the entire length and twist it with scissors.
- Glue the fringe to the hat along the entire diameter.
- We mark three equidistant points on the product and bend the semicircles upward.
- We decorate with paper feathers and a pirate emblem.
- We fix the elastic band.
The elastic band can be disguised with a beard and hair, making the image even more intimidating.
Space applique
Even small children can make this application. After all, the manufacturing technique is as simple as possible.
Paper rocket
A very beautiful applique can be made for children for Cosmonautics Day. Despite the simplicity of the image, these crafts look great:
- First we select the background, it is blue, dark blue, black.
- We will lay out the pre-prepared parts of the craft on colored paper or cardboard. Children from 3-4 years old can cope with this work.
- Details - the main part of the rocket, a round window, triangular wings. We glue everything one by one.
- Paste it carefully. We decorate the sky with golden stars.
- Children of older groups will perform a more complex applique. They themselves draw the parts according to the template and cut them out. Details are placed on the background.
A rocket made of silver paper on a black outer space background, impressive:
- cut out the nose and wings from blue paper;
- round windows - portholes, made of red, on which we apply smaller white circles;
- highlight the back compartment with a blue stripe, put a cut-out fire from red paper, put a yellow cut-out on it, it is smaller in size.
It remains to depict 2-3 planets and stars. The beauty of the craft is obvious.
Volume applique
The same craft made from corrugated cardboard looks great. The paper parts are glued to the background, and the same cardboard parts are glued to them with double tape. The result is a three-dimensional application.
From beads and beads
On drawings depicting constellations, draw stars using a stencil:
- Select small beads and seed beads in yellow, red, and blue colors.
- Apply glue to the outline, lay out the ornamental material along the outline, then small beads and beads, distribute evenly with a stick over the entire star. It turns out beautifully.
- So we fill all the constellations with decor.
Choose the background at your discretion.
Using the same technique, you can make other objects: the moon, a comet, a satellite, to the main decoration, it doesn’t hurt to add elements of voluminous decorative stickers and distribute them along the contour.
Cardboard postcard
On the outer part of the postcard, depict a rocket with a cut-out porthole; the astronaut, depicted on the inside and glued to a paper spring, should look out of this window:
- We must try to ensure that the image of the face in the helmet falls exactly into the lens of the window.
- The color of the postcard is blue, with a brilliant image of the object.
- We draw one or more astronauts according to the template, color them, and cut them out.
- We make a spring from a small strip of paper folded into an accordion. Glue one end to the card, the other to the person.
- We unfold the postcard and see the starry sky, an astronaut who has “walked” into outer space.
Salt dough rocket
Children are given a rolling pin to roll out a piece of dough, cut out the body according to the template, the windows can be removed, holes can be left in this place, or an overhead window can be made:
- Add a triangle-shaped bow and compartments to the main craft, and add fire too.
- Cut out using a star shape. We pierce all the products, leaving holes for making a pendant. If desired, the product can be used this way.
- Place the product in the oven to dry.
- Color with colors at the child's discretion.
- Now our rocket can fly to distant stars. On a purple or blue background, spray white paint - small stars. Glue the craft.
Ideas for origami
When learning the art of origami, it is important to know what figures can be made from paper. The most classic option is the crane, which is considered a symbol of happiness and success.
In Japan, there is a belief that if you make a thousand cranes, any cherished wish will come true.
You need to make a crane according to a pattern; this is not the simplest type of origami, but it is very exciting and useful. In addition to the crane, you can make many other equally interesting figures.
- Various animals and birds - owls, foxes, hares, crabs and so on;
- Flowers and plants;
- Geometric figures;
- Unusual figures in the form of a cup, heart, star and much more;
This or that type of origami is made according to a certain pattern. There are easy paper origami, as well as more complex options for more experienced craftsmen.
Origami step by step
Drawing
Of all kinds of artistic creativity, the theme of astronautics is best expressed in a drawing.
You can depict a rocket, as well as spaceships, lunar rovers, satellites. Kids are just starting to use paints, but older children can do more serious work.
Preschoolers should be asked to draw a drawing of an astronaut in a helmet, a rocket, and the earth:
- We divide the sheet into three parts and roughly outline where the figures will be.
- On the right side we draw a large round head, a rectangular body, arms and legs in voluminous clothes.
- Inside the circle we draw a square - a spacesuit. Let's draw the person's face.
- On the left we draw a round earth. You can draw a circle according to the template to depict the continents.
- At the top of the picture is a spaceship, we draw it small, it is in the background, the child will do it himself: a triangle, a circle.
- A cord stretches from the ship to the astronaut’s spacesuit, draw a line. Our hero in outer space!
- You can decorate with colored pencils, crayons: Blue earth, a bright astronaut suit, everything is at the child’s discretion.
It is advisable to paint over the entire sheet of the drawing, without leaving any white spots.
With younger schoolchildren, you can depict more complex objects, use a palette, and mix paints.
Having depicted satellites, ships, planets with a simple pencil, you need to paint over them with suitable colors, in addition to this, we make the background of the picture from mixed colors, for example, blue, cyan, a little red, mix, paint over the surface, you get a mysterious space.
Or you can start the image not with objects, but with the background: paint a sheet of paper blue and purple, add blue, white, spray white, yellow paints, when dry, draw white objects on a beautiful background - an astronaut, a ship, a planet. The drawing is a miracle!
Modules
Small squares of paper are used to make parts for modular origami. They are no less convenient than their classic rectangular counterparts, but are used only for tangram puzzles - flat figures assembled like puzzles. There are two types of modules: main and additional. The second option is needed for narrow long parts:
The main module folds as follows:
- We bend the square base diagonally.
- Raise the outer corners up to the center line.
- Turn the workpiece over.
- Bend the top.
- This is what should happen.
- We lower the forked part over the previously bent one.
- Fold the resulting triangle in half into a “valley”.
- The final module is presented in steps 8 – 10.
Volumetric rockets
This craft is good because you don’t need to use craft tools. You can do them on the road, during a walk, and then include them in an interesting game:
- Take a square sheet, white or colored, bend it in half, then straighten it out.
- Bend the sides in the middle and straighten them again.
- The result was three stripes of folds: one in the middle, and one on each side of the craft.
- Now bend the upper corners towards the middle.
- From this position, bend one side so that it matches the fold of the other side, and bend it back again, now the folded side coincides with the central fold.
- Also on the other side.
- We turn the craft over, we have a body, nose, wings.
- You can cut the wings and bend the corners. We draw the details and launch the rocket into space!
Foam craft
Let's take a foam plastic blank in the form of a cone, paint it blue, let the bow part be pink, the rear compartment blue, make pink wings and a yellow window out of paper, and glue it. Crumple the corrugated red paper and glue it to the back - fire. Five minutes, the flight is normal!
Cardboard sleeve
Very convenient material, almost ready-made craft:
- We glue two bushings with hot glue, this is the body.
- We cut the soft sleeve, glue three or four small cylinders from it - this will be the engine, and glue it inside the body.
- 4 wings, cut out and glue on.
- We glue a cone on top - the bow of the ship. Adding windows.
- We will color the craft at our own discretion.
Plasticine astronaut
Let's roll a ball, this is a head in a helmet:
- We roll 5 sausages, make a spacesuit by rolling a larger piece of plasticine into a spring. The rest of the sausages are also spirals - arms, legs.
- Orange gloves, boots. Let's put it together, we get an astronaut.
- To highlight the face, mark the parts: nose, mouth, eyes. And we will make the front part of the spacesuit from part of a transparent plastic bottle.
Universe layout
On dark-colored cardboard, draw thin orbits with white paint. In the center is the Sun, the closest orbit is Mercury, then Venus, the Earth with its satellite - the Moon, Mars, Jupiter, Saturn, Uranus, Neptune, the last one is Pluto, but not all of it is included in the solar system.
We make the sun from corrugated yellow paper: we glue thin strips or pieces tightly to each other onto a disk of cardboard, we do not glue it completely, some of the paper remains free, especially along the edge of the circle - scorching rays.
We cut out the remaining planets from cardboard and color them.
The entire craft should occupy no more than a third of the table. The layout can be hung on the wall, in front of the eyes of a student or preschooler.
We respect the proportions:
- The largest of the 9 planets is Jupiter, light orange in color, then the planets go in descending order of size:
- Saturn, light yellow, paint on the rings,
- Sea green uranium.
- Neptune blue,
- Land of blue.
- Mars is red.
- Venus of yellow,
- Mercury is grey.
- Pluto is small in size and gray in color.
- There are so many circles of different colors and sizes that need to be made.
We highlight craters, spotted, wavy surfaces with paint and add white.
You can note the satellites of Mars - there are two of them, Venus and Mercury do not have them.
Other planets have many satellites; it’s a matter of choice; if you wish, you can teach the children their names and numbers.
Papier-mâché planet
Any planet can be made like this: inflate a balloon, cover it with glue, glue newspaper, used office sheets, and unnecessary paper:
- We do not seal the tail of the ball where the strings are tied.
- Let the work dry overnight.
- Then we pierce the balloon and pull it out.
- We paint the craft blue with yellow spots. This is our Earth with its continents.
- Other planets can be made in a similar way.
- We take balloons, inflate them to different volumes, observe the proportionality of the planets, cover them with paper waste, about 3-4 layers of paper, wait for each layer to dry. Then we paint and varnish the craft, otherwise the gouache may smear.
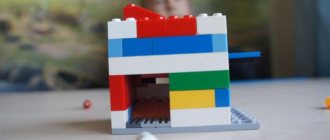
Rocket from boxes
It is best to take boxes from under tall refrigerators, cut out a door, a window, decorate the rocket at your discretion, and sign it. Fold the bow part from the top of the same box. Cut out the wings from thick cardboard and glue them on. Turn on the Starry Sky night light and you can imagine flying into space.
For story-based and role-playing games, a rocket from half a box is suitable. The box should be the height of the child:
- We make the front part: a body with a front wall, and two halves of the box walls on one side and the other, which help to hold the front part.
- We cut out a window onto which we glue a cardboard ring - a porthole.
- Decorate the rocket with stars.
- You can make an inscription, draw a Russian flag.
This is time-consuming work, and an adult must help with advice or action.
It is great that from an early age, children are introduced to public, significant holidays that are celebrated both in Russia and abroad.
Children develop a sense of belonging to the celebrations, and the basis of a festive culture is formed.
It wouldn’t hurt to mention the world’s first cosmonaut, the creators of rockets, and walking on the moon. Let children know from an early age who made the dream come true.
The topic of space is a good platform for intellectual development, an ongoing source of educational information.
Parents play a significant role when, together with their children, they participate in making crafts and talk about what they themselves know. This is not just leisure, but a kind of unity between adults and children, where everyone feels like a significant person.
Cap
Simple hat templates for beginners are opened by a paper cap, which is quite simple to make:
- Fold the sheet in half so that the fold is on top.
- We bend the two upper corners towards the center, carefully working out the lines.
- We fold the remaining strips at the bottom up on both sides.
- We turn the corners in opposite directions.
- We unfold the product.
This option is considered a working one, it is made from a newspaper spread and is a great saver during the summer heat or during renovations.
Sombrero
The main accessory for a Mexican party is the sombrero, a bright headdress with a characteristic shape and bright colors.
Detailed instructions for making such a hat look like this:
- Prepare materials (whatman paper, flower pot, decorative rope).
- Cover the pot with white paint and let dry.
- Turn it over, attach it to whatman paper and circle it.
- Inside the circled circle, draw a smaller circle of 3-4 cm and cut it out.
- On the left strip, make equal cuts 3-5 cm wide.
- Decorate the brim of the hat: cut it in a circle and bend it inward by 7 cm.
- Paint the pot and let dry.
- Place a strip of double-sided tape inside the pot.
- Fasten the fields with the pot.
- Color the hat with patterns.
- Attach decorative rope.
Step-by-step instruction
The Dunno costume can be created either completely from scratch or based on the child’s existing trousers and trousers. Which option to choose is up to everyone to decide for themselves, but it will take a novice craftswoman at least 2-3 days to complete such an outfit.
Sewing a tunic shirt
If the child’s wardrobe does not have a bright yellow, orange or red shirt that can be used to create a Dunno costume, then you will have to sew it yourself. This can be done in two ways: complex and simple. The complex method involves creating a pattern according to the child’s individual measurements, while the simple method allows you to sew a new item using only other children’s clothing as a sample. In this case, the shirt will have a one-piece sleeve, which will greatly facilitate the entire sewing process.
A sample shirt pattern created according to a child’s individual measurements
A simple version of sewing a Dunno shirt consists of several simple steps.
Step 1 (cutting material):
Step 2 (sewing the shirt):
Equipment:
Sewing trousers (short trousers)
As in the case of a tunic shirt, the simplest pants for Dunno can be sewn based on the trousers existing in the wardrobe.
Making a pattern on fabric:
Sewing trousers:
Rag doll – Dunno
My granddaughter loves boy dolls very much, so without thinking twice I gave her my next “masterpiece.”
Everything, as usual, begins with transferring the paper pattern onto fabric. I always sew dolls from linen.
The patterns were cut out with allowances, basted, sewn, and turned right side out.
Filled with padding polyester or holofiber - whatever you have. The head and torso are tighter. And the arms and legs are softer so that they bend easily when playing.
We sewed up all the holes into which the padding polyester was filled.
Sewed on the buttons. This is to make it more convenient to sew the limbs to the body later.
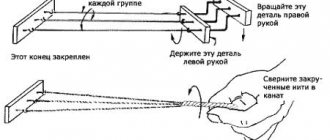
Let's start sewing. First, through one hand, we sew a stitch with a thick strong thread through both holes on the button in the marked place. Pull the thread away from the button to the side by 10 cm.
Then we pass the protruding ends from the side where the second hand is supposed to be sewn on one by one through the holes on the button. You will have to put a needle on each end of the thread.
We make knots at both ends, tightening them tightly so that the arms do not dangle. We cut off the excess ends.
We do the same with the legs, pressing them tightly to the body. The legs should not wobble. Our boy will stand on them if he wants.
An accordion formed between the legs. It’s okay, you can’t see it under his clothes, but he can stand firmly if he wears shoes with flat cardboard soles.
Now let's start designing the face. We embroider the mouth with red or pink floss threads, then the eyes. Be sure to mark with safety pins before sewing so that the eyes and mouth are exactly where you want them.
We embroider eyebrows and make eyelashes from bobbin threads. My boy is small, only 20 cm, and he doesn’t need thick eyelashes.
I usually don't make one toy because my granddaughter has a twin brother. Therefore, two dolls with different clothes, eyes and so on. In the photo they are lying with their heads not sewn on, because I was going to make them one-piece clothes, but then I changed my mind - let them undress.
Using this pattern, I cut their clothes - trousers and a shirt.
I cut it out with seam allowances.
I placed the trousers at the top with an elasticated belt. The shirt was decorated with lace in the center and an elastic band with a ruffle at the neck. I made the closure at the back with Velcro at the neck so that it would be convenient for children to play - they love to take off their clothes at this age!
Dressed the boy. I sewed his head on.
Now let's start with the hairstyle. I cut the threads and divided each into 3 parts. Then the hair will be soft, fluffy and not heavy.
I crocheted a small hat with a beveled bottom edge along the back of the head.
Using a hook, I pulled the hair under the hat, hung it like a fringe, trimmed it, and did my hair.
But I have two of them, boys.
Here they are, my handsome boys, standing and holding each other’s hands. They're exactly like my grandchildren when they're not fighting.
But they started playing around and got into the slippers.
I knitted a hat for my beloved granddaughter’s boy; he looked like Dunno from Sunny City.
And of course, he made a complete mess - he climbed onto the curtains! Give your children and grandchildren joy, it will be rewarded to you a hundredfold!
Source