Daisies are the embodiment of simple beauty and sincere joy. In this article you will learn how to make paper daisies with your own hands. These are very simple flowers with characteristic shapes, so their paper counterpart is also very easy to make.
A paper daisy flower with a yellow center surrounded by rays of white petals brings sunshine to any floral arrangement or bouquet. Here are 12 simple examples with step-by-step photos. These are daisies made from corrugated paper , several origami models and light versions of daisies made from colored paper using templates.
Paper chamomile quickly
Here's how to make simple paper daisies . This is just a diagram, but very simple and understandable. If you need to make a lot of flowers quickly, this is a great easy way.
You need a sheet of any paper, approximately 22 x 30 cm, glue, tape or a stapler.
- Before folding and cutting the paper, color it as you wish.
- Fold a sheet of paper in half lengthwise.
- Draw a line 3 cm from the edge across the width of the paper.
- Cut the strips approximately 1.5cm from the folded edge to the line.
- Fold the two uncut edges together and secure with glue or tape.
The paper chamomile is ready.
Author: Andrea Mulder-Slater Photo source: kinderart.com/art-lessons/seasons/paper-flowers/
What is needed to make such a bouquet?
- Yellow food coloring.
- Semolina.
- Corrugated paper in white and olive colors. I would like to say a few words about the quality of the paper. Choose thicker, stiffer floral paper rather than thin crepe paper. She keeps her shape perfectly.
- Drinking straws.
- Wooden skewers.
- Brush.
- PVA glue.
- Candies.
- Toothpicks.
- Scissors.
- Scotch tapes: regular, double-sided thin and double-sided thick.
- Threads of any color (green in MK).
- Decorative basket for a bouquet.
- Styrofoam.
- Foil.
- Green organza fabric.
Now let's make a bouquet!
1. First you need to make pollen for daisies. It will be replaced by yellow-painted semolina. Add about 10 drops of food coloring to the cereal and rub the mixture well with a spoon or your fingers.
2. It is easier and faster to do this with your hands; it is advisable to wear gloves, otherwise the skin will also become stained.
3. Cut a rectangle measuring 5 cm by 30 cm from white corrugated paper. Please note: cut the paper exactly as shown in the photo, the embossing lines should be vertical.
4. Fold the strip of paper in half and then in half again. Make cuts on the sides, but not completely cutting the paper, but leaving 1 cm from the edge.
5. Make several cuts as in the photo, also leaving 1–1.5 cm intact from the edges. Use scissors to give the future petals an oval shape.
6. Make the edge of each petal a little uneven, this will give it a natural look.
7. Using a wooden skewer, pull out the workpiece.
8. This is what the final product should look like. Let's put it aside for now.
9. Wrap the candy in foil as shown in the photo. Tighten the edges with tape, making sure that the sweet and the tube are firmly attached. For the base of the flower, you can use both wooden skewers and tubes. Tubes are interesting because they are flexible and can be shaped. For example, if on a skewer the bud strictly looks only up, then on a tube it can be tilted slightly.
10. Take double-sided thin tape. Wrap it around the base of the candy.
11. Fold the previously prepared workpiece like an accordion, placing one petal more closely on top of the other. Make several of these accordions, 4-5 pieces.
12. Now just glue our accordion petals to the tape, one after the other, until you wrap the entire candy.
13. Wrap double-sided tape around the base of the candy again.
14. Take a blank with petals, but an ordinary one, not folded like an accordion. Wrap it around the base of the candy 2-3 times.
15. Secure everything with thread.
16. Cut strips of green corrugated paper 0.7–1 cm wide and 20–25 cm long.
17. Use scissors to trim off the excess paper at the base of the candy.
18. Grease a strip of green paper with glue and glue it to the base of the daisy, masking the thread.
19. Glue green paper all over the flower stem.
20. Fold back the petals, exposing the middle of the daisy.
21. Prepare glue, a brush and colored semolina.
22. Grease the foil in the middle of the chamomile with glue and, while it is still wet, sprinkle it with semolina.
23. This is such a beautiful daisy you should get! Make as many flowers as you need. MK uses 7 daisies.
24. Now you need to make leaves for the bouquet. To do this, cut out several blanks from green corrugated paper as shown in the photo below.
25. Using nail scissors, cut the teeth along the edges.
26. Using tape, attach one piece of paper to a wooden skewer.
27. Glue two more leaves just below. Then cover the skewer with a green strip of paper.
28. Now we will make decorative greenery from organza. Cut the fabric into 12cm x 12cm squares.
29. Fold the fabric as shown in the photo below.
30. Twist the fabric around a toothpick to form a beautiful bud of greenery. Secure your creation with tape. Make 5-6 such blanks.
31. Everything is ready: daisies, leaves, decorative greenery. It's time to start assembling the bouquet! To do this, cut out a piece of foam plastic that fits the size of the basket.
32. Place several strips of thick double-sided tape on the foam.
33. Secure the foam to the bottom of the basket. This tape holds the structure very firmly.
34. Now our daisies need to be stuck into the foam. If all the flowers are made on skewers, then there should be no problems. Just stick them in the right place in the basket and that's it. If you used a tube to create a flower, first insert a skewer into it and secure it with tape.
35. After this, you can form the entire bouquet; insert not only flowers, but also prepared leaves into the foam.
36. Along the edges of the basket (and also in its center, if there are unsightly voids there) insert toothpicks with decorative organza greenery.
37. If you have a small self-adhesive ladybug, great! Decorate the bouquet for her too.
The gift is ready! A little materials, patience and imagination - and anyone will gasp when you present him with this sweet basket of daisies!
There is probably no person in the world who does not like sweets. Some people like chocolates, others like grilled cakes or pralines. Therefore, recently such decorative and applied art as sweet design, from the English “sweet”, translated as “sweet”, has become increasingly popular. One of the varieties of this handicraft is sweet floristry - creating flower bouquets with candy cores.
The creation of such crafts is inextricably linked with the creation of sweets, and they were born a very long time ago. People began making the very first candies in those distant times when no one even thought about sugar. The Egyptians used dates and figs as a sweet base, the Greeks and Romans used honey and barley molasses. In those versions of sweets they added nuts, poppy seeds, and sprinkled with sesame seeds. The term “candy” itself came into use, oddly enough, from pharmacists. They prepared candied fruits as a cough remedy. "Confectum" is translated from Latin as "cooked."
The form of sweets familiar to us in the form of a block appeared in the middle of the 17th century. In 1663, a sweet with nut and honey filling - praline - was made especially for the French ambassador to Germany.
In America, starting in 1800, the massive use of sugar beets began. Caramel is born. And milk chocolate, beloved by many, was born at the end of the 19th century.
In Europe, sweets based on beet sugar became available thanks to Napoleon. The Emperor loved sweets, but the supply of sugar from England was stopped due to the war. It was then that instructions were issued to find a substitute for the English product.
When sweets were rare, they were stored in beautiful boxes - bonbonnieres (from the French bonbon - candy). These were real works of art, made of precious metals or genuine leather. Such bonbonnieres were considered an expensive and extravagant gift.
But in the 19th century, the production of sweets became widespread, and storing them in boxes was inconvenient. Then, first, simple wrappers made of paraffin-soaked paper appear, and then the bright candy wrappers familiar to us.
Thanks to the popular custom of giving sweets on holidays or even for no reason, floristry was born. After all, beautifully decorated candies are much more pleasant to receive.
In this article we will offer you options for creating sweet bouquets of wildflowers
.
Bouquet of poppies made from candies
In spring, fields covered with the first greenery are decorated with scarlet poppies. The master class below suggests making these bright and beautiful flowers with a sweet candy filling. This bouquet will be an excellent gift or simply an original and delicious home decoration.
Materials and tools:
- Candies (preferably round);
- Corrugated paper green, red and black;
- Flor wire approximately 50 cm;
- Artificial leaves;
- Floor tape;
- Scissors and tools for working with wire;
We start by cutting the paper into pieces. For one poppy you will need 4 red rectangles approximately 5 x 7 cm and 1 black rectangle approximately 5 x 13 cm. The size of the blanks is approximate, since everything will depend on the parameters of the candies themselves that you choose.
Cut out petals from red rectangles (see photo). We stretch the upper edges quite strongly with our fingers. They will become wavy. Now very carefully stretch the middle of the petals a little. They will become convex.
We cut one narrow edge of the black workpiece with a fringe to about half. These are future stamens. Now we twist the cut strips into ropes with our fingers.
If you choose candies with candy wrapper tails, then you need to glue them with a small piece of tape so that the candy becomes round.
Now we take the black blank and stretch the middle a little. We wrap the candy in it (see photo). Corrugated floral paper has sufficient density and will easily hold the candy without additional fixation.
We take a piece of floral wire and make a loop at one end, bending it about 2 cm. Insert this loop into the roll of black blank and twist the paper around the wire. The stamens can also be twisted. Use a thread or tape to secure the piece of candy to the wire.
We begin to glue the red petals. Apply a drop of glue to the base of two petals and glue them opposite each other. We glue the second pair in a checkerboard pattern relative to the first two.
We wrap the base with the flower petals with tape or a strip of green corrugated paper.
All that remains is to make the remaining poppies for a lush bouquet of wildflowers.
You can add chamomile to it. Beautiful bright and sunny flowers will contrast perfectly with red poppies.
Candy daisies
The materials and tools will be almost the same as in the last master class:
- Candies (preferably round);
- White and green corrugated paper;
- Gold foil (for the cores);
- Scotch tape and a thin rubber band (like bank tape);
- Wooden skewer for shish kebab;
- The pieces of floral wire are slightly longer than the skewer;
- Scissors and pliers;
- Glue;
- Thin satin ribbon and corrugated paper for wrapping the bouquet (optional).
First you need to make the core of the flower. Chamomile is yellow, so we wrap the candy in gold foil. If the candy wrapper itself is yellow, then you can leave it without additional wrapper.
We cut white paper into strips. Its length should be enough to wrap the candy three times, so you determine the size of the workpiece yourself. The width is also determined by the parameters of the core, but not less than 5 cm.
Now you need to wrap the resulting white flat candy. We intercept one end with tape or an elastic band, and bend the other, as shown in the photo.
On each layer we cut out chamomile petals. You can adjust their length during the process. Fluff the petals.
Now take the skewer. This will be the stem of one of the daisies and an additional stiffening rod for the rest of the bouquet. You can apply a little glue to one of the ends. We wrap the base of the chamomile on top with a strip of green corrugated paper.
All that remains is to make the rest of the daisies for the bouquet, put them together and put on a “skirt” made of corrugated paper. We tie a bow from a green ribbon and the bouquet is ready.
Another wildflower that will look great in a bouquet is a sunflower.
A long-standing legend says that the gods gave people a sunflower flower so that the bright sunlight would not leave them in the worst bad weather. Even when the whole sky is covered with clouds, sunflower flowers turn their bright heads behind the sun, which is hidden behind the clouds. This is a flower of warmth, joy and positivity.
Candy sunflower
Materials and tools:
- Candies (triangular “truffles” would be ideal);
- Corrugated paper in a sunny yellow shade;
- Tape;
- Glue;
- Scissors;
- Skewers or flor wire for stems;
- Threads;
- Polysilk (dark brown) and floral mesh (golden);
For those who have recently been involved in sweet floristry, you should definitely know about such a wonderful material as polysilk. This is a thin, light, pliable film that wrinkles easily and takes the desired shape. Has a rich glossy sheen.
We cut out a square from polysilic so that the candy fits into it. For convenience, you can use a candy wrapper as a pattern. Exactly the same blank needs to be made from floral mesh. For each core you will need one square of both types.
Now you need to wrap the candy first in a square of polysilic, secure tightly with a thread, and then in a floral mesh.
Now we prepare a strip of yellow corrugated paper. The length of the workpiece should allow you to wrap the candy in three layers. The width of the strip is approximately 8 cm.
Now we cut one of the wide sides into a “fence”. These are future petals. The cutting height is approximately 2.5 - 3 cm.
We wrap the candy with the blank. Try to fold the paper so that the petals are in a checkerboard pattern. The edge of the workpiece must be secured with glue. We wrap thread around the base of the candy to create a shape.
We straighten the petals and sharpen them with our fingers, like real flowers.
Now we insert a skewer or a piece of floral wire into the base of the flower (you get a roll of corrugated paper there). We secure the tape with tape and wrap it around the entire stem. Instead of tape, you can use a narrow strip of green corrugated paper, after smearing the skewer with glue.
Our sunflower is ready, all that remains is to make the rest of the flowers for the bouquet.
Another beautiful and delicate flower that complements a bouquet of wildflowers is cornflower. Sky blue small flowers go well with daisies, poppies and sunflowers. Such a bouquet will never leave anyone with a sweet tooth or flower lovers indifferent.
Candy cornflowers
Materials and tools:
- Sweets (round and preferably in a silver wrapper);
- Blue corrugated paper;
- Scissors (regular and curly);
- Skewers or pieces of wire for the stem;
- Threads;
- Tape tape or a strip of green corrugated paper for decorating the stem.
We cut out strips of corrugated paper on one wide side with curly scissors, or you can take regular manicure scissors and carefully cut out the teeth. The size of the strips will depend on the size of the candy. But the approximate parameters are 5 - 6 cm in height and 15 - 17 cm in width.
Cut the strip into three equal parts. On each we make two cuts so that we get three petals of equal width. We cut starting from the curly edge. This will be the top of the petals.
We round the corners of each of them a little. Using your fingers, gently stretch each of them a little to create a concave shape.
Now on each petal there are small cuts in the center.
We attach the first three petals and tightly wrap them with threads to the tail of the candy.
All that remains is to make a stem using a skewer and tape, as described in previous master classes, and the cornflower will be ready to join the bouquet of wildflowers.
Crocuses are another cute flower. Very tender and spring-like, they are perfect for a sweet bouquet.
How to make a large daisy with your own hands, ideas with photos
Large daisies can be useful not only for wall or stage decor. Daisies, as attributes, are needed for theatrical dance or as an accessory for clothing. We offer several options for making chamomile for this type of purpose:
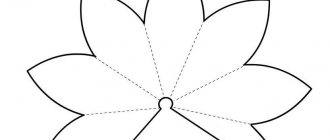
- If you need children to have daisies in their hands, then you can make them like fans, which can be taken in 2 hands and connected during the dance to make a whole flower:
- You can make a fabric daisy like this to decorate a headband for a little girl. An example of making such a chamomile can be seen in the master class of our article No. 1. Only in this we used paper, but you can use the same principle to work with thick, starched fabric.
- The daisy hat can be sewn from fabric or glued together from high-quality thick paper.