- What can be made from cones
- Processing buds
- Christmas tree made of pine cones
- Pine cone decorations
- New Year's wreath of pine cones
- How to make a beautiful ball of pine cones
- Topiary made of pine cones
- Making a candlestick from pine cones
- How to make a basket of pine cones
- Animals made from pine cones Teddy bear made from pine cones
- Hedgehog made of cones
In the world, probably, only babies do not know what cones are. This natural material not only serves as decoration for trees, but is also the source for many Hand-Made crafts. With just a little time, you can make colorful products from pine cones at home and transform your interior with designer crafts. And also make collective compositions from spruce, cedar, and pine cones, involving the whole family in the work. By devoting just a little time to creativity, you will plunge into the magical world of a fairy tale. If you have a rich imagination, then it will not be difficult for you to make any craft. In the meantime, we have selected the most popular compositions.
What can be made from pine cones
Many people associate this material exclusively with crafts for children. With the same hedgehogs and bears that parents make every year for exhibitions in kindergarten and elementary school.
But, in fact, it is a universal material from which you can create amazingly beautiful interior decor elements. Atmospheric Christmas wreaths, baskets, decorations for the festive table and much more.
Preparing cones for work
It is better to collect material in mid-autumn or spring. The autumn harvest is suitable for crafts from unopened cones. And by spring they are fully ripe, freed from seeds and acquire a permanent shape.
The main difficulty in the work is that they need to be properly prepared. Otherwise, the source material and the product itself may be severely deformed.
Drying
Even if the cones look dry and open, otherwise the craft may not be successful, before use they must be dried in one of the following ways:
- natural drying. You can use wicker baskets or lattice boxes as containers. It is important that the container is not airtight and does not create a greenhouse effect. Lay paper (newspaper) at the bottom of the container, and then lay the prepared material. Closed young pine fruits are dried in one layer. Already opened specimens can be stacked in 3 tiers. The box is installed in a well-ventilated and dry place for 2-3 weeks;
- in a frying pan. In an open cast-iron frying pan, lay out the cones (in one layer) and, gradually turning them, dry them until they are completely cooked;
- roasting in the oven. The prepared material is laid out in even layers on a baking sheet lined with foil. The oven is heated to 250 degrees and the prepared raw materials are placed in it for 40-50 minutes. The oven door should remain ajar.
Some craftsmen recommend drying pine cone crafts in the microwave. This is the fastest way to evaporate moisture. At maximum power, it will take only one minute to dry completely. Before placing in the microwave, the pine cones are placed close to each other on a plate lined with a paper towel. To avoid unpleasant situations, the process must be controlled.
Treatment
Before drying, it is necessary to carry out processing, the choice of which depends on the purpose of the collected material:
- to get closed cones, before drying, they are dipped in wood glue or PVA for 30 seconds;
- To give the workpieces an unusual shape, the cones need to be kept in boiling water until elastic, and then shaped and secured with electrical tape or rope.
It is also recommended to treat the collected material against insects before use. To do this, prepare a solution of 6% vinegar: 1 glass of vinegar for 1 glass of water. The workpieces are kept in this solution for about 30 minutes and then dried.
How to paint
For painting, use dried, fully opened cones; The following methods exist:
- Dye. Acrylic or gouache, applied with a sponge or brush. The sponge speeds up the work, but does not affect the entire surface of the scales. A brush allows you to get a better result, especially if several shades are used.
- A tin of paint. At the same time the fastest, easiest and most expensive way. The cone is hung on a fishing line, dipped into a jar of alkyd enamel, and hung to dry.
Painting with a brush
- Paint on a sponge. If there is a large amount of work to be done, the sponge is placed in a container and thoroughly soaked in paint; the cone is pressed against it on all sides.
- Aerosol enamels in the form of a spray. The paint is applied from a distance of 15-20 cm.
- Hairspray and glitter. Treat the surface with strong-hold varnish and immediately sprinkle it with glitter. The excess is shaken off and, if necessary, processed again.
Spray painting Source ariae
- PVA glue and glitter. Mix glue and water in a bowl deep enough to dip the pine cones into. Repeat several times, allow excess to drain, dry. Then apply glue in the right places and sprinkle with glitter.
- Wax. It can be purchased in the craft department (in the form of flakes), or replaced with cheap candles. The wax is melted in a water bath, a dye (food or oil) and aromatic oil are added to the solution. The cones are dipped in wax and dried several times until the desired result is obtained.
After spray painting Source previews.123rf
Pine cone decoration
What could be more interesting for a child than Christmas tree decorations made with his own hands? Moreover, they can be made in a matter of minutes. For crafts, decorative elements, fir branches, artificial greenery, lace, mini-gifts, beads, etc. are used. You will also need paint, twine and hot glue.
The entire decor is attached to the base of the cone, which must be painted or covered with glitter in advance. Most often, golden or white paint is chosen for Christmas tree decorations. Along with the decor, a piece of twine folded in a loop or an open paperclip is attached.
Unusual flowers from pine cones
Every child can please his mother or teacher with a bouquet of bright and unusual autumn flowers. To create a craft you will need: straight twigs or brushwood, acrylic paint, brushes, green foamiran or colored paper, hot glue.
Leaves made of foamiran or colored paper are attached to the branches using glue, and then covered with green paint. The cones are painted in different colors and attached to the branches with the wide end using hot glue. The bouquet is ready, all that remains is to put it in a vase.
Winter "bouquet of roses"
In the cold season, fresh flowers are a rarity. But from pine cones you can create a worthy analogue to a traditional bouquet. An arrangement of unusual “roses” will be an excellent interior decoration during the New Year holidays, perfectly harmonizing with an elegant Christmas tree and traditional accessories.
However, such a “pink bouquet” looks beautiful in any season, especially if the room is decorated in eco, country or Provence style. Children will especially like this craft due to its ease of execution and brightness.
You will need:
- large pine cones, any odd number;
- long straight branches of a bush or tree to imitate stems;
- green felt;
- quick-setting glue or heat gun;
- acrylic or matte spray paints.
We paint the prepared pine fruits in shades characteristic of real roses: peach, burgundy, red, yellow, and so on. We make the branches that will serve as stems for the “roses” dark green.
It is best to take aerosol paints, which not only apply neatly and evenly, allowing you to cover the most inaccessible places, but can also produce beautiful color or tonal transitions (ombre).
But when children are involved in making crafts, it is better to use brushes, although they leave smears and drips with unattractive relief sagging. The solution here is to dip the material completely into the paint, and then twirl it in your hand so that it spreads evenly over the surface.
Acrylic is quite expensive. You can replace it with gouache by adding a little PVA glue, then the paint will not be washed away by water. Decorative items are coated with clear varnish on top.
We glue improvised “roses” to the stems. We cut out the greenery from felt; if desired, you can also make sepals.
Now all that remains is to find a decent vase for a handmade bouquet.
Small tree made of pine cones
You can make a beautiful indoor Christmas tree in a few minutes. For this craft you will need: cardboard, glue, paint, beads for decoration.
The cardboard is rolled into a cone and covered with paint or glitter. Subsequently, the cone is covered in a circle with cones in a random order. The main thing is not to leave large gaps and ensure the symmetry of the cone. You can decorate the finished spruce according to your own taste.
Most often, such beauties are decorated with beads on a string or beads are glued directly to the scales.
This is interesting
Vases are not the only souvenirs that can be made from ordinary pine cones. In general, natural material is an excellent means of using imagination, creativity and craftsmanship in practice. For example, from large cones you can make such an original candlestick that cannot be found in any store.
And from the petals of large cones, separated from the base and pre-painted with golden acrylic paint, you can make a topiary (artificial tree). And what ideas will pop into your head when you see such an abundance of material that nature gives us!
Garland of cones
Do you want to create a truly New Year's atmosphere in your apartment with decorations in the popular Scandinavian style? Then you can safely make crafts from pine cones in the form of a garland. For this you will need: white acrylic paint, glitter, twine, hot glue, two brushes.
The blanks are coated with white acrylic paint. If desired, you can dust them with sparkles or choose other colors that match the interior. After the paint has dried, melted hot glue is dripped onto the base of the cone and attached to the twine.
Varieties
The most accessible types of cones include the following types of natural material:
- Pine and spruce. Medium in size, pine cones are round in shape, spruce cones are oblong. You will most often find them in interior decoration, among table decorations at a special event (wedding, anniversary).
- Fir. They resemble spruce, but with smaller scales.
- Cypress cones. Widely used for floral winter decoration, it has small sizes (20-40 mm) and a bizarre shape. They are great not only for New Year's, but also for wedding decor: decorating glasses, tables, bracelets for bridesmaids.
Candlestick fragment Source cs7.pikabu
- Larch cones. The shape is similar to balls, slightly flattened at the poles; wide figured scales resemble flower petals, size - up to 30 mm. The compositions have the elegant appearance of neat little roses.
- Cedar. A wonderful natural material, which, due to its solid size, is used both in interior and garden decor, but in most regions it is almost exotic. More exotic cones of coniferous trees growing on different continents are not readily available.
Polar rose (larch) Source i.pinimg
Snowflake made of cones
The easiest way to decorate for Christmas that always looks stylish. To make this craft you will need: hot glue and decorative materials. The cones are glued together in a circle at the base. Lace and a finished wooden snowflake are glued into the center of the resulting circle. You can decorate the finished snowflake with paint, glitter, etc.
Daisies and gerberas
Another step-by-step master class on creating a bouquet of pine cones. This time you will have to work hard and use pliers to remove the upper scales, up to about half of the fruit. The resulting core is cut with scissors, forming a beautiful hemisphere. The preparation for daisies or gerberas is ready. It is better to handle its processing by an adult, but children will complete the remaining stages of the process without much difficulty.
You will need the following tools and materials:
- bamboo skewers or floral wire;
- tape;
- acrylic paints;
- awl and heat gun.
Use an awl to make a hole in the flower blanks and insert the tip of a skewer into it using glue. We paint the “petals” white and the core yellow. For gerberas we choose a wide variety of shades, focusing on the natural color of the flowers.
We tape the skewers with green tape so that they resemble stems. Now the bouquet can be placed in a vase, complemented at your discretion with beautiful dried flowers or live plants. The second option involves using a floral base, since if you simply put the skewers in water, they will begin to rot.
Christmas wreath made of pine cones
Creating a Christmas wreath with your own hands is not difficult. To create a craft, just cut out a ring of the desired diameter from thick cardboard and decorate it with pine cones. Before starting work, you need to clearly think through the design, determine the color scheme and set of decorative elements.
To create a wreath, lace, bunches of rowan berries, spruce branches, ready-made floral preparations, etc. are often used. You can give the wreath a more delicate and homely look with the help of light dyeing or decorating with sparkles.
Ball of cones
The ball is based on a foam blank, but the problem is that it cannot be pasted over. The foam will simply shrink. Therefore, to decorate the ball you will need: pliers, hot glue, copper wire, decorative paint.
A small piece of wire is inserted into the base of the cone and the area is glued for strength. The remaining “tail” of the wire is twisted clockwise to form a spiral. Then the workpiece is screwed in and the procedure is continued until the foam is completely hidden. You can paint the ball both before starting work and after, in the finished product.
Decorative candlestick made of pine cones
A fairly simple craft to make that can create the atmosphere of a real Christmas miracle. To implement the project you will need: a wooden cut of the required diameter, lace, paint or artificial snow, glue, spruce branches for decoration.
The cones are glued with hot glue along the edge of the wooden base, covered with paint (preferably through a sprayer) or snow, sprinkled with glitter (optional) and tied with lace. Additionally, the structure can be decorated with rowan berries, spruce branches, etc.
Candlestick for floating candles
Small vertical candle holders for floating candles can be made in a couple of minutes. To do this, take small wooden cuts, pliers, glue and decorative elements that match the general style.
Apply glue from a gun to the base of the cone and glue it to the cut. Use pliers to remove the middle and insert a candle in a metal candlestick there. Decorate the finished candlestick at your discretion.
Making topiary from pine cones
What the topiary will be like is determined by the chosen foam blank. In addition, before starting work, you need to stock up on: a ceramic pot, a stick of the required length, floral foam, floral pins, hot melt glue, and decorative materials. Progress:
- a stick is placed in the center of the ceramic pot and secured with glue;
- the rest of the space is filled with floral foam;
- put a foam piece on the free end of the stick;
- Pins are glued to the base of each cone, and then they are strung on polystyrene foam, placing them tightly together.
Floral foam in a pot can be covered with moss or covered with decorative stones. The trunk and crown are painted as desired.
Amazing zinnias
On the one hand, pine fruits are surprisingly similar to roses, on the other – to a garden flower called zinnia. It is enough to turn at least one copy with the rod towards you and make sure that this is really the case. All that remains is to add some color to the handmade “zinnias” and the bouquet of them will look just like the real thing.
Some crafters trim the top of the buds to make them even more similar to their floral counterpart. But for compositions collected on a floristic base, and not on stems, there is no need to make additional efforts (cutting a pine fruit is not so easy). In this case, we immediately begin painting the material. We use acrylic and a flat synthetic bristle brush. It is advisable to either prime the fruits with water-based emulsion first, or bleach them according to the recipe described above. Then the dark surface will not show through the paint layer. Don’t forget to make the yellow centers characteristic of zinnias.
We remove some of the upper scales with pliers to make it easier to attach the man-made flowers to the base.
Then, with the resulting “flowers” you can create various decorative compositions. For example, place it in a beautiful porcelain dish. Or simply arrange with fresh herbs.
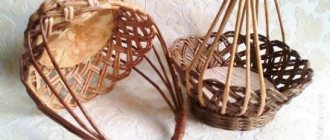
Basket of pine cones
A craft can be not only beautiful, but also useful. For example, a basket of pine cones assembled with wire and fishing line can be used as a fruit vase, and even carry small things in it. Such a basket will be especially in demand at the dacha. To make a durable basket you will need: pliers, scissors, fishing line, copper wire, needle. Progress:
- the cones are sorted, leaving the largest for the bottom, the smallest for the walls;
- the wire is passed between the scales and twisted;
- The next one is screwed as close as possible, trying to ensure that the scales cling in the form of a lock. Place the cone with the narrow side inward;
- the assembled chain is closed into a ring of the required size;
- the bottom ring will be small, the widest ring will be placed at the top;
- the twisted rows are connected to each other using fishing line and a needle, sewing the resulting blanks together.
After the base of the basket is assembled, a handle assembled according to the same principle is attached to it with wire. You can decorate the basket with lace, artificial leaves, flowers or berries.
The forest gives us enormous opportunities to express our creative potential. Just a little imagination, and unique things will begin to appear from scrap materials that you won’t be ashamed to keep for yourself or give to friends. In addition, children can be involved in all crafts with natural materials. After all, this activity brings joy to kids at every stage, from collecting material to the appearance of their first independent masterpieces.
Material advantages
Cones have a lot of different uses: some use them for kindling, others mulch flower beds and beds, and others make healthy jam. But since childhood, they have been firmly associated with the New Year holidays and a decorated Christmas tree. It is not surprising that they are readily used to decorate the interior, and not only in winter; The advantages of pine cones as decoration are:
- Availability. That rare case when high-quality (and environmentally friendly) natural material is absolutely free, and you can stock up on it by taking a walk in the park or in the forest. Some lucky people have coniferous trees growing near their house (or in their country house), which makes decorating almost inevitable.
Decor from nothing Source xn--80afdb0cbapl
- Rarer species can be purchased in specialized online stores of floristry and decoration, hobbies and creativity, or in flower and gift packaging stores.
- Ease of manufacture. Original crafts are easy to make with your own hands, and they will look no worse than store-bought ones. You will need a little patience and ideas gleaned from the Internet after watching a couple of master classes.
- Durability. Decorations will last for more than one season.
Waiting for the holiday Source cdn.homedit