A small vase for sweets is necessary in any home. And it can be made from such a familiar material as paper. There are different ways to work with paper, such as origami and weaving from newspaper tubes. From this article you will learn about the techniques that can be used to make a candy vase quickly and easily with your own hands, and with the help of detailed master classes, even beginners can handle the work.
Vase “Golden Autumn”
For this craft, you will need a small glass jar of a shape you like. You need double-sided tape, paper, pencil, scissors, and a piece of foam rubber. An important component will be matte and transparent paint for stained glass, a gold outline on the glass and melange threads like “Iris”. By strictly following the recommendations of the master class, the result will exceed all expectations.
- According to the name of the product, draw various leaves on paper.
- Place decorative elements on tape and cut them out.
- We place the cut-out decor over the entire surface of the jar and, using foam rubber, cover it, as well as the bottom, with a continuous layer of stained glass paint. Choose the tone to your liking.
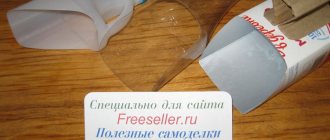
- After the paint has dried thoroughly, remove the glued elements. In front of you will be a painted plain base of a vase with transparent curly leaf windows.
- Carefully outline all the edges with a gold outline for glass; some parts of the design can be completed on the jar itself (leaf stalk).
- We paint the “glass” leaves with transparent stained glass paint in autumn tones. Draw veins on the dried leaves using an outline.
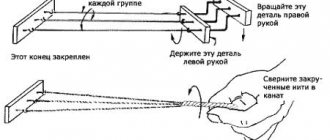
- Finally, decorate the top of the vase (neck of the jar) and the bend at the base with melange threads, carefully laying them in even and tight turns. Make the rows small in width.
Select the melange according to the color scheme of the finished product.
You can make four vases by analogy, but in a spring, summer and winter direction. At any time of the year you will have a new decorative element in your interior.
This is interesting
Today, candy bowls are especially popular in the United States - they form part of corporate culture. By placing bowls of sweets in the office, the company expresses a loyal attitude towards employees and in a simple way encourages them to further increase productivity. Typically, round glass vases, like aquariums, are used for candy. Also, treats in wrappers with a company logo are offered to visitors, clients and business partners.
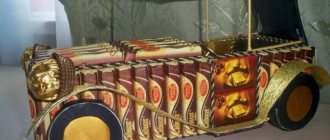
The first candy bowls of this kind were presented at the 1876 World's Fair held in Philadelphia. The glass pieces were shaped to resemble the famous Independence Hall, where the Declaration of Independence and the Liberty Bell were signed. Already in the 20th century, glass jars with lids intended for storing candy began to be mass-produced by factories in Pennsylvania. Many containers were shaped like a train, a car, a steamship, or even a weapon so that children could play with them when the candy ran out. Special hand-painted candy bowls for the holidays were produced in limited quantities. Vases with unusual designs are now highly collectible.
Classic candy bowls were invented by the European aristocracy in the 18th century, when a wide variety of desserts appeared. Sweets eliminated the unpleasant aftertaste of heavily spiced main courses. Ice cream, fruit and melted chocolate were served in a special kind of bowl on a long stem - cream bowls. “Dry” desserts such as marmalade, lollipops and chocolates were placed in tall glasses with a lid to protect them from drying out. And wide flat vases were placed on coffee tables in several rooms so that guests, moving from one to another, could always “catch” one or another delicacy.
Spectacular vase
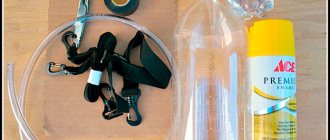
It is quite simple to make an original design from a narrow, tall bottle and at minimal cost. Prepare everything you need: a glass container of your choice, white acrylic paint, painting tape, acrylic varnish, scissors, a brush (you can use a kitchen sponge).
Pay special attention to such a moment as degreasing the bottle, otherwise the paint will not lie evenly on the glass. The masking tape should be cut into strips of various sizes (the width and length are determined at your discretion).
Glue it in the way the design will look like (for example, geometric patterns), glue a thinner strip near the neck, or, alternatively, glue the neck completely (it will remain unpainted).
Choose the patterns you like - you can cut out different figures of flowers and stars from the ribbon.
The entire surface is covered with paint. When painting, hold the bottle by the neck. After drying, paint over it too. Carry out the procedure several times, making sure that there are no gaps left. Remove the stencils from the masking tape from the thoroughly dried product and cover the vase with acrylic varnish in several layers. A beautiful, shiny flower vase is ready.
Ikebana will look amazing in it.
What do we need
To make a fruit stand you need to prepare:
- three plates of different sizes. which are rarely used;
- a metal rod, you can purchase it at a hardware store;
- drill and bit;
- plasticine;
- masking tape;
- wooden block;
- a can of special paint.
That's all you need to have on hand. Remember also that you can always use any other decorative elements to decorate your future fruit bowl. To do this, you can take stencils, rhinestones, sparkles, and multi-colored paints. If desired, you can even improve the dishes with original decoupage.
Plaster vase
One of the most malleable materials, gypsum is a good material for making original vases. They will become a stylish interior decoration, made with your own hands. There are a lot of techniques for creating crafts from plaster.
A master class is offered, where a two-liter plastic bottle is taken as a template. Cover the surface on which you will create with oilcloth. Stir the gypsum mixture with added water to the desired consistency and place the solution on a flat surface in the shape of a circle.
Place the bottle in the center. Apply the solution to the template up to the narrowing area and wrap it carefully with a bandage. Let the mixture dry (this will take no more than half an hour). Carefully remove the container and begin to form the base of the vase.
To do this, prepare another portion of the solution, apply several layers, each time wrapping it with a bandage. Then proceed to forming the upper part of the product. A 1.5-liter plastic bottle needs to be cut so that its height is one third of the main template.
Align the blank with the bottom of the vase and apply the solution, alternating with layers of gauze. Coat the joint of the two parts well with the solution in several layers. Having achieved the characteristic shape of the product, leave it in a warm place for a day until it dries completely. Thoroughly clean the dried form with sandpaper and begin decorating. At this stage, everything depends on your preferences, tastes, fantasies.
Artistic painting, simple painting with acrylic paints followed by coating with acrylic varnish, sticking a favorite photo or creating a 3D blend will do. The caveat of this craft is that it cannot be filled with water. Its main purpose is decorative decoration; you can arrange a beautiful composition of dried flowers or branches, ears of corn and other natural material in it.
Decoupage
You can decorate the vessel using napkins. Decoupage designs can be anything from floral motifs to vintage images. Materials for creativity:
- bottle
- white matte paint
- napkins with ornaments
- PVA
- brushes and sponge
- a piece of fine-grit sandpaper (120)
- acrylic lacquer.
Just like in the design of the jar, we apply paint to the surface of the glass. After each stage, intermediate drying is required. It can be done naturally or speed up the process by using a hairdryer.
Tear off a piece of napkin with a pattern.
Note!
How to make a craft with your own hands: what you can do with your own hands at home
DIY foam crafts: snowman, Christmas tree, sculptures, original figures with instructions (photo + video)
Papier mache from egg trays, boxes, cassettes: the best ideas on what can be made from egg packaging
We arrange the image as your imagination dictates.
Fix the picture with PVA glue. Apply the composition on top of the napkin, spreading it with a brush from the center to the edges.
Smooth the paper transition with sandpaper. We tint it with a sponge.
We varnish to protect it from a humid environment.
Vase made from a wooden block
We cut part of the tree in such a way as to achieve the desired height of the finished product. You can remove the bark, or you can leave it as is. We make the hole using an electric drill. In this situation, a man will be a good assistant.
The hole must not be through. We carefully sand the inner surface with sandpaper. At your discretion, treat the front part of the vase with stain, or leave it in its natural state. Place a bottle of suitable size inside, pour water, place flowers. You can decorate your garden plot with such flowerpots. Floor vases made from a wooden block will look beautiful in a country house.
The range of vases is huge - in shapes, sizes, volumes. Various materials are used in their production. The pride of the housewife will be a vase of her own individual production, especially if the whole family takes part in its creation.
"Star"
An openwork craft made from modules - a flat vase is equally suitable for both sweets and fruit. The most difficult part of this model is the through “windows”, but they are what give the product an original and impressive look. It is important to follow the video tutorial exactly and then you will definitely get the openwork elements.
You will need 1617 modules, size 1/16. Of them:
- 658 white;
- 483 yellow;
- 420 red;
- 56 blue.
Original craft
Try creating a vase from a material such as cardboard, which will become a wonderful stylish item in the interior.
Gather the components needed for work:
- a cardboard pipe of certain parameters can be purchased at a hardware store;
- stationery knife, glue, newsprint;
- paint and varnish used as a fixative.
Make a bottom for the prepared pipe - cut out a circle with a diameter that matches the diameter of the pipe and glue it to it. The vase frame is ready. Making paper decorations is a rather labor-intensive process. Fold the cut newspaper strips in half and then roll them into small rolls, gluing the ends together.
Prepare a sufficient number of such parts. Cover the surface of the cardboard tube-vase with them. Please note that they need to be placed very close to each other. However, there will still be gaps that can be filled with any available material - small buttons, beads, types of pasta, beans (white or red).
It is advisable to paint the product with gouache, not very diluted with water, or with aerosol paint, carefully painting the paper flower rolls. Leave the product for a while to dry. Decorate according to your taste.
The simplest items can become the highlight of your home's interior. When thinking about creating a vase with your own hands, you need to carefully analyze the style of the interior so that your work emphasizes its originality. Let's look at some of them and listen to the advice of designers.
The laconic, discreet shape of the vase, its discreet colors and neat finish are perfect for the minimalist style. Classicism presupposes symmetry in ornaments of light colors. A variety of materials are used to create a vase with your own hands, suitable for the high-tech style. Metal, plastic, glass or wood are used. Vases, the design of which combines literally everything (even the seemingly incompatible) look interesting in the extravagant kitsch style.
Preference in decoration is given to spectacular rich colors and original decor. Art Nouveau is characterized by abstraction, smooth lines and decoration using decoupage. To create a vase that suits the avant-garde style, you need a rich imagination, as well as extremely rich colors and elegant patterns.
An individual vase in your own design will become a unique addition to the design, tell about the taste of the owners, and delight the guests. This item will be a great gift for birthdays, New Years and other holidays. Make crafts - vases, give yourself and those around you beauty and a good mood.
What you will need
To make the product you will need:
- Threads - knitting, floss, twine or even sewing. The thinner they are, the longer it will take to wrap the structure.
- Balloon. It’s better to have several at once, in case something goes wrong.
- A plastic or glass container (if you are using a solid frame) onto which the thread will be glued. The base needs to be wrapped with cling film.
- Stationery glue or potato starch paste. For strength, you can add a little PVA to it.
- Decor that depends only on your creative imagination. The lace trim, bows, and flowers look cute and touching.
To attach decorative elements, it is convenient to use a glue gun with silicone.
Assembly of parts
Assembling the parts of our craft is not so difficult here. In order to correctly assemble the parts, you need to read the following Article, which describes in detail all the details of the assembly. After the parts are assembled into one common craft without any problems, then start gluing them.
Gluing the parts
The shelf parts must be glued using PVA or titan glue. You don't need to pour a lot of glue. It is better to tie the assembled craft with glue with a strong thread, tighten it and lay it out to dry. The craft glues together in about 10-15 minutes.
Burning out crafts
To decorate our craft with a pattern (for example, along the edges of the craft), you will need an electric burner. It can be very difficult to burn a pattern beautifully. To burn patterns, you must first draw the pattern with a pencil. You can read how to work with an electric burner and add patterns to a shelf here.
Varnishing crafts
If desired, you can transform our craft by covering it with Wood Varnish, preferably colorless. Read how best to varnish a craft. Try to choose a quality varnish. Varnishing is carried out using a special brush “For glue”. Take your time. Try not to leave visible marks or scratches on the craft.
No good owner would want to clutter his home with trinkets, especially if their role is insignificant. After all, the decor should be practical and functional, combining several options. This rule primarily applies to the kitchen space, which should remain stylish and cozy, without being devoid of interesting details. And one of the decorative and functional attributes of a modern kitchen is a fruit bowl.