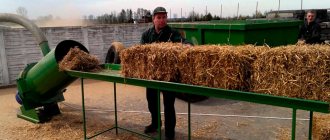
In many private houses it is not possible to equip full-fledged heating, so stoves are most often installed. Such an interior object occupies a large area. Therefore, they try to finish it as effectively as possible, so that it not only performs the heating function, but also creates a unique atmosphere of warmth and comfort. Finishing the surface of a stove in a house or bathhouse with decorative stone has become widespread. This modern technology allows you to quickly and without special preparation make a high-quality finish.
How to make a smelter for aluminum and other metals
The indoor ornamental plant shown in the video is actually a cleverly disguised smelter. This idea will be a real boon for those who from time to time work with metal in order to make another craft from aluminum or other metal at this cheap smelter, but there is not enough space in the workshop or at home to have its own place for each thing.
You will find some inventions for yourself in this Chinese store.
Products for inventors.
Methods for melting aluminum cans
The last question is of a technological nature, and we will examine it in more detail. First you need to decide on the melting temperature of the aluminum can. And it is equal to a little more than 600 degrees Celsius. Where can you get such a temperature? The value is not so high, so you can get it in a sufficient number of ways, for example:
- In a homemade oven;
- In a professional oven;
- At the stake using a crucible;
- Directly in the mold, or in a crucible using a gas torch or blowtorch.
A logical question immediately arises: is it even possible to melt aluminum over a fire? After all, this would seem to be the simplest method, requiring virtually no costs. In this case, it should be noted that on the coordinate plane the temperature of the fire, in direct dependence on the time of its burning, varies from 300 to 750 degrees Celsius, after which it slowly declines again. The result is a kind of paraboloid curve, in the time period of which it is important to find exactly those temperature parameters within which our aluminum will melt to a state of absolute fluidity so that it can be poured into molds, otherwise there will be no point in our actions.
DIY mini aluminum smelter
Aluminum is used in the production of parts in blacksmithing. The peculiarity of such an alloy is that it has low weight, a high degree of ductility, and good conductivity of heat and electricity.
With all these qualities, the alloy in question can be called a low-melting material, which significantly increases its popularity. To carry out work on creating parts from aluminum by bringing the alloy to a plastic state, a forge is used.
For many years, people have considered the question of how to make a forge for melting aluminum and the result of a huge number of attempts has become structures that you can create with your own hands.
Homemade forge for melting aluminum
Purpose and classification
A metal smelting forge is a furnace that has been used in blacksmithing for many years. However, the small efficiency indicator determined that it was not used in the production of products from the alloy in question in industry. There is the following classification:
- By type of housing: open and closed. Open has a completely open top. The closed version has a closed top.
- At the installation location: stationary and personal forging.
Closed type forge Open type forge
To remove gaseous combustion products, a special pipe is created if the work is carried out indoors. The open type does not have a pipe, since combustion products escape without being drained.
General operating principle
With your own hands, using scrap materials, you can create an effective system that will allow you to carry out forging work. There are a huge number of types of designs that you create with your own hands. A professional forge has the following elements:
- the table is made of fire-resistant material;
- there is a firebox with a grate;
- air chamber to improve fuel combustion efficiency;
- air drainage with supply air duct;
- valve for regulating air supply;
- tent;
- window for feeding workpieces;
- umbrella;
- chimney;
- crucible;
- hardening bath;
- gas-air chamber.
An example of a furnace design for aluminum smelting
The type of forging equipment in question can be called a classic forge, which is used in blacksmithing. It is quite difficult to create it with your own hands, but you can create a simpler design for melting aluminum.
Brick construction
It is better to make it yourself using scrap materials. A mini forge of 6 bricks is suitable for obtaining various parts that are used to decorate metal objects, buckets or other parts. The creation process can be divided into the following stages:
- We create the body from fireclay bricks. Such a brick can withstand exposure to high temperatures for a long time. When choosing a brick, you should pay attention to the fact that it should not have damage or defects. This is because cracks will lead to heat loss.
- We create the grid grate shelves from scraps of steel pipes. Steel pipes should be of small diameter. Fusible material options cannot be used.
- The grate is made from steel strips, the thickness of which is 4-6 millimeters.
- We twist the grate at an angle with a screw.
- The fuel can be coal or coke.
- Ignition is usually carried out using a blowtorch. You can also use a gas burner.
- A window under the nozzle must be created when using a blowtorch. This is because the forge emits a lot of heat, which can cause the lamp tank to explode.
This type of design, which you can quickly create with your own hands, should be used exclusively outdoors, since there is no umbrella with a chimney. During smelting, a large amount of combustion products is released.
When considering the question of how to make a forge for melting aluminum, we note the possibility of creating portable versions.
An example is a portable version of the track, which with additional elements are installed on a common base. The lining is represented by fireclay marl with fireclay sand.
Another design element can be called an air supply system to the track, for which you can use, for example, a manual siren. It can run on coke or charcoal.
, please select a piece of text and press Ctrl+Enter.
How to make a furnace for melting and hardening metal with your own hands
Unlike industrial equipment, a homemade furnace for melting metal is a compact device. Such portable equipment can be used to smelt, harden or smelt non-ferrous metals.
Melting metal and cast iron
A furnace for melting metal is a body made of fireclay bricks. The binding element is clay. The firebox is designed to burn coal. There is a hole at the bottom through which the air is blown into the inferno.
At the bottom there is a cast iron grate called a grate. Coke or coal is laid out on it. It can be removed from the old stove. Sometimes refractory bricks are laid on edge when forming the body.
The finished structure is fastened from the outside with a metal belt.
A furnace for melting metals must have a crucible. It can be an enameled or cast iron cauldron. The location of the crucible is next to the burning coke. To improve airflow, a fan is installed nearby. The equipment is used for steel smelting, but can be used as a furnace for cast iron smelting.
Electric furnaces for melting metal
The basis of such a stove is asbestos, which can be replaced with tiles. Electrodes installed in a melting furnace with your own hands must have a voltage of 25 V.
They are made in the following order:
- They are machined from the brushes of an electric motor.
- 6 mm holes are drilled into the assembly.
- A wire with a cross section of 5 mm is passed through them.
- A nail is driven in to secure the wiring.
- In order to improve contact with graphite, the file makes notches.
Mica is placed inside the furnace as a heat insulator. When connecting to the network, you need to use a step-down transformer. After production, the oven turns on and runs for some time in idle mode.
Muffle furnace
Muffle furnaces are often used for heat treatment of parts. Such equipment is characterized by a wide temperature range, from 20 to 1000 degrees.
A muffle furnace for hardening metal operates on different types of energy. However, at home it is better to use a unit that runs on electricity. Hardening is carried out in the furnace muffle.
A muffle furnace is made with your own hands in several stages:
- The muffle is made from fireclay bricks. Due to the round shape of the oven body, their corners are beveled. In each brick, grooves are selected where the spiral is laid.
- If the muffle furnace for melting is made from an oven, then the inside is lined with fire-resistant bricks. Grooves for the spiral are cut into the masonry.
- The chamber, made of refractory brick, is placed in a housing made of steel. Insulation is placed on the bottom. The gap between the side walls of the chamber and the housing is 4 cm, where the insulation is inserted. The top consists of 2 layers of metal and insulation.
- Holes are drilled in the housing, and the ends of the spiral are brought out through them, which are connected to the network cable.
- When using an oven, no insulation is required. It is already provided for in it.
Aluminum smelting
Making a furnace for melting aluminum with your own hands is a real thing. In industrial production, units with the name - rotary-type ovens - are very expensive.
To understand how to make a furnace for melting aluminum, you need to understand their operating principle. There are several types where non-ferrous metal is melted.
Mini oven
Take a car wheel and bury it in the ground so that the top cut does not protrude outward. A hole is made in the middle for the pipe. One end is passed into the hole, and the other is brought out. A cooler is placed on it to pump air. The smelter is filled with coals and aluminum scrap. Air is supplied and the temperature rises.
Metal tank
You can make a furnace for aluminum from a metal tank. For example, the body of a top-loading washing machine. The interior of the structure is lined with refractory bricks. A pipe for air supply is mounted below. Thus, portable equipment is obtained.
From the bottle
One of the unusual ways in which aluminum is melted. Nichrome wire is wound around the bottle. The surface of the bottle is first lubricated with oil. A mixture of liquid glass and clay is applied on top.
Drying is carried out for a week. Then another layer of wire is wound and clay is applied. After 7 days, the bottle is removed and only the heat-resistant shell remains.
Voltage is connected to the ends of the wire to glow the nichrome, and raw materials are loaded into the hearth.
Lead smelting
An electric furnace for melting lead consists of the following elements:
- A round casing made of stainless steel, inside of which there is insulation. It is attached with brackets to the wall.
- An industrial heating element is supplied from below.
- There is a rotary type valve on top.
- A sensor that is located 3 cm from the bottom.
- There is a temperature regulator on the side.
By setting the regulator to a certain temperature, we warm up the device. The lead inside melts. At the end of the melt, a mold is placed underneath and the valve opens. Molten lead fills the interior of the mold.
Is it possible to melt aluminum cans at home: how to melt
If you are thinking about the question of how to melt aluminum cans at home, we recommend reading this article from ballony.com.ua to the end. Aluminum has long remained one of the most popular metals, used in a wide variety of light and heavy industries from the space industry to mechanical engineering and food production. The main advantage of aluminum is its relatively low melting point and high quality of finished products. Especially if aluminum is used as the main element in various alloys, distinguished by such qualities as strength and lightness, which are valued today on a par with gold.
Tin cans and other scrap are recyclable! How to make a furnace for melting aluminum with your own hands
Aluminum alloys have a low melting point and good machinability of parts. And there is always a lot of aluminum scrap on the farm.
Therefore, aluminum is often melted at home to replace non-standard or small parts of mechanisms: a blank is cast, and then processed on a lathe. Sometimes souvenirs and small interior items are made from aluminum with their own hands.
Melting furnace structure
Homemade furnaces for melting aluminum consist of a body - a metal cylinder (2) lined with refractory (fireclay with sand or concrete).
Inside the mine there is charcoal (8) , which serves as fuel. A crucible (3) is installed in it - a container in which the metal will be melted.
The crucible can be a thick tin can, a teapot or any stainless steel container.
In the lower part of the shaft (6) there is a hole for air injection (7) through the lattice base (4) , which allows you to maintain combustion and regulate the temperature in the furnace.
A hair dryer or a vacuum cleaner pipe is used as a blower. The damper (5) is necessary to remove excess air.
For furnaces with a capacity of several tens of kilograms, a lid (1) to quickly and evenly heat the metal. In small ovens you can do without it.
The furnace elements should not deform or melt when heated. Therefore, the use of aluminum bodies, tubes and crucibles is unacceptable. steel or cast iron to build the structure .
Reference. Natural gas or electricity are also used as fuel for aluminum smelting .
How to make a furnace for melting metal?
Creating a small unit that can melt several kilograms of aluminum scrap is not a difficult task. To lay out the stove in the garden you will need the following materials :
- red bricks - 20-25 pcs. ;
- tall tin can - 1 pc. ;
- grill grate - 1 pc.;
- dryer - 1 pc. ;
- a piece of pipe with a diameter suitable for the outlet of the hair dryer - 1 pc. ;
- roll of electrical tape;
- a piece of steel wire 30-50 cm long ;
- charcoal for ignition (the amount depends on how much aluminum needs to be melted).
The bricks will serve as both the body and the refractory coating of the furnace, and the tin can will act as a crucible.
Two holes are made in the upper part of the jar opposite each other, and a wire is threaded . It will be possible to lift and remove the crucible with the melt from the furnace.
The air will be supplied from the hairdryer turned on in cold air mode. tape a piece of pipe to the outlet of the hair dryer with tape or tape - this will be the air duct.
Such a simple furnace design is convenient because no tools are actually required to create it; everything is done by hand.
Important! Do not use zinc-coated , as toxic zinc fumes will be released when melting aluminum.
Brick well installation plan
- One row of bricks is laid out in the form of a rectangular well . The internal dimensions of the hole should be approximately the length and width of one brick .
On one side, two bricks are laid out to form a corridor for the air duct. The width of the corridor is equal to air supply tube - A grate is installed on the laid out row .
Instead of a grill grate, you can use any metal lid or plate with holes for air supply. - A second row is laid on the grate , without any gap for the air duct.
Photo 1.
Completed brick well for the smelting furnace. The edges are reinforced with metal strips, the air duct opening is visible.
- An air duct is created . A piece of pipe is attached to the hairdryer with tape or tape . To ensure the strength of the structure, the connection point is wrapped in thick paper and then connected with adhesive tape . Electrical tape is a more elastic material compared to adhesive tape, so it is more convenient to work with. The cold air supply button is also secured with tape on the hairdryer. The finished mechanism is brought to the bottom row of bricks.
- In the stove well, coal is poured onto the grate and melted for ignition. The hair dryer turns on, which activates the combustion process.
Advice. The intensity of the air supply can be adjusted by changing the operating mode of the hair dryer , as well as the distance between the pipe and the window for the air duct.
- The tin can is installed on the top row of bricks using a wire threaded through it. Like a pot over a fire, it hangs over the grate.
- After lighting the furnace and installing the crucible, two more bricks are placed in the third row so that a square hole is obtained from a rectangular hole. This will fix the can inside the housing and heat up the oven space faster.
you can load scrap into it for remelting. A sign that the jar is warming up is its redness.
Important! It is recommended to melt aluminum in a heated crucible . When loading cold scrap into a cold can, there is a greater chance that the container will burn out and the aluminum will leak out of the can directly onto the coal.
The principle of the design and operation of such a furnace is very simple and does not cause difficulties. However, it is always worth remembering safety precautions :
- work in fire-resistant gloves;
- avoid water getting into the melt;
- do not use materials containing toxic substances.
Two-can design
Another type of homemade furnace for melting aluminum is a design made from two large cans . One of them serves as a body in which a hole is cut for air supply, and the bottom of the second can with holes serves as a divider .
A crucible is installed inside the jars.
Such a device is very compact , and small volumes of metal can be melted even in a ventilated garage. However, the design is not stable or fireproof , and will only last a few cycles.
Possible problems and their solutions
A carelessly assembled appliance will result in inefficient operation of the oven and make it dangerous to use. Here are a few points to pay attention to:
- Slots and gaps in a brick building. They can be caused by chips on bricks or loose fit of refractories to each other. Gaps reduce fuel efficiency and reduce combustion intensity and temperature. Aluminum in a crucible may simply not melt.
Therefore, after laying out each row, a visual check is carried out for the presence of holes. The holes are covered with a sand-clay mixture or covered with fireproof material .
It is recommended to use concrete mortar only in the case of a stationary unit that is not planned to be disassembled. But you should not use asbestos sheets and chips in places where the stove is heated, because this material is a carcinogen.
- Violation of the horizontal level of the building. Misalignment reduces the stability of the structure and creates conditions for uneven distribution of coal. The result is uneven heating of the crucible and the metal in it.
The laying of each, especially the bottom row of bricks, is controlled by the level . You can also check horizontality by placing a jar of water on the grill . On a flat surface, the top edge of the water will be parallel to the edge of the can.
Check out the video on how to make an aluminum smelter.
Do-it-yourself aluminum furnace - easy!
The desire to have a small melting furnace at home is easily feasible and does not require large investments, knowledge or time to build.
You can independently build a unit with a capacity of up to 10 kg of molten metal and make souvenirs, accessories or blanks for small aluminum parts.
The temperature reached in a home furnace allows you to melt most aluminum alloys in a short time ( several tens of minutes depending on the volume of scrap).
Of course, the quality of the resulting metal differs from industrial quality . Aluminum melted at home contains an increased amount of oxide films, contaminants, and is less stable in chemical composition. But it will still be suitable for use at home.
What is artificial facing stone?
Lining the stove with artificial stone has gained great popularity.
This material is easy to purchase at any construction supermarket; it weighs less than natural lump minerals. For the manufacture of this building material the following are used:
- Sand
- Natural mineral crumbs of fine fraction
- Lightweight artificial fillers
- Various adhesives
- Dyes and pigments
- The backing is made of special fiber, which makes it easier to install on the stove.
There are several types of artificial facing stone, such as gypsum artificial stone, stone made from marble or granite chips, stone from sandstone chips, wood panels for fireplaces, as well as flexible stone for the stove, made on a special substrate. They can cover even the most curved surfaces.
DIY aluminum smelter
The indoor ornamental plant shown in the video is actually a cleverly disguised smelter. This idea will be a real boon for those who from time to time work with metal in order to make another craft from aluminum or other metal at this cheap smelter, but there is not enough space in the workshop or at home to have its own place for each thing.
You will find some inventions for yourself in this Chinese store.
Inventors shop at a budget Chinese online store.
Required funds
In this project, we use equal proportions of sand and gypsum to make a simple melting pot that's powerful enough to melt scrap metal in a second, and nice to look at so you don't have to hide it. This is a mini metal smelter.
First we need large bags of sand and plaster. Both can be bought at a hardware store. We also need a 9 and a half liter metal bucket and a blanket to cover our work area with, because most likely we will get it a little dirty. A two and a half liter bucket can be used as a measuring bucket, but you will soon see that it has a more important purpose.
DIY electronics in a Chinese store.
Job.
For our refractory lining we use the following recipe: 4.2 liters of gypsum, 4.2 liters of sand, and 3 liters of water. When the water touches the dry mixture, the countdown begins. We'll have about 15. So let's start mixing everything up. It is very important that all the dry mixture gets wet, getting rid of lumps as quickly as possible.
After a couple of minutes of stirring, the mixture should be fairly runny and roughly the same color. After making sure that there are no lumps left, we proceed to transfusion. Carefully pour the mixture into a metal bucket, being careful not to spill anything. Enough mixture to fill the bucket, leaving about 8cm at the top.
Now we can take a plastic measuring bucket and use it to form the center of the smelter. You can fill it with water to add weight, but sand or rocks will also work.
When we push the bucket, the mixture rises, but does not spill out. The mixture has already begun to harden. So let's move the bucket up and down to level it out.
You need to hold the bucket in this position for 2-3 minutes, during which time the plaster will harden enough for the bucket to remain in place.
It takes about one hour to fully cure, but the plaster is soft enough to trim. If you dampen a rag and gently rub it over the top, you can smooth out the plaster very nicely and give it a nice texture. Once you're done, leave everything to dry for about an hour.
Melting crucible from a fire extinguisher
Why not turn that old fire extinguisher into a melting pot? You can tell that it is made of steel because if you put a magnet near it, it will be attracted. This does not happen with aluminum.
Having released the pressure in the cylinder, we unscrew the top valve so that we can easily and safely cut it with a hacksaw, which took less than a minute. For the crucible we will use the bottom part because it is essentially a steel container 8 cm in diameter and 13 cm high. Good size for our homemade mini smelter.
By this time the plaster should be well hardened. Let's pour out the water. Next, use a pair of tongs or something similar to gently pull one side of the bucket toward the center. Now, if you grab it with both hands and twist it a little, the bucket will come loose and be pulled out easily.
We've achieved an amazingly smooth surface that makes our homemade melting pot look surprisingly professional.
Air supply hole
All we need is a hole for the air supply and a cover. Let's take care of them. The three and a half inch hole saw attachment works great for this tube. By placing the center of the bit on the top line of the bucket, you can begin to carefully cut through the metal.
When we go through the metal, we need to tilt the tool down about 30 cm, which is easy because the plaster has not yet fully hardened and cuts like butter. Now we have a hole that the blower tube fits into perfectly.
It will be placed a few centimeters from the bottom.
Blower
Now, if the crucible fails and the molten metal pours out, in the smelter the metal remains inside and does not flow out through the tube. A leaf blower is very easy to make. First you need to take a 3 cm tube, it will be located next to the hot coals.
You will also need a 3 cm PVC pipe. As you can see, the threaded coupling from one end is screwed onto a metal tube, and the adapter from the other end is simply screwed onto a PVC tube.
Lid
Let's go even further. Let's make a lid that will help maintain the temperature. We need a pair of 10 cm U-bolts. Place them vertically in a wide bucket filled with half the initial volume of our mixture. After an hour, the plaster will harden and can be easily removed from the bucket. And now the lid for the melting pot is ready.
Pressure relief hole
You need to make a hole to relieve pressure. it can be done before hardening, but you can drill it with a drill with an 8-centimeter attachment. Once the hole is made, you will have a lid that looks like a huge donut. This design allows you to relieve pressure and melt the metal without even removing the lid.
Conclusion
If you light a fire, you will see that the inside becomes so hot that the soda can melts in a second and the crucible fills with liquid aluminum. With a mini-smelter like this, we can melt aluminum in our backyard and cast anything we can think of.
Best of all, when you're not smelting scrap, the smelter doesn't take up space or be noticeable. You can insert a potted plant inside and instantly turn it into a piece of decor. This pot-turned smelter is more than it seems. Just make sure your smelter is stable, this is extremely important for safety reasons.
By the way, you can try using the smelting furnace as a blacksmith's forge or even as a barbecue, because after all, it runs on coal.
Now you know how to use widely available materials to make a mini smelter that is powerful enough to melt metal in seconds and at the same time pleasant enough to look at that you don’t have to hide it. Translated and voiced by the Science and Technology channel.
Another publication contains more useful information about aluminum products.
DIY mini aluminum smelter
Aluminum is used in the production of parts in blacksmithing. The peculiarity of such an alloy is that it has low weight, a high degree of ductility, and good conductivity of heat and electricity.
With all these qualities, the alloy in question can be called a low-melting material, which significantly increases its popularity. To carry out work on creating parts from aluminum by bringing the alloy to a plastic state, a forge is used.
Elementary chemistry
Next, pure chemistry comes into play. If aluminum is to be used for workpieces, it is important to ensure that it is absolutely clean and free of porosity. To do this, we will use flux, which you can easily make with your own hands. For this we need:
- Cryolite;
- Sodium chlorine;
- Potassium chlorine;
- Sodium fluoride.
The preparation of a chemical compound is extremely dangerous to health, so we work with chemicals strictly in a respirator, goggles and protective gloves. The flux will lift all the slag from the body of the aluminum melt to the surface. Then, before pouring into molds, it can be collected with a regular spoon and thrown away.
DIY furnace for melting aluminum: types, manufacturing features and reviews
To make a muffle furnace for melting aluminum on your own, you need to become familiar with its basic elements, after which you can begin selecting materials, preparing tools, and the assembly itself. But first, it’s worth considering its purpose in order to understand whether it is suitable for achieving your goals.
Brief description of muffle furnace
The main purpose of a muffle furnace is to heat metal. Using such a device can help melt metals such as aluminum or copper, as well as other non-ferrous materials. In addition, with its help you can successfully carry out the operation of firing ceramic products and drying them.
Cremation can also be carried out. It is worth noting that there is a wide variety of muffle furnaces. They can be electric, gas, air and some other types. They also differ significantly in the type of construction.
They are standard vertical or horizontal, as well as tubular.
The main difference between a muffle furnace and a conventional furnace for melting aluminum with your own hands is that it has a special section called the muffle. This area allows you to protect the metal that is being processed.
Basic structural elements and materials for assembly
The main element is, of course, the heater. It is best to choose an electric one. Its greatest advantage is that it is very easy to operate. In addition, there are such details as a heating chamber and a special heat accumulator. In order to successfully melt aluminum, heat control must be in place. This will help make the process continuous.
If you have to melt several different materials, then the aluminum itself should be subjected to the process not just once, but several times. In this mode of operation, it is necessary to ensure that the heat accumulator also functions as a regulator. This is necessary in order to maintain the desired temperature of the aluminum after melting.
In order to make a stove for melting aluminum, you need to prepare the following materials:
- grinder, wire and metal bucket;
- seven bricks;
- construction-type safety glasses, a few unnecessary pieces of metal;
- hammer and other standard tools.
Start of assembly work
Assembling a homemade furnace for melting aluminum begins with the following:
- You need to take 7 prepared bricks, which will play the role of a temperature accumulator.
- Using a grinder, a compartment is built on each side of the brick. The result should be a space that will be used for an electric type heater. To increase the strength of the structure, you can take wire and wrap the entire structure with it.
- A metal bucket that has been prepared can be used as a fireproof chamber. If there is no suitable one, then you can make a camera yourself.
Housing assembly
Even a simple furnace for melting aluminum - such as a muffle furnace, for example - requires a housing. In this case, it can be made from a piece of unnecessary sheet metal, the thickness of which will be from 1 to 1.5 mm. It is worth noting that a layer of rust will be needed here.
Another important point concerns the height of the bucket. This parameter should be with a certain margin, since the working chamber will be mounted on a layer of bricks plus thermal insulation. Next you will have to roll the metal sheet into a pipe.
This process is quite problematic, and therefore it is recommended to use special rings made of reinforcement.
To complete the construction of a furnace for melting aluminum with your own hands, you need to do the following:
- The prepared rings are put on a twisted sheet of metal and connected around the circumference.
- The bottom for the furnace body can be assembled from the same sheet of metal that was already used for the pipe. It is mounted by welding to the lowest ring.
- It is necessary to make a special hole in one of the bricks through which an electric heater can be placed directly inside the working chamber.
- For ease of laying out, you should immediately number the bricks, and then start laying them out. It is necessary that they fit very tightly to each other. The resulting design of a furnace for melting aluminum, made with your own hands, must be very stable.
- A heating coil must also be attached to the bricks.
- To install a spiral heater, you need to make several grooves and install bricks along them.
- You can also cut grooves in the right places using a grinder. It is recommended to use eye and respiratory protection during operation.
- Most often, the material for the spiral is either nichrome or fechral.
- The spiral must be wound very carefully and in such a way that the turns are close to each other. The distance is necessary to avoid short circuiting.
- The entire structure should be coated with the solution.
In this way, you can make a muffle-type furnace for melting aluminum with your own hands.
We make a mini-smelter and melt aluminum cans
And then I searched some more and found how to build a smelter. But the video with the making of the smelter, alas, has not been translated into Russian.
21 comments
- SO65LO
- 7 February 2015, 13:12
- +1
- allayah
- 7 February 2015, 13:25
- AlexSi
- 7 February 2015, 14:01
- +3
- SO65LO
- 7 February 2015, 14:07
- +1
- Vovka_BC
- 7 February 2015, 14:07
- Opus
- 7 February 2015, 16:13
- +2
Well, it’s not just gypsum, but mixed with some kind of sand (play sand). In general, I liked using the hairdryer.
P.S. Hookah vendors with vacuum cleaners and barbecue makers with hairdryers are becoming increasingly common. )
- Snipe
- February 8, 2015, 00:09
- Opus
- 8 February 2015, 02:14
- r1pper
- 8 February 2015, 10:33
At the melting temperature of aluminum, gypsum loses its water of crystallization and turns back into “powder.”
- AlexSi
- 8 February 2015, 11:12
- Opus
- 8 February 2015, 17:08
- +1
- allayah
- 8 February 2015, 14:57
- allayah
- 8 February 2015, 15:05
- XenUrs
- 7 February 2015, 19:37
- mariposa
- 7 February 2015, 19:58
- hamster76
- February 8, 2015, 00:15
- Opus
- 8 February 2015, 02:20
- +2
- hamster76
- 8 February 2015, 14:37
- Opus
- 8 February 2015, 16:57
- +1
And then I searched some more and found how to build a smelter. But the video with the making of the smelter, alas, has not been translated into Russian.
- Vietheity
- 8 February 2015, 19:30
10 mm) and drying for 5 days, followed by greasing the cracks and drying. Thermal insulator is expanded clay. In about an hour, the resulting structure without an insulated lid reached 950 degrees (and the temperature continued to rise). There is more than enough for hardening and aluminum. I haven't tried brass. The thermostat in China costs
Is it possible to melt down aluminum cans at home? Simple life hack | (Photo and video)
Did you know that in order to use an aluminum pan on a fire you need to know the rules for using this utensil. Otherwise, it may simply melt. After all, the melting point of this metal is only 660.4°C.
Using this information, you can organize your own small business project. So, we melt aluminum cans into ingots at home.
Briefly about security
Safety in aluminum smelting comes first, because this is a rather dangerous undertaking, especially if it is carried out using artisanal methods. What could go wrong? Let's get a look:
- Explosion when water gets into the melt;
- Spillage of high-temperature raw materials, possible burns;
- Danger of fire getting out of control;
- Penetration of chemically active substances into the respiratory tract or onto the cornea of the eyes.
In this regard, we strongly recommend not to wear synthetic clothing to avoid its melting, use goggles, a respirator, and preferably welding gloves. If you plan to melt aluminum on an ongoing basis, it would be a good idea to look for a fireproof suit.
Gas horn
A DIY gas forge should be practical. Its walls are made of fireclay bricks.
The manufacturing procedure is as follows:
- Refractory bricks are being prepared.
- The walls of the forge are folded. The amount of material varies depending on the complexity and size of the case.
- Surfaces are processed using a hacksaw.
- All elements fit tightly. The presence of cracks is not allowed.
- A threshold is installed in the front part.
- A rectangular hole is cut at the back. It serves both for ventilation and for working with long workpieces.
- A hole of the appropriate diameter is cut out on the side for the gas burner.
- The gas burner is made of stainless steel. This is a pipe welded at one end and with a metal mesh at the other.
Such a forge has its advantages:
- The furnace is structurally simpler than a coal forge.
- Simple fuel supply and simple temperature adjustment.
- Light weight.
- Low cost.
There are other types of gas forges made of metal. There are no fundamental differences between them.
Figure 3: Burner drawing for a gas forge
Ceramic tile finishing
The simplest finishing option, which is quite easy to handle, but only if you have high-quality material and well-written instructions.
Option for facing the fireplace with ceramic tiles
Stage 1. Material selection
The following materials are used for finishing fireplaces:
- porcelain stoneware;
- clinker;
- majolica (pressed tiles covered with glaze);
- terracotta.
All of these options are characterized by increased thermal conductivity, the ability to withstand high temperatures, mechanical strength, durability and impressive appearance.
Regarding the glue, it must be heat-resistant and consist of elastic materials that neutralize thermal deformations that inevitably occur when the structure is cooled/heated.
Heat resistant glue
Stage 2. Finishing the fireplace
Step 1. First, the surface is cleaned of dirt, the seams are deepened by approximately 1 cm (the same as before applying plaster to the walls), and if necessary, the old coating is removed.
Corner brick fireplace
Step 2. Laying tiles are adjusted. Cladding can be carried out only after the entire set has been cut to size.
Step 3. The surface is marked. To do this, you will need a building level and a plumb line, but if possible it is better to use a laser level.
Step 4. The bottom row is laid, starting with the first uncut tile. The adhesive is applied to several tiles at once and carefully distributed with a notched trowel. Each tile must be pressed and, if necessary, tapped with a rubber hammer.
Step 5. Upon completion of installation, the surface is checked with a level to ensure it is flat. The sooner this is done, the faster the necessary adjustments will be made.
Laying tiles on the fireplace
Laying tiles on the fireplace
Step 6. Immediately after laying, the surface of the tile is cleaned of any adhesive residue, otherwise the glaze may be damaged.
Step 7. The seams are rubbed even before the solution has completely hardened. They are filled with thick cement mortar using a rubber spatula. Each processed seam is smoothed with a wet sponge.
Fireplace grouting
Installation subtleties
This stone can be laid on any surface, even wood and drywall. Only in this case additional surface preparation is required. For a wooden wall, it would be appropriate to install sheathing and waterproof it. With concrete and brick surfaces everything is simpler, but careful leveling of the surface cannot be avoided. It should be clean and smooth.
Walls are different everywhere, it is necessary to take into account all the nuances.
- The walls are cleaned of dirt and dust.
- Cracks, irregularities, and holes are repaired using putty.
- If the walls have pronounced unevenness, you need to use drywall.
- Carefully seal all joints and cover the surface with putty.
- Then coat with primer, if necessary, do this twice, waiting for the first layer to dry.
- Treat the wall additionally if there is fungus on it. It is not enough to simply remove it; you need to dry the wall well, then treat it with a primer.
- If there is old coating on the walls, it must be completely removed. This applies to paint, wallpaper, decorative plaster.
The prepared surface is treated with a primer. Rooms with high humidity are treated with a special composition that prevents the appearance of fungus and mold. You can glue the gypsum stone using a cement-adhesive mortar, which is applied to the wall with a notched trowel. The glue dries very quickly, so there is no need to dilute a lot at once. You should try and get used to how much you can use in a certain amount of time.
This is a very important point, because the quality of the glue determines how the decorative elements will stick. It can be of several types.
- A dry mixture based on cement. Provides good adhesion of the material to the surface, but shrinks.
- Dry mixture with a gypsum base. Most suitable for gypsum tiles due to its composition.
- You can use glue that is available for tiles, as well as liquid nails and mastic. Each composition contains instructions for the preparation and use of the material.
To lay out the panels efficiently, you must first make markings. To do this, you need to use a level and draw a line along which the first row will be laid out.
Laying begins from the bottom corner to the central part. The stone can be laid in even or uneven rows, leaving seams, which are then sealed with grout having a gypsum, alabaster, or cement base. When working, use a narrow spatula, act carefully, trying not to cover the tiles. If the surface gets dirty, you should immediately remove the solution with a wet sponge.
Determining the quality of the melt
Another property of flux is the improvement of binding qualities. In this case, aluminum products will be homogeneous, stronger and more durable. In this case, precise proportions must be observed both when making the flux itself and when adding the finished compound to the aluminum melt.
So, to obtain the best effect, we add an amount of flux equal to 2.5 percent of the total mass of the melt to the crucible with molten metal. It is better to carry out the corresponding calculations in advance so as not to waste time and not miss the very moment when the temperature in the center of the fire reaches its maximum value. In this case, the surface of the metallic liquid should be mirror-like; if this is not the case, add a little more flux, but try not to overdo it.