Now on frosty winter evenings you can easily relax with a cup of hot coffee, wrapped in a warm blanket that you can make yourself. You ask how? Very simple! To do this, you don't need to know how to sew professionally or go to the store for expensive fabric. You may have everything you need at home. To make a warm blanket, all you need is old sweaters. Choose a color palette that matches your decor, or combine different shades to create a bright and colorful blanket.
Knitted
Surely many people recognized “grandmother’s” rug. Yes, previously it was an attribute exclusively of village houses, but changing fashion has turned its face to a modest handicraft product. Now interior designers are vying with each other to advise clients to decorate respectable villas with the simplest handmade rugs - it’s stylish. Traditional rug made from leftover fabric
DIY blanket for a newborn made from plush yarn
If you knit from a strip of fabric, the rug will be soft and cozy. Many people prefer the improved version: tie a strip of fabric with thread, then the product turns out more dense and holds its shape better.
Color combinations can be the most unimaginable. And don’t be embarrassed if it turns out too bright: the main thing is that you like the result.
Improved "grandmother's" rug
Using this technique, it’s quite difficult to make straight edges on rectangular rugs, but I wouldn’t complain about it. In my opinion, the absence of perfectly straight lines only emphasizes the originality of the product.
see also
- DIY children's handbag patterns
Coat pattern with hood- DIY Solokh headband pattern
- Pattern of a long dress to the floor without sleeves
- Serpyanka for sewing
- DIY chuni patterns
- Sewing cabinet with table
- Pattern of women's panties with shorts
- Oversized dress pattern
- DIY vest without sewing
- Patterns for tourist backpacks
How to knit a beautiful blanket with knitting needles
Choosing a pattern is already half the battle to knit a beautiful blanket. Moreover, even very simple drawings will look great.
Yarn selection
An important question that interests everyone is which yarn is best to knit a blanket from. I looked at the reviews of needlewomen on the forums: some knit from acrylic, others from wool, in the end many came to the conclusion that it is best to take acrylic in half with wool. My friend Svetlana, whose blankets I showed, uses exactly this kind of yarn.
Therefore, yarn containing both is an ideal option for knitting blankets.
- What is thick yarn called?
Buy threads from the brand you like; personally, I love ALIZE. Consumption for a blanket measuring 100x150 cm is from 600 to 1500 grams, depending on the pattern and the number of folds of the thread (knitted in one thread, two, or four).
- You can also knit from plush yarn, from “grass” - look at examples of such fluffy blankets.
- We select the knitting needles according to the thickness of the threads, knitting the sample. Typically numbers from 6 to 14 are used.
- It is better to take circular knitting needles - it will be more convenient to knit a large fabric on them. I haven’t had straight knitting needles for a long time now; I knit all my things only on circular ones.
- Just don’t buy knitting needles with thin fishing line, knitting on them is a pain, you need to choose ones so that the thickness of the fishing line is approximately the same as the diameter of the knitting needle itself.
How to knit
You can knit a blanket with a single piece of fabric, or you can knit it from different squares, which are then sewn together, or from strips.
We knit a sample pattern and calculate the loops that need to be cast on the knitting needles. But that is not all. You need to immediately think about how to make the edges of the blanket neat and beautiful.
Second life for old things
A good housewife will never lose anything. Even old, worn-out items can be put to use by making a cozy country blanket or a blanket for gatherings in the gazebo. For the first version of the blanket you will need:
- At least 8 knitted sweaters.
- Scissors.
- Hook.
- Thick thread and needle.
Before you start sewing a blanket, sweaters must be washed, dried and steamed. Only after this can you start cutting. Cut all sweaters into strips 12 cm wide. Mix the strips, distributing colors and patterns. Pin and sew strips along the length. The seams must be processed with a zigzag or overlock, otherwise they will crumble.
Next, you need to cut the resulting rectangles crosswise into strips 12 cm wide. Mix again, selecting combinations of colors and textures, making sure that the seams match, if necessary, sweep. Sew and finish the seams. Along the perimeter of the blanket, also process it using an overlocker and trim it with tape or a blanket stitch by hand.
Bedspread with decorative stitching
Sewing such a product is not much more difficult than the previous version. In addition to old sweaters, you will need scissors, a cardboard square template, yarn in a contrasting color with the sweaters, and a thick needle.
Make two templates of squares from cardboard, 20 by 20 and 10 by 10 cm. Rip clean and steamed sweaters along all seams, set aside the sleeves. Cut out larger squares from the base material. Cut out 10 x 10 cm squares from the sleeves.
Lay out the blanks on the floor, choose a pattern or color combination. Pin in the chosen order along the strips and stitch on the machine, retreating from the edge by the width of the foot. After the entire blanket is sewn, you need to finish all the seams with decorative stitching. This could be a simple overlock stitch or a chain stitch, or any other decorative stitch. Trim the edges around the perimeter with tape - and the blanket is ready!
Crochet blankets. diagrams and descriptions, photos for the sofa, for children, for a newborn, from motifs
It was a coat, it became a blanket
A warm and beautiful blanket can be made from old coats, which you don’t dare throw away, but moth and time have done their job. In addition to the main material, you will need scissors, yarn and a hook.
First of all, you need to tear off the lining and rip the product apart at the seams. The seams can be cut off, since unrolling and steaming them will take too long. Cut the material into the maximum number of even rectangles of different sizes. Arrange them on a flat surface into a single whole.
Crochet the edges of each piece with yarn. After this, connect all the fragments together into a blanket. A beautiful and original bedspread is ready! Now it can be washed and ironed. If you have not one coat, but two or several, you can use threads of a contrasting color for each element for tying. Then the plaid will turn out brighter, but a little eccentric.
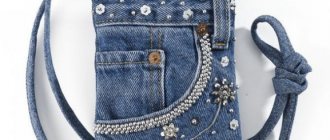
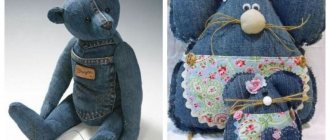
Plaid made from old jeans
You can make a stylish and neat blanket yourself from old jeans, jackets and other denim items. To make the blanket truly functional and beautiful, you need to sew a lining on the back side - fleece or an old thin blanket. Here's a short tutorial on how to sew a blanket from jeans squares. To work you will need:
The standard size of a blanket for a one-and-a-half bed is 150 by 220 cm. Cut out the details for the blanket from denim fabric. The width will be 10 squares, the length 15. In total, 150 squares of denim will be required. Since jeans have different textures, shades and thicknesses, after all the parts are cut out, they need to be laid out and the most harmonious pattern selected.
Carefully collect the laid out rows in piles, number them and pin them together with paper clips. This is necessary for greater convenience in work, so that the pieces do not get mixed up and the rows do not get mixed up later.
Sew the squares of each row into a strip of ten elements. You need to step back from the edge by the width of your foot, or 0.5 cm. To avoid fiddling with knots, make fastenings and cut the threads right away.
From the duplicating material, cut out one large piece corresponding to the size of the bedspread, but leave an allowance of 2-3 cm. Pin both parts together with tailor's pins and turn the blanket over to the right side. The product needs to be quilted. To do this, the stitch is inserted into the seam connecting the rows along the width. It is not necessary to quilt along the length.
Trim the edges of the lining flush with the edges of the jeans. Hem the edges with bias tape or braid. If the thickness of the folded material and the lining do not allow the use of binding, both edges are folded with the cuts inward and stitched at a distance of 0.2-0.3 cm from the fold.
How to sew a down jacket blanket (pattern): sewing a women's down jacket-blanket coat with your own hands
236 Article author: Reading time: 1 min.
Fashion trends of the last few years dictate very interesting rules. During the cold season, every fashion-conscious girl wants to choose an interesting option for warm outerwear. One of such bright elements that are very popular now are down jackets and blankets.
How to sew a down jacket blanket yourself?
This fashionable product continues to occupy a leading position in the choice of consumers, which is why many needlewomen are interested in how to sew such a thing themselves. Sewing such an oversized down jacket is quite simple, since its manufacture requires minimal knowledge. And during the assembly process of the product, only a few seams will be required. They can be made either by hand or on a sewing machine. The main advantage of a down jacket is its increased level of comfort, which in itself already adds a slight charm to the image.
Down jacket-blanket: pattern and sewing with your own hands
First, let's figure out why this down jacket is called a blanket. In fact, everything is simple - this model is ideal for those people who dream of going to work in a “blanket” and do not want to get out of a warm bed in the morning. The down jacket has a simple cut and looks most like a large square piece of material with holes for the sleeves and a belt.
The unique design of such a thing allows you to stand out elegantly in the crowd, and in the cold season it will warm you with its warmth. In addition, a down jacket is easy to make yourself, since sewing it does not require special skills.
Reference! A two-color version of a down jacket, which can be worn on one side or the other, will look very unusual and will allow you to create absolutely any look.
Model description
A very interesting and elegant option for tailoring can be a quilted model with a classic voluminous collar for such a down jacket, which will partially help solve the problem of the lack of a hood in the cold. The quilted material will give the finished item sophistication and femininity, and the filler will not roll up in one place and will be evenly distributed over the entire area of the product.
An interesting model with a belt and a wide collar is harmoniously suitable for any look: casual or business, and this gives additional versatility to the product.
Model:
Materials and tools
Of course, at the very beginning of work on creating a down jacket, you should decide on the materials that will be used. For the outer part, it is best to use waterproof polyester or polyester-cotton blends. This will keep you warm in bad weather and extend the operation of the finished product for a longer period.
There is a huge selection of fillers. Here it is better to choose insulation according to personal preferences. The most popular of them:
- Natural fluff. It has excellent thermal insulation properties, but may begin to come out through the fabric.
- Synthetic down. It warms perfectly, does not climb or roll down. Plus, it's washable.
- Sintepon. It warms well, but tends to pill.
- Holofiber. It has good warming properties and does not cause allergies.
Important! When choosing a material, you should start from its practicality, and when choosing a filler, it is better to choose hypoallergenic insulation that can be washed. Thus, the product will last longer, and there will be fewer problems during its operation.
Tools you will need for sewing - scissors, chalk, needle, threads by color, sewing machine (if you have one). This will be enough to sew a down jacket by hand.
Pattern
To sew a down jacket you need a minimal pattern. Of course, you can do without it, but for beginners it is best to place an approximate diagram on the fabric. For size 44 of such a blanket coat you will need a piece of material 190*150. In this case, the length of the product will be 102 centimeters.
Attention! The pattern is intended for pre-prepared material with already quilted filling.
Pattern:
Sleeves:
The width of the back in the finished product is equal to the width of the back at the shoulders + 5 centimeters for freedom of fit. Collar height 24 centimeters. And the shoulder seam from the armhole line is 10 centimeters.
Cut out the materials.
Placing the pattern on the fabric is quite simple - you need to transfer it to the material and, according to the diagram, cut the coat according to the pattern lines (they are marked in blue), taking into account a 1 centimeter seam allowance.
In the finished version it looks like this:
Sewing steps
- At the beginning of assembling the product, you should sew the sleeve into the armhole and remove the insulation from the seam allowances. It will get in the way during the stitching process, and may come out in the finished product, which doesn’t look very nice.
- Previously, the seam allowances on the armhole should be treated with tape of a suitable color - this will allow the product to be worn both front and back.
- Along with the shoulder seams, the collar joint seams should also be sewn. This should be done on the front side of the product, and on the back side, sew a ribbon or trim of a suitable color, which will hide the seam.
- And perhaps the most important thing in the last stage of processing is that its edges should be processed along the contour of the product. This can be done in 2 ways: stitch the trim around the entire perimeter of the product, or remove part of the insulation along the edges - fold the edges 2 centimeters to the wrong side and stitch.
Thus, the work on the product is ready, and the stylish down jacket blanket can be worn right away.
Did you like the article? Share it What is your assessment of this material? Found a mistake? Select it and press Ctrl + Enter. We'll fix everything! Author of the article: I love creativity, and that's why I'm here! auto RU
tkaner.com
Choice of shape and size
Denim is a high-quality, durable material; you can sew a neat bedspread or a large blanket from old things. If denim pants are not enough, you can use unnecessary denim shirts, skirts, and jackets. The blanket is made according to the principle of a mosaic - it is assembled and sewn from individual fragments into a blanket of the desired shape and size. The advantage of sewing is that no special pattern is required. It is recommended to choose a simple layout of denim fragments and avoid too small flaps - they are difficult to sew and the finished product turns out to be heavy and bulky. Tips for choosing the shape and size of a blanket:
- if you need to sew a blanket for a sofa or bed with your own hands, you can base your calculations on the size of the finished textile;
- to calculate the required number of denim patches, draw a diagram of the plaid;
- when making a patchwork-style blanket, round blanks are cut out;
- Between the elements of the blanket you can lay cotton strips cut from old shirts.
Plaid scraps can be folded in various ways: according to a simple pattern, with a pattern, from squares or circles, with lining, trim along the edge, with fringe. After choosing the shape and size of the denim blanket, you need to draw a sketch of the model and be guided by it during the work process.
To make the blanket durable and neat, you need to make a lining - it will cover the seams on the wrong side of the bedspread. For sewing, you should not use scraps from jeans from heavily worn places, otherwise the appearance of the bedspread will be shabby.
Assembly of the canvas
After things have lost their shape and turned into regular old fabric, the iron comes into play . It is necessary to carefully iron the former items so that they are smooth and easy to cut into separate flaps. Using a pre-prepared sketch or experimenting on the fly, we cut the fabric into parts of a convenient, creative and desired shape. Once all the pieces are prepared and cut out, you need to carefully sew them together.
It is best to use a sewing machine. Thanks to it, the seams will be even, and the strength of the product will be higher. If you sew the flaps by hand, then the entire work will take more time, and this is worth taking into account. When the main canvas is ready, you can begin the main task. Now you will need to sew a cozy home blanket from it.
The first step is to prepare a piece of fabric for the lower part of the future product. You can make a bedspread with or without filling. If the goal is to get a light blanket, then it is best to choose padding polyester and use it in one or maximum two layers . A sketch is again drawn on paper, the dimensions of the bedspread are indicated to scale.
The future bedspread can be decorated with applique. It should be glued at the initial stage, when the fabric is not yet completely stitched.
The filled bedspread is made of three parts. Filling is placed between the two parts of the canvas, and the parts are sewn together. After all decorative elements are sewn and glued, and the filler is in place, you can proceed to the final stage. You need to trim the edges of the bedspread; for this you will need a plain strip of fabric. A strip 5 centimeters wide will be enough. The length is selected individually.
DIY pastel pompom rug
"Granny Squares"
One of the most popular crochet motifs is the granny square. One scheme, but the flight of imagination is limitless. You can vary the colors, take different yarn, and each time you will get something new. You definitely won’t have any questions about how to knit an original blanket.
This motif is performed in a circle. First of all, you need to knit a chain of 6 air loops and connect it using a connecting post.
1 row. Knit 6 chain stitches: 3 chain stitches + 3 chain stitches according to the pattern:
Then knit 3 double crochets into a ring.
Next, 3 chain crochets, 3 double crochets, 3 chain crochets, 3 double crochets, 3 chain crochets and 2 double crochets. Connect the row with a connecting post, inserting the hook into the 3rd chain lifting loop of this row.
To start knitting the next row, knit 1 connecting stitch in an arch.
Related article: How to make a paper bookmark for a book: video and photo corner
2nd row. 3 chain stitches, 2 double crochets in the arch from the chain stitch of the previous row, then 3 chain loops and 3 double crochets in the same arch.
After this, knit 1 chain stitch and in the next arch from the chain loop of the previous row, knit 3 double crochets, 3 chain loops, 3 double crochets. Continue knitting in this manner until the end of the row.
3rd row. Knit 4 chain stitches, then into the arch from the chain stitch of the previous row, knit 3 double crochets, 3 chain loops, 3 double crochets.
We knit 1 chain stitch and 3 double crochets into the next arch from the chain stitch of the previous row. 1 chain stitch, 3 double crochets, 3 chain crochets, 3 double crochets into the corner arch from the chain stitch of the previous row. Repeat 2 more times.
Next, knit 1 chain stitch and 2 double crochets into the next arch. Close the row using a connecting post.
Subsequent rows are knitted in the same way until the desired size of the square itself.
The motifs are stitched together in any convenient way.
An example of stitching with a needle can be seen in the photo:
In addition to knitted blankets, patchwork blankets are now in fashion. The popularity of such products is quite clear: they look bright and catchy, but at the same time create an atmosphere of warmth and comfort. Decorative elements made using patchwork technique can give the room originality and an unsurpassed look.
How to sew a blanket from sweaters without felting
It is not at all necessary to cut the fabric into squares; a blanket made of sweaters will look interesting with both stripes and triangles - a flight of imagination will suffice.
Machine knitted sweater before work.
We remove the sleeves. There's no point in trying to undo the seams if they're overlocked. But if the knitting is done by hand, you can unravel the seam and you will save the fabric from “spilling” the edges.
This jacket did not have to unravel the side seam. Sweaters can only open one side seam.
- Prepare a template for cutting out motifs, so the work will go faster, and the squares without distortions will be much easier to sew. A roller knife is an ideal tool for this kind of work, but safety precautions should come first - it is very sharp.
- A ready-made square motif for a future blanket.
Loose sleeve. We also try to cut out as many squares as possible from it, we try to leave the side seams on the canvas untouched.
Ready-made motifs for a blanket.
Lay out ready-made motifs before stitching and combine. You can outline a schematic drawing of the blanket in advance and follow it - counting the number of motifs that will have to be cut.
We stitch together the motifs, preferably with double stitching.
Ready-made blanket with lining. The back seam can also be hidden under the lining, to suit your taste. This blanket has seams facing out and will probably fray a bit for a while.
You can use a lot of old things for a blanket:
Skirts and jackets in endless sizes from second-hand stores, dresses and trousers. Often, such things are made of Scottish wool, but their colors have long gone out of fashion, there are abrasions and the fabric has faded a little (that is, it can no longer be used for wear, it cannot be altered).
Some great ideas for blankets and blankets made from sweaters and old woolen items, all photos are enlarged:
A blanket. We sew from old things.
Winter, frost. We spend a lot of time at home. To make the evenings useful, let’s do what we simply don’t have enough time and energy for in the summer, spring and fall.
But you will need a positive attitude. We are waiting for spring, a time of renewal and new hopes.
Therefore, we not only tune in internally to change, but also externally: first of all, let’s put things in order at home. And let's start with this: let's check our closets, chests of drawers and bedside tables.
It is behind their doors that all our shortcomings, omissions and long-forgotten unnecessary things are often hidden. Today we will work on the chest of drawers and the closet in which clothes are stored.
I would like to draw the attention of those site visitors who generally do not accept any alteration of old things, for whom it is easier to throw away everything old. Then this article is not for you
To avoid getting irritated and spoiling your mood, do not read further!
I will share my little experience with everyone else. Today, for the first time, I decided to repurpose old sweaters and blouses into something useful. Circumstances prompted me to this idea:
- too many of these same knitted items (which are not used at any time of the year) have accumulated in the closet
- the new bed is covered with an old tapestry bedspread
- I have some free time that I want to spend productively
- I wanted to learn patchwork sewing
I have already tried to master the patchwork technique and sewed a rug for the kitchen. And I really like him! Such a cozy, handmade wool rug. It fits perfectly into the interior of my kitchen.
Note: white will suit any color and will refresh any product well.
Take to work everything that you don’t wear: skirts, pullovers, jumpers, sweaters and warm old woolen scarves! I decided to use red, pink, gray and white knits for my bedspread.
Once you have collected enough knitwear and matched it tones, start cutting things at the seams. The seams must be carefully cut out and placed in a separate bag. Imagine that even these strips can also be used! You can use them to make rugs for your balcony or cottage.
Next, we cut the resulting pieces of knitwear into strips (rectangles), but if you want, these can be squares. It will be much more difficult to work with other shapes (triangles, circles, trapezoids and others). Therefore, we will leave them for real craftswomen.
I cut rectangles 8cm wide.
The length of knitted strips can be completely different: from 10cm to 40cm. For me, the most convenient length of the strips was from 20 to 35 cm.
If you have the patience to cut a large number of strips, that’s already half the battle. Don’t give up what you started and finish everything: sew a new bedspread for your bed!
Expert opinion Ksenia Petrovna Romanova Expert in the field of interior design, as well as the head of a fabric sales salon
The cut strips need to be ironed. By the way, for my bedspread I used knitwear of different thicknesses. This may not be entirely correct, but in principle it is possible to combine them.
I put all the cut pieces in a shoe box to make it easier to use when sewing. The box helps keep the blanks in piles by color and prevents them from falling apart.
Plaid of unwanted sweaters
The original project is on the Yellow Suitcase blog. The owner of the suitcase is Michelle, that's her.
So, if you have a few sweaters in mind that are old enough that it would be awkward to wear them “in public” and warm enough that it would be a pity to just throw them away – let’s make a designer warm winter blanket out of them.
For a blanket measuring 150 by 180 cm, Michelle took 10 sweaters. She bought most of them at the Flea Market. By the way, now even second-hand stores have sales and sell, for example, any item for 30-50 rubles.
First step. Decide on a color scheme (Michelle's is creamy-gray, warm, earthy tones).
Second step. Open all sweaters and cut off all labels, zippers, buttons, etc.
The third step is felting. We'll throw it in the washing machine
Please note that only natural wool has the ability to feel. If you have “raw materials” with artificial additives, they will either not mat at all, or not as much as products made entirely from natural wool.
For felting, put your workpieces in a bag for gentle washing or simply in an old pillowcase (if this is not done, wool can clog the entire drain of the washing machine), add bed linen or a pair of jeans, and put the washing machine on a long cycle, switching from cold to hot water and with the obligatory rotation of the drum and spinning.
This is what Michelle writes as a size 54 sweater looked like after washing with the drum spinning. He sat down and fell down. For some it might be a nuisance, but for us it’s just right!
The next stage is cutting out the parts. Michelle prepared two templates: for a large square - 26.5 cm side, and for a small square (we will sew four such squares into one large one) - 14 cm side.
We arrange our parts by color and size, as in the picture.
Now you need to find a free, flat place, most likely on the floor, and lay out the parts on it so that you get the image of the future blanket.
Pay attention... no, not to the cats, but to the fact that Michelle left a couple of pockets and placed them along the edges of the blanket. What a good idea - you can put there, for example, a TV remote control, or even a handkerchief
Let's go further - we sew the parts of the blanket on the machine. Michelle writes that she sewed with a straight stitch, the widest stitch. It’s not entirely clear why, because on her car, as you can see in the photo, there is also a knitted stitch. We sew the smallest parts first, then the large ones together in rows. Pins are needed only when sewing large parts and rows.
We put the rows together, check again how they fit together...
This is what the back of the blanket looks like.
The next step is to choose a suitable lining. Michelle's is pure wool Scottish fabric. If for some reason we don’t have one like this, we can probably put fleece on the lining – it’s soft and stretches. Let's round the edges of the blanket, as in the illustration.
The last step: take a large thick needle, a skein of yarn and sew the top and lining together with a decorative stitch. I would also secure it at the corners of the squares, simply stitching several times with the same yarn.
The result was a blanket that was cozy and warm even in the photo. On the reverse side you can embroider your initials and the year the blanket was created - for sure it will last for many years!
Do it yourself
To create a warm blanket from old sweaters, you will need the following materials and equipment:
- pins;
- sharp scissors;
- contrasting or plain threads;
- a sewing machine or thread and needle for those who decide to sew by hand;
- 10-12 soft wool or cashmere sweaters;
- flannel fabric for the reverse side.
You may not have that many old clothes at home. In this case, you can buy sweaters at a consignment store or any other store. If there are various elements on the clothing, such as pockets, buttons or decorative details, they do not need to be removed. They will become a bright accent on the finished product and give it originality.
You can also buy ready-made scraps of fabric to create a similar blanket. But they are usually made from cotton rather than wool or cashmere. Therefore, the finished product will not be as warm.
Tip: do not forget to wash the sweaters in the washing machine on a delicate cycle before starting the manufacturing process. They may have stains or an unpleasant odor.
Patchwork in the house
Patchwork techniques have become very popular all over the world. This is not surprising, because things made in this way are bright and original, and also allow you to recycle unnecessary fabric scraps. A do-it-yourself patchwork blanket can be plain or variegated, have a complex or simple pattern - the patchwork technique gives wide scope for creativity. To sew such an unusual blanket, you will need:
- The material is white and contrasting color.
- A circle template with a diameter of 15 cm, a square template inscribed in this circle.
- Scissors, thread, sewing machine.
From material of both colors, cut out the same number of circles of the selected diameter. Fold in pairs face to face, stitch around the circumference, leaving a 1.5-2 cm gap. Turn inside out through this gap, sew up. It is advisable to iron every detail.
Patchwork for the lazy
You can sew a blanket from pieces of fabric with your own hands, spending a minimum of effort and time. It is not even necessary to process the material. You will need a large sheet of non-woven fabric, an iron and many scraps of fabric of different colors and sizes.
The first stage is the artistic layout of the shreds on non-woven fabric. They need to be laid out so that there are no empty gaps between the material. After this, carefully, without moving the shreds, iron them with a hot iron to glue them to the material.
Next you need to stitch it all, starting the lines at the closest possible distance from each other. The closer the seams are, the more wear-resistant and durable the product will be. You can take this blanket with you outdoors, to the beach, or lay it on the floor for children’s games.
To decorate your home with a cozy, beautiful and practical thing, you don’t have to spend a lot of money or look for something special in stores and on the websites of famous designers. A little time, imagination and effort, and everyone will gasp at your interior.
Easy way
There is an easier way to sew a bedspread for yourself. To do this you will need a ready-made piece of fabric . The most difficult thing in this case will be to decide on the type of fabric. A piece of fabric with the required parameters is purchased in the store. The size is selected according to the sofa or bed you have at home. A cozy blanket can be light or warm, with or without lining.
Matter is processed in such a way as to produce the desired result. A rectangular piece of fabric purchased in a store is decorated with embroidery or appliqué, and the edges are processed and decorated with ruffles or frills. This is the easiest way to make a bedspread at home yourself, spending a minimum of time and effort.
It’s worth talking about a creative solution that will appeal to many. The home bedspread can be made double-sided .
The sides can be made of different fabrics, have different patterns, and are made according to different parameters. Thus, one bedspread can be laid differently every day depending on your mood or day of the week.
Things you sew with your own hands are always more valuable, so you shouldn’t waste time on handicrafts.
Cat bed made from an old chunky knit sweater
I once saw this idea on the Internet and decided to make such a cozy bed for my cat Vasilisa.
I didn't even have to cut anything here.
- I took an old men's sweater, it would be better if it was a large knit so that the bed was thicker, I folded the collar inward, I didn't want to cut it, I hemmed it.
- I drew a chalk line under the sleeves and machine stitched the sweater along it.
- A piece of padding polyester folded in four was inserted into the lower part.
- I sewed up the bottom edge.
- The sleeves and upper part of the sweater were stuffed with rags and holofiber.
- I connected the sleeves with cuffs, inserted one into the other, and sewed them on.
True, at first my Basilisk was very wary of the new bed and tried to run away from the photo shoot. But after a few days, I noticed that she climbed into it on her own and slept, curled up.
Comfortable and warm house shoes
Feet are frozen - expect health problems. So be sure to keep them warm. This means that you will need appropriate indoor shoes for your winter cottage. The simplest option is warm knitted socks with thick soles. It can be made from felt or felt; you can use ready-made thick insoles or soles from old slippers - whatever you have on hand, whatever you like best.
House shoes made of leather (natural or artificial) are very comfortable in the country. In such warm slippers you can go out onto the porch, and even into the street - you never know what you might need. In addition, they are stronger and more durable than fabric products, which means they will last you more than one season.
In these slippers you can go out onto the porch, and even into the street
House boots - knitted or fur - are also popular now. Such shoes in a store or on the market are not cheap, but they are quite easy to sew with your own hands. Just think in advance about whether your sewing machine can handle the selected material. If in doubt, you will have to arm yourself with a needle and strong thread and sew the seams by hand.
Popular footwear - house boots, knitted or fur
You can take the idea proposed in the next master class as a basis. True, I do not share the optimism of its authors: such a product is hardly suitable for walking in a snowy garden. But they are perfect as house shoes. The upper material is not necessarily sheepskin; it can be successfully replaced by both drape and faux fur.
Those who prefer a thorough approach in everything may find another video useful. He will introduce you to the basics of shoe making and help you sew comfortable slippers and boots for your home with your own hands.
A women's down jacket-blanket is a thing for those who value comfort!
No matter how fashionable we are in the fall, with the onset of cold weather, thoughts about a warm and cozy down jacket arise more and more often. And with the first frosts, a down jacket completely turns “from thoughts” into an essential item. A fashionable down jacket-blanket is a stylish solution for those who don’t want to get out of bed, but still have to go to work. 
Contrary to the popular belief that a bulky down jacket will make your figure look even bigger, this is not the case. The fact is that large things make the figure visually more fragile. There is a game of contrast: the small next to the big becomes even smaller. But a down jacket will not add grace to you - that’s a fact. If we consider it as a warm, comfortable and everyday item, then it is difficult to find a more universal item!
This model of down jacket got its name because of the similarity... well, you already understood what it looks like, it’s warm like a blanket, and you can wrap yourself in it the same way. Designers at fashion shows have long presented this model, but it only recently reached the shelves of regular stores.
Characteristic features are a voluminous cut and a corner collar. More often than not, a down jacket-blanket does not have a hood, however, a huge warm collar can partially solve this problem. These down jackets are double-breasted, so they retain even more warmth in windy weather.
Model lengths may vary:
- short down jackets (good for autumn);
- midi length (around the knee);
- long full-length maxi models.
Two-color options (which can be turned inside out and worn with the “lining” facing out) are very interesting and unusual. Bright colors and pastel colors are popular: white, beige, pink.
If such colors do not seem practical to you, choose dark colors: noble burgundy, deep wine, dark green, gray, metallic. They are as non-staining as black. A black down jacket is definitely the most practical thing for winter, but it’s a little tired and boring.
Down jackets can be found in different brands and price categories. It is probably unnecessary to say that it is better to buy a down jacket with natural filling (down-feather). Pay attention to the outer fabric of the product. The softer it is, the easier it is to wrap yourself in it and the softer your outfit will look. However, such a thing will wear out more quickly.
What to wear with a down jacket?
Of course, this item will not fit with an evening dress, but in a casual and even casual business wardrobe, it can be combined with a huge number of things.
- Cozy knitted suit and sneakers;
- Trousers, jeans, leggings + jumpers and sweatshirts or T-shirts;
- dresses and skirts + jumpers and sweaters
- smart suits, overalls.
From shoes:
- sneakers;
- boots with tractor or flat soles;
- ankle boots;
- over the knee boots (with or without heels).
Remember, every time you put on a down jacket and knee-high boots, somewhere a little kitten is sad. Therefore: either over the knee boots or ankle boots.
Bags:
- cross body;
- shopper;
- backpack.
Hats:
- elongated beanie hats;
- baseball caps;
- hats made of large yarn.
In general, with this bulky down jacket you can create a large number of sets, look stylish, and feel very cozy - just like in a real blanket!
modnaya-krasivaya.ru
Preparing for work
Fortunately, even a novice needlewoman has a wonderful opportunity not only to sew a stylish patchwork bedspread, but also to recycle unnecessary items. The technique of sewing from scraps of various materials is called patchwork. The history of this type of needlework goes back to the Middle Ages, but today there is no complete information about it.
To sew a new blanket from scraps, you need to prepare for work. First, a sketch of the product is created. It is according to the sketch that pieces of old fabric will be prepared. During the work you will need:
- scissors;
- thread and needle;
- measuring tape.
After creating a sketch, you need to select suitable old things. They can be very diverse. T-shirts made of light fabrics, scarves, scarves, shorts and much more are suitable. In patchwork, you can use any materials, even completely different in density and texture. Next, the selected items must be prepared, namely, ripped apart.
Wrap up the canned food
The easiest way to use a blanket is to prevent hot jars of homemade preserves from cooling quickly. Carefully take the twists with a towel, turn them over and, after making sure the lids are tight, wrap them in thick cloth. This action will protect the glass from cracking when in contact with cold air, and will also prolong the pasteurization process - the destruction of pathogenic bacteria in canned products.
Prolonged heating of fruits or vegetables will create adequate conditions for storing preparations.