How to choose your outfit
There are a lot of ideas. Different colors with all sorts of shades of pinkish, bluish, gray and classic white. The most varied textures of materials are used. Starting from velvet and ending with knitwear.
Fur outfits from top to bottom or only trimmed with fur trim. For luxurious imposing “hares”, mischievous savvy bunnies, serious thoughtful “browns”. Accordingly, everyone’s ears are also different - diverse. Large hanging ears, small erect, with a blue or pink insert. There is plenty to choose from and where to direct your efforts so that the boy feels “at ease” throughout the entire action.
Free master classes on sewing bunnies Tilda
Bunny in a dress and green coat
An interesting and photo-filled master class on sewing a tildo and clothes for it. Watch here
Bunny based on toys by T. Conne
Master class and patterns from Evgenia Ambartsumyan. Watch here
Step-by-step master class from NKALE
Watch here
Knitwear option
How to sew a bunny costume with your own hands when you take on it for the first time? The simplest option is considered to be a knitted outfit, which is easy to make using a pattern. A kind of sports kit. There is no need to be afraid. The main thing is to start and follow a certain sequence. Moreover, the New Year is ahead, and both adults and children are looking forward to this holiday. A DIY New Year's bunny costume will delight everyone.
Face design and clothing
A hare's nose.
Naturally, everyone who sews such a toy wants to dress it up to their own taste. You will see for yourself what exactly suits your hare as soon as he is ready. Many craftsmen write that each tilde doll has its own character, and if the clothes that were originally planned do not fit (this happens!), you have to redo everything.
Bunny character
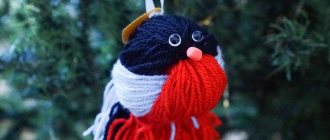
What should you pay attention to first? Of course, for the ears and tail. Without these attributes, a hare is not a hare. White is good. But you can get creative and add blue, gray and pink inserts or use them as the basis for an outfit.
Then the presence of snow-white details is mandatory. The bunny simply has to be fluffy and soft, that’s how he was born. Therefore, experiment with all your might with fur, velor, knitted velvet and other similar materials. Carrots are the main delicacy for a hare. Therefore, such an accessory will only add fun.
Hare by Tone Finnanger
Pattern 1
Pattern 2
Such a rustic bunny with a carrot hem - I really like it!
Fat hare Tilda
Patterns and visual assembly of the toy.
Basic kit
The sports theme is quite relevant, modern and well suited for the chosen character. Therefore, the sports kit must be sewn first. Or maybe you already have it in your wardrobe. If you still decide to do it yourself, you can use the following recommendations.
For a complete outfit you will need:
- soft base made of velor, fleece, footer or knitted velvet. Measure your child's height and multiply by two. This is the length of the cut with a width of 1 m. 50 cm;
- finishing fur. Twenty centimeters is enough;
- one meter of elastic band;
- machine (sewing) with a complete set for sewing (needles, threads, scissors);
- various decorations.
To create a pattern for a bunny costume with your own hands, the cut is folded in half. All parts are cut out in twos. You need to measure your hips, chest and add five centimeters on each side. Then measure the length of the trousers and sleeves. The back and the height of the hood.
Pants are sewn like this:
- the bow-seat is stitched;
- the product is turned inside out, and the side seams are made along the wrong side along with the pockets;
- the seams must be ironed;
- The cut at the waist and the hem of the bottom of the pants are rolled up;
- The elastic is inserted into the finished panties.
Note!
- Ideas for LD (a girl’s personal diary): step-by-step instructions for making it yourself, photo reviews of the best options
Educational soft books made of felt: materials for making, detailed instructions + reviews of plots for books (100 photos)
- Original do-it-yourself valentines - design options, necessary materials, master class for DIY work
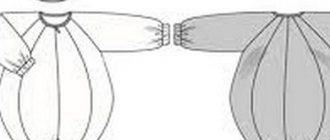
Top (hoodie):
- the seams on the shoulders are sewn down and ironed;
- the sleeves and the main part are connected;
- side seam one and two are sewn;
- the hood is assembled from two parts and the front section is tucked up;
- the armhole and hood are connected;
- the lower edge of the main part and sleeves is processed.
In this set you can play sports or wear it at home or on the street. Very convenient and practical. Now it is used to create an outfit for the holiday.
Ideas for inspiration
Bunnies from various authors. Just look at the images!
Maison de reve
Dzigora Natalya
Konovalova Olga
Adding bunny attributes
Matching bib and ears for the hare. A template is made from which four parts are cut. The main tone can be used on the outside, and the contrast tone on the inside. The ears come together. Now they need to be basted to the hood. Almost the “hare” is already visible, you just need to make it smart, because it is going to a holiday. For example, on the chest, directly on the jacket, a bib made of fluffy fur is attached. So much better.
Now it's the paws' turn. And you can’t do without a ponytail. To do this you need fifteen centimeters of fur, cut into a circle. Maybe a little more. It is pulled together around the circumference with a thread strung along a line. The tail is ready.
We make overlays for the paws. Mittens are too warm. Details in the form of a small oval are made according to the size of the palms. Elastic bands are attached from the wrong side. One should cover the wrist, the other two should cover the child’s palms.
The shoes will require two fur strips that need to be secured.
Note!
- Do-it-yourself bead brooch: photos of the best options, step-by-step master class on how to create it yourself, weaving patterns
Do-it-yourself felt toys - TOP-120 photos of toy ideas, do-it-yourself instructions for making them for beginners
How to make a lapbook with your own hands: a detailed master class on how to make it yourself, reviews of lapbook elements
Origami - do it yourself
If you need a paper hare craft, you should try the origami technique. This is an excellent technique that will suit even the smallest children - you can find the simplest and most primitive schemes online that are easy to implement. But you can find something more complicated!
The origami technique is very useful for children - it develops hand motor skills, intelligence, and logical thinking. In addition, this is a very exciting activity that will keep your child busy for a long time!
We recommend reading:
- Craft bullfinch: detailed description of how to make a bird with your own hands (115 photos)
Crafts from vegetables: 100 photos of the best crafts for children and a review of recipes for adults
- Craft ship: 120 photos, templates, drawings and step-by-step instructions on how to make a boat
Just take a paper folding diagram from the Internet - there are a lot of pictures with clear instructions. You can make either a simple bunny or a more beautiful and complex three-dimensional figure.
Photo of a DIY bunny costume
Step-by-step instructions for creating ears
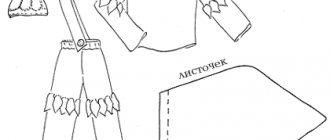
Manufacturing process step by step:
- Draw ears on paper and cut them out.
- Transfer the sketch to the fabric.
- Cut four pieces for the base from the compacted plush material. From satin - two smaller sizes.
- Sew or glue the pink parts to the base of the product. Iron the seams.
- Connect the parts of the base with the outer sides inward and stitch.
- Turn the resulting workpiece inside out and use an iron.
- Using wire, attach the finished ears to the headband.
- Wrap a piece of fabric around the headband and secure with glue.
A little history
Previously, not many glass toys were produced due to a lack of raw materials, and toys made from cotton wool turned out to be the most affordable. They were made by masters of their craft, depicting not only New Year’s characters, but also various animals, cartoon characters, and Soviet-themed toys. These were polar explorers, skiers, pioneers and border guards.
In the creation of cotton toys, the experience of hereditary craftsmen who were engaged in their manufacture even before the revolution was used. Then, in the thirties of the last century, they tried to launch mass stamping of products, mainly animal figurines. The toy was glued together from two halves and covered with nitro varnish.
Despite this, until the fifties, cotton toys were made by hand. Then the mechanization of production completely displaced such toys from the mass market. Only a few folk craftsmen made them at home. The beauty of a cotton toy is that it has a soul. The soul invested by the master.
Recently, there has been increasing interest in this type of creativity. After all, the new is the well-forgotten old. Artists and decorators make not only cotton toys, but also various interior items, introducing new elements into the technology.
How was the cotton toy made? The wire frame was wrapped with strips of cotton wool soaked in starch paste, and sometimes pieces of paper were added like papier-mâché. After drying, the toy was painted, adding mood. Today we will create a cotton toy - a hare. Only instead of paste we will use PVA glue. So, what is needed for production.