DIY bow costume for a boy: photo and manufacturing instructions
You read a lot of books and got used to me.
I saved the Pumpkin's house from Lemon and Cherry. Not afraid of Orange Onion, cheerful Cippolino! Oh, we’ll cry with him, If we want to clean it. But bitter onions will cure us of a hundred ailments!
This bitter root crop grew in the heat and slush. Although it will make us cry, it will save us from the flu.
CARNIVAL COSTUME “CIPOLLINO”
(“ONION”) consists of the elements:
1. Straight trousers with straps 2. Shirt 3. Onion cap
Recommendations for choosing fabrics
Lining fabric is ideal for making a suit. Its advantages: affordable price, ease of processing, large selection of colors, bright shades. Prepare yellow and green fabric. To duplicate the cap and voluminous appliqué, you will need a thin padding polyester and a large yellow button.
Description of work
Trousers. Consists of parts: front half of trousers, back half of trousers, strap (7 cm wide), leaves.
1. Prepare a pattern for the front and back halves. The ideal option is straight pants with elastic (pajama pants). Open it up. Sew the side seams. Mark a line a few centimeters above the knee. Place the leaves on the product face to face, i.e. with the sharp end up and position them so that the dotted line on them coincides with yours. Stitch it up. No need to iron. Now complete the instep stitches. Insert an elastic band into the drawstring and try on the trousers. Hem the bottom of the product. 2. Prepare a strap 7 cm wide (finished), adjust the length, sew. The button on the belt is decorative; the loop does not need to be made.
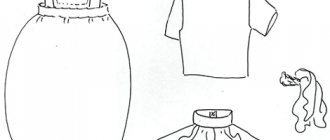
Shirt.
Cut and sew the shirt according to the pattern and description from any sewing magazine. Before sewing the sleeve seams, sew the leaves (see description of the trousers). Also baste the leaves to the neck (wrong side to the front side). Finish the neckline with a roll, the ends of which are also ties. The back can be decorated with a voluminous applique (the “Bow” motif, see Appendix 1); to do this, place a thin padding polyester under the applique details before stitching.
Onion cap.
We cut out a rectangle from yellow fabric, the width of which is 50 cm, and the length corresponds to the circumference of the child’s head (L) + 3 cm for seams.
Fold in half lengthwise and iron.
We cut out a rectangle measuring 25xL cm from thin padding polyester and put it inside. We fix it in several places with a needle. We perform decorative stitching. If the machine does not perform decorative stitches, you can embroider by hand using a stem stitch. We make the middle seam. To make “onion feathers” we sew thin tubes and stuff them tightly with synthetic padding. We pull the cap tightly along the top edge, after inserting the feathers. Application. Motif "Bow".
(click on the picture to enlarge)
Schemes, description, sketch, photo: Lyudmila Orlova, drawing of Cipollino and Lukovka: Elena Krampets, coordination and layout: Tatyana Evtyukova
The material was prepared specifically for the children's portal "Sun" and published on December 7, 2006.
For personal use only! Republication in other publications is prohibited!
Features of a bow costume for a boy
The bow costume is most popular among boys, although there are also girls who choose this outfit. This costume is not difficult to prepare due to the large number of variations. Everyone will be able to choose the appropriate option for themselves based on the available materials and their own capabilities.
Absolutely everyone knows this vegetable that makes people shed tears. There is no doubt about the recognition of the image. The main colors will be yellow and green in various shades. The lower part of the costume should be yellow, and the top should have some kind of green feathers. Brown is also used. You can look for existing clothes in the children's wardrobe and use them as the basis for a costume.
Reference! A good costume option for a boy would be a combination of brown pants and a vest with a bright accessory on the head in the shape of a bow and an appliqué on the clothes. Also, one of the simple outfits would be a golden cape and a hat.
How to disinfect beds
Not every plot owner has the opportunity to observe crop rotation, so after digging up onions or other plantings, it is better to disinfect the bed. Immediately after harvesting this crop, the soil should be watered with a solution of Fitosporin to improve the soil health.
A bright pink solution of potassium permanganate is suitable for the same purpose. But many pests were able to adapt to potassium permanganate. It is better to use Trichodermin with live spores, which fight not only pathogenic organisms in the soil, but also promote the rapid decomposition of remnants of roots and other vegetation.
Treatment with iodine will give a good result. It is not tolerated by weevils and chafer larvae. Water the beds with a solution: 20 ml of iodine per 10 liters of water.
Then you need to plant green manure, preferably mustard. It will enrich the soil with nitrogen and neutralize the soil from many pests. You can also plant oats, which will saturate the soil with phosphorus. Green manure is left until spring
Also in the fall, the beds are dug up with the addition of manure, ash, and compost. In the middle zone, this is the first ten days of October.
Mullein consumption - 6 kg per 1 sq. meter, chicken manure - 1 kg (in granules - 200-300 g per 1 sq. m), compost - 3-4 kg, ash - 1-2 kilograms.
What you need to make your own bow costume
To make an outfit you may need various materials and equipment. Ultimately, everything will depend on the chosen sewing technology. Therefore, first you should carefully study the design features of the selected option. The most commonly used materials for making a suit:
- Ready-made clothes in suitable colors, which can later be decorated;
- Fabric for sewing;
- Sewing supplies (threads, needles, pins, etc.);
- Paper, ruler, pencil, measuring tape for taking measurements and making patterns;
- Finished pattern;
- Paints for fabric and paper;
- Colored paper, cardboard;
- Stationery.
For sewing, completely different types of materials that are convenient for sewing can be used. You can even use faux fur material to add volume and texture. However, don't forget that holiday events are about play and fun. Therefore, it is better to choose lighter materials in which the child will be comfortable running and jumping. The best fabrics are felt and cotton. Felt is very convenient because its edges do not crumble and it does not require additional processing of the cuts.
How to make a bow costume
There are many options for making this type of suit. Let's look at some of them. One simple option is a suit consisting of yellow shorts with a green strap with one button. On the head there should be a cone-shaped hat with a spectacular decor in the form of onion feathers. Follow the following sequence of actions:
- First you need to draw a pattern. To do this, you can take any children's shorts and trace them on paper. Adjusting the length and height of the belt is easy;
- Cut out the strap. To do this, you need to take the necessary measurements so that it fits the child well in size. If you are not sure, then it is better to take its length with a reserve, and after trying it on, make the necessary adjustments. Its width should be 5-7 cm;
- We connect the side sections of the shorts and think about processing the belt. This could be an elastic band or an opening with a zipper or button. Also, if necessary, we process the lower cut of the legs;
- One side of the strap should be sewn to the back of the shorts, and the other should be fastened with a button on the front. It is better to take a large button to make it easier for the child to unbutton the clothes.
Those craftswomen who already have basic sewing skills can choose a suit made of satin or satin. This material is more difficult to work with, because... it is smooth and slippery. But it looks very bright and impressive. Manufacturing stages:
- The costume consists of trousers with an elastic waistband. The pattern can also be taken from the finished product and added an additional 5-10 cm on each side in width, because pants should be voluminous;
- We sew the side sections together;
- The waistband will have an elastic band and we will also sew an elastic band to each pant leg at the bottom;
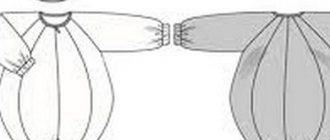
- To sew a sweater, take a rectangular piece of fabric and fold it in half;
- At the top we make a notch for the neck and hem the cut. We insert an elastic band inside to make the blouse comfortable to put on;
- The bottom can also be gathered using an elastic band, or you can leave it straight by processing the bottom edge of the material;
- The side sections are connected to each other;
- Don't forget to leave room for your hands. It is also better to process the armhole using an elastic band;
- Next, we make a beret-shaped hat. To do this, cut out a circle. We cut out a green strip of length equal to the circumference of the child’s head;
- Hand sew the edge of the circle with large stitches. Next, the circle is cut to the length of the green strip;
- The strip is sewn along the diameter of the circle;
- Next, decorative ornaments and other accessories are added.
Attention! At each stage of production, the costume can be measured for the child and the necessary adjustments can be made.
There are many fans of a wide version of this outfit. To make it, you need to make a sweater pattern in the shape of a trapezoid. The jacket should expand downwards. The neckline is cinched with elastic. Wide sleeves look beautiful on this product. If the clothing is sleeveless, then underneath you can wear a plain white or orange badge.
For this option, you should make a large collar with sharp corners in green. This is a small and painstaking job, during which you will have to separately sew the triangular corners together from the inside out, and then turn them right side out. Next, they are sewn onto the neck line from the wrong side. You can cut triangles out of felt. Then they can simply be sewn on, without additional processing, and the corners can be easily adjusted with scissors on the product itself.
Complementing the image
The mask is only one of the elements of a children's costume. To harmoniously complete the look, you can decorate your clothes or match them. It is worth taking into account the specifics of the image and supplementing it with the necessary attributes. Let's say you need to sew a ponytail on your dog's pants and put on paw mittens. For carnival, you need to decorate your dress or suit with sparkles. But you can do without it. Just choose plain clothes to match the color of the base or its individual elements. A beautiful costume for a child for a holiday does not have to be expensive at all; original and well-thought-out details are enough.
New Year's holidays are a time of carnivals, miracles, etc. Only at this time can an ordinary person turn into a fairy-tale character and, leaving all everyday worries, have a lot of fun. Children also look forward to New Year's parties. To look decent at the holiday, take care of your carnival outfit! A bright mask will add a touch of mystery to your image.
Nothing will complement your New Year's look better than a carnival mask!
If you didn't have time to prepare your costume, it doesn't matter. It is enough to make an original mask in an hour, and it will be able to turn your ordinary evening clothes into a fabulous outfit. This idea can also be used when preparing a child for a matinee. A cardboard or felt mask of some animal will complement children's clothing well. Without extra expenses, your baby can become a cute little bunny, a cunning fox or a fierce tiger. At the end of the article you will find a whole selection of masks that you just need to print and cut out!
Show your imagination - and your New Year's Eve will be simply unforgettable
Well, for lovers of photo shoots, we have selected a set of masks, glasses, mustaches and lips that will enliven any New Year's party. Just print them out on a color printer, stick them on thick cardboard and cut them out! The blanks need to be attached to wooden kebabs, and then armed with them for a festive photo shoot. But first things first…
Additional accessories for decoration
One of the main attributes of the costume is a spectacular hat. There are also many options for making it. So, you can take a piece of fabric and fold it into a triangle. In this case, the lower part should be equal to half the circumference of the baby’s head. Before stitching the seam, a pre-prepared bundle of green felt strips of different lengths is inserted into the cap.
There is another way to sew a hat. Let's consider the main stages of creation:
- It is necessary to cut out a rectangle 50 cm wide. The length should be equal to the circumference of the baby’s head plus a couple of centimeters for processing the seams;
- Next, fold the fabric in half and iron it thoroughly;
- We cut out another rectangle from padding polyester for the lining. Its width should be equal to 25 cm, and its length should be equal to the parameter of the first rectangle;
- Next, we put the lining inside the cap and fasten it in several places with large stitches;
- We make decorative stitching on a machine or by hand;
- Sew the middle seam;
- To make feathers, we sew thin rectangles and fill them with cotton wool or foam rubber. Next, we tighten the cap along the top, having previously placed onion feathers inside it.
You can complement the image using water-based face painting. It is absolutely safe and can be easily washed off with water. So, you can draw both a separate onion and green feathers on your face.
Additional accessories can be made in different ways:
- Using appliqué, you can add additional elements to finished clothes. For example, you can glue or sew a bright yellow onion onto a T-shirt or blouse. It can be made voluminous by placing a layer of foam rubber or other filler inside;
- Drawings with acrylic paint on fabric also look good. It can be either one large onion or many small ones;
- A very labor-intensive decoration option is embroidery. This method is used for expensive designer options for decorating products;
- You can cut out an onion from thick cardboard and glue it to different parts of clothing. One large onion on a bandage will look beautiful. Templates for this vegetable can be downloaded online and enlarged to the desired length before printing. You can draw an onion on paper and paint it with acrylic paints;
- A face mask cut out of paper will look unusual. It is very convenient to attach it to your head with the help of invisible ones;
- In prop stores you can buy artificial vegetables and attach them to a headband, hat or even shoes.
A wig made of green rain will look beautiful and unusual on your head. It will look like an imitation of onion feathers. It is also easy to cut out thin strips from colored paper and glue them onto a yellow or green hat.
Paper mask
The simplest solution is to make a New Year's horse mask for a child, and you will learn how to do this in this master class on making a horse's face.
For this you will need:
- Colored paper.
- Styrofoam.
- Glue.
- Scissors.
- A simple pencil.
- Cardboard.
- Rubber.
- Template (you can download it from the Internet and print it on a printer or draw it by hand).
Having prepared everything necessary, let’s begin to implement our plan:
- First you need to draw a horse's head on paper, but if drawing is not your thing, then just print out a mask template from the Internet. And in order not to waste time searching for the desired template, just enter “print a horse head mask” or “print a drawing of a horse’s head” in the search bar of your browser.
- So, the horse template for cutting is ready, it’s time to start making the parts of the New Year’s mask. To begin with, glue the template onto cardboard, and then proceed to choosing colored paper, preferably brown, yellow or orange and red shades. Having chosen the main background of colored paper, preferably brown, we place a template of a cardboard horse’s head on it and trace it along its outline with a simple pencil.
- Using scissors, we cut out the blank along the contour, and then make holes for the eyes on it.
- From yellow or orange colored paper, cut strips 5-8 cm long and 1 cm wide - they will be needed to form the horse's bangs.
- You should cut out the horse's lips and ears from foam plastic and cover them with colored paper, red lips and ears with brown paper, respectively.
- To make the mask voluminous, you need to glue the following parts to it: bangs (the thicker the better), lips (preferably in the form of a smile) and ears.
- To complete the touch, attach an elastic band to the mask.
DIY hedgehog mask
Don't know how to make a hedgehog mask for your head? It's very simple.
First, prepare everything you need, for example:
- Colored paper.
- Glue.
- Scissors.
- Rubber.
- Cardboard.
- Hedgehog mask template (a ready-made template can be found on the Internet by entering “how to make a hedgehog mask with your own hands” in the search bar).
- Pencil.
Manufacturing:
- We place the prepared template on colored paper of the desired colors and outline it along the contour with a simple pencil.
- In the finished hedgehog's face, we must make holes for the eyes and nose.
- We form hedgehog needles from colored paper. They can be made in two ways: by cutting strips or triangles.
- Needles should be glued onto the hedgehog mask using glue. If you don’t want to waste time making needles for a mask, make a one-piece hedgehog mask with needles.
Based on the above, you can make a nightingale mask or a man’s head out of paper with your own hands, and if you are in doubt about how to do it correctly, you can find the relevant information on the Internet by entering “how to make a man’s head out of paper” in the search bar of your browser, or "Nightingale for the New Year."
The simplest option
This bow suit for a boy consists of yellow shorts with one green belt and a large decorative button. On the child's head is a conical hat with a decoration on the top in the form of green onion feathers. You can choose faux fur fabric, as in the photo below, but do not forget that it is usually very hot at the holiday, and children move around a lot. A child may feel hot in fur pants and a hat. The best material for making a suit is felt or cotton fabric. Felt is convenient because its edges do not crumble, so there is no need to hem the bottom edge.
You can sew pants by attaching your child’s summer shorts to the material. A harness is a strip of fabric, approximately 5 cm wide. It is sewn at the back to the center point of the shorts, and then thrown over the shoulder and fastened with a button at the front. The hat is sewn from fabric folded into a triangle. Its lower part is equal to half the circumference of the head. Before stitching the seam, a bunch of thin green strips of felt are inserted into the top. The bow costume is ready!
Cardboard masks
As you can see, the material for manufacturing can be varied. Some of them are at hand, but often underestimated. You can make not only masks for children from paper, but also from cardboard. This refers to the thick cardboard from which the boxes are made. Everyone probably has a cardboard box of household appliances in their home. This is exactly what you will need to create the foundation. The good thing about brown cardboard is that it doesn't need to be painted, making it great for the faces of a variety of animals. Here, for example, is a dog’s face made of cardboard.
It is necessary to attach additional parts to such cardboard bases; in the case of a dog’s face, you will need a nose, ears, and eyebrows. You can use pieces of foam rubber, cotton wool or other bulky material. If you draw well, you can use a black marker to mark the missing details: mustache, nose, facial lines. You will also need to secure the fixing elastic; too thin will not work for this mask. To ensure that the elastic itself is tightly connected to the cardboard and does not tear the base, you need to know one trick. Thread one end of the elastic through the hole and tie a piece of foam rubber. Do the same on the other side, the muzzle is ready.
Satin suit
This manufacturing option is suitable for those mothers who have a sewing machine at home. Satin material is slippery, but looks impressive. The pants are sewn in the form of wide trousers; there is an elastic band at the waist and at the bottom of each leg. The jacket is cut from material folded in half. We cut a neckline at the top and fold the edge. We insert an elastic band inside to gather the fabric. The sides should not be stitched all the way. Holes are left for the hands. The bottom can be gathered with an elastic band, or you can leave it flat and tuck it into your pants. An additional element for a bow costume will be a headdress.
Therefore, further work goes on the beret. To do this, cut out a large circle from gold fabric. The circumference of the child's head is measured and a green strip is cut out according to the measurements. A needle and thread are threaded along the edge of the circle and stitches are sewn around the entire perimeter. Next you need to pull the thread and gather the fabric to the size of the green stripe. Then sew the headband in a circle. At the last stage, be sure to try the beret on the child’s head so that nothing presses or slips. All that’s left to do at the end is to attach the bow feathers, and the boy’s bow costume is ready!
Playing on the contrast of volumes
Oversized remains at the peak of popularity this season. But you don’t have to think that it’s impossible to look feminine in it. This is wrong. The main thing is to choose the right combination.
DIY carrot costume for a girl
Thus, one of the current techniques is to combine a voluminous sweater with a tight-fitting bottom.
These can be tailored jeans, tapered ones, tight-fitting straight-fit leather trousers, and even skinny jeans, which many girls have in their wardrobes. Thanks to the contrast of volumes, such bows look sophisticated and feminine.
In order not to visually increase the volume of the hips, choose a sweater length just above the middle of the thigh - this is the optimal solution for maintaining the proportions of the figure. The edge of the sweater can be tucked into jeans, outlining the waist, and the sleeves can be rolled up, tearing off fragile wrists. This will add additional sophistication to the outfit.
Wardrobe 40+: how to dress stylishly for older women?
Wide option
Since onions are a round-shaped vegetable, the suit can be made wide and voluminous. To do this, the jacket is not cut evenly, but widened downwards, in the shape of a trapezoid. We gather the neck and bottom with elastic. The sleeves can also be made wide and decorated with ruffles at the wrists. A sleeveless vest option is acceptable if you wear a yellow or orange turtleneck underneath. The collar is decorated with green sharp corners. This is quite a painstaking job, since you will have to separately sew triangular pieces of fabric together on the wrong side and then turn them right side out. When a large number of such corners have been made, they are sewn onto the neck line from the inside out. You can make it easier by buying a green felt sheet and sewing it to the neckline. Then use scissors to cut the corners. There is no need to sew it, since the felt edges do not crumble.
The lower part of the suit is green. This is not important, so a boy can wear any dark trousers for his bow costume. All that remains is to sew the hat. Let's look at this process step by step.
Choose a bright accent
If you select items of different shades for a green set, then immediately determine which detail will attract the main attention. For example, match a bright blue dress with a green handbag, earrings and stole
Despite the fact that the main item of the look is blue, it is the green accessories that attract more attention.
In urban style: 11 looks for cold days of autumn
This technique helps to visually elongate the figure to look slimmer. This is also a good way to save on trends. If green is a fashionable color this season, buy yourself a green scarf; if it’s red, go shopping for red.
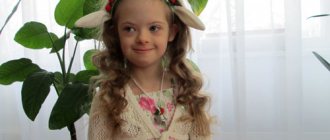
Bow cap
To make the bow costume look complete, you can sew a hat with green feathers, as in the photo below. Having measured the circumference of the child’s head, we transfer the measurements to the material folded in half. Cut out a rectangle whose length is equal to the circumference of the head plus 2 cm for the seams, 1 cm on each side.
Several pointed strips of fabric are cut from felt. You can pre-sew them together into a bundle. Then the top is gathered around the feathers and sewn together with simple threads to match the color of the fabric.
As you can see, making a bow costume with your own hands is not difficult, especially if you have a sewing machine and some sewing skills.
Hat as the main element
The main attribute in Cipollino’s costume is a hat in the shape of a bow. There are no specific instructions about what shape or color it should be. Therefore, you will have to rely on your imagination and an approximate idea of the type of bulb.
To make a Cipollino hat, you can use a fabric pool cap in yellow or white color without any drawings or company icons. As a last resort, a small icon or the name of the manufacturer can be covered with a patch of a similar color.
In addition to the pool hat, any fabric hat of these colors that fits your head tightly will be suitable.
A small cut is made in the top middle of the hat for the bun. A bunch of greenery in this version is also made of fabric. Take ten identical strips of green fabric and sew them five by five. The top of each strip must first be cut at an angle so that the foliage does not appear square. You need to leave a hole at the bottom for filling.
Each stitched strip should be filled with cotton wool or foam rubber of suitable size using a long pencil/knitting needle. Do not fill it completely, leave about 2 cm at the bottom to secure the bun to the hat.
The bun from below is tied with a green thread and threaded through the cap slit. In order for the bun to hold well, the cut must be sewn up from the inside.
The image of Cipollino as a whole
It is not necessary to sew trousers and a shirt for a suit. They can be selected from everyday clothes. The shirt should be yellow to match the hat. Sleeves should be rolled up slightly to the elbow. Cipollino wears trousers with straps. Denim overalls or short straight trousers with fun suspenders will do the trick.
For decoration, you can add a bow applique to the front pocket. Ready-made appliques are sold at a fabric store and applied to clothing using an iron. You can sew on naughty patches, because according to the book, Cipollino was from a poor family. Fantasize and create the image of Cipollino at your own discretion.
Hat as the main element
The main attribute in Cipollino’s costume is a hat in the shape of a bow. There are no specific instructions about what shape or color it should be. Therefore, you will have to rely on your imagination and an approximate idea of the type of bulb.
To make a Cipollino hat, you can use a fabric pool cap in yellow or white color without any drawings or company icons. As a last resort, a small icon or the name of the manufacturer can be covered with a patch of a similar color.
In addition to the pool hat, any fabric hat of these colors that fits your head tightly will be suitable.
A small cut is made in the top middle of the hat for the bun. A bunch of greenery in this version is also made of fabric. Take ten identical strips of green fabric and sew them five by five. The top of each strip must first be cut at an angle so that the foliage does not appear square. You need to leave a hole at the bottom for filling.
Each stitched strip should be filled with cotton wool or foam rubber of suitable size using a long pencil/knitting needle. Do not fill it completely, leave about 2 cm at the bottom to secure the bun to the hat.
The bun from below is tied with a green thread and threaded through the cap slit. In order for the bun to hold well, the cut must be sewn up from the inside.
The onion hat can also be made from colored paper and large-format cardboard. First, you need to measure your head circumference using a measuring tape, and then cut a cardboard strip of the appropriate size. This will be the frame. The required length plus 1.5 cm for gluing is measured on the cardboard. You can choose the width at your discretion, but not less than 2 cm.
Place the cardboard on the head again and make sure the size is correct.
Glue sheets of yellow colored paper to the outside of the cardboard strip. The paper should be of such a height that you can step back a couple of centimeters from the top of your head and tie a bun. Glue the edges of the paper and the inside of the cardboard so that you get a cylinder with holes at the bottom and top.
Place the top hat on your head and gather the colored paper into a bun at the top, leaving some space inside between the top of your head and the paper. Lightly press the top so that the onion has a rounded shape. Wrap the bundle with yellow thread.
Finally, decorate the bunch with greenery leaves from colored paper of the appropriate color. Cut out oblong leaves and glue them, covering the place where the bunch is fastened.
Progress
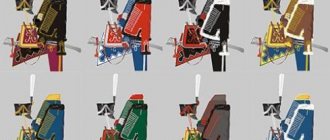
The first box will be useful to us for making the animal's body. Measure the half-circumference of your hips and add another ten centimeters. This will be the hole. The suit will be put on through it. Take a pencil. Draw a hole and then cut it out. The second box will be needed to cut out parts for the animal - the head and tail, as well as for our rider. Take a pencil. We randomly draw a tail and head on the side of the box. You can draw the template yourself and trace it with a pencil. Don't forget the rider. Draw his legs in trousers and boots. All prepared parts need to be cut out. Now let's start decorating our costume. Take gouache and a brush. Think about the color scheme in advance. Involve your children in coloring the details; it’s more fun to do such an exciting activity together. When all the details are drawn, let them dry thoroughly so that nothing gets smudged. Then we fasten the parts with tape. Attach two ribbons to the hole through which the outfit will be put on. These will be straps, thanks to which the horse will rest on the person’s shoulders. Glue the reins to the animal's head. Now we try on the original horse costume and go to the holiday.
This is how you can easily make original New Year’s costumes for a child or for yourself with your own hands. After all, this is a pleasant activity, because when making an outfit, you put your soul into every detail.