A cradle is a small bed for newborns that can be rocked, moved, taken on the road, or placed right next to the parents’ bedside. This product must be durable and strong so that the child does not fall off with a poorly secured lounger during motion sickness.
In this article we will tell you how to make a cradle for newborns with your own hands in different ways. These are products made from waste material and wooden boards, ropes and thick fabric. There are options for weaving from wicker, and there are beautiful cradles made of wool rugs. The main condition for creating a crib is naturalness and environmental friendliness when choosing materials, so that the child does not inhale the “aromas” of synthetics or toxic varnishes and glues.
DIY cradles for newborns are made using natural wood or wool or cotton fabric. To fasten wooden parts, use only PVA glue (D3 or D4), and use only acrylic varnishes or paints for surfaces. They are completely odorless and non-toxic; they are widely used to cover children's toys and furniture.
Low wooden cradle
If the baby's dad has the skills to work with boards, then he can easily make a wooden cradle for a newborn baby with his own hands. Take high-quality boards - dry and clean, without gray spots of mold, so that the baby does not have an allergic reaction. To get wide and tall parts, the boards need to be glued together, making panels of the required size. This will protect them from cracking due to changes in temperature and humidity.
When the boards are ready, cutting is performed. The dimensions of the drawing must correspond to the height of the baby plus 20-30 cm for a pillow and freedom for the legs. The width of the bottom is also determined by placing the baby on a flat surface. It is better if the child can spread his arms to the sides freely.
The sides are cut out in a trapezoidal shape, rounding the parts at the top. The bottom of the bed is rectangular, as are the sides. For beauty, you can make beautiful curves. When the main part of the cradle for newborns is assembled with glue or screws, start working on the rounded legs. They have a flat surface on top, and the bottom part is made semicircular. The legs are made stable using a large radius. The crib should not completely rock, but slightly tilt in one direction and the other so that the baby does not fall out when tilting.
When you have made a cradle for newborns with your own hands, all that remains is to cover it with acrylic varnish. You can line the inside of the crib with fabric so that it stays on top; drill holes in the wooden parts for the laces.
Useful accessories
A canopy suspended above the cradle creates a cozy “house” and gives a feeling of security and peace. Thanks to it, a bright sunny day or light in the room will not prevent the child from sleeping peacefully.
Toys hanging on an arc built into the cradle will not leave any baby indifferent. In some models, they can move in a circle to soothing music, which helps the child fall asleep quickly. For those who are afraid of the dark, there are small star night lights.
Many modern electronic cradles have remote control using a remote control.
Barrel version
A rocking crib for a baby made from a barrel will look very impressive. This DIY cradle for newborns is made up of two main parts. This is the barrel itself, from which a large piece has been cut off, and a wooden stand made of two strong legs and a lintel.
The barrel is attached to the side legs with dowels and mini-fixes made of hard wood. You can screw it on with bolts, securing it with nuts on both sides, adding a lock nut or a lock nut to make the structure reliable.
The remaining parts can be screwed on with screws or, if you have carpentry skills, tied onto tenons. You already understand how to make a cradle for a newborn with your own hands; all that remains is to cover everything with a layer of varnish and line it with fabric from the inside. It is advisable to attach a quilt to prevent the child from hitting the hard walls of the barrel. Don't forget to thoroughly clean the edges of the metal hoops so that they don't tear the fabric and harm your baby.
Types of cradles
The offered range of cradles is not limited to the standard model. Modern shabbies are improved examples of their distant ancestors.
Classical
The classic version is the most common. The box is suspended on cables from the ceiling or mounted on the wall. Sometimes parents worry about the safety of the child and therefore refuse this model, which is quite natural, although in vain - the designs are initially designed to withstand loads that greatly exceed the weight of even a very well-fed baby.
A positive feature of such a cradle is the ease of motion sickness. You don’t need to constantly stand nearby: one touch with your hand and the cradle will continue to swing by inertia for a long time.
Bassinet swing
Essentially, these are small swings mounted on stands. The cradle has built-in seat belts, which is very important, since the sides of the box are small. In many models, the backrest is adjustable to the position of the body, which allows the child not only to lie down, but also to sit. They are recommended for use for children whose weight does not exceed 18 kg.
A swing cradle is an excellent way to calm a child, which has a positive effect on coordination of movements and the vestibular system.
Automatic
An automatic cradle is an electronic swing cradle. It comes with a remote control, a night light, and a soothing selection of music. This model will save parents a lot of free time, but it is still not recommended to sleep in it for a long time - it is better to use it exclusively to calm and lull the baby.
This model is best used as an additional sleeping place to the crib.
Hanging cradle for crib
This is an indispensable item for those who already have a stationary crib. As a rule, it is almost impossible to pump it - only roll it if it has wheels. And if they are not there, a fabric cradle will help out - it is easily attached to the sides of the crib and just as easily removed when there is no longer a need for it.
Cradle-boat
Another interesting idea for making your own hanging cradle for newborns is a rocking boat. Unfortunately, this is a very difficult job that only an experienced high-level carpenter can do.
Therefore, if you are a carpenter, then you will definitely like the idea of creating such a spectacular cradle boat, as it looks quite original. It is not difficult to make stands for the cradle; these are ordinary legs with a jumper, the upper part of which is slightly raised and rounded. But it’s difficult to make the curved edges of the boat itself. You must have a steam generator and a chamber to steam the board and bend it according to the template of the required size. After cooling, the board remains curved.
Such a cradle is attached to cotton ropes threaded through holes drilled in the boards. To make it more similar to a real boat, small blocks were used, but they serve only a decorative function, since the cradle can neither lower nor rise.
Baby carrier for newborns: how to choose, use and sew it yourself
With the birth of a child, parents first think about buying various things for him. If everything is clear with the crib, then choosing a stroller can take more than one week. But this transport is not at all mobile: it is inconvenient to travel in a car, go shopping, go to the clinic or visit. This is why many people already purchase a baby carrier in the first month, if one is not included with the stroller. But how to choose the right model, is there a difference between winter and summer options, is it possible to sew such a cradle yourself?
Cradle made of slats
For those who like to make wooden structures, there is another option for an original baby crib. It consists of two semicircular planks, for which several boards were first glued together, and then they were cut out from the resulting shields according to a pattern. The next step will be to connect them to each other with a number of identical slats, screwed on with screws on both sides. The bottom of the crib is made flat.
For beauty, stars were cut out on the sides with a jigsaw. All slats must be thoroughly cleaned so that the crib is smooth and safe for the baby.
Possible mistakes
Some dads try to save on everything and make mistakes when designing or building a crib, which will affect their children in the future. Here is a list of the most common mistakes that should not be made:
- Use old building materials . This applies to both wood and fasteners. Old wood may contain mold, mildew and other dangerous microflora. A small child will quickly catch the infection, and parents will wonder what happened to him.
- Do not treat wooden surfaces . There is an opinion that clean wood is much more environmentally friendly and safer. This is only partly true. The child can easily chew the board when his first teeth appear. At the same time, he can injure the oral cavity with broken wood chips or shavings. Don’t be lazy and save on wood processing, otherwise you’ll have to treat your child for a long time.
- Do not make calculations and drawings without experience in this field . Construction in a hurry is only permissible for experienced master carpenters with extensive experience. One miscalculation can ruin the entire project!
Carrycot for newborns
It’s easy to make a crib like the one in the photo below with your own hands. The wooden part of the structure is represented by two identical frames, which are connected at the central side points with bolts. They are held in an upright position by metal folding drawers, screwed to the top of the structure.
If you want to attach a canopy, you will also have to make a corner from slats with a central round stick for putting on the fabric. This design easily folds in half and can be taken with you outdoors or to the country. The cradle itself is made of thick fabric; satin or linen are suitable. A children's mattress is placed on the bottom.
How to crochet a blanket for a newborn, diagram with explanations
For those who are starting to knit, there is no point in taking models with complex patterns, it is better to start with a simple one. For example, a blanket made of colored squares, reminiscent of a patchwork quilt. It is better to use cotton yarn, or cotton mixed with wool. We take a thread of medium thickness and hook No. 3. Eight colors will be required.
The blanket consists of squares and is knitted like this:
- Set 6 balloons and close them in a circle with a connecting column (CC). Then we knit in a circle, with each row starting with 3 stitches per rise. Please note that 2 dc + 2 ch + 2 dc are marked with a group of dc.
- 1st row: 3 dc, 2 dc, 4 dc, 2 dc, repeat a couple more times.
- 2nd row: 3 dc, in an arch of 2 chains, knit a group of dc, 4 dc, in an arch of 2 dc, knit a group of dc, repeat a couple more times.
- 3rd row: 5 dc, in an arch of 2 chains, knit a group of dc, 8 dc, in an arch of 2 dc, knit a group of dc, repeat a couple of times, 2 dc.
- 4th row: 7 dc, in an arch of 2 ch, knit a group of dc, 12 dc, in an arch of 2 dc, knit a group of dc, repeat a couple of times, 4 dc.
- 5th row: 9 Dcs, in an arch of 2 chains, tie a group of Dcs, 16 Dcs, in an arch of 2 chains, tie a group of Dcs, repeat pararaz, 6 Dcs.
- 6th row: 11 dc, in an arch of 2 chains, tie a group of dc, 20 dc, in an arch of 2 dc, tie a group of dc, do it a couple of times, 8 dc.
- 7th row: 13 Dc, in an arch of 2 VPs, tie a group of Dcs, 24 Dcs, in an arch of 2 VPs, tie a group of Dcs, repeat a couple of times, 10 Dcs.
- 8th row: 15 Dcs, in an arch of 2 VPs, knit a group of Dcs, 28 Dcs, in an arch of 2 chains we knit a group of Dcs, repeat a couple of times, 12 Dcs.
- 9th row: 17 dc, in an arch of 2 ch, knit a group of dc, 32 dc, in an arch of 2 dc, knit a group of dc, repeat a couple of times, 14 dc.
- 10th row: 19 Dc, in an arch of 2 VPs, knit a group of Dcs, 36 Dcs, in an arch of 2 VPs, tie a group of Dcs, repeat a couple of times, 16 Dcs.
- 11th row: 21 DC, in an arch of 2 VPs we knit a group of DCs, 40 DCs, in an arch of 2 chains we knit a group of DCs, repeat 2 times, 18 DCs.
- 12th row: 23 Dc, in an arch of 2 chains, tie a group of Dc, 44 Dc, in an arch of 2 chains, tie a group of Dc, repeat a couple of times, 20 Dc.
Designations:
- VP – air loop, air;
- Dc - double crochet.
Fabric pendant
You can sew a cradle for newborns with your own hands (photo below) from thick fabric, securing it to a floor beam or ceiling using strong ropes. So that the child can be rocked to sleep, a spring is attached at the junction of all the cords. Be sure to properly strengthen all the knots so that the child is safe and does not fall out of the bed.
The cradle is sewn from rectangular pieces of fabric, and attached to wooden round sticks with sewn wide loops. A mattress is placed at the bottom of the crib. If desired, also sew a canopy, which is simply hung on a spring in the center.
How to crochet a blouse for a newborn, diagram with explanation
Babies do not have thermoregulation, they do not know what is hot or cold, so all responsibility for clothing lies with the parents. For evening walks you can knit a blouse. The most convenient model to knit is a simple rectangular shape. No special knowledge is required here. For a blouse for the summer you can use cotton, for the fall a mixture of acrylic with cotton or acrylic with wool. Choose yarn marked children's. Now we determine the size; all children's blouses and sweaters are knitted according to the circumference of the chest. In children from 0 to 3 months, the chest circumference is 41 cm. It is better to knit looser. Therefore, the width of the back and front of the model will be 21 - 22 cm. The height of the blouse is 21 - 25 cm. The sleeves are 15 cm long. Now we take the yarn and knit from it a sample measuring 10 × 10 cm. In the middle, using a ruler, measure the number of loops in cm in length and height. Next, based on the number of loops per 1 cm, we calculate the quantity we need (knitting density). For example, we got 1 cm 3 loops in length and 4 stitches in height, then for the back we will need to cast on 63 - 66 loops and knit 64 rows. We also calculate the shelves; for the sleeve, you need to measure its width and make the calculation. We knit a chain of 66 VP and make the part. The back is ready. The shelves are knitted the same way, with a slight difference; one needs to be made a little larger than the other. In addition, at the level of 56 - 58 rows from the neck side, we make uniform decreases on both shelves. Sleeves can be knitted in the round by closing the initial chain into a ring. Now all that remains is to sew all the parts and attach the fasteners or simply make ties from flagella.
Macrame cradle
Many women are fond of weaving cords, so it is not surprising that the cradle for a newborn baby was made using the macrame technique. For this work you will need natural, durable cotton rope. The main threads are attached to selected hoops made of wire.
The bottom of the bed is best cut from plywood. Since the child is quite light, you can take the thinnest plywood - 4 mm. First of all, the cords on the upper hoop are fixed with knots. Next, the selected pattern of knots is made around the circumference using a working rope.
When the required height of the crib is reached, attach the lower hoop and weave a tightly mesh for the bottom. When the product is ready, insert the cut piece of plywood. Be sure to clean the edges with sandpaper; it is best to cover it with acrylic paint. Lastly, work on the bottom decorative fringe and make strong ropes to attach the crib to a hook on the ceiling.
Features of the hanging cradle
Newborn babies have an increased need for sleep—some sleep up to 13 hours a day. Therefore, arranging a comfortable and safe place for the child for this purpose is the primary task of parents, which a hanging cradle can help with.
A cradle is often a rocking box bed suspended from the ceiling. It is small in size, so it is intended for rocking babies only up to six months, while the baby is not yet able to sit.
Benefits of use
The choice in favor of a cradle is largely justified from the point of view of the child’s comfort - the conditions of some weightlessness that the cradle creates are more familiar to a newborn, it creates a feeling of the same security and safety as the mother’s belly. According to experts, the cradle allows you to smooth out the sharpness of the child’s transition from one world to another, preventing additional stress from arising.
Pros of use:
- a convenient and easy way to rock a baby;
- no load on the back (as opposed to being cradled in the arms);
- small design dimensions;
- mobility;
- ease.
It has been tested in practice that children in a cradle fall asleep much better and have healthier sleep. The small space of the box creates the illusion of being in the mother's womb; the baby feels safe, so he sleeps more peacefully. In addition, the mother no longer has to constantly rock the baby in her arms, which gives her more free time and the opportunity to do other things.
The cradle can be installed in any convenient place in the house: due to its small size, it will not take up much space, and the “airiness” of the design will not give the impression of a cluttered space. For small apartments it may be the best option. If necessary, it will not be difficult to move the cradle to another room - the light weight of the box allows this to be done.
Flaws
If during the manufacture of the cradle all safety standards were observed and reliable materials were used for the construction, then there are no shortcomings as such. The only disadvantage of any cradle model is the short period of use.
Most cribs are designed for newborns, so after the baby begins to sit up (about six months), the sleeping place will have to be changed and purchased a more spacious stationary crib.
Cocoon cradle for newborns
It’s easy to sew a comfortable portable cradle with your own hands, which is popularly called a cocoon, since it seems to hug the baby from all sides. You can take it with you on the road, on vacation in nature, or put it on the bed next to your mother.
Despite all the apparent complexity, sewing such a cradle is not at all difficult. You will need thick cotton fabric of one or two colors, a zipper, tape for tightening the corners of the cocoon, padding polyester, foam rubber and batting. If you have a sewing machine and very basic sewing skills, then feel free to start sewing such a cocoon, you will definitely succeed.
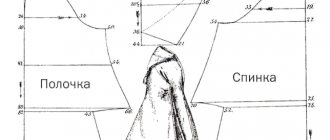
Pattern-drawing of a cocoon
The figure below in the article clearly shows all the necessary dimensions for sewing a fabric cocoon for a child. Using this pattern, two identical parts are cut out of fabric. On the wrong side they are sewn along the edges, leaving only the flat lower part unsewn. The soft bottom of the cocoon will subsequently be inserted through this hole. This pocket will be closed with a snake, which needs to be sewn onto its edges.
Next, you need to roll up a “sausage” from padding polyester and insert it along the entire perimeter of the cradle, pressing it tightly against the side seam. Then only on the front side a seam is made along the line marked in blue chalk. All that remains is to cut the foam bottom to the required size, cover it with a layer of thin batting both above and below, and then insert it into the pocket reserved for this purpose in the center of the cocoon and fasten it with a zipper. A wide satin ribbon is sewn onto the edges of the thickened sides to tie a beautiful bow. This closes the cocoon from below.
The article presents several interesting examples of making cradles for newborn babies. Choose the manufacturing method you like and do the work yourself. Good luck!
How to crochet a blanket for a newborn, diagram with explanation
A knitted blanket is not only beautiful, but also practical. You can knit it thin or thick, for summer or colder seasons. And we’re not talking about the invested soul and love. We suggest knitting a beautiful blanket according to the following pattern. Scheme 1 is the main drawing of the product, and Scheme 2 is the binding. Loop icons are shown in the same figure.