Table Of Contents
- DIY candy cup
- DIY candy cup step by step
- DIY candy cup photo
- DIY bottle cup
- DIY cardboard cup
- DIY cup photo
- DIY cup video
Creative individuals always want to give their loved ones gifts that they made themselves. One of the unusual, original and memorable options is a hand-made cup. In shopping centers, gift cups made of cheap plastic are very expensive and look unremarkable. It’s a completely different matter to put your soul into a future product, spending a little time on production. The cup can be made from a variety of available materials - bottles, cardboard, paper, plasticine, wood... No matter how the cup looks, it will in any case fulfill its main purpose - it will become a symbol of primacy, victory, leadership. Such a gift can be presented either to your beloved man, recognizing his first place in your heart, or to a sports team before an important match.
What you will need
Paper cup
- Cardboard
- Pen or pencil
- Scissors
- Paper
- Toilet paper roll tube
- Paper cup
- Dye
- Brushes
- Glue
- Art supplies to decorate the cup (optional)
- Printer (optional)
Cardboard cup
- Dye
- Brushes
- Paper
- Cardboard
- Pen or pencil
- Scissors
- Printer
- Art supplies to decorate the cup (optional)
Cup from an old glass
- Wine or champagne glass
- Hardening plasticine
- Aerosol paint
- Primer for spray paint
- Hot glue gun
- Art supplies to decorate the cup (optional)
Updated old cup
- Plastic cup
- Aerosol paint
- Art supplies for decorating the cup
- Spray glue (optional)
- Simple glue
- Scissors
- Markers
- Paper
- Label printer to sign the cup (optional)
Steps
Making a cup from a paper cup
To make a cup from a paper cup, you need to take paper, a pencil or pen, cardboard, a paper cup, a toilet paper roll tube, paints and a brush, a marker, PVA glue and scissors.
Cardboard can be taken from a cardboard box or from a package of breakfast cereals or other products.
Draw the outline of the cup handle on paper.
Take a piece of paper and draw a cup handle on it. Make sure that the height is approximately the same as the height of the paper cup. The specific shape of the handle can be whatever you want. The decision is up to you.
Cut out the handle and base of the goblet.
Take scissors and cut out a cup handle from paper. You will also need a base for the cup, so draw a square or circle on paper and cut that out too.
The size of the base is up to you, but remember that it should be slightly larger than the diameter of the top of the paper cup. This way the cup can rest securely on the base and not fall.
Transfer the outlines of the paper parts of the handle and base onto the cardboard, and then cut them out.
Taking the paper blanks for the handle and base that you just made, transfer their outlines onto the cardboard. You will need to trace the handle blank on cardboard twice to make two of these cardboard pieces. Next, take your scissors and cut out both cardboard arms and the base.
Paint the details of the cup.
Prepare the paint. You will need to paint the outside of the toilet paper tube and also paint the paper cup inside and out (you don't have to paint the bottom). The handles and base of the cup should also be painted.
The choice of paint is up to you, the main thing is that all parts are the same color.
Decorate a paper cup and toilet paper tube.
At your discretion, use crayons, paints, or otherwise decorate the previously painted paper cup and toilet paper tube. Here you can draw stars or sign the name of the cup itself with a marker.
You can also decorate the cup in other ways, including adding glitter or plastic stars to it. Give free rein to your imagination and enjoy creative work.
Glue the handles to the goblet.
Tuck a small section of paper under each end of both handles. Do this in such a way that with these folds the handles can be glued to the paper cup. Then glue the handles to the sides of the glass.
If the ends of the handles do not correspond to the angle of inclination of the walls of the paper cup, they can be pre-trimmed.
Glue the remaining parts of the cup together.
Glue one end of a toilet paper tube to the base of the cup. Then glue the other end to the bottom of the paper cup.
Making a cup from a glass
Gather the necessary materials.
To transform a glass into a goblet, you will need a stemmed wine or champagne glass, some hardening clay, a hot glue gun, spray paint, and a spray paint primer.
You can take any brand of plasticine. The main thing is that it hardens in the air.
Make the handles of the cup from hardening plasticine.
Make two handles for the cup from plasticine. Place the handles on top of each other to check that they are the same size and shape. If necessary, shorten and correct the parts to make them exactly the same.
Wait for the plasticine handles to dry.
It will take about 24 hours for the plasticine to completely harden. Therefore, wait one day before proceeding.
Glue the handles to the glass.
Use a glue gun to glue the handles to your wine or champagne glass. Let the hot glue set for a few minutes before continuing.
Paint the cup first with primer and then with paint.
Prepare the cup for painting by applying a spray primer. Then spray paint the cup.
Decorate the cup.
Once the paint is dry, you can decorate the cup the way you like. Use a permanent marker or acrylic paint to label the name of the goblet, or add small embellishments to the goblet.
Updating the old cup
Gather the necessary materials.
You will need spray paint, craft decorations, spray glue (optional), plain glue, scissors, markers and paper.
Find an old cup.
If you have an old cup lying around somewhere, try to find it. An old cup that is lying around somewhere useless and takes up extra space can be given a second life if you paint it and put skillful hands to work.
Before you do anything with the old cup, make sure no one in the family objects to it.
Material for work
To convey the required shape of the craft, use two disposable paper cups of different sizes. You can buy a shot glass for the bottom stand, and a large 200-gram glass for the cup itself.
Between them is a thin support made from a toilet paper roll. It can be installed on a tight circle or square. Carved curved handles are first drawn on cardboard and then cut along the contours with scissors. Connect the structural parts with PVA glue or transparent tape.
Papier-mâché version
A cup glued together from cardboard can be wrapped in cling film and pasted over with pieces of paper in several layers. The first layer is not spread with paste, but the paper is simply dipped in water and applied to the polyethylene. The remaining 5 or 6 layers are glued alternately. It is more convenient to use different types of paper, for example, newspaper and white sheet. Then it will be clearly visible whether the surface of the craft is completely covered or whether there are voids left.
Papier-mâché takes several days to dry, so you need to make the craft in advance. When all the layers have dried, cut one side of the cup and take out the base on which it was assembled. The cut is sealed with a layer of paper, and the surface is decorated as desired.
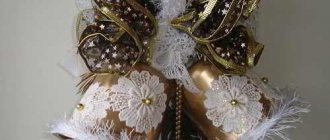
Cake
Everyone will like a tasty and beautiful addition to the holiday table. For its manufacture, a round blank is used.
The best option would be to make a craft from a box of chocolates. To do this, buy a product of the desired shape in the store. It is used for the third tier.
The two bottom layers are made of cardboard blanks onto which candies are attached around the perimeter. The top tier of the box is complemented with a bow to match the product.
We recommend reading:
Crafts flowers - 125 photos of the best ideas from craftswomen. Instructions on how to make it yourself from A to Z. Simple and complex options for crafts + video tutorial- DIY crafts: TOP-200 photos of the best ideas. Schemes, master classes, modern design, new products, instructions with descriptions
Crafts from plaster - 120 photos of the best ideas for creating original crafts with your own hands. Master class for beginners with examples and video lessons
Cup made from a plastic bottle
Let's do some handicrafts again)))... I'm just a little tired of knitting and want to relax, and rest, as you know, is a change of activity)))... Today we will make a craft - a cup from a bottle or a vase, as you like. A cup from a bottle is the simplest thing... and it’s done “one, two, three times...” in general, you probably noticed that I try not to complicate either my life or yours and everything that is done on the blog “We create - we’re not lazy! )))" extremely simple)))
For work we will need:
- Empty clean plastic bottle
- old unwanted CD or DVD
- Glue, it’s better if it’s a glue gun, but you can get by with some quick-fix super glue, but when using it you’ll have to clean the surface to be glued
- The paint... I have everything from the same spray can (you can replace it with some other one by adding PVA glue)
Tools
In addition to ordinary scissors, you can use a shaped device (zigzag, wave) to decorate a doll box.
If there is no specialized tool for scoring, it is done under a ruler using a nail file or a disposable plastic knife.
As for adhesive materials, it is better to choose one that dries quickly and is easy to work with. A glue gun is rarely used to make a doll box with your own hands. Traces may remain from it. And it’s not always possible to apply it in an even, thin layer. Most people prefer a combination of PVA or Moment and double-sided tape. It is worth remembering that the latter may come off over time. Therefore, you should not use it to connect component elements.
If the box-box consists of several parts (with further gluing), it is better to use brown masking tape to hold them together.
Ordinary clothespins will be indispensable when making a doll box with your own hands. They are used to fix parts while the glue dries. They must be clean, dry and not leave marks.
Paper cup
Hello, friends, “Golden Hands” masters!
If you are a hard worker and prefer to use things made by yourself, then this disposable paper cup making tutorial is for you! However, anyone can try themselves as a creator, regardless of whether you are a man, a woman, in the prime of life or still a child! How to make a glass with your own hands is useful for every person to know!
So, first you will need a sheet of paper; it can be absolutely any format, texture and size. Just know that the larger the original sheet, the larger your resulting cup will be. As an example, we can take a regular notepad.
Other interesting ideas
The gift should be thematic, that is, correspond to the interests of the person for whom it is intended. A man will like a car, a craft in the form of dumbbells, a simple composition including alcohol and candy.
For a girl, you can make a delicate bouquet or an animal figurine. Children will be delighted with their favorite cartoon or fairy tale character.
Candy can be used to make laptops, helicopters, dolls, robots, trees, fruits and other crafts. You just need to use your imagination and start creating.
Materials for making a cup
To make such a memorable gift for dad with your own hands, you need to prepare:
- cardboard (you can use corrugated cardboard, a shoe box);
- pasta or grains in different shapes to create the texture of the cup;
- small decorative elements (stars, beads, bolts, etc.);
- gold spray paint;
- pencil;
- scissors;
- glue gun (or PVA glue).
Stage one: creating a cup
The work of creating a fairy cup is simple, but it will require a lot of patience and time.
The first step is to do the following:
The resulting cup must be turned upside down, placed on cardboard and circled. The resulting circle line needs to be supplemented by drawing larger and smaller circles. After this, you need to cut out the resulting shape from cardboard. This is the rim of the cup. Of course, it needs to be glued to the bowl.
New Year's composition
When going to see friends, you can take with you a basket with delicious and colorful gifts. To do this, you need to put original candy crafts in it. They make a ball for a football lover.
We recommend reading:
DIY crafts from Kinder surprise eggs - 125 photos of exclusive options with step-by-step instructions, master class and videoCrafts made from twine - an overview of original design solutions. More than 100 photos of new products + step-by-step instructions for creating crafts with your own hands
DIY crafts from candy wrappers: 150 photos of the best ideas from craftswomen. Simple instructions, master class, diagrams and video tutorials on creating crafts from candy wrappers
A musician will love a small candy guitar. Complete the composition with Christmas balls, which are also made from sweets.
There should be tinsel in the basket, and a bow of bright ribbon should be tied to the handle. Such a surprise will definitely delight your friends and lift the spirits of the whole company.
How to make a paper cup - description with photos
For competitions in kindergarten or school, you can make medals from cardboard on satin ribbons, and for the winner - a beautiful paper cup. We will tell you later in the article how to make different versions of such crafts. It is recommended to prepare such prizes for children's parties to present to the winners of fun competitions. The kids will definitely like this gift, and its availability must be announced in advance to provide a greater incentive to win.
How to make a cup out of paper with your own hands? It is not difficult. There are several original ways to assemble a voluminous craft. A reliable and durable cup will be made using the papier-mâché technique; a craft made from individual elements looks great.
The cup consists of 4 parts. This is a stand, a thin leg, the actual container of the cup and curved handles on both sides. It is not the flat drawn prize that looks beautiful, but the voluminous one, which is solemnly handed over to the winner.
Instructions
- Take a plastic bottle and cut off about a third of the top. Cut a circle with a diameter of 6-7 cm from ordinary cardboard and attach it to the neck of the bottle using masking tape.
- Apply pieces of paper or newspapers to the workpiece in several layers, lubricating them with PVA glue or some other glue options (approx. Their recipes, as well as other papier-mâché techniques, can be found on the Internet). To prevent the mixture from sticking to your hands, periodically moisten them with water. Wait until the mixture dries completely.
- Level the product by carefully trimming the edges and sanding it using sandpaper. Prime the product by applying the primer in thin layers. Wait for each coat to dry before applying the next.
- Cover the piece with metallic acrylic paint. Decorate the cup
with rhinestones, beads or other decorative elements, depending on your imagination. Attach them with super glue.
How to make a cup from a bottle
- We take a suitable plastic bottle from water, lemonade or something else and cut it in half crosswise with scissors (don’t forget to remove the cap before doing this))) I originally had a bottle with embossed stripes, so I cut everything out according to them, or you can just leave a smooth edge... This is the cup itself.
- Now screw the cork on the bottle, take the prepared disk and glue the cup to the center of the disk using a glue gun. If you use glue, then it would be more rational to glue the cork to the disk first, and then screw the bottle part of the cup there...
Site.ru
Cup made of sweets and plastic bottle
We invite you to make a creative gift for a man - a uubok made from sweets and a plastic bottle.
To make a candy cup you will need:
— 800 gr. “Golden Lily” candies + 1 pc. heart “Lubimov”;
- plastic bottle;
- a container suitable in shape and density (here is a plastic water canister “Znamenovskaya”); - cork from children's gouache; — building plaster; — metallized corrugated paper in silver and gold color; — brown corrugated paper; — technoplex; - gold and silver braid; - gold and silver beads; — thermal gun.
Cup of candy and plastic bottle step by step:
Trim the bottom of the canister and bottle to the height you need (photo 1). Make a hole in the canister cap the size of the bottle neck. Cut out the bottom of the gouache cork (this ring will act as a gasket so that the upper part of the cup does not wobble). Instead, you can fill the joint with hot glue (photo 2-3). Fix the structure (photo 4-6).
Fill the upper part near the cork and the lower part (not reaching a couple of centimeters to the edge) of the cup with diluted plaster to strengthen the structure and let it harden (there will be no adhesion between the walls of the bottle and the hardened plaster, since the walls of the bottle are smooth - so after drying the plaster may fall out... but it needs to be inserted back and then it will rest on the stand) (photo 9-10).
Wrap the workpiece with silver corrugation. Why cut two corrugated strips - wider for the top and narrower for the bottom. The width of the strip will be equal to the volume of the widest part of the top (for the top strip) or bottom (for the bottom) minus a couple of centimeters. Stretch the upper (lower) part of the corrugation so that it can wrap around the edge of the cup with a small gap, while applying glue to the corrugation (since the plastic may scorch and the bottle will change shape). Cover the inside of the workpiece with gold corrugation (photo 12) and decorate all joints around the circumference with braid.
Then you need to cut out a square stand from the technoplex and trace the lower circumference of the cup in the center on it. Along the intended line, make a groove-notch 2 mm wide and 1.5-2 cm deep using a knife (as long as you left the unplastered bottom). Cover the stand with corrugated paper except for the circle under the cup. Run hot glue into the recess on the pedestal and insert the goblet.
Next, at your discretion, decorate the finished cup with candies, beads, and braid.
A cup of sweets and a plastic bottle is ready!
How to make a cup with your own hands from plastic bottles
In any competition there are always winners, which means they must be awarded with medals and cups. However, it is not always possible to purchase ready-made cups to reward competition participants. And then creativity and the desire to make things with your own hands come to the rescue.
In this article we have prepared for you an excellent master class on making a paper cup. Such a voluminous craft can be not only an excellent option for awarding the winners of absolutely any competition, but also, for example, original packaging for sweets and other small gifts.
To make a cup with your own hands, you will need the following materials: cup parts templates (attached below), glue, thick double-sided paper or soft cardboard, ruler, pencil and scissors.
Bouquets for loved ones
Even men can be presented with a sweet bouquet. The strong half of humanity also loves sweets and would not mind pampering themselves. And any woman will simply melt from such a bouquet. It's not that difficult to make it. It is advisable to purchase candies that are round in shape and not heavy in weight.
To create a bouquet you will need:
- chocolates – 15-19 pcs.;
- elongated skewers;
- corrugated paper (can be the same color or different) for creating buds, green paper is used for the stems and leaves of the flower;
- glue;
- narrow tape for ease of use;
- strong threads;
- ribbon for tying a bouquet;
- organza.
Work algorithm:
DIY military crafts - creative ideas, tips, photo examples
Simple DIY crafts - instructions for creating products from paper, cardboard, pine cones, fabric, bottles
- Each candy is strung on a skewer and secured with tape.
- To create the petals, an 8x12 cm template is made for them. Folded in half and the shape of the petals is cut out.
- Completely finished petals are created from corrugated paper. You can twist one edge of the petal to give it shape.
- Surround the candy on a skewer with the finished petals and a flower bud is created.
- At the base of the candy, corrugated petals (along with the candy) are tied together in the shape of a bud using a thread.
- Cut the green paper into strips 7 mm wide and 100 mm high. These will be blanks for the leaves. The number of stripes is based on 4-5 leaves per flower.
- We strengthen the leaves at the base of the bud with glue so that it is higher than the bud itself. The free end of the leaf curves beautifully.
- The skewers are also masked with green paper using glue. It will be enough to bring the paper to the middle of the stick.
- Ready flowers are collected into a bouquet.
- To prevent the flowers from moving, they are tied together with a prepared ribbon.
- Now the last decoration of the bouquet is with corrugated paper and a satin ribbon is tied. For greater effect, you can add organza, a satin bow, and beads.
- The bouquet looks beautiful in a wicker basket.
Master class on making dolls from cardboard, paper and yarn
Irina Sekisova
Master class on making dolls from cardboard, paper and yarn
Description: the master class is intended for speech therapists and educators for classes with preschool children on lexical topics: “Human. Body parts"
and "Clothes"
.
With the help of these dolls , teach children to compare, establish similarities and differences in a person’s appearance and clothing. To make dolls , we will need the following materials: thick cardboard , colored paper doll faces printed on a color printer , a simple pencil, scissors, glue, tape, awl, yarn , paper clips, rhinestones for decorating clothes, buttons, lace paper napkin .
Step-by-step production .
We cut out templates of girl and boy dolls from . Having attached the template to beige colored paper , trace it along the outline with a simple pencil and cut it out.
Then we glue the cut out dolls onto thick cardboard . We put on swimsuits and shoes for girls, and shorts and shoes for boys.
Using a printer, we print out the faces of girls and boys with different eye colors (blue, green, brown), stick them on the head, cover them with tape and cut them out. The dolls are almost ready.
yarn for each of them . I used yarn of different colors to show the children that hair color, like eye color, can be different (blond, brunette, brown-haired, red)
.
DIY cup
Creative individuals always want to give their loved ones gifts that they made themselves. One of the unusual, original and memorable options is a hand-made cup. In shopping centers, gift cups made of cheap plastic are very expensive and look unremarkable. It’s a completely different matter to put your soul into a future product, spending a little time on production. The cup can be made from a variety of available materials - bottles, cardboard, paper, plasticine, wood... No matter how the cup looks, it will in any case fulfill its main purpose - it will become a symbol of primacy, victory, leadership. Such a gift can be presented either to your beloved man, recognizing his first place in your heart, or to a sports team before an important match.
Cup decoration
The finished craft can be painted from a spray can or with a gouache brush. You can decorate the cup with stickers in the shape of stars or hearts, place flowers or geometric shapes. The design depends on the purpose of the prize.
If it is given for sports achievements, then you can draw balls, shuttlecocks or rackets, skis or other equipment. If an artist is awarded, they depict a brush and paints, a palette, or put multi-colored blots.
Garland
For a bright and shiny product you will need a lot of multi-colored elements. The three parts are folded like an accordion, then a hole is made in the center and sewn together with thread. This operation must be done many times.
Afterwards, all the components are combined into one garland. Crafts made from candy wrappers allow you to create bright decorations for your home and kindergarten. Kids will be happy to take part in the process.