It would seem, why philosophize if jewelry for every taste and budget is sold in stores? There you can find a pendant made of gold with diamonds, leather and wood, a classic or clearly avant-garde design. But no: many people want to make jewelry personally. And it’s not just about the financial component: you want the jewelry to be original and carry a piece of the creator’s soul.
Today you will learn how to make a neck pendant with your own hands. Here are the simplest master classes, some of which are even suitable for children's handicrafts. Mothers and grandmothers will certainly help kids, and teenage girls will be quite capable of making such jewelry on their own.
Pendant manufacturing options
A piece of jewelry can be made from:
- wires,
- beads and beads,
- genuine leather and wood,
- fabric and wool,
- yarn and paper.
The options for what a pendant can be made from are limited only by the imagination of the craftsman.
Additionally for work you will need:
- various fittings (including those specially designed for pendants),
- rings and pins for fastening elements,
- ribbons,
- rhinestones,
- glue,
- pliers,
- scissors,
- wire cutters
In order to make a beautiful pendant at home, you must first decide on a sketch of the product. The decoration should complement the wardrobe and match its overall style.
A unique designer decoration will be a real highlight of any set of clothes. You can get ideas by looking at the fashion collections of famous designers.
Materials and tools
There are many ideas from which you can make an original pendant. First of all, it is worth choosing the central part, which will be the basis. After selecting it, you can select additional elements.
The following options are suitable for holding the central composition and fastening it to the lace:
- Wire 0.2-0.4 mm thick
- Ropes
- Jute
- Clay
You can complement the composition with small rhinestones, beads or weaving.
If the central part is not made of solid material, for example, stone or shell, but is made independently, then the following materials will be useful:
- Sweaty and thin cardboard
- PVA glue or epoxy resin
- Clay
- Components of the composition: small beads, shells, dried flowers, rhinestones
The design of any pendant will also require a cord or chain with a lock and a loop holder for the pendant.
Advice. The holder loop can also be made from wire, which will frame the pendant in a beautiful pattern.
To work you will need tools:
- Scissors
- Tweezers
- Pliers
- Ruler
- Pencil
- thick needle
- White sheet of paper or white cloth
It is better to do all work on a white background: paper or fabric. This way all the details will be clearly visible and will not be lost.
How to make a pendant with your own hands
Depending on your clothing style and work skills, you can use different raw materials and techniques to create jewelry.
We recommend reading:
- DIY hairpins: step-by-step guide + instructions. 100 photos of finished hair jewelry. Master class for beginners
- DIY brooch - the best step-by-step instructions with description. Photos of finished products, as well as a master class for beginners
- How to weave rubber band bracelets with your own hands - a review of the best weaving patterns. TOP 100 photos of different methods and beautiful weaving patterns
When thinking about how to make a pendant with your own hands, it is useful to familiarize yourself with the recommendations of experienced craftswomen, which they willingly share on specialized websites.
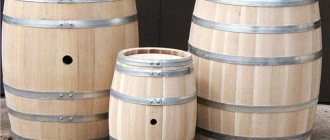
Pendant "Tree of Life"
Carving designs into wood requires sharp cutters, both plain and triangular. The “Tree of Life” is considered an ancient Slavic amulet, a symbol of wisdom and immortality, which is why many people wear such jewelry in our time, although they do not put any sacred meaning into it.
Anyone can cut out the contours of the trunk and branched crown. The craft made on the cut of a large branch looks beautiful. Leave the bark in place; it gives the pendant a natural and finished look. The recesses can be processed with a small milling cutter using a hand drill.
Wire decoration
Pendants made with your own hands from ordinary wire look stylish and elegant. For work, it is recommended to use golden-colored wire, steel wire, or a bronze-like shade. In addition, it is possible to use copper wire.
The diameter of the wire section is allowed in different sizes. Typically, material with a thickness of 0.02 - 0.04 mm is used. When planning to make a complex decoration, it is wise to use wire of different sections for its base.
To work, you need to prepare the necessary tools and think through a sketch of the decoration.
Beads or a stone of natural origin can be inserted into a twisted wire frame. An openwork pendant without unnecessary decorative elements will look unique.
We recommend reading:
DIY headband with flowers: 120 photos of the best ideas. Simple instructions with real examples and full descriptions. Master class and secrets from craftswomen- DIY satin ribbon bows: TOP-200 photos of the best options. Step-by-step instructions + master class with description (video lessons + diagrams)
- How to make a box - an overview of the best ideas for creating a box from different materials. 150 photos of new designs, instructions, diagrams, execution techniques, video
The work is carried out in stages and begins with the formation of the base of the product from the wire by twisting it in accordance with the sketch.
How to make a pendant from stone, beads, leather and wire
If you hold a competition for the best “easy to make” / “can be given to many people” ratio, DIY pendants will certainly win it. Firstly, such decorations can be made in literally two simple steps. You don't need any special skills or tools at all. Secondly, almost everyone wears them, the only question is the design of the jewelry. There are not many master classes on earrings for men. But no one will find it strange to make a pendant for a man (with a pendant in the shape of a fang, for example, or a cartridge).
The content of the article
Homemade pendants: what base to choose, how to fasten the clasp and straighten the fishing line
How to make a pendant from stone Do-it-yourself pendant from beads Leather pendants Wire pendants Interesting ideas for inspiration
Homemade pendants: which base to choose, how to secure the clasp and straighten the fishing line
Working with a pendant is just two steps.
- Choose (or come up with your own) pendant.
- Secure it to a cord or chain.
What can be used as a pendant?
These can be ready-made metal pendants that already have a loop. For example, you can attach the pendant with a connecting ring to the bail and buy a ready-made base for the pendant with a clasp. The photo above also shows the pins. These metal pins are super useful for jewelry making, allowing you to turn any bead with a hole into a pendant. Just insert the pin into the bead, use wire cutters to reduce it so that 7-8mm remains and bend this tail into a loop:
What the pendant will hang from is usually called the "base". It can be a chain or some kind of cord, waxed, rubber or leather. Here is an example of a pendant on a chain.
Sometimes transparent fishing line is used instead of a cord. This one is also in our catalog. It is sold in skeins and must be flattened before use.
The solution to straightening the fishing line for a pendant is very simple. It needs to be heated with steam. For example, boil water in an electric kettle and stretch the fishing line into the gap between the lid and the kettle itself. Or put a fishing line between fabric folded in several layers, and place an iron on top with maximum steam. And stretch under it and straighten the entire skein.
If the homemade pendant is expected to hang very low, it does not need a clasp. It is simply put on over the head. But in most cases, the base needs some kind of lock. And it needs to be secured somehow.
Everything is simple with the chain. Connecting rings are threaded into the outer links. A carabiner lock is attached to them.
The waxed cord is simply tied to the carabiner or ends are used to glue the cord. In this case, it is better to use polyester: its ends are simply melted with a lighter, and a drop of glue can be dropped onto the cut end of a cotton cord. The cord is attached equally on both the clasp side and the ring side. A small master class. We have several cords that need to be attached to the clasp. We take an additional piece of cord approximately 40-50cm long, fasten it into a ring (photo 1-2), Then we bring all the other cords to the clasp and tie one large knot together with those cords that are tied to the ring or lock (photo 4) If There are a lot of cords, then the knot can be corrected with pliers (photo 5), with one of the free cords we begin winding from the bottom (photo 6-7). We tie the lace with the last turn, drip glue so that the winding holds tightly.
Waxed, leather and rubber cords must be glued into ends with loops for attaching locks. Spring end switches are used in the photo.
It's easy to do it yourself. But you can simplify the work even more and take a ready-made base. The necessary limit switches and locks were already attached to it at the factory.
Choose in our store everything you need to make a pendant at home with your own hands
| Ready basics | Pendants made of natural stones | Bales |
Return to contents
How to make a stone pendant
First you need to choose a beautiful stone (or several) and cord (or chain) that you like best. All that is required after this is to connect the stone and the cord.
In our catalog, many stone pendants are sold already in a ready-made metal frame. These just need to be hung up.
Other stones have a ring. These are attached to the cord using a bail (a holder for a pendant).
If there is no ready-made frame or ring, a stone pendant is made using a wire frame. You don't need to drill anything to do this. The stone is simply braided with wire. See what interesting options there may be.
Here is a short photo tutorial on how to make such a frame.
Return to contents
DIY bead pendant
Essentially we are talking about a pendant made of beads.
It is made in the same way as a pendant for earrings or bracelets. Take a look at this pendant, for example. It looks very interesting, but is very simple to do. Here the beads are attached to one another on pins with a ring. We explained how to work with such pins in this master class. The last pin is connected to the bail (holder).
Here is another version of such a pendant. This DIY bead pendant doesn't even need a clasp. It is worn over the head, stretching the chain through the infinity sign. Yes, it will turn out quite symbolic