To ensure that the picnic leaves only positive impressions, it must be organized and thought out in advance. As a rule, you take a barbecue and a set of skewers with you when going outdoors for cooking meat and vegetables. A useful accessory is a variety of skewers stands that make grilling meat easier for tourists.
Selection of design and materials
When making homemade barbecues or buying ready-made ones in a store, you should immediately think about how and where they will be used. If on hiking trips or during rare trips into nature, it is wiser to have a collapsible barbecue. The legs for it are not made at all or are made foldable for ease of transportation.
It is better to provide stationary braziers installed in the courtyard with a reliable support, also stationary or mobile, so that the structure can be easily moved, hidden from rain and wind, and stored in a utility room for the winter. It is not necessary to equip it with wheels; it is enough to make the legs removable. The disassembled fryer is easier to carry and more convenient to store.
You also need to choose the optimal height of the legs and the material for their manufacture.
The easiest and cheapest way is to make legs for the barbecue from a pipe - an ordinary round one or a profile of a suitable cross-section. Its choice is determined by the weight of the structure. Instead, steel angles, thick reinforcing bars, and other rolled metal are often used. In the case of stationary barbecues, the supports are often made of brick or concrete blocks.
This option is preferred by those who do not know how to work with metal or do not have the equipment and tools for such work.
Tools
In this article we will talk about improving a regular barbecue. To do this yourself, you need the following tools:
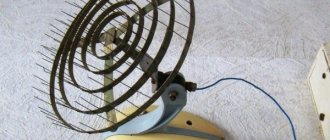
- electric motor;
- electric drill;
- Bulgarian;
- drive pulley;
- drive belt, you can use a bicycle chain, but in this case there will be sprockets instead of pulleys;
- gears (their number is equal to the number of skewers).
For example, a motor from a windshield washer device in a car or a drive for rotating wipers is used as a motor. In principle, any similar 12 V motor will do, no matter left or right rotation.
If you use a 220 V motor, the electric grill will not be as mobile, and there will also be a risk of electric shock. The rotation speed will also be too high. The 12 V motor is powered even from a small motorcycle battery. Gears can be purchased at the store or cut out from stainless steel yourself.
Preparation for production
Before describing the process of making barbecues, it is worth paying attention to the fact that the barbecue itself almost never lies on the ground, as this is inconvenient. It must have a stand. The design can be completely simple and consist of four supports; the stands can also be more functional: have shelves for utensils or skewers.
Also, some products can serve as a decorative element: ornate forged patterns will decorate any area.
When carrying out work on the manufacture of a stand or a joint structure of a barbecue and a stand, you must have:
- welding machine, electrodes and mask;
- electric screwdriver (battery is better);
- grinder and cutting wheels;
- square;
- roulette;
- sheet of metal, old barrel or cylinder;
- corners 20x20 mm;
- pens;
- loops;
- hardware and fasteners;
- pipe.
Sharpening
For safety reasons, sharpening the end is best done at the final stage of production.
- We cut the blade with a grinder obliquely or on both sides.
- We sharpen the cut corners with a grinder and sandpaper;
- We remove burrs, chamfers, and grind.
Gift handmade skewers, handles with animal heads
Do-it-yourself barbecue stand made from a profile pipe
Every country house must have a barbecue. Most often it is used only when guests arrive to cook meat, less often for other dishes. But one thing is certain: the barbecue is a stationary structure. When manufactured, this design can turn out to be grandiose, it all depends on your decisions.
Preparation for production
Before describing the process of making barbecues, it is worth paying attention to the fact that the barbecue itself almost never lies on the ground, as this is inconvenient. It must have a stand.
The design can be completely simple and consist of four supports; the stands can also be more functional: have shelves for utensils or skewers.
Also, some products can serve as a decorative element: ornate forged patterns will decorate any area.
When carrying out work on the manufacture of a stand or a joint structure of a barbecue and a stand, you must have:
- welding machine, electrodes and mask;
- electric screwdriver (battery is better);
- grinder and cutting wheels;
- square;
- roulette;
- sheet of metal, old barrel or cylinder;
- corners 20x20 mm;
- pens;
- loops;
- hardware and fasteners;
- pipe.
Stands for various barbecues
The type and shape of the stands depend on the design of the grill itself. In some cases, these will be strong stands, but often in stationary barbecues the stands have a complex structure and the presence of additional functionality.
The simplest option is to use corners of large or medium thickness. They are simply welded to the grill itself. Often a footrest is attached to the bottom of the corners to prevent the corners from bending.
- A barbecue stand made from a barrel is not too difficult to make. Either a whole barrel or half of it is used as a roasting pan. The most difficult thing in the process of creating such a stand is to make the correct semicircles to fit the dimensions of the barrel, and the remaining parts are easily attached to each other by welding.
- Grills are often made with minimal welding and easy-to-install legs. This type of construction does not have any special aesthetic properties, but it copes with its main task perfectly.
The manufacturing process has a certain sequence.
- It all starts with finding a large sheet of metal on which the entire layout of the grill will fit. Afterwards, all the dimensions are drawn and one solid piece is cut out using a grinder, since cutting thick metal with a hacksaw takes a long time and is very difficult.
- Next, you need to carefully use a grinder to make notches at the bend points (it will be almost impossible to bend sheet metal without them).
- Then you need to weld the corners. After this stage, you get a box, this is the grill itself. Small pins are welded to the bottom plane at four points. They are selected based on what kind of legs the structure will have.
- Round or square metal tubes are usually used as legs. They can be easily made to the desired length and adjusted to suit the landscape. Also, these legs are removable - you can easily replace them with others if necessary with your own hands.
Where should I start?
Before you start making skewers with your own hands, you need to decide how long they will be. The optimal size is 700 mm. After taking the necessary measurements and applying the required marks on the stainless steel wire, it can be cut into separate parts using a chisel and a hammer. In order for the piece to have a pointed end, it is advisable to immediately cut at an angle.
When making stainless steel skewers, the master must take into account the fact that stores are supplied with wire with high levels of hardness and elasticity. It will be much more convenient to work with the material by reducing these indicators. To do this, already chopped pieces of wire must be placed in a specially made fire and wait until they become red-hot. Then, using pliers, the hot pieces should be removed from the fire and left in the air. Cooled wire will be softer and more pliable. According to reviews from craftsmen, working with such material is much more comfortable.
Corrosion protection
To manufacture more complex and beautiful structures, forging skills and a high level of proficiency in a welding machine are required. And it is necessary to remember that metal is susceptible to corrosion and rust formation on the surface.
Otherwise, all your work will quickly be nullified. Basically, heat-resistant paints and enamels are used for such purposes, since they will not “fly around” at high temperatures.
Also, such products will save you from humid air and exposure to oxygen.
Special primers are often used, which can be purchased at any automotive store.
If you have free time, you can carry out a process such as bluing. After this, the metal surface is covered with a dark, heat-resistant film. First, you need to free the entire surface from dust and dirt, after which you should place the part in a container with a solution of caustic soda. The part must be kept in it for two hours and at a temperature of 120-140 degrees.
The choice of grill stands is very diverse. You can take the simplest option or approach this matter with creativity. If something doesn’t work out the first time, don’t be upset: the second time choosing a stand for the grill will be much easier.
Stands for various barbecues
The type and shape of the stands depend on the design of the grill itself. In some cases, these will be strong stands, but often in stationary barbecues the stands have a complex structure and the presence of additional functionality.
- The simplest option is to use corners of large or medium thickness. They are simply welded to the grill itself. Often a footrest is attached to the bottom of the corners to prevent the corners from bending.
- A barbecue stand made from a barrel is not too difficult to make. Either a whole barrel or half of it is used as a roasting pan. The most difficult thing in the process of creating such a stand is to make the correct semicircles to fit the dimensions of the barrel, and the remaining parts are easily attached to each other by welding.
- Grills are often made with minimal welding and easy-to-install legs. This type of construction does not have any special aesthetic properties, but it copes with its main task perfectly.
What are they?
There are various stands for skewers or tagankas on sale, which are excellent replacements for barbecues. They are easy to use and easily transportable, as they weigh little and do not take up much space. By purchasing this design, you will save money and purchase more ingredients to prepare your favorite dish.
There are many designs of such stands:
Removable legs made of round or profile pipe
It is more convenient to use a portable grill with removable legs, which are easy to install and remove if necessary. Hollow pipes work best for them. There are several options.
- For the first, you will need 4 small pieces of reinforcement and the same number of round pipes of such a diameter that the reinforcement fits inside. Its segments are welded to the bottom of the roasting pan at the corners. The legs are placed on the resulting pins. If desired, the pipes can be concreted while pouring the area for the barbecue area to ensure maximum stability.
By analogy with this method, removable legs for a barbecue of a mirror design are made: not pins are welded to the barbecue, but sections of a round pipe in the form of short legs. Separately, two frames are welded from a profile pipe, the cross-section of which must correspond to the internal diameter of the round pipe.
The second option involves attaching the legs with a threaded connection. You can do them in different ways:
- weld bolts to the bottom of the fryer, and cut an internal thread in the round pipe;
- weld plumbing couplings to the brazier, and cut external threads on the pipes;
- weld corners with holes to both the grill and the pipe and fasten them with bolts and nuts;
- Weld nuts to the brazier and bolts to the pipe legs.
The lower ends of the legs are sealed with plugs to prevent dirt and moisture from getting into them. If the barbecue will be used outdoors, you can weld rods from the fittings to them in order to stick them into the ground and adjust the level on uneven terrain. For use on a flat, hard surface, it is better to equip the ends of the legs with flat pads cut from a thick steel sheet.
Forged supports
If you have a pipe bender and tools for metal working, you can make a barbecue on an original forged support. The material for it can be pieces of unnecessary water pipes, fittings, steel rods, small-section profile pipes. All of them can be bent, twisted, forged and welded, which allows you to create compositions of any complexity.
They can be supplemented with small embossed decor made from sheet copper, brass or even tin coated with gold or silver paint.
Without the ability to independently manufacture such a design, you can order it from a craftsman using standard or your own sketches and become the owner of a unique stand.
To give an aesthetic appearance and protect against corrosion, the roasting pan itself and the legs on the grill are treated with a special primer and coated with heat-resistant paint.
Supports made from scrap materials
Not everyone has the time, desire and opportunity to make their own supports. You can carefully look around, rummage through the trash in the attic or barn and think about what can be used as a stand for a barbecue. Even an old kitchen table covered with tin or tiled will do. Or a steel shelf.
A lightweight folding stand can be made from an old clothes dryer, cot, or camping furniture made from aluminum tubes.
If you have the frame of an old foot sewing machine, then your stationary metal grill will become a real decoration of the site. The cast iron frame with its many curls and weaves is not only very beautiful, but also very stable. A little modification and decorative coating is enough to give it a second life.
Do-it-yourself grill: how to make it from iron, drawing, dimensions, photo
Option for a simple kebab maker with a minimum of welding work
To make a roasting pan with dimensions of 800x350x200 mm, you will need about a third of a solid sheet of metal 1250x2500 mm. Sheet cutting drawing:
Cutting drawing of a standard sheet of metal, barbecue reamer Ready reamer
How to make a simple grill:
- We make a drawing - a development of the future structure. It can be drawn on a sheet of paper, cardboard, thick film, and then transferred to metal.
- We mark the sheet of iron.
- Using a grinder, cut out the “extra” squares.
- Using a grinder, we make shallow cuts along the future fold lines to make bending easier. We clean the seams.
- We bend 4 sides.
- We weld the box.
We make legs from a profile pipe or corner:
- cut 4 pieces of the required length,
- We weld them in the corners of the roasting pan.
- Removable legs can be made from reinforcement. To do this, carefully weld 4 nuts to the bottom, and cut threads at the ends of the rods.
- Scheme for attaching removable pipe legs
- Leg design made of threaded rod and nuts
- The finished product is processed with a metal brush to remove roughness. If desired, paint with heat-resistant paint.
How to cook a barbecue with your own hands
The design is easy to carry. The roaster is a universal basis for other models that can be placed on stationary and transportable stands, as well as built into complexes.
Unlike the previous method of making a homemade barbecue, it is not necessary to take a solid sheet of metal. Metal pieces of improvised means are suitable, from which 5 parts of the required dimensions are cut out:
- two long sides;
- two short;
- bottom.
Scheme of cutting parts of the fryer
If you choose a thicker metal for the bottom, the product will last longer.
Step-by-step instruction:
- We cut out the blanks.
- We weld and clean the seams.
- We cut off two pieces of corner 10-15 cm long for the handles and weld them onto the short sides of the brazier.
We make legs from a profile pipe:
- cut 4 blanks 40x40 mm 10 cm long and 4 30x30 mm 80 cm long;
- We weld short pieces of pipe to the bottom of the box;
- We drill a hole in the long legs and cut a thread for the retaining bolt.
If you want to install a stationary barbecue at your dacha that you do not intend to disassemble, you can make adjustments to the diagram. In this case, legs made of a profile pipe or corner will not only serve as a support, but also unite the parts of the body.
Parts are sometimes connected with fasteners, but more securely - by welding. The reinforcement will give strength to the finished product, and it will not “lead” when heated, even if the fryer is made of thin steel.
Second phase
At this stage, a small anvil is used in the work. The essence of the procedure is to splash the already cooled pieces of steel wire with a hammer and give them the desired shape. In this case, you should leave 100 mm on one edge. The steel strips obtained in this way must have the same thickness up to 3 mm. The untouched 100 mm edge of the strip must be folded into a ring (an exception is the case when a craftsman makes skewers with a wooden handle).
From this place you need to step back 50 mm and use pliers to make a small spiral of half a turn. In order for pieces of meat to be threaded onto a homemade skewer without any problems, its second end must be sharp. You can sharpen it using a sharpening machine or an emery wheel. To avoid injury when using the product, it is advisable not to sharpen the end of the skewer very much.
Stationary fryer on a strong stand
A special feature of this model is a dismountable stand made of profile pipe.
How to make a grill on a stand with a cutting table
The roasting pan, installed on a movable stand with a cutting table, provides almost everything:
- the ability to prepare food, supply dishes, spices;
- conveniently, “at hand”, place accessories by hanging them on hooks;
- store fuel supplies and kitchen utensils;
- transport the kebab maker within the site.
In case of rain, the unused roasting pan can be turned upside down to prevent it from rusting and placed in the same location.
Grill drawing:
The technology for manufacturing the fryer is similar to the previous version:
- We cut out the body blanks from a sheet 4 mm thick.
- We weld the body.
- We weld handles from a 25x25 mm corner with a length of 100 mm.
- The drawings schematically show the holes in the grill for air intake and the distance between them, as well as grooves for skewers.
Products with handles
Skewers with a wooden handle are quite popular among consumers. In such products, one end does not need to be bent into a ring. Instead, the end of the skewer will be capped with a wooden handle. Many craftsmen recommend using acacia to make a handle. To work, you will need a lathe on which wooden blanks will be processed.
The handle is considered ready if it is equipped with a special hole for a skewer. This hole is made by drilling. In this case, the length of the handle and its diameter should be less than that of the steel strip. The handle is placed on the skewer after it has gone through the hardening procedure. To ensure that the handle sits firmly, many craftsmen use special crimp rings.
How to make a stand for skewers from metal with your own hands
In order not to take a bulky barbecue with you on outings, you can make a metal stand on which you will fry meat on skewers. Then we proceed according to the following step-by-step instructions:
- We take a steel strip 20 mm wide. Let's break it down into several details. There will be 2 strips, each 50 cm long, and 4 legs, each 25 cm long.
- We cut off the necessary pieces with a grinder.
- We take a drill in our hands and drill one hole at the end of the short pieces and a pair of holes on each side of the long ones.
- We connect them in pairs with a hammer and rivets.
- As a result, you will get 2 blanks, the legs of which will be folded (each consists of 3 parts).
- Now you need to cut out the grooves in which the skewers will be located. We retreat 10 cm from each edge and make cuts. The distance between them is 5 cm. We make them with a grinder to a depth of 1 cm.
- All that remains is to stick the stands into the ground or hammer them in. You can place skewers on the coals and fry the meat. After finishing the meal, the cooled structures can be easily removed outside.
Welding, grinder, two gas cylinders
Last year I was puzzled by a normal grill. I took two 50L propane cylinders from Avito, and again I found a bed from a sewing machine on Avito.
I already had a grinder and a resanta SAI190 inverter (not an advertisement).
will come up with a folding table, in this photo there is only a frame
burn it with a torch and cover it with varnish,
Of course, I’m still a handyman, this is the first time I’ve held a welding machine in my hands, so let’s call Dr. Dew to measure the homemade product in half-lengths.
250 out of 250? I don't care, it suits me.
Well, what happened in the end.
Let's calculate the homemade budget:
gas cylinders for air transport - 2*500r
rolled metal (75mm pipe, corners, and other small items) - 1.5tr
After a year of use, I’ll say that the thermal paint at 650 degrees Celsius doesn’t hold up or I painted it poorly.
The kebab in this unit turns out simply divine, due to the fact that the lid closes and all the heat remains inside.
How to make a wooden skewers stand with your own hands
The simplest stand for skewers can be easily made from wood with your own hands. It is quite possible to make a work of art from it. The basis for the future skewer will be a stump of a log or stump. The height is enough 30-40 cm. You will also need two wooden saw-cut circles from another piece of log.
They are attached offset from the center to the side above and below the hemp. We make several holes in the top cut into which metal skewers will be placed. They are located with the tip down, where they rest against the lower cut. It turns out to be quite safe, original, and this design is always at hand in a private home or country house.
Lattice
I decided not to make a grate for the tandoor with my own hands separately. She'll just take up space. Therefore, the decision was made to cook a structure for three dishes at once - the depth of the jug allows. The first one has a solid bottom made of sheet steel, the other two are made of wire. For convenience, I framed each circle with a metal rim. The tiers were evenly distributed on two reinforcing bars, the ends of which were shaped like handles. I adjusted the joints with the edges and cut off the protrusions. So I got a 3-tier tandoor shelf with my own hands.
Source prom.st