There are many different tools and equipment collected in a garage or workshop. If you don’t think through the storage system, then finding the right item is not so easy. To create perfect order in your garage and save time spent searching for a specific tool, you need to collect all the necessary items in one convenient area. A wall mounting system is ideal for this purpose. Thanks to this arrangement of tools, the room is decluttered and usable space is freed up. All necessary devices are placed in plain sight.
Types of organizers
To repair things, furniture, communications in the house, many devices and components are required. To store a minimum set of tools, a convenient option is a box with compartments and sections for sorting small items, devices, keys, etc.
Depending on the functionality and frequency of use, tool organizers are classified into:
- designs with compartments and shelves;
- boxes with retractable compartments;
- boxes with opening lid.
Top best ideas for storing tools
Since instruments can be long and short, large and small, and different in shape, the methods of storing them also differ. There are several methods for systematizing tools. Below are the most convenient and popular ones that you can do with your own hands directly on the wall.
Vertical storage systems such as racks
One of the types of vertical storage of tools is a system in the form of racks. The most necessary tools that can be placed within easy reach should be placed on the racks. Items that are needed less frequently are removed to distant racks on the upper or lower shelves. Metal garage shelves - IF systems - are perfect for this.
According to the types of installation, racks can be:
- stationary and collapsible;
- rotating or movable;
- hinged, retractable.
But even with a large selection of options, the proposals will not always satisfy the necessary needs of the garage owner. Therefore, it is recommended to combine store-bought shelving with homemade holders and shelves, or design a complete wall-mounted storage system yourself.
Vertical homemade wooden racks with slots for storing wrenches and screwdrivers are very convenient. They can easily accommodate adapter bushings for attaching tools with a conical shank of different sizes or pliers.
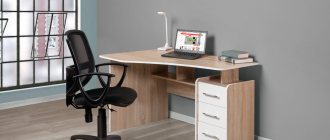
A vertical rack in the form of a mobile stand is an excellent choice for storing handy tools. It is recommended to make it from wood or plywood. Separate groups of tools are placed on hooks, magnets or shelves. Special perforated panels are often used for vertical storage systems.
Magnetic tape
Magnetic tape is simple and easy to use. Magnetic strips are taken to secure the tool and mounted on a wall storage system. You can attach a variety of tools to the tape: from small metal wrenches and screwdrivers to large objects.
Materials and design principle
To make a homemade organizer, choose the material according to availability and preferences. You can make a tool box with your own hands from:
- wood;
- plastics;
- metal
You can quickly and efficiently build a box for repair equipment if you select a container that is suitable in size and equip it with convenient compartments and drawers. The design depends on the idea conceived. It is important to ensure the tightness of the compartments, select a material that will support the weight of the contents, and equip the device with reliable loops, hooks, and runners.
Reuse plastic bottles
Old bottles and other containers are great for holding nuts and bolts, screws, nails and other hardware on a shelf next to your workbench. It is enough to remove the original label to easily see the contents (screw fastening) inside.
Additionally, you can make a simple individual shelf for storing bottles with a clasp. For convenience, you can drill holes of the desired size. The bottles will then be placed through the holes, keeping them and the fasteners easily visible and conveniently organized.
Defining a Plan
To make a box for screwdrivers and keys with your own hands, develop a step-by-step plan. To follow the stages of work, prepare a project according to which you perform each action.
Design a homemade organizer using the following algorithm:
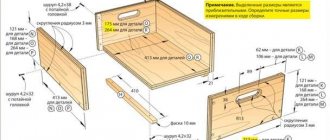
- on paper or using a computer program, draw a sketch of the future product;
- draw a diagram of an open drawer with pulled out compartments;
- calculate what size each section and box should be;
- determine the dimensions based on the length of the available tools and the number of devices;
- indicate fastening parts, handles, locks and hinge mechanisms;
- Place the dimensions of each position on the drawing.
Important!
When drawing a tool chest by hand, use graph paper. Large sheets will allow you to draw the details and parts of the organizer on a 1:1 scale, from which you can make patterns.
Using a detailed and understandable drawing, you can calculate the required amount of material, fasteners and accessories.
Description
The organizer is a box (case) with many compartments for sorting fasteners of different calibers and purposes. This storage option is optimal for placing accessories for tools and various small items inside.
An organizer for self-tapping screws, screws, nails and other things is a very functional item that serves the following purposes:
- organization of fasteners according to individual characteristics with quick access as needed;
- preventing loss of contents, protecting them from destructive external influences and damage;
- ease of transportation of fastener parts to the work site and storage during periods of non-use;
- maintaining order in the workshop, reducing time to select the required part.
Manufacturing process
Build a tool box in accordance with the drawn up project. To get a quality product, first complete the largest part - the organizer box itself, and then equip it with compartments and pull-out sections.
For the process of making a portable box, prepare the following:
- hammer;
- pencil;
- ruler;
- hacksaw;
- jigsaw;
- screwdriver;
- carnations;
- self-tapping screws
A homemade box can be equipped with wheels for mobility purposes. Hardware, screwdrivers, and hammers are made of metal alloys and are heavy.
Moving the structure on wheels will reduce the load on the handle, eliminate harm to health, and will not scratch the floor or furniture. The amount of materials and accessories depends on the configuration and type of organizer.
From plywood
One of the easiest materials to work with for making a tool box is plywood. You can make a structure of any complexity from plywood canvas. For independent construction, chipboard with a thickness of 0.5 to 1.5 cm is suitable. The more tools you plan to put in the box, the thicker the glued veneer should be.
Magnets
metal parts
Continuing the topic, we’ll tell you about anywhere.
Tell me honestly, how do you store your woodworking tools, saws, drills, clamps, nuts, washers and a bunch of other little things you need in your garage or workshop? I think many will answer: in plastic paint buckets or cardboard boxes. Moreover, “small things” are usually stored in the form of some kind of “assortment” and when you finally need some small key or nut, you need to spend a fair amount of time to find them. Sometimes it’s even easier to buy new parts than to find old ones. Are you familiar with this situation? If yes, then I suggest making a few simple and inexpensive devices for storing small items so that they are always in sight.
Homemade storage for small parts
Containers from Nesquik or other food products can be used as a container for placing hardware. They are great for storing nails, bolts and drywall screws. These are great dispensers as the fasteners lie flat and are easy to grip, and they use space better than say coffee cans when you store them on a shelf.
A big plus is that the containers don’t even need to be modified. Simply wash and use. And the lid is useful for protection from dust or if the container accidentally falls. The nails will remain inside.
Where to order and buy a rack for storing hardware in Moscow inexpensively
- Call and order by phone;
- Come to us at the address: 141280, Russia, Moscow region, Ivanteevka city, Studenchesky proezd, 5;
- Write a letter by e-mail;
- Place an order through the cart of our online store Sclad.Ru;
- Order delivery using any of the above methods both in our region and throughout Russia. We work with all transport companies.
Other cities where you can buy our racks (storage systems) of nails, screws, self-tapping screws
Arzamas, Arkhangelsk, Astrakhan, Barnaul, Belgorod, Bryansk, Veliky Novgorod, Vladivostok, Vladimir, Volgograd, Vologda, Voronezh, Dzerzhinsk, Yekaterinburg, Ivanovo, Izhevsk, Irkutsk, Kazan, Kaluga, Kirov, Klin, Krasnodar, Krasnoyarsk, Crimea, Kurgan , Kursk, Labytnangi, Lipetsk, Murmansk, Naberezhnye Chelny, Nizhny Novgorod, Novosibirsk, Orel, Orenburg, Penza, Perm, Petrozavodsk, Pskov, Pyatigorsk, Rostov-on-Don, Ryazan, Samara, St. Petersburg, Saratov, Smolensk, Sosnovy Bor, Stavropol, Stary Oskol, Surgut, Syktyvkar, Tambov, Tver, Togliatti, Tomsk, Tula, Tyumen, Ulyanovsk, Ufa, Ukhta, Khabarovsk, Cheboksary, Chelyabinsk, Yaroslavl.
Also, we can offer you plastic boxes for hardware in Moscow.
If you have any questions, call us and our consultants will help you choose the right storage system for bolts and nuts based on size and load.
Placement while working
When disassembling a piece of furniture that needs repairing or moving, you need to drive screws and nails into a piece of rigid foam. It is better to group similar fasteners together. This will be most useful when reassembling furniture. You can also write on the foam with a pen or marker to identify fasteners or make notes that will be helpful when reassembling the piece later. Buy furniture screws wholesale, the price is more favorable in our store “First Fasteners”.
If you don't have the required piece of foam on hand, you can use a piece of corrugated cardboard from a box. You should thread the screws through the flat surfaces of the cardboard or insert them into the corrugations on the sides. Writing labels and notes on cardboard is no less convenient than on foam plastic.