Applied art has many directions, but beadwork is especially popular. Bright compositions, original bouquets with flowers made of glass beads can become a pleasant gift, decorate a party or home interior. Beaded floristry is used in making hair jewelry, decorating clothes, and creating wall panels.
Learning to create unique beadwork is not at all difficult, because the technique is quite simple and does not require special skills. The main thing is to apply patience and a little imagination. To learn how to weave various lilies from beads, you can use the advice of experienced needlewomen.
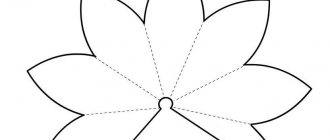
Leaves
- Take a green wire 20 cm long. Put 15 light green beads on it.
- Let's make a loop by twisting the wire. Next we will put on 18 beads and twist the ends of the wire together.
- Then another 18, we go around the central axis on the other side and twist it again.
- Then we make 1 more arc on each side, collecting 22 beads.
- We cut the end of the wire, bend it and insert it into the central beads. We will need 7 such leaves.
What you need to know before you start
Small decorative glass beads with a hole for stringing on thread, fishing line, or wire are beads. You will only find out how many varieties there are (transparent, glossy, mother-of-pearl, two-color, melange, etc.) when you become interested in beadwork.
The smooth and beautiful Czech is especially popular among needlewomen. In some flower arrangements, including lilies, “cutting” looks good. It creates a faceted, chopped texture and shines strongly in the sun's rays.
Stamens
- We collect 20 pieces of orange beads on a golden wire 80 cm long.
- We collect 9 brown beads and make a loop out of them, twist the wire and thread its short end back through 20 orange beads.
- The first stamen turned out. Now we collect another 20 orange and 9 brown beads.
- We make a loop out of the brown ones and thread the wire back through the orange ones.
- Let's make 5 more of the same stamens.
We twist the ends of the wire.
Varieties of colors
Florists can easily tell you several varieties of these flowers. In the same way, from the hands of a craftswoman, pink, blue, and tiger lilies are made from beads. It all depends on the correct color of the beads.
Only the technique remains unchanged. The easiest way to make any yellow or water lily from beads is by parallel weaving, although some craftsmen prefer the French technique.
Today we will take a closer look at the traditional white beaded lily and give you a master class with step-by-step photos.
Pestle
We take a golden wire 15 cm long and put 10 cm of orange beads on it. Fold the wire in half and make a loop. Twist the ends of the wire. We twist the loop itself.
Parallel weaving
For those who want to learn beading for beginners, lily is the best option. The parallel weaving technique is simple and convenient.
Leaves are usually weaved in parallel; this technique is suitable for beads of different sizes and for bugles. Procedure:
- Place two beads on fishing line, wire or monofilament.
- Pass one end of the fishing line through the second bead.
- Pull the thread tighter.
- Add three beads for the next row.
- Pass the second end of the wire through the third row of beads in a counterclockwise direction.
Next, you need to follow the diagram, since different flowers have leaves of different sizes and shapes.
Petals
- Take a golden wire 60 cm long.
- We collect 17 beads on it, most of which are golden, and 4 pieces in the middle with different intervals are black. We make a loop of wire.
- Next, we weave in the same way as the leaves, making 3 arcs on each side of the central axis and adding 5-6-7 pieces of black to the golden beads in different places to create dots characteristic of a lily.
- We form a sharp corner at the end by pulling out the wire. Having made all the arcs, twist the ends of the wire.
- We will need eight of these petals: six for the flower and two for the bud.
Preparation of the workplace
Beginners think that they can easily string beads onto a fishing line while sitting on the sofa or sitting comfortably on the windowsill.
But experienced craftsmen know that during the work process it is very important that the beads are sorted and not scattered, and that all the necessary tools are always at hand.
Therefore, one of the important points before starting work is preparing the workplace: sit at the table, lay out all the necessary tools on its surface, conveniently place your laptop or magazine with weaving patterns, and you can safely get to work.
Flower assembly
- We twist 2 petals together.
- One petal is superimposed on the other diagonally.
- We make 3 such blanks. We twist the pistil and stamens together and screw three pairs of petals to them one at a time using green wire.
- In this case, they should alternate: 3 outer petals and 3 inner petals between them.
- Wrap the base of the flower with floral tape. We straighten the petals.
- We bend the stamens located at the edges to the sides.
Assembling the bud
We fold one petal into a tube lengthwise.
- We wrap the second petal around it and twist their wires.
- We twist both petals together completely.
- We attach 2 leaves to the bud on both sides and twist their bases with the base of the bud.
- Wrap the base of the bud with floral ribbon.
General recommendations from professionals
Starting is always a little scary and exciting, but weaving flowers with beads for beginners will be an excellent start in needlework. You don’t have to wait long for the result of your work, which provides interest and inspiration (this is especially important for beginners).
We recommend reading: DIY birch bark crafts: decorative ornaments, toys and rules for harvesting birch bark
8 Basic Professional Flower Bead Weaving Tips for Beginners:
- Before you start making a product, check the quality of the material - the reaction of water and perfume, bright sunlight, mechanics. Use cotton pads.
- If you use cotton threads for work, it makes sense to treat them with beeswax for strength.
- To make it more comfortable to work with beads, use a felt or velvet napkin (a soft stand with sides will also work).
- When starting work, take a thread no longer than 1 m.
- As you work, pick up beads with a needle.
- Store beads in special boxes, divided by color, texture, type, etc. It’s easy to find this option in craft stores today.
- It's great if you can illuminate your workplace from several sides.
This is just the basics, simple tips. But it’s smarter to learn how to make flowers step by step from detailed master classes.
Build a branch
- Take a thick wire 60 cm long, fold it in half and twist it. We wrap the end with the loop with floral tape.
- We attach the other end to the base of the flower and wrap it with green wire. Then we wrap the junction with floral tape.
- We do the same with the bud. We connect both stems together and wrap them with wire.
- Then we take floral tape and wrap it around the entire stem, starting from the top, and gradually apply all the leaves to it.
- We bend the flower and bud to the sides, straighten the leaves.
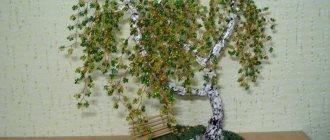
- It turned out to be a twig. Other branches can be made with different numbers of flowers and buds, which need to be prepared in advance.
- Having made several of these branches, you will get a bouquet of beaded lilies, woven yourself.
- Based on our master class, you can make more complex products - for example, an Amazonian lily from beads.
- To create it, you will need to prepare a pot, glue and foam to secure the plant trunk in the pot.
- You will also need a piece of brown felt to create the ground surface and decorate the foam.
- In addition to flowering branches, you will need to make several large leaves characteristic of this plant.
- Having learned how to make branches with flowers, you can also make a brooch - a lily from beads.
- To make it you will need thick cardboard and felt or leather for the base of the brooch. You will also need a pin for fastening.
Knowing how to weave a beaded lily, you can also make lilies in other colors. And even if you give your bouquet to someone, photos of beaded lilies will remain with you forever.
Techniques used
As we have already said, a lily can be woven using two techniques. Let's take a look at their features.
French weave
This technique is also called arc weaving and is often used to create leaves and flowers on plants. This technique is easy to distinguish visually. A thick wire with large beads is attached to the center of each element, and a thinner wire with smaller beads is attached to the base.
Many masters simplify this technique in their works and simply leave a central axis around which the arcs are wrapped. Petals made with French weaving have a more rounded shape.
Parallel weaving
One of the basic techniques in beading. It consists of beads strung in horizontal rows. At the same time, depending on the shape being created, the row can be reduced or increased by adding or subtracting a certain number of beads.