Hello dear readers! Today we will weave violets from beads. Beading is a labor-intensive process, but the result is worth it. You can make plants and animals, bracelets and necklaces, and even toys. But today we will make one of the indoor plants - violet. Let's start by preparing everything you need for weaving.
Where to start working on flowers
When starting beadwork for the first time, you need to prepare everything for work in advance. It’s very inconvenient to leave a craft unfinished and urgently go to the store to buy something more.
So, to work on a beaded violet for beginning needlewomen you will need:
- beads;
- wire;
- sharp scissors or wire cutters.
If you plan to “plant” the violet in a pot, you will also need the pot itself and plaster or clay to secure the bead composition. For convenience, it is worth considering where to pour the beads for work? An empty palette of children's paints will work just as well as special containers.
It is also advisable to arrange a workplace. A comfortable chair, a free desk and good lighting will add comfort and pleasure to work.
Workplace
The best option is to have a separate workplace. However, this may not be the case. The main thing is maximum convenience during the work process. Nothing should distract you and everything should be at hand.
The table and chair should be comfortable, the room should be well lit. Maximum workplace comfort will create a high-quality and fruitful work process.
How to choose beads
The stores offer beads from mainly three manufacturers:
- Chinese;
- Czech;
- Japanese.
It differs in price and quality. Chinese is the cheapest, often sold in large bags. Good for beginners. It may have an admixture of defects - beads of irregular shape, deformed, without holes. Then before work it will need to be calibrated.
Japanese is the most expensive and high-quality, offering an amazing variety of both colors and shapes. Czech is the most popular because it has the best price-quality ratio.
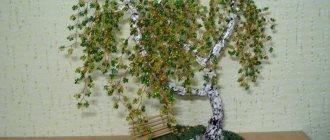
Simple violet for a pot
For it you will need beads of lilac (blue, light blue, pink, white) color - for the petals. A little yellow for the stamens. And green beads for leaves.
Note!
- DIY fruit bouquets - TOP-200 photos with instructions for creating a bouquet of fruits with your own hands. Unconventional ideas with simple diagrams and work overviews
- Crocheted flowers: TOP-160 photos and step-by-step knitting pattern, review of finished products with your own hands. Crochet master class for beginners
- Paper lily - TOP 100 photos of the best product options. Master class with step-by-step diagrams and drawings for creating an origami lily with your own hands
Step-by-step instructions on how to make a violet from beads will help even novice needlewomen understand weaving.
Bush assembly
The first step in the step-by-step instructions for assembling a violet bush for beginners will be creating a bouquet of flowers.
- You need to take three flowers together and connect them together with assembly wire, wrapping them closer to the ends of the stems.
- Next, identify one of these flowers as the central one and begin adding all the other flowers around it, continuing to wrap the ends of the stems.
- All flowers should be located at the same level.
- Having connected all the flowers into a bouquet, start adding leaves around them.
- They should be located at such a level that half of each leaf is visible from under the flowers.
- Continue wrapping the stems. It is better to distribute the existing leaves into two rows.
- In the second of them, the leaves should be staggered relative to the first.
- Bend the ends of the stems taking into account the height of the pot.
The first stage - weaving a flower
- String about a meter of lilac beads onto the wire.
- At a distance of 10-11 cm from the edge of the wire, twist the first loop of 7 beads.
- For the second loop, take 15-17 beads (the exact number depends on its size and how closely the second ring will fit to the first).
- Twist the second loop close to the first.
- Make the third loop in the same way, turning it four times.
- The first petal is ready. Twist the second petal on the same wire at a distance of one centimeter. Then the third, fourth and fifth.
- Small petals are made in the same way, only from two rings each. You will need three of them.
Video lesson:
purple violet
The master class for beginners describes in detail how to knit a violet flower with leaves from beads. Two flowers of different sizes and correspondingly different leaves are knitted. We begin to knit a large leaf. We collect 13 beads on the wire and bend the resulting column with arcs of wire with beads. The size of the leaf depends on the number of arcs laid out.
Popular articles Beaded keychain “Crocodile”
In this case, seven rows are laid out. Ten beads are placed at the base of a small leaf. The flower petals are knitted in the same way; the base is a loop of six beads. The center of the flower is made of yellow beads. When the leaves and flowers are ready, the assembly of the bush begins.
The second stage is weaving the stamens
String 3 yellow beads onto a wire and twist them, making a total of five stamens.
A more complex option is to string 10 beads onto a wire, twist the last three into a loop and thread the second end of the wire back into the seventh, sixth, and so on until the first bead. Also make five stamens.
The third stage - weaving leaves
- Immediately make a twist of two wires and work at the end of it.
- For the axis, collect six beads, make the first pair of arcs to the left and right of it (as shown in the diagram for making a violet from beads).
- Add two more arcs.
- The next arcs should be extended not on the whole sheet, but on its lower part. This is done in order to give the leaf a real shape.
- There will be a total of four “corners” on each side.
- Make five such leaves. If desired, their number can be changed in accordance with the size of the pot and the author's design.
- You can make several smaller leaves in the same way.
Leaves
We weave a stepped petal: we make a frame blank for a small leaf. To do this, we need a piece of wire 13 cm long and a second piece 85 cm. We make a tight twist of them 10 cm long (you should have a short “tail” of about 3 cm (this is the axial wire - the axis) and a long wire with a free edge, on We will use it to collect beads (working wire).
We collect 6 dark-colored beads on the axis and make the first pair of arcs with dark beads.
We make the second pair of arcs with the addition of light beads at the top of the future leaf.
In the third pair of arcs we add even more light beads.
We begin to make “steps”: we do the first one without reaching 5-6 beads to the top of the sheet. We measure out the required amount of beads (remove the excess), and pass the wire from the inside to the front of the sheet.
We collect 7-8 light beads and the required number of dark ones, return to the base of the sheet and make one turn around the axial wire (we place the working wire between the last and penultimate rows, and not under the last as usual).
We weave the second side of the leaf in the same way.
The small leaf should have only 4 “steps” on each side. When making “steps”, be guided not by the number of beads (how much to retreat), but make sure that the “steps” are approximately at the same level.
We make five such leaves.
For a large leaf, we make frame blanks from pieces of wire 15cm and 1m long. We make a twist of about 11 cm, a free “tail” of about 4 cm.
We collect 7 dark beads on the axis and make the first pair of arcs.
Then everything is the same as for a small piece of paper.
A large leaf will have 5 “steps” on each side.
Now all the blanks are ready.
We decorate all the stems with floral ribbon. We give the desired look to the flowers and leaves.
The fourth stage - assembling the composition
After all the elements of the composition are woven, assembly follows. Flowers are collected like this. In the middle of the stamen, they are surrounded by three small petals. Large petals follow.
The stems are braided with green floral ribbon. All flowers and leaves can be customized by bending them to suit your taste. Leaves are tied to the flowers with wire.
Note!
- Crochet rose - diagrams and descriptions of how to crochet a rose with your own hands. Crochet technology + interesting craft ideas
- DIY edible bouquets - TOP 130 photos with instructions for creating a bouquet with your own hands. Creative ideas with simple diagrams and photos of finished works
- Craft primroses - simple instructions for creating crafts from scrap materials. Schemes of beautiful DIY products + photo reviews
Gypsum or alabaster is diluted according to the instructions. The bouquet needs to be placed in a pot and filled with building mixture. Hold vertically for a while until the solution hardens.
The composition is ready. Additionally decorated with stones, beads or painted.
Terry violets for a pot
A beaded violet would be a wonderful gift that does not burden the owner with complex care. The master class for terry violets is described below.
Such flowers differ in life from ordinary ones in a large number of petals and a wavy border along their edge. Often double violets are multi-colored, so it is worth using beads of several similar or contrasting shades for the petals.
Special view
It is very difficult to find a person who would not admire the beauty and tenderness of the violet. Today, thanks to the efforts of breeders, there are more than 30 thousand species of this beautiful plant in the world.
The so-called terry violets are especially popular. In appearance, the flowers vaguely resemble the bows on the heads of cute first-graders - they are so colorful and wavy.
The flowers of the plant consist of six or more petals, and the leaves are elliptical in shape. The tips are either pointed or heart-shaped. They can be smooth or corrugated.
As for color, petals are found in white, purple, burgundy, pink, and blue. So, having decided to make a terry plant, the choice of bead color depends only on the preferences and taste of the master.
Materials and tools
The terry type of plant differs primarily in the shape of the leaves, so for production you will need slightly different materials:
- several shades of beads for petals;
- white base for “terry” design;
- green beads (preferably several shades) to get textured leaves;
- wire rod with a diameter of 0.2 or 0.3 millimeters;
- threads;
- floral tape;
- natural coarse fiber (sisal) green;
- glue.
How to weave a terry violet
Step-by-step instructions for beginners look like this.
- Make a loop of 7 beads, moving about 10-12 cm from the edge.
- Add two more loops, increasing the number of beads (similar to the previous description).
- String five beads of a different color onto the wire and place it between the second and third loops, as shown in the photo of a violet made of beads.
- Decorate the entire circumference of the petal with such waves.
- Make 5 petals.
Note!
- Crafting tulips from paper - TOP-100 photos of interesting ideas for creating tulips from paper + simple instructions for beginners
- Mimosa craft: TOP-160 photos of simple and complex crafts. Master class for children and adults on making mimosa with your own hands
- DIY napkin flowers - a detailed master class with simple diagrams. Non-standard solutions for creating flowers + photos of finished crafts
Making terry violet leaves and stamens from beads is no different from simple making. The assembly of the composition is similar.
Step-by-step instruction
All these materials will be enough to make a small bouquet of violets. But if you want to place it not in a vase, but on a windowsill, then in addition to this you will also need a real flower pot, some soil or other material to fix the flowers.
Step 1: weave the petals
They are made using the French weaving technique; in the previous article the author used it to carefully form brooches. If you don’t remember well, you can go back and read the detailed master class.
Step 2: collecting flowers
Thus we weave a flower with 6 petals. In this case, it is better to make the last row of each petal in a different shade from the main one. In this case, our violet is blue, and the trim of each petal is light blue. This is the first tier of the violet. For the second tier, the petals should be a little larger in size, and it is enough to make only 5 of them. We connect the finished bases into a circle, and in the center of the larger one, we place our blank of 6 petals.
Step 3: make the middle of the flower
To form the middle, we string 7 beads onto the wire, fold them in half (approximately as it turns out), and form several turns directly under the low one. This way we form a small loop. We leave a little free space on the wire and form exactly the same loop from 7 yellow beads. In total, you will need 3 such loops. We close it all in a circle and place it in the center of the flower.
Popular articles Panels made from newspaper tubes
The first violet is almost ready. All that remains is to twist the remaining free ends of the wire together and decorate it with green thread or floral tape (which is much more convenient, faster and of better quality).
Step 4: forming buds
Just like the core, we form small buds. Five loops of green beads are closed in a circle, and a blank of three blue loops is placed inside. The remaining wire tails are twisted and decorated in the same way using floral tape.
Step 5: weaving leaves
Using the French weaving technique (look at the diagrams), we form green leaves. Their number depends on the density of your bouquet.
Step 6: Assembling the flowerpot
Now we connect all the finished parts together by twisting the wire. The bouquet turns out quite lush and beautiful. We decorate the joints with floral tape and place our product in a flower pot. To fix it in place you will need either soil or regular gravel, which we pour around the stem of the bouquet.
Violets with buds in a pot
Having fixed your gaze on any living flower, it is easy to see that all the flowers never bloom at the same time. There are always open flowers and buds. Both of them can be successfully embodied in beads.
The composition of violets with buds is similar to that described above, only in addition to flowers, bud blanks on long wire stems are also woven into it.
How to weave a violet bud
A bud is an unopened flower. This means that to make it, you need to weave several petals and roll them together.
It is best to weave three or four petals in the same way as large flowers are woven. Just reduce the number of loops on the petals. Then fold the petals together, giving them the shape of a drop or ball.
String 4 green beads onto the wire at the base of the bud and twist them into a ring under the bud. You can form an inflorescence from two or three separate buds, or combine an open flower with one or two buds.
This way you can complement compositions with both regular and double flowers.
Brooch with violets
If you are interested in beaded floriculture, you should not limit yourself to window sills. You can create amazing brooches from violets or their variety - pansies.
You can use the beaded violet master class described above. Just making fewer flowers, petals and the bouquet as a whole will turn out more elegant. Or embroider a flower on thick fabric (base). You can also create flowers using brick or mosaic weaving techniques.
In addition, when embroidering a brooch, you don’t have to limit yourself to standard round beads. Iridescent cutting, shining stones and golden threads will perfectly complement the “picture”. The video clearly shows how to embroider a beaded brooch.
Let's learn the basics
Creating a violet with step-by-step photos will not be difficult. Unlike a capricious houseplant, such a flower in wicker form is perhaps one of the easiest to implement. It is called a flower for the most beginning craftswomen.
If you purchase all the necessary materials and have patience, you can make a violet from beads yourself
Beautiful violets made of large beads
But before you start a master class on weaving a violet from beads, as in the photo, you need to learn about the basics of beading in order to have at least a minimal understanding of its main techniques.
Note! If this is your first acquaintance with beadwork, then you need to start with a test sample on which you need to test the technique and get a feel for the material. And only after that start creating violets.
The first thing you need to do is familiarize yourself with the weaving pattern, which should be easy to implement and simple. Another important task is the selection of the beads themselves. For beginners, a large one is suitable.
It is worth remembering that the appearance of the finished product largely depends on the selection of materials, and more precisely, on their quality. Irregularities on the wire, inclusions of a different color on the beads indicate low quality. In this case, it is better to look for other options.
For future crafts, it is necessary to select only high-quality material
Advice! For the first attempt, you do not need to take a very large product. Before creating crafts from beads, you need to get good at it and hone your skills.
Beaded necklace with violets
You can create a summer mood at any time of the year by trying on a bright and fresh necklace with beaded forest violets.
The video shows the entire manufacturing process. First, a green base with corners is created. Then small delicate violets of several shades are woven together.
To make the decoration fit more naturally around the neck, it is better to weave it not from wire, but from fishing line. You can buy a fishing one or a special one in craft stores.
In addition to the necklace, you can weave a bracelet or ring using the same motifs and materials.
Materials for work
Before starting work, decide on the color palette of the future violet, prepare all the necessary tools and materials. For beginners, it is better to take large beads; they are more convenient to work with.
In addition to beads, you will need:
- beads for stamens;
- copper wire;
- scissors;
- round nose pliers;
- flower pot;
- needle;
- PVA glue;
- alabaster.
This is the basic set of materials, you can add additional decor:
- pebbles;
- pebbles;
- butterflies or ladybugs for leaves;
- artificial grass;
- basket instead of a pot.
Wedding decorations with violets
Flower lovers who cannot imagine life without violets will appreciate the idea of wedding decorations with them.
White violets can complement an outfit or hairstyle. Combs or hairpins decorated with beaded snow-white violets are spectacular. You can embroider a veil or gloves with violets. Earrings, tiaras and tiaras with them are also good.
The photographs show some of the embodied fantasies of needlewomen. Every bride has the opportunity to invent and create a unique look to her taste.