A clay pot is one of the most useful products of ancient times. In the absence of modern dishes, our ancestors used clay products of various shapes in everyday life. Nowadays, making clay pots is a hobby that brings little benefit to flower growers and gardeners. To make a pot, you don’t need any skills; anyone can handle this task!
Necessary materials:
- Clay For a small pot, 250 - 300 grams is enough. It can be purchased in special. stores or collect it yourself if there is a forest, river, or pond nearby.
- Potter's wheel Purchased in the same special stores. stores or made from improvised materials...
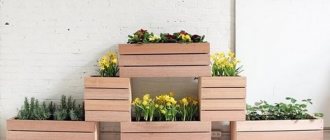
Greenery on the windowsill
It doesn’t matter if you don’t have a garden; you can grow fragrant herbs on your windowsill all year round. And in order not to spend money on pots or just to please yourself with an unusual design, such beds can be arranged in metal tea boxes.
Part 1
No doll's house will be cozy if there are no plants in it. Where can I get them? Especially your favorite ones, exactly the ones that stand on the window in your real home. Cacti and succulents, geraniums and indoor roses, you can make anything!
- And to Myshop
It’s as simple as that: let’s learn how to sculpt them! Practice on plasticine, then switch to polymer clay. Learning how to make such a miniature with your own hands is great! It is best to sculpt, of course, from polymer: fire the crafts, and they will be “stone”, the same as they offer you to buy, for example, in China. But doing it yourself is much more interesting, right?
Moreover, today you can purchase not only individual colors, but also entire sets of polymer clay, which include many colors at once, like a set of plasticine. And it's inexpensive.
This article contains the first part of the pictures. These ideas and photos help you understand how to sculpt and what plants you can make.
Cacti and succulents are especially popular
Let's look at them first.
DIY positive pots
Ordinary flower pots can be transformed, just have paint in your arsenal. Here are some ideas on this topic.
We weave flower pots step by step with our own hands in a master class
This question can be asked by all readers of this article. Indeed, why not go to the store and find a suitable pot there. Now thousands of different pots are sold for every taste and color. Well, while you are thinking, you can list the most popular reasons for such an “act”:
- I don’t want to spend money, or the price of a flower pot seems very high
- After visiting all the stores, I couldn’t find anything very original and interesting.
- Can't find a pot of the right size
- I want to do something useful with my own hands
These are the most popular reasons why people refuse to go to the store and want to make a potty themselves. People who potty for the second or fourth reason will have the least amount of difficulty and are most likely to make it to the bitter end. These people clearly understand that they really want to make a pot with their own hands and will not go to the store to buy it, no matter what the difficulties. But they should be happy - there are no big difficulties!
There is no clear list of available materials; materials that allow moisture to pass through well will probably not be suitable. You can use absolutely any materials. From scrap materials you can get a very beautiful and good pot. Most often, various cans are used as containers, for example, canned pineapples. You can see an example of such a pot in the photo below.
About the same result can be obtained from a mayonnaise bucket. Nowadays such a bucket is not as common in supermarkets as it used to be, but you can find it.
Despite the huge variety of materials, we will almost always need: scissors, a ruler, a simple pencil, paints, colored paper, glue that glues iron and plastic surfaces. This is the minimum amount of materials that will be required when making any pot.
A lot depends on what you need a new pot for and on your plant.
The pot can be hung on the wall or placed on the windowsill. Here we cannot advise you anything specific. Pot for a large flower:
As many have understood, this pot is made from an ordinary iron bucket. When choosing a bucket, carefully check that it is made of stainless steel. Otherwise, your bucket will be damaged by corrosion. Do not forget to make several holes at the bottom of such a bucket so that water after watering can drain into the pan.
If a bucket is not enough for your flower, then you can make it a “house” from waste material.
Tiny pots made of polymer clay
If you are a lover of minimalist design, then tiny polymer clay pots will suit your taste.
To make such a pot you will need polymer clay, a spoon or other suitable tool for selecting clay, a knife and a stove. First of all, knead the clay and, when it becomes soft and pliable, form a ball. Then hide the clay in the freezer for 10 minutes so as not to deform its shape in the next steps. Then, using a knife and spoon, remove the clay from the ball. Then put your mold back in the freezer, and then, using a sharp knife, give it the desired shape. If something doesn't work out the first time, you can start again. When you get the desired result, bake the pot according to the conditions indicated on the packaging of your clay.
You can also make cute houses from polymer clay.
Types of clay by composition
Clay is not always the same. If you find clay on hills and ramparts, it will have a brownish-orange hue. It contains several mineral compounds, which is why the mixture does not look quite standard. Rivers contain a purer substance, as excess particles are separated from the clay by constant washing with water and currents. What type of clay you take doesn’t really matter. To start making, you need to carefully process the material, no matter what type of clay you use...
Preparation
First of all, it is necessary to transform the collected clay into a homogeneous mass (pure substance). To do this, take a bucket or pan and completely dilute the clay with water so that the liquid becomes as non-viscous as possible. Stir the mixture quickly but evenly! After stirring for 3-5 minutes, take the finest sieve and carefully pour the mixture to get rid of small particles of soil, sand, etc. When the already cleaned clay has completely settled to the bottom of the bucket, drain off the excess water, then leave the bucket of liquid clay in the sun. When the clay becomes more plastic and soft, you can begin processing...
Manufacturing
Already having a ready-made clay mass, we begin to knead it to a comfortable consistency. Level the clay, removing any pits and bumps to create a neat shape. Run a knife over the lump of clay to check for bubbles. Avoid even small and inconspicuous voids; it is important that the clay dough is as dense as possible (otherwise, when heated in the oven).
After giving the clay the optimal shape, you can begin to create your first piece of pottery. The easiest way for a beginner is to build a pot from the base.
- Roll 1/4 of the entire mass into a round ribbon. Apply this tape to the middle of the circle, creating a spiral, the main thing here is uniformity! After completing the spiral, begin to press on the cracks in the spiral, also evenly; otherwise the “vessel” will turn out crooked or simply crack in the oven!
- Now, having a finished bottom, begin to attach the walls of the pot to it, piece by piece. Try to create the desired shape without leading to absurdity - i.e. When you spin the pottery wheel, you will create an exceptional shape. There is no need to try to level the outer walls in a static position - you will be wasting your time! Since you are new to pottery, don’t build large walls for a pot, now the main thing is to understand the manufacturing principle...
- Once you've completed your mold, use a potter's wheel to smooth out the pot. Start the circle rotating and gently place your fingers on the walls of the pot without additional movements (since the circle will smooth the walls on its own). It is important that the speed of rotation of the circle is not too high, otherwise small particles of clay will scatter around, or the entire structure will simply fall apart!
- Having already created a beautiful and even pot, we leave it in the sun until it hardens completely. When the pot has acquired a bright yellow, beige or gray color (depending on the type of clay), you can begin to harden it. It must be carried out over a fire or in an oven (if available), since the oven will not provide sufficient temperature. You will need a very small fire. When half of it burns out and turns into coals, you can put the resulting pot in it. Take out “your creation” when you are sure that the product has reached maximum hardness, take it out (carefully, because the clay is very fragile when hot...) and leave it until it cools completely.
If you did everything according to the instructions, you will get a full-fledged pot, even and beautiful. If you wish, you can decorate any pottery: apply patterns, paint it in any color.
Stylish cement pots
Cement mortar and various food containers also make excellent pots.
What will you need?
- Polymer molding clay;
- galvanized mesh (to give a “waffle” pattern);
- foil;
- jute twine;
- flowers.
Before you begin the process of making the planter, be sure to read the instructions on the polymer clay package. Find out how to work with the material and find out at what temperature the products will need to be dried in the oven.
Fun pots using paper glue
You can also update pots using paperclay; another name for this material is paper clay. You can buy it or even make it yourself (the recipe can be easily found on the Internet). You will also need any available tools that can be used as stamps. If you want to make your pots colorful, wait a day for the clay to dry before painting.
Additions for future lessons
If everything turned out well, and you want to try again, then now you will learn about additions to your pottery masterpieces...
- Structural patterns This concept means the creation of patterns on the product itself. For example, make light cuts with a knife, horizontally or vertically. Or draw wavy lines with your fingers. The main thing here is not to make too strong indentations or protrusions.
- Making lids A very beautiful addition to pots are lids for them. They're not that difficult to make, but they add a lot of character to your creation!
- Giving unusual shapes If you are a very patient and creative person, you can create not only standard clay pots, but also jugs, vases, etc. Whatever your imagination can do.
About the pottery hobby...
Clay modeling is not only the creation of beautiful products, but also a process of self-development and “nervous relief.” For both children and adults, sculpting creates a therapeutic effect that provides immediate calm while watching the clay deform. It has been proven that clay pottery modeling develops intelligence. Many psychologists prescribe clay therapy as the most effective way to combat stress!
If you are interested in pottery, we suggest you purchase a pottery wheel from Kolokol Manufaktura
Handicrafts and flower pots
To decorate pots, you can use threads, lace, buttons and other sewing materials. And here are some ideas.
But what kind of pots can be made from felt.
Cacti and succulents and plasticine and polymer clay
A small collection of 7 different cacti: they are very easy to sculpt. Pots and filling them are also easy.
The next few cacti are made not from clay, but from stones, and they look very realistic. This once again reminds us that we don’t need to sculpt any fine details on a cactus, the main thing here is coloring and painting:
Next - stud earrings in the form of small succulent plants (quite suitable not for earrings, but for a miniature pot). The main thing is to choose the main color (gray-green) and slightly tint the edges (pink):
Let's watch a master class on how to make succulent leaves:
First, we make a sausage, then we cut individual leaves from it, give them shape, and then we begin to lay out the finished leaves in rows of 5 pieces in a pot prepared in advance, securing them with a circle in the center. The further you go, the smaller the leaves become.
What kind of cacti can they be?
If you think that these are monotonous plants, then you are mistaken. There can be a great variety of shapes and colors here. See the ideas: they will help you create similar plants.
The following photo shows an example of a plant with leaves and a flower:
And lithops (they are even easier to sculpt):
Theoretically, you can mold anything
plant that you like, based on the photo. The problem with other plants is due to thin leaves. This is why succulents are most often sculpted.
And some more ideas for inspiration
How to make a jug from plasticine
You can study the surrounding things with your baby and tell him about new objects not only by showing them in reality or in pictures, but by working with plasticine. The baby will be very interested in not only helping you mold it, but also holding it in your hands, turning it, examining it from all sides. After all, the drawing in the picture is presented only on one side, and the object in reality can be large enough for the baby.
After reading a fairy tale to your baby, for example, about the fox and the crane, your baby will most likely have a question about what the jug looks like. You can show him it in a picture, or you can offer to make it out of plasticine. This lesson explains how to do this easily, quickly and clearly for your child.
And so, to make a plasticine jug you need:
- a piece of plasticine of any color;
- ballpoint pen case.
1. The necessary materials are prepared, i.e. Take one piece of plasticine, for example, red, and a ballpoint pen case, one side of which is closed and the other is open.
2. A ball is rolled out of a piece of plasticine.
3. The ball is put on the ballpoint pen case. It must be placed on the closed, non-sharp part of the case. Then the case is pulled out, leaving a hole in the ball.
4. Take the next small piece of plasticine and roll a flagellum from it.
5. A ring is made from the resulting flagellum. The ring is obtained by folding the flagellum and connecting its ends.
6. The resulting ring is attached to the ball. You need to stick it in the place where the hole was made using a ballpoint pen case. Moreover, the center of the ring must coincide with the center of the hole.
7. Next, the stuck ring is kneaded with your fingers from its inside so that you get the neck of a jug with a spout. Smoothing the plasticine is done to the edges of the hole in the ball.
8. On the inside, you also need to use your fingers to make a smooth transition from the ball to the neck. In addition, another plasticine flagellum is rolled up. It also rolls up into a ring. The resulting ring is attached to the ball on the side opposite to the hole, thereby forming the bottom of the jug.
9. Next, a handle is attached to the jug. To do this, another flagellum is rolled up and attached to the pitcher.
10. The resulting jug can be decorated with various ornaments or simply stamped with a circle on its surface by pressing the open part of the ballpoint pen case.
If you find an error, please select a piece of text and press Ctrl+Enter.
Olesya Selikhova
About the author: Psychologist, specialist in the field of family relationships and raising children. I love drawing, modeling, needlework and any interesting creativity. Mother of two children and a wonderful wife!
items
Share with friends:
We also recommend watching!
How to make a lizard from plasticine.
How to make a traffic light from plasticine.
Mosaic planter
Give a second life to an accidentally broken vase or tile by using it as flower pot decor. In addition to fragments of any size, we will need glue for ceramics and special grout for seams.
Flower pot decorated with mosaic
1Use a tile cutter to obtain shards. If you don't have one on hand, wrap them in a thick rag and beat them with a hammer.
2 We sort the fragments according to the size and color of the picture, setting aside those that suit them.
3 Coat the prepared container with glue and glue the fragments.
4 We fill the gaps between them with grouting compound. We remove the excess with a rag immediately before it dries.
5 If desired, varnish the finished product.
Interesting options for DIY floor pots and flower vases
An interesting and unusual solution would be a floor flower pot made of wood. To work you will need a stump, log or thick branch. The wood blank should be freed from the core. It can be removed both in the transverse and longitudinal position of the workpiece. The result will be a tall or long pot. The resulting hole is carefully cleaned and polished. Decorative decoration for a flower pot made by yourself from wood can be the removed bark. It is recommended to emphasize the natural beauty with a layer of varnish.
Helpful advice! A garden pot made from 5 ceramic tiles glued together will look original and stylish.
A stump or log can be cut into several parts. The core should be removed from each element. The components are arranged in several rows, creating a multi-tiered composition. To ensure reliability of the structure, all elements are glued together.
An interesting solution would be a floor flowerpot made from an old plastic container lined with wooden slats. The container should first be treated with an antiseptic. There are a number of drainage holes in the bottom. The entire surface of the container is lined with pre-painted wooden planks, which are placed in a vertical position.
Outdoor outdoor flowerpots can be made from old car tires, painted in different colors and decorated with any pattern. The products are left in their original design or one of the side surfaces of the tire is cut out in a figurative manner. The finished outdoor flower vase is primed and painted with a pattern.
Helpful advice! In order for the tire to cut well, it should be treated with machine oil or grease for better sliding of the knife blade.
You can make a spectacular floor pot from cement mortar
Such a flowerpot made of tires can be decorated decoratively using mosaic techniques. To do this, a mesh is applied to the surface of the product, on top of which a thick cement mortar is applied. Mosaic elements are pressed into the mixture. For this purpose, you can use tiles or pebbles.
A flower garden made of glass bottles, which are laid around the circumference of the base in several rows, will look unusual. You can use a tire or bucket as an internal base. The walls of the container are coated with thick cement mortar. The necks of the bottles are pressed into the mixture.
Wicker pot-basket
In the classic version, vines or willow twigs are used for weaving. But, if you don’t have branches on hand, you can use plastic cut into thin strips or even old newspapers and tissue paper.
To protect against moisture, such products must be coated with glue or varnish.
Preparation of willow twigs
Weaving flowerpots from thin and flexible grapevines turns out to be more decorative. But, since grapes are grown only in the south of Russia, we will use willow branches.
The optimal time for collecting raw materials is early spring during bud break or July-August. The branches must be selected of the same length, as straight, long and flexible as possible, up to 3 mm thick. They are cut at a 45° angle with pruning shears. To check the flexibility, the rods are bent at 90° - they should spring back easily.
For weaving, both unpeeled twigs and branches with completely removed bark are used.
In the latter case, it is better to collect the raw materials in the spring - the bark of such a rod separates better. To remove it, use a special tool - a pinch. It is made from a thick branch with a splinter at the top. If the raw materials were collected in advance, before starting work, the branches are “revived” - soaked in hot water for 4-5 days.
To obtain a more intense color of the rods, boil them in hot water for about half an hour.
Weaving methods
Weaving the bottom of a flowerpot basket
For a small flowerpot you will need about 8 rods about 30 cm long:
1In the center of 4 blanks, you need to make a cut so that 4 more branches can be inserted there.
2 Weaving starts from the bottom. We select the thinnest twigs and begin to braid the crossed branches with them, 4 pieces at a time.
3After several rows (their number depends on the size of the bottom of the future flowerpot), we begin to braid two branches at a time, and after another 3-4 rows, one branch at a time. The braided blanks should be positioned at an equal distance from each other like a fan.
4When the size of the bottom is sufficient, we secure the remaining ends of the branches, intertwining them with horizontally located weaving branches.
5 To form the walls you will need thicker rods. They are pushed one at a time into the bottom weave next to the braided branches.
6 Carefully bend the rods so that they are perpendicular to the bottom and tie them at the top so that they do not interfere with work.
7 We begin to braid each of the branches located horizontally.
8 At the end of the work, we form the edges of the flower pots. To do this, we intertwine them with thin branches along with the remaining thick ends of the rods into a braid.
9So that the ends are not too conspicuous, they are cut obliquely at an angle of 45°.
10If you want to make a flower pot in the form of a basket with a handle, you need to take a rod, bend it and insert it into the sides of the product. Then a bunch of thin branches is wrapped around it twice. The second time, a bundle of twigs is pushed between the gaps formed in the first branches.
Thin branches can simply be glued horizontally around the perimeter of any container. For reliability, they are tied at the top and bottom using twine.
Interesting options for creating hanging flower pots
For plants that do not need frequent watering and hanging varieties, a hanging coconut shell pot is a good option. To make it, you need to cut the nut in half, removing the pulp from it. This way you will get two pots. Several holes should be made in the bottom of each half using a drill for drainage. To hang the structure, nests are also made on both sides of the shell.
Helpful advice! Such flowerpots do not require additional decoration, since they have a pristine exotic appearance.
You can weave a hanging flowerpot for your garden with your own hands from thin vine branches or artificial rattan threads. The product can have a round, cone-shaped or cylindrical shape. The material is pre-soaked to gain flexibility. First of all, prepare the bottom from plywood, along the circumference of which holes are made. Thick rods are vertically inserted into them to create a frame.
The vine is placed between the twigs of the frame and pressed with an awl, forming the walls of the pot of the required height. The finished product is treated with moisture-proof impregnation and varnished.
For flowers that do not like frequent watering, hanging products are suitable
Unexpected solutions for creating hanging flowerpots for the garden with your own hands
You can make a DIY hanging flower pot from an unnecessary plastic bottle of shampoo or shower gel by cutting it lengthwise or crosswise. Using an awl, holes are made. The blanks can be painted with acrylic paints, decoupaged, or tied with thick colored threads.
This unique hanging arrangement is made from a bird cage that is used as a flowerpot. This option is suitable for short plants. The cage can be spray painted and decorated with any decor.
An original solution for creating a flower pot for the street with your own hands would be to use metal baskets that are filled with substrate. A layer of coconut fiber is placed on the bottom, which does not allow moisture to pass through and at the same time gives the product an attractive appearance.
A hanging structure for flowers made from a plastic bowl, which is inserted into a vertical hoop, will look stylish and unusual. The flowerpot should be fixed using Moment glue. A hanging planter can be created from an old football or basketball by cutting it in half or making another unusual shape. There are holes on the sides at four points for hanging, into which you need to insert a rope.
Plaster plant pots
For work you will need 8-10 spoons of dry rotgypsum
The technique is similar to the technology for working with cement mortar.
1To ensure that the finished product can be easily removed, the mold must be pre-greased with oil.
2It will be more convenient to remove a dried pot from plaster if you cut the plastic jar-mold in advance with a knife, and then temporarily glue both halves with tape.
3We will need two containers, one slightly larger than the other. We will insert them into each other, pouring a solution between them.
4First, pour the gypsum mixture only to the bottom of the container. The solution needs to stand and get stronger, and only then continue working.
5Insert the second container inside the first and fill the gap between them with the solution.
6The work can be simplified if you pour the gypsum mixture into the bottom, and then press it with a second container so that the solution comes out to the very edge of the pot.
7 We compact the solution with a wooden stick so that no voids form inside.
8 Leave the finished flowerpot until completely dry for a day.
9If desired, you can use a tool for cutting the cuticle of nails or a thin stick on a partially dried product (it must first stand for 7-8 hours) to cut out various patterns.
Original plaster pots
When making flowerpots, do not forget about the drainage holes that are made in the bottom of the container. Otherwise, the water in it will stagnate and the roots of the plant will quickly rot.
Where to begin?
Are you thinking about selecting supplies and looking for ideas for decorating flower pots? But why not look at the problem deeper? Is it even worth spending money on an unsightly abode for flowers? Perhaps you can make the flowerpot itself at home? The advantages of such a handmade product are obvious. Firstly, you receive a product of the required capacity, and secondly, you fill the environment with 100% exclusivity.
A pot made by yourself will be 100% exclusive