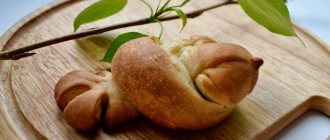
The Dymkovo toy made from salt dough, made by hand, is a beautiful product, the motif of which is inspired by the ancient crafts of Rus'. Initially, it was sculpted from clay, but not everyone is a master in working with this material and not everyone has access to it. That’s why I’m offering two master classes in which I’ll show you how to make a Lady and a Horse from salt dough, accessible to everyone.
Working with a template
To continue working with the craft, take a drawing that depicts a horse; you can draw it yourself, cut it out from a children’s coloring book, or print it from the Internet. You will also need a stationery knife, a thin brush, paints or gouache, a toothpick, super glue or PVA, a board for working with plasticine or cardboard wrapped in foil; if you don’t mind, you can use regular kitchen foil. Since this method of making crafts will be carried out using salt dough, you can add a magnet, so you should get a horse on a magnet.
It is necessary to cut out a horse template from paper, preferably it has a streamlined shape. Next, you need to attach the cut out image to the rolled out dough, carefully cut along the contour with a stationery knife, then remove the excess strips of dough and leave the figure on the board.
Using a toothpick, you can apply a relief pattern to make the figure more expressive. Carefully draw grooves with a toothpick, highlighting the mane, tail, hooves, eyes, nostrils, ears, and so on. Leave the product to dry on the windowsill for 15 hours. After this, you need to grease the figure on one side with PVA glue, and then wait until it dries completely. The same must be done on the other side, leaving the horse for another 5 days for perfect drying.
You can speed up the technological process by sending the figurine to the oven, heated to 80 degrees, and leaving it for an hour and a half. After the horse is completely dry, you can paint it with paints and glue a magnet. With the help of such simple manipulations you can get a beautiful and exclusive craft with your own hands.
How to blind a young lady
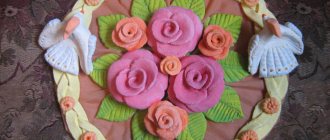
The most popular image of a smokey woman is a busty beauty in a bright outfit. We will talk further about how to make a Dymkovo lady toy from salt dough.
The first step is to prepare the base of the figure - the dress. It consists of a bell skirt (can be hollow, which will save on dough, but should be quite stable) and a bodice. At the same stage, the figurine can be decorated with a frill apron: for this, a piece of dough is first rolled out into a rope, which is then turned into a ribbon by lightly tapping it with the edge of the palm. A special feature of a smokey lady is often her ample breasts, so you should not forget about this detail of the figure.
The next step is to attach two flagella to the body. These are hands. They can be crossed on the chest or rested on the sides - it all depends on the imagination and how the image of the lady will be completed. At the final stage, you can give her, for example, a baby, a basket or a rocker.
Now you can attach the head, decorated with braids of intertwined strands and a kokoshnik, to the body. Or an intricate hat, if the image of a city-dwelling young lady is created.
Dymkovo salted dough horses
Elena Olegovna Manankova
Dymkovo salted dough horses
Working with salt dough is a fascinating activity. Especially when you make a craft with soul and interest. I really enjoy working with salt dough and enjoy watching my little charges work. When they get work like this, they are very happy, and of course, like all children, they don’t hide it.
All the guys are sure that their work is the best. I have always been amazed at how children remember their work. Now you look at them and it seems you are already confused - who exactly made this or that horse . And a glance is enough for the child - he recognizes his work exactly. These are the beautiful horses the children and I sculpted in class. And then they were decorated in the style of Dymkovo painting .
These are the wonderful horses we got !
Apple Tree On a cold winter evening, I suddenly felt sad, sat and remembered how nice and warm it was in the summer. Working with salt dough helps. Collective crafts of the teacher and children for the Easter holiday. Children really like to work and create various kinds of work with their own hands. Working with salt dough helps develop perseverance in children.
How to make a salt dough horse
The content of the article
You can make it from salt dough with your child or on your own; it’s easy to turn the craft into a magnet, Christmas tree toy or keychain. Such arts and crafts activities improve fine motor skills, general condition and mood. So sculpting from dough is not only pleasant, but also useful. Unlike various low-quality plasticines, the dough does not contain harmful components and does not cause allergic reactions.
Dough horse: where to start?
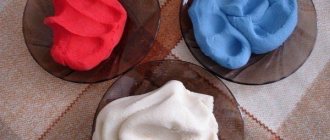
In order to “knead” the material for modeling, you need to take the following ingredients: a glass of flour, a glass of salt, one tablespoon each of vegetable oil and starch, 2/3 glass of water. You need to carefully mix all the ingredients and knead them into dough. Try to make it smooth and elastic and not stick to your fingers. Separate part of the dough and form it into a ball; roll out a layer about 0.7 cm thick on a cutting board.
Master Class. Salt dough horse
Audience: the master class is designed for children of senior preschool and primary school age, their parents and teachers. According to the ancient eastern calendar, the symbol of 2014 is the Blue Horse. The horse is characterized by such qualities as hard work, devotion, assertiveness, dynamism and energy. And the blue color reflects peace and tranquility. I bring to your attention a master class on making a Blue Horse. Let's work hard and rejoice together. Beautiful is a horse standing in a stall, Beautiful is a horse flying across a meadow, Beautiful is a herd grazing in a field, Beautiful is a foal rushing across a clearing. Horse, a wonderful creature of nature, I feel a close unity with you. Four hooves, carrying horseshoes, Soft lips, taking sugar. The eyes of a horse will look into the soul, From the eyes of a horse the sorrows will fade away. (Vera Vdovina)
The gaze of a cat is predatory and calm, The gaze of dogs is angry or betrayed. Only the horse looks at the world differently, Because the world is in its eyes. (Vera Vdovina)
Materials:
- dough - aluminum wire - tape - napkins (paper, wet) - PVA glue - foil - sponge - gouache - water jar - brush - pen - shiny hairspray
Source
Horse - a horse made with your own hands. 50 master classes, photos and ideas
Everyone, without exception, loves toys. They are the ones who can take us to a fairy-tale world and a fantasy world, where we are free to be anyone, and at the same time forget about our hardships and sorrows. Handmade toys have a special magic and bring great joy. And not only for children! They are warmed by the kindness and warmth of the master. But not everyone knows how to make a homemade toy; for example - a horse. After all, this is a symbol of the New Year coming to us. And such a cute horse can also become an excellent New Year's souvenir.
What can you make a horse from? Here the question needs to be posed more specifically: who is good at what? Someone is an excellent sewer and can sew a tilde horse from scraps of fabric; someone is talented in sculpting and using clay, salt dough, plasticine and other materials will recreate a figurine of an animal. There are many ideas for making horses. These are knitted horses, embroidered, drawn, and shaped using appliqué techniques...
But there is another way to make a cute flexible horse. And it will be described by the “Horse with your own hands” master class . For this craft you will need the following materials:
- linen twine,
- braided two-core copper wire,
- red threads,
- glue "Moment"
- a piece of thin skin
- thin strip of fur,
- black fabric paint for eyes,
- decorative braid,
- scissors, pliers.
And before starting work, you should definitely take into account one very important fact: linen twine does not “like” knots at all, so the material chosen for the craft is not too thin (no more than 1.5 mm in diameter and no less than 1 mm). It is inconvenient to use twine that is too thick or too thin when making a doll. And, if there are knots, then in the most critical places it is better to fix the joints with Moment glue.
So, the selected twine of excellent quality (it is more even) is wound on cardboard or a book to form skeins:
– 30 full turns 32 cm long for the front legs;
– 30 turns 50 cm long for the body and head;
– 30 turns 50 cm long for the hind legs and chest;
- 15 turns 46 cm long for the tail.
Having measured a 40 cm piece of two-core copper wire, it needs to be cut from one edge and bent. These will be the hind legs. For the front legs, the wire is prepared separately in the form of a 32 cm long piece of one core; that is, the core is first separated from the wire and left intact in its braid. The wires are connected, and at the same time they must be distributed so that the head, when tilted, almost touches the ground. The wire for the front legs is secured “to the body” of the horse by tightly wrapping it around the base wire.
Now take a 50 cm roll of twine, apply it to the wire and tie it around it. First you just need to tie it with a red thread in the middle and attach it to the edge of the future head; the thread knot should be inside the dressing. Thus, the next two tight ties are gradually made with red threads with wire inside, placing the knots under the twine. Under the first dressing, do not forget to pass a thin leather strip - a bridle. Next, all the winding around the wire ends; but now the same twine is used for tying. The front legs should remain outside the winding during this work.
Then the front hooves are unwound. Take a skein of 32 cm, cut it and throw it on top of the horse’s body, placing it directly above the legs. Both halves of the skein of twine are tied to each leg as tightly as possible. The winding threads are tightened in knots and secured with glue for better fixation. If there is a slight difference in the length of the legs, they need to be trimmed with scissors.
For the chest and hind legs of the craft, take a skein 50 cm long with your own hands and, following the example of the front legs, throw it on the horse’s chest (under the neck). Twine should be wrapped around the chest and hind legs. The threads should be divided equally on each side. The design must be carefully monitored during operation. The body can be lengthened, but then twine is additionally wound to the hind legs.
A skein of 15 turns will be used to wind the tail. It needs to be connected to the body by passing through the lower abdomen. The tail is separately fixed with thread.
At this stage, the “Horse” craft should be slightly trimmed. Make the legs the same length, adjusting the torso (especially if there are unevennesses here and there). The horse should stand level and stable. The body can be additionally wrapped with twine to thicken it.
Decorative braid is prepared for the hooves (preferably with a geometric ornament or pattern). But you can also use leather strips. Strips of the selected material are cut along the leg, overlapping them slightly, and glued to the leg at the very bottom with Moment glue. The legs are trimmed again. And the tail is shaped at your own discretion. For the ears, a figure eight about 4 cm long is cut out of a piece of thin leather. The blank for the ears is folded in half and attached to the head slightly below the second red winding. A mane is made from a strip of fur (faux or natural) and glued from the ears to the knitting needle. A blanket is cut from any dense fabric, and a saddle is cut from leather. The horse is ready. On the eve of the New Year and in general, this product will lead the most popular toys.
No less interesting is the master class “Horse made of beads” . It is generally convenient to make animals from beads; including horses. You can make a primitive horse from rounded beads and fishing line, or you can convey all the details as accurately as possible. A beaded horse is a wonderful gift, a symbol that a graceful and strong animal will protect its owner and serve as a talisman.
A soft toy horse made of fabric is quite simple to make. In this case, you can guarantee its strength and environmental friendliness. Well, it’s not worth talking about the joy that its recipient will experience. You can sew a horse together with your child. And you don’t have to buy pieces of fabric for this; Unnecessary things are also quite suitable - for example, old pajamas or a velvet dress that has gone out of fashion. By the way, the child can handle the horse presented on his own. Adults should only guide his work and prompt him if necessary. To sew a horse you will need:
- pattern paper,
- marker,
- textile,
- scissors,
- pins,
- threads, needle,
- multi-colored buttons,
- stuffing filler,
- sewing machine