Salt dough frame
Elena Tkachenko
Frame made of salt dough
Salt dough frame
There are a large number of different recipes for salt dough , I propose the simplest and least expensive one.
Salt dough recipe:
• 1 glass “Extra”
• 1 glass of cold water
• 1 teaspoon vegetable oil
Preparing a sketch of the future frame (drawing or composition)
.
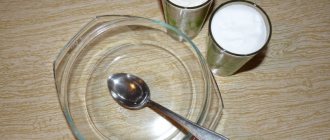
Let's prepare cardboard, scissors, ruler, stacks, pencil, gouache of different colors.
frame from cardboard , mark the place for the photo, and carefully cut out a “window”
.
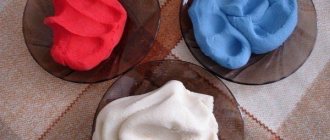
Knead the dough , strictly observing the proportions. Roll out on the table.
We measure and cut out the outline of the frame according to the cardboard template.
the dough frame carefully on the cardboard. We make sure that it does not go beyond the contour, we cut off excess.
the dough into even rectangles (of fashionably different shapes)
to decorate
the frame .
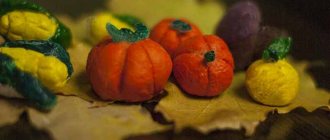
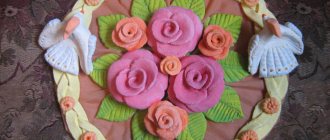
Decorate the frame with dough . We sculpt the figures and place them on the frame .
Wait for it to dry completely (about a day)
.
We paint the background of the frame with gouache (apply gouache twice if necessary)
.
We decorate the figures and decorative elements at our discretion.
I recommend choosing bright colors and applying gouache twice if necessary.
this frame as room decor or as a gift for family and friends.
Craft from salt dough “Bar” September is not only the beginning of the school year, but also the first month of autumn! A little sad time, but also filled with charm! Autumn is.
We sculpt from salt dough (photo report) Dough is a very surprisingly plastic material for sculpting various figures and compositions. Unlike ordinary plasticine, the dough does not stain.
Making amulets from salt dough Topic: Making amulets from salt dough Goal: to reveal and develop potential abilities in a child Meetings: 5 Number of children: 10 people.
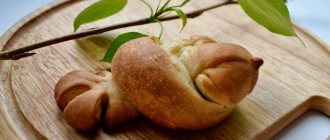
Making a candlestick from salt dough Making dough from flour, salt and water is an ancient custom and was used to make figures from folk tales and religious ones.
Modeling from salt dough (photo report) Salt dough has recently become a very popular material for modeling, especially among children. So many fairy tales and cartoons.
Children's crafts from salt dough Children love to sculpt from salt dough. It does not stick to your hands and is very soft to the touch. I make the modeling dough with my own hands just before.
Crafts from salt dough “Owl” Recipes and methods for sculpting from salt dough are different and varied, since sculpting from salt dough is a great pleasure and joy! AND.
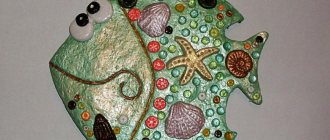
Fish made from salt dough My daughter and I decided to show how we make our crafts from salt dough. Since the craft needs to be done quickly enough, there is no time for shooting.
Salt Dough Theater Theater is one of the most democratic and accessible forms of art for children. It allows you to solve many pressing problems of modern pedagogy.
Modeling from salt dough “Cat Marquis” Purpose: To improve the ability to work with salt dough. Objectives: Developmental: Develop fine motor skills through the ability to roll a ball.
Why dough?
Dough has many advantages over conventional modeling materials: plasticine, clay or plastic.
- This material has a large number of special properties:
- It's easy to make at home with common ingredients.
- It is inexpensive and suitable for families with any budget.
- It can be eaten without harm to the health of even a small child
- It's nice on the hands and kids just love it.
- Allows you to create any shapes
- Easy to dry and does not deteriorate after drying
Thanks to these properties, the dough can be used for games with children from one year old and without fear for their health or safety.
Master class on handicrafts using salt dough “Farm Frenzy”
Photo frame made of salt dough. Master Class
Author: Sazhaeva Evelina Valerievna, teacher of additional education MBOU DOD House of Children's Creativity, Novy Urengoy
The master class is designed for children 6-10 years old.
Purpose:
introducing children to simple elements of modeling from salt dough, interior decoration.
Goals
: Introduce children to a new technique for making a photo frame from salt dough.
educational: training in skills of working with salt dough; creating a competent photo frame composition;
developing: development of aesthetic taste, fine motor skills of the hands, mental processes - imagination, perception, memory, thinking;
educational: to cultivate a sustainable interest in fine arts, a creative and aesthetic attitude towards the environment.
Materials and equipment:
· cardboard square 10/10 cm;
· cardboard squares 10/10 cm – frame wall;
· photograph 10/1-cm;
Preliminary preparation:
It is necessary to bring an interesting funny photo to each participant of the master class in advance. The teacher should prepare salt dough and sample frames.
I. Motivational moment.
- Guys, today a magic chest was sent to our lesson from the fairyland of Handicrafts. Let's see what's hidden in it.
We look in the chest. It is desirable that it be wicker or painted like caskets in fairy tales.
— Looks, these are photographs. How interesting and unique they are.
- Do you know why people take pictures? (as a reminder, we were kids, and now we’ve become big, but we can look at ourselves when we were little).
– How are photographs stored at home? (in an album, in frames on shelves, on walls, on a computer).
– Where can I get photo frames? (can be bought in the store).
- That's right. Do you think we can make a photo frame ourselves? Let's imagine that you are not just teenagers, but master wizards from the country of Handicrafts. We know that most things that create coziness in the home are things made with your own hands. A frame for a certain photograph will better convey the mood, emotions of the characters and remind us of the event captured in the photograph. And to create your unique frame, a magic chest with its magical objects will come to our aid.
We take out objects and materials, carefully examine and discuss each item: name, purpose
II. Formulation of the problem.
— Looking at the materials from the chest, we see that our frame will be molded from salt dough. The technique of modeling from salt dough is no different from modeling with plasticine. It can also be rolled out, crumpled, made into balls, sausages and given any shape. We will start with simple modeling elements - rolling, making balls and fastening elements together. But products made from salt dough turn out to be more lively, each with its own character, sometimes not smooth, but speaking. Recipe for salted text (for crafts):
- approximately 100 ml of water (the amount of water depends on the type of flour)
- half a glass of PVA glue (for elasticity).
III. Master class topic message.
— Our master class is called “Funny Farm.” What can you tell about it from the name? Correctly we turn to the topic of animals. I suggest you make frames in the form of funny and amusing animals. Let's start with a cute giraffe.
Demonstration of the finished frame
-Like. Let's try to make such a frame.
IV. Stages of work.
1. Let's get to work. First, we need to cover the table with oilcloth. Then we take the dough and separate the required amount for work from it, put the rest in a plastic bag so that it does not dry out.
2. Now we need to color the dough in the desired color. Our giraffe is naturally brown and yellow so we can use yellow, light brown or orange. Let's stick to bright orange. Take the dough and add paint to it
Knead thoroughly until the dough is smooth and evenly colored.
3. After preparing the dough, take a rolling pin and roll out the dough to a layer 1.5 - 2 cm thick.
4. Attach a cardboard template and use a stack to cut out a 10/10 cm square
Wrap the remaining dough in a bag.
5. In the resulting frame blank, make a 6/6 cm square window in the middle. Align the cuts using a stack and water
6. Set aside our frame and let it dry. Take the remaining dough and make 4 small balls and one large oblong ball - the head.
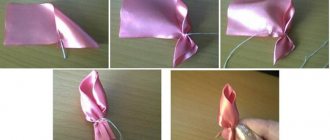
7. From two small balls we make the ears of our giraffe. First we make elongated triangles, then we collect a fold at the base
How to dry the dough?
After the crafts are formed, the dough will need to be dried. There are two ways to do this. The first method is very simple: dry the craft naturally, which will take several days. It is important that the craft is not exposed to sunlight or sudden temperature changes - otherwise it will crack.
The second, faster drying method is to use the oven. In this case, it is necessary to heat the stove to a moderate temperature of 70 degrees and dry the craft for about 1-1.5 hours. With this drying method, there is a danger that the craft may crack.
Ways to decorate photo frames
If the finished photo frame seems simple and unattractive, you can decorate it, turning it into a unique thing that can become an original decorative element.
Let's look at the simplest techniques for decorating photo frames.
Quilline style decoration
There are probably old postcards around the house. We cut them into strips, which we roll into spirals. We fix the ends of the strips with glue and attach the quilling rolls to the frame.
Using colorful paper napkins
We cut the napkins into squares, make lumps out of them and glue them to the base. Carefully straighten the “roses” and give the product a finished look.
Using seafood
Seashells of different sizes and smooth pebbles are suitable for decoration.
We lay out the elements on the frame and fix them with hot glue. You can paint or varnish the finished craft.
Decorating with “golden” shells
Let's prepare halves of walnut shells. Lay them out on paper and paint them with golden spray paint. After drying, attach the shell to the photo frame using a glue gun.
Use of eggshells
We chop the washed and dried shell into small fragments and glue it to the base. Using a brush, we paint the shells in different colors and coat the finished product with varnish.
Aroma decor
Photo frames can be not only beautiful, but also fragrant. In this case, anise stars or cinnamon sticks are used as decoration. The glued elements have a beautiful natural color, so it will be enough to refine them with varnish.
Birch bark decor
As the name implies, birch bark is used to decorate the frame. Using scissors, cut the required number of blanks and attach them to the base with hot glue.
Such a photo frame will look very impressive when framing black and white photographs.
Decoration with braid
In this case, the base for the frame should be painted in a contrasting dark color. The selected braid is glued around the perimeter of the frame. To complete the composition, you can decorate it with multi-colored buttons.
Decoration with cord
For decoration you will need a twisted cord and double-sided tape. The rope is attached in a circle in several rows, filling the entire surface of the workpiece.
Denim decor
We cut off belts, scraps with rivets and other decorative elements from unnecessary denim items. We glue them to the base using a glue gun and place them under a press for better adhesion to the surface.
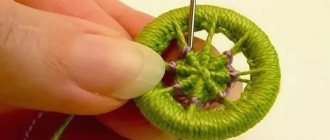
Decorating with yarn
We take knitting threads of the desired colors and tightly wrap them around the edges of the frame. Products for children's photographs are especially delicate.
Using disks
We break the unnecessary disks into fragments and lay them on the surface of the photo frame. To fill the voids we use acrylic paint in tubes.
By analogy with disks, you can decorate the frame with fragments of old stained glass. In this case, the product will turn out bright and unique.
We have not considered all the ways to make photo frames with your own hands. A variety of materials are used for work. These are felt, velor, satin, guipure and lace. Buttons, brooches, coins, beads, beads and sequins will be useful for decoration. You can always find a use for scrap materials to create a unique photo frame.
Elephant
The elephant seems to be a more complex craft, but in reality it is very simple to complete.
Master class on creating an elephant:
- Form one large ball of dough.
- Make 6 small balls and a sausage from the material.
- Attach 4 balls to the bottom of the large ball.
- Flatten two balls into pancakes, which are pressed down on one side. These will be the elephant's ears. It needs to be glued to the body on one side.
- Pull the sausage out from one edge and, on the contrary, press it down on the other. The thick end will be the head, and the thin end will be the trunk.
- Glue the head to the body.
- Make eyes from the dough and glue to your face.
- The craft needs to be dried and painted.
The cute and kind elephant is ready.
Advice. To make crafts last longer, they can be coated with clear nail polish after painting. Then it will be more convenient for children to play with objects, keep them in their classrooms, and even drop them.
Caterpillar
It’s not difficult to make a funny caterpillar from dough. The craft is suitable even for the smallest creators.
Operating procedure:
- Roll the sausage out of the salted material.
- Cut it into 5 equal parts, and leave one part larger.
- All the pieces need to be rolled into balls.
- The balls need to be glued together into a chain. The big ball will be the head.
- You need to glue eyes and a nose onto your head, which can also be made from dough or other material: poppy seeds or peppercorns.
- The caterpillar's face needs to be completed with a toothpick.
- All that remains is to dry and paint the craft.