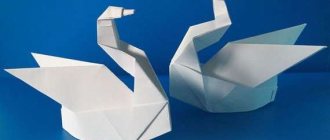
origami paper hare
Little bunnies with their long ears, big teeth and innocent eyes are loved by everyone. To learn how to make a paper hare with your own hands , you won’t need a lot of time and effort. But most importantly, children simply adore these little fluffy animals, so paper hares are a favorite craft for all children.
There are many examples with step-by-step photos, instructions, diagrams and much other useful information.
In the article you will find how to do:
- Origami paper hare
- Origami jumping bunny
- Origami rabbit diagram
- Easter bunny made of paper
- Inflatable origami bunny
- Simple origami rabbit
- Paper hare craft
- DIY cardboard rabbit
Origami hare for children
Using this diagram you can make a paper hare for children with your own hands. The model will surely appeal to children, because these playful origami hares , if controlled correctly, can move: they can curtsy, straighten their backs, tilt their heads and much more.
To make such a cute little animal, you only need a square sheet of paper. How to make an origami hare is shown in the diagram.
If this scheme is too complicated for you, detailed step-by-step instructions can be found on the website, the link is below.
Photo source: luntiks.com/kids-origami/how-to-make-origami-for-kids-step-by-step-paper-moving-hare-1772.html
Bunny in Tilda style
The height of the toy is 30 cm.
To make a toy with your own hands you will need:
- body fabric – knitwear;
- a piece of cotton fabric for the inner part of the ear;
- fabric for pants, linen with the addition of acrylic - 0.2 by 0.5 m;
- fabric of two colors for the dress - shirt cotton;
- ribbons, lace, felt for decoration;
- buttons for attaching legs and arms;
- floss threads for decorating the face;
- black beads for eyes;
- filler – holofiber;
- threads, sewing accessories.
Description
We start by making a pattern. It needs to be printed to scale on format A and all the details cut out.
The layout looks something like this - see photo.
On the fabric laid out in two layers, mark out all the details and pin them together. At the same time, be sure to mark the boundaries of the areas that do not need to be stitched - they are for turning inside out! Do not forget to provide allowances of 10-15 mm.
We sew the details along the contour and only then cut them out. This note does not apply to the ears; we cut them out right away.
The ears will be double-sided - the top is made of knitwear, the inside is made of cotton.
From cotton we cut out two parts according to the pattern; from knitwear you can simply cut out a piece of sufficient size.
We fold the cotton and knitted parts in pairs with the right sides inward and pin them together.
We sew the parts together using machine stitching. When using knitwear, use a very fine stitch (1.5 mm) so that the seam does not unravel in places where the padding is dense. If you use fleece, you can sew with a larger stitch (2.5-3 mm).
We cut out the parts, leaving a minimum allowance of 2-3 mm. If the toy is made of cotton or linen fabric, then it is better to use zigzag scissors for cutting.
We turn the parts inside out and fill them with holofiber (except for the ears). We lay it down gradually, in portions. We try to distribute the filler evenly.
On the legs, we stuff especially tightly the places where the parts are sewn on and the feet.
We stuff the body, starting from the muzzle. Then – neck, stomach, bottom. Finally, we seal the tummy and sew up the hole.
We stuff the front paws tightly in the areas of the hands, more loosely at the top.
To sew up the holes we use a blind stitch.
The following photo shows the parts filled with filler.
We are not connecting the parts yet, we will do this later, as we “dress” the bunny.
We design the bunny's face. We embroider the nose with floss threads to match the color of the clothes, and make drawstrings under the eyes. We sew black beads as eyes.
Panties
Iron the fabric for the pants before cutting, since then, after putting them on, it will be impossible to remove and iron them.
We will not make a pattern for the pants; we will cut them directly from the finished parts.
We place the body and legs on the fabric laid out in two layers.
Please note that we place the legs at the level at which they will be sewn to the carcass.
Let's make the pants fluffy, with cuffs at the bottom, knee-length.
When cutting, keep in mind that the pants should be of a length that allows the bunny to sit, that is, they should not be stretched.
The width of the panties is defined as the volume of the torso plus 5-7 cm. If you want to get more fluffy ruffles, then add 10-12 cm. Keep in mind that it is better to sew narrow pants from thick fabrics; the ruffles will look too rough.
Let's start cutting.
The photo above shows a horizontal line 3-4 cm above the top edge of the leg. At this level we cut the fabric.
Now we will lay out the fabric so that the cut panties do not have side seams.
The diagram below shows how to fold the fabric.
We make two counter turns to the center with a slight overlap of the edges (up to 1 cm) - these will be seam allowances.
Then fold the fabric in half along the midline. It turns out folded in four layers.
We cut on fabric folded in four. How to do this is shown in the following diagram.
The wide dotted line is the fold line of the fabric in the center. The small dotted line is the cutting line along which we make the cut. By increasing the cutout, we will reduce the width of the pants and vice versa. In this master class, 2.0-2.5 cm are cut out.
We get two parts.
For the cuffs, cut out two strips. The width is equal to twice the width of the finished piece plus two seam allowances. For example, finished cuffs should have a width of 1.5 cm. Accordingly, with an allowance of 0.75 cm, the width of the workpiece will be 1.5 x 2 + 0.75 x 2 = 4.5 cm.
The length of the workpiece is determined by the circumference of the bunny's leg plus allowances.
We fold the cut pieces in half along the long side and iron them.
Sew on narrow lace for decoration. If desired, you can replace the lace with braid, ribbons, decorate the cuffs with buttons - it all depends on your imagination.
To gather the panties, we sew two lines with a long stitch on both parts. We retreat 5 mm from the edge, make the first line, and after 2.5 mm we lay the second.
On both sides we leave tails of thread 10-15 cm long.
We distribute the threads in pairs, on one side we tie them into a knot. By pulling the two upper or lower threads on the other side, we gather the fabric.
Having obtained the length of the lower sections equal to the length of the cuff, we tie the ends of the threads and distribute the gathers evenly.
Sew the cuffs to the main parts.
Fold the pants in half with the inside out and sew a vertical seam. We get some kind of skirt.
Fold the pants so that the completed seam is in the center - see photo. We perform step seams in one pass.
Iron the seams. We make several notches in the corner of the crotch seam so that after turning, the fabric lays out beautifully and does not pull. The notch lines in the following photo are shown in black.
Turn the pants inside out and iron them again.
Let's start dressing the bunny.
We thread the legs through the trouser legs one by one.
Now you can sew on the legs.
For this we will need a long needle with a wide eye and strong threads in several folds (5-7). In addition, we select two buttons according to the width of the hare’s legs. In this MK we use buttons with a diameter of 1 cm.
Using a simple pencil, mark the firmware points on the legs for fastening. They are usually located 15-20 mm below the upper edge of the leg. We try on the legs on the sides of the body, checking the symmetry of the location.
We pierce the leg from the inside out, leaving a tail 10-15 cm long.
We thread it through the button and make a reverse puncture, exiting with the needle next to the first one.
We pierce the hare's body, bringing the needle to the other side.
We sew the second paw in the same way. We insert the needle from the inside, leaving a long tail, bring it out, thread it through the button, and perform a reverse puncture. Having pierced the body, we bring the thread to the opposite side. Please note that there is no need to tighten the threads!
It turns out that on each side of the body, on the inside of the legs, there are two tails of thread - one comes from the body, the second from the paw.
We tighten the threads, fixing the position of the paws. They should fit snugly to the body.
We hide the ends of the threads in the body.
We pull the pants up, turn the upper sections inward by 1 cm, and pin them to the body with needles. At the same time, we combine the middle seam of the panties with the central seam of the body. Similarly, we combine the center of the back with the middle line of the back. We put the excess width of the upper cut into folds, giving the panties a fluffy shape.
We sew the pants with hidden stitches to the body.
Dress
We will sew the dress, like the pants, without a pattern.
We place the hare on the fabric so that the neck is level with the top of the fabric (the neck will be here). The bottom of the fabric should be at the required length of the dress plus allowances for the top and bottom hems (1 cm for each).
We cut out a strip, its width is equal to the length of the future dress, and its length is equal to the width of the dress. The width of the dress depends on the size of the bunny. In other words, there should be enough fabric to completely wrap the toy plus allowance for folds.
We sew the cut strip into a ring. We turn the bottom edge and stitch it. If you wish, instead of a hem, you can overcast the edge and sew on a lace braid. We gather the top edge, as we did on the panties.
We put the dress on the toy’s head without turning it inside out.
We decide on the height at which the dress will be fixed. It depends on the image of the bunny that you create. You can sew the dress along the top of the neck, or you can lower it a little, getting a small neckline.
At the selected height, pin the dress and distribute the folds evenly. We sew the dress with hidden stitches and turn it right side out.
From the second fabric we cut out a strip for the second tier of the skirt. Its length is equal to the length of the first part, but its width is smaller. Sew the short sides of the strip. We turn the bottom edges and stitch them. We simply turn the upper sections 1 cm and iron them.
Pin the second strip just below the first, making even folds. Sew the top edge with hidden stitches. We decorate the skirt with a decorative ribbon. It can be sewn or glued to the web.
If you wish, you can knit a blouse for the bunny (we don’t sew on the sleeves yet), a scarf and any other clothes and decorations. Or there is a second option - to sew these things from knitted fabric. You can do without them altogether.
Next, we will make cuffs that will peek out from under the blouse and create the appearance of sleeves on the dress.
Cut out two strips from the selected fabric. Their width is equal to twice the width of the finished cuff, and their length is equal to the circumference of the foot plus the seam allowance.
We sew the strip into a ring, turning half of it right side out.
We put the cuff on the paw. We do this from above, gradually lowering. Please note that the bottom of the cuff should fit very tightly to the paw.
We pin the cuffs and sew them on.
We put on a jacket for the bunny. We put sleeves on the upper paws. Next, we sew on the handles, repeating the technology for the legs (with buttons).
We tighten the threads, fasten them, and hide the ends in the body.
We sew on the sleeves, put on a scarf, beret, and other decorations.
Cute soft toys
It’s not just simple-to-make toys that are popular. Teddy bunnies, tildes and bunnies with long ears are loved by many - not only children, but also adults. And handmade Piglet bunnies are a collector's item for people all over the world.
Teddy Cutie
This is a collectible type of toy that has a number of characteristic features. First of all, it should be noted that real teddies are never sewn from artificial materials. Plush toys of this type are stuffed not with holofiber or padding polyester, but with sawdust or straw, to which fragrant herbs are added. All parts of the toy's body, as a rule, are movable due to special disc-pin devices.
How to sew on ears
The ears must be sewn on to the product during the manufacturing process. Each type of rabbit has its own methods of cutting, stitching and decorating the ears, its own shape and length. Most often, the ears are sewn on from the inside, after which the product is turned inside out along with the ears, which are straightened with a thin stick. After this, the toy is ready for stuffing.
Little felt bunny
Patterning a hare is a simple and fun process. Every beginning needlewoman can sew a bunny with her own hands. The plush hare will become a true friend to children and will give a lot of joy not only to the craftswoman, but also to the little mischief-makers.
Easter Bunny Teddy
To make a rabbit with your own hands you need to take:
- plush on a knitted base, glued with suede on the reverse side so that it hardly stretches - 50 cm by 50 cm (this is enough for two rabbits);
- velor, fleece or cotton for ears, heels, palms - 20 cm by 20 cm;
- chenille wire for ears (shaggy);
- wheels: Ø30 – 4 pcs. for legs, Ø25 – 1 pc. for the neck, Ø20 – 4 pcs. for hands, Ø15 – 1 pc. for the head;
- cotter pins 2.8 – 5 pcs.;
- washers – 10 pcs.;
- plastic or glass eyes – 15 mm;
- cilia;
- synthetic fluff;
- metal granulate;
- threads for tightening - simple threads in color;
- needles;
- floss threads in the color of the heels and nose;
- pastel;
- masking tape;
- round nose pliers, awl, wool brush;
- chalk;
- glue "Moment Crystal".
Description
The Teddy pattern is shown below.
We cut out all the parts and sew them together in pairs.
Fill it with filler and assemble the rabbit using a cotter pin fastening. We design the face.
Teddy Rabbit
To make a toy with your own hands you need to take:
- beige short pile faux fur;
- a little of the same white fur;
- filler;
- sewing tool, thread.
Description
We print or redraw the Teddy Bunny pattern in life-size.
We cut out the necessary details.
The head consists of five parts: side parts (2 pcs.), white cheeks (2 pcs.), wedge (1 pc.).
First of all, we sew up all the darts on the sides of the head and the wedge.
Next we sew in the cheeks. To do this, combine the marks on the cheeks with the marks on the sides of the head.
All seams are made using a “back needle” stitch. The seams should be small enough (1.5-2 mm) and not loose, otherwise when stuffing, especially the head, all the seams may come apart.
Please note that you need to start sewing from the top red dot to the bottom, moving clockwise. After completing the seam, sew the other side of the head in the same way.
Then we fold both parts with the pile inward and stitch along the chin line, starting from the upper corner of the cheek.
Then comes the most crucial moment - sewing in the wedge. The main thing here is accuracy and precision, otherwise you will end up with a skewed nose.
Next, we align the central mesh on the wedge with the extreme point of the nose, then we combine all the other marks.
We start sewing from the central mark on the wedge to the right, moving from mark to mark. Having reached the end of the wedge, fasten and cut off the thread. We sew the left side in the same way (from the center mark to the left). It is advisable to first chop or sweep away the parts.
After sewing the entire head, turn it inside out. Using a brush, comb out the lint from the seams.
Stitching the torso
The body consists of 4 parts plus a valve.
We start stitching from the tummy. We fold both parts with the pile inward and stitch along the line marked with red dots. Then we fold both parts of the back, stitch first from the red to the blue point, and then from the blue to the red. Leave the space for stuffing open.
After this, we connect the tummy to the back, matching all the marks. We sew, leaving a hole for the flap (we do not sew up the neck).
Sewing arms and legs
We fold the upper paws in pairs. We sew, not forgetting to leave room for stuffing. Then we turn the paws inside out and comb out the lint from the seams.
We fold the leg parts in pairs with the pile inward, stitch them, leaving the space for sewing in the heels unsewn.
Then, aligning the marks on the heel and foot, we sew.
Having finished sewing, turn it inside out and comb out the lint from the seams.
Stitching ears
Fill the parts (except for the ears) with filler and sew up the remaining holes. We connect the parts and design the face.
Preparing to sew
First you need to determine what the bunny or rabbit will be made of, and prepare materials and equipment for sewing. The fabric can be either colored or plain. If you have faux fur, you can use it too. You also need to prepare the following:
- buttons;
- cardboard;
- polyethylene;
- threads;
- a needle;
- pencil;
- ruler;
- measuring tape;
- flat surface.
Both experienced and novice needlewomen cannot do without patterns. It is convenient to draw them on polyethylene or cardboard. Polyethylene is convenient because the material is clearly visible through it, and this makes it easier to combine the parts of the pattern. If the material has a pattern, which also needs to be adjusted, film is a good alternative to cardboard.
Among other things, polyethylene patterns are convenient to store in paper folders; they do not wrinkle, deform or tear.
To create a pattern you will need a disappearing marker. It is notable for the fact that the lines disappear, but not immediately, but after 2 or several hours . This tool will come in handy if the lines are not needed in the future.
In other cases, it is better to use a simple pencil or chalk. In addition, you will need a mat and a roller blade.
Those who plan to engage in creativity seriously and for a long time are recommended to purchase professional tools for cutting and sewing: zigzag and tailor's scissors, as well as a knife for cutting out rounded shapes. The threads must be strong and elastic, since when stuffing a soft toy, the seams stretch. It is better to do machine stitching with polyester threads. The following fabrics are suitable:
- felt;
- flannel;
- cotton;
- fleece;
- calico
Teddy Cutie
For sewing you will need:
- main fabric – plush or faux fur;
- material for individual parts - fleece, suede;
- floss threads to match the color of the fabric;
- fabric for dress;
- ribbons or any other decor;
- ready-made eyes with eyelashes or beads;
- buttons matching the color of the main fabric with two holes - 4 pcs.;
- filler;
- brush;
- sewing supplies.
Description
First of all, a Teddy bunny pattern is made.
We retake all the details of the pattern separately in full size.
We cut out all the details taking into account allowances. If a material with long pile is used for a toy, you need to take into account its direction when marking the parts. It is better to cut the heels from fleece or suede.
We sweep away the cut parts in pairs, stitch them together, leaving unsewn areas of 4-5 cm. Through them we turn the parts inside out and fill them with filler.
We fold the seam allowances inside and sew them together with blind stitches by hand.
Sew the head to the body. To increase stability, we first lay one seam clockwise, then the second in the opposite direction. In this case, we try to make the stitches of equal length and with equal spacing.
We sew the hind legs through buttons, as described for the first model.
We comb the fur, lifting the crushed pile.
For the dress, cut out a rectangle of the required size and sew it into a ring.
We process the upper and lower cuts. We put the dress on the bunny, gathering along the top edge.
We fix the gathers with neat stitches, while simultaneously sewing the sundress to the body.
We sew the handles on top of the sundress with buttons.
We place the ears to the head and mark the attachment points with pins. Mark the position of the eyes with pins. We insert a needle and thread under the ear, bring it out at the point of the eye, put on a bead, go in the opposite direction, piercing the head with a needle. We make a small tightening, creating a relief on the muzzle.
We sew the second eye in the same way. In this case, we do not sew on the ears, only the eyes.
We embroider the nose using satin stitch and outline the mouth.
We turn the lower raw sections of the ears inward and sew them up. Sew on the ears using hidden stitches.
If desired, you can add several patches. First you need to thin out the pile with tweezers and sew a patch into this place, making two or three stitches on all sides. It will look beautiful if these stitches are made with a contrasting thread.
You can sew a rhinestone onto the patch or decorate it with embroidery.
In conclusion, we offer several ready-made patterns of cute bunnies.
Filler selection
When choosing a material for stuffing, you need to understand that it can be synthetic or natural. Natural fibers are good, but not very durable, they can be damaged by moths, and dust mites readily settle in them. But synthetics, as many believe, are not very good for health. The final decision remains with the craftswoman. Here are the most common materials for stuffing:
- natural cotton wool;
- felt;
- padding polyester;
- synthetic fluff;
- sliver;
- synthetic wool.
Natural materials
The cheapest fiber of natural origin is cotton wool. It is harmless, hygienic and is often used to fill stuffed bunnies and teddy bears. Even if a child tears off a toy’s paw and puts a small piece of cotton wool into his mouth, nothing bad will happen.
How to sew a Tilda hare with your own hands from fabric with patterns
Tilda's hares require certain skills, but beginners, if desired, can cope with this task. They can be sewn by hand, I have a friend who sews them by hand, or using a machine. My friend spends every evening trying to make a masterpiece, but she decorates them and sews clothes for them. But that is another story.
You can sew by hand, which will take more time, or you can sew using a sewing machine, which will be faster.
You can use these patterns.
I present a video on sewing. This craft can be done by both beginners and experienced craftswomen. You can watch the video, in it the author explains and shows everything in great detail.
These are some interesting ideas that I hope you will be able to bring to life. After all, Easter is a special holiday, and in some families it is celebrated on a grand scale. And I want to give everyone gifts, decorate the house beautifully so that everyone feels cozy and comfortable in it.
Preparatory stage
The process of making a simple version of bunnies for children begins with the preparatory stage - making pom-poms. You will need one large pom pom for the bunny's body, as well as one pom pom for the head. The size of the large template should be approximately 9 cm, and the small one - 5 cm.
Prepare two pairs of templates of the required sizes. The template is two identical rings made of thick cardboard with a cut out round ring inside. Place rings of the same size together and wrap the yarn tightly around them.
It is important to wind the threads as tightly as possible so that the pompoms turn out to be of high quality and fluffy. Next, cut the workpiece along the upper line where the rings meet, and tie tightly along the bottom line with thread. After fixing the thread, remove the templates and straighten the pompoms.
Note!
Garden bunny
Making such a bunny will not be difficult.
To work, you need to find a sample that we will use further. We take as a basis an ordinary plastic bottle and acrylic paints.
We place the bottle conveniently and foam it on all sides, make the head more voluminous and begin to form the bunny.
After each coat, allow some time to dry.
And so we do several layers, let the whole figure dry completely. If you overdo it a little with foam in some parts of the figure, it’s okay, then you can cut it off with a knife. Conversely, if there is not enough material somewhere, moisten that place with water and add more foam.
Now you need to act quickly, while the foam is still soft, wet your hands with water and form the main features. When the figure is formed, we proceed to trimming the irregularities. After complete drying, you can sand it with sandpaper.
We make the paws and tail, use wire to form a shape and apply several layers. Ears can be made from wire and foil, then simply foamed.
Well, now that our figure has already been formed, we can start priming. We also cover it with tile cream and paint the bunny.
This is how we get a bunny for the garden that will delight you and your loved ones every day.
Bunnies made from cardboard tube
What can you use to make a bunny craft, you ask? Many people use disposable paper towels in the kitchen. Once you've finished all the towels, you're left with a cardboard tube that you're unlikely to need.
However, for a craft in the shape of a bunny, this option will be just right. In addition to the bushing, you will need some other materials:
- Scissors and pencil.
- Self-adhesive toy eyes.
- Pink paper.
- A small pompom for a ponytail or just cotton wool.
- Paints, brush.
- Thermal gun.
- Decorative elements.
Here are detailed instructions for making our bunny. First, you should draw ears and the outline of the top of the craft on the sleeve. Next, carefully cut out the outline with scissors.
If your sleeve is very tight, you can use a utility knife to cut it out. Now the blank needs to be painted in any color.
From pink paper, cut out a bunny's nose, preferably in the shape of a heart, and a couple of inner ears. The paper ears should be smaller in outline than the ears on the sleeve.
You can cut out antennae from black paper or simply draw them. Next, all that remains is to glue all the details onto the workpiece: inner ears, eyes, nose, antennae and tail. The final touch is to draw a smile and add decorations.