how to make a paper ball
Do you want to know how to make a paper ball with your own hands? He asks why? Because it's beautiful, fun, simple and practically free! It is impossible to think of anything more beautiful for home decor, holiday decoration and mood lifting. Here you will learn how to make it yourself:
- New Year's paper ball
- Paper honeycomb ball
- Origami paper ball
- Paper pom poms
- Origami kusudama ball
- Wicker paper ball
- Paper strip ball
Balloons in decoupage, shabby chic, artichoke and vintage styles
Now let's briefly go over these styles.
They are very similar in some ways. For example, using the decoupage technique you can make shabby chic and vintage crafts.
To do this, we take a ball, paper or napkins, primer (when the base is not the color you need) and PVA glue.
We remove the layer of paper from the napkins so that only the backing with the pattern remains. Apply glue to the base and smooth the pattern on top. Another layer of glue is applied on top. We try to use a wide brush, it smooths out the creases well.
On top you can cover the craft with glitter and varnish. Leave to dry for a day.
In order for the base to be evenly colored, it is first coated with whitewash or white primer.
Here are some decoupage ideas.
Below we see the tenderness itself. These are pink, white and dusty nude shades that are typical of the shabby chic style. Lace, ribbons are all here.
It’s so beautiful that you can’t take your eyes off it.
This style can be repeated in absolutely any technique, but it looks best in kanzashi.
You can also add large camellias here and now you have a vintage.
However, vintage we use different colors. And chocolate, blue, blue and red. Everyone fits. The main thing is camellias, lace and beads.
Below you see an idea using the artichoke technique.
Detailed instructions for creation are given in this video.
Of course, it will require accuracy and patience. But no one else will have such jewelry.
Wreath
Twine wreaths were traditionally woven in the fall. Autumn crafts made from twine are a symbol of harvest and fertility.
Note!
Crafts from toilet rolls: step-by-step instructions for creating crafts. Master classes with simple work schemes (140 photos)Crafts from corrugated paper - step-by-step master classes on how to create crafts from corrugated paper with your own hands + photo diagrams
DIY crafts made from cereals: photo reviews of the best works made from cereals. Step-by-step instructions and diagrams for creating DIY crafts
Autumn wreaths are made from natural materials and hung on the front door.
There are many options for wreaths. The easiest way to make a wreath is from a cardboard base.
We will need:
- Thick cardboard;
- Jute twine;
- Glue;
- Cones, spices, dried flowers, etc.
A ring is cut out of cardboard, coated with glue and wrapped with twine around the entire perimeter. A final layer of glue is applied on top. The resulting wreath can be decorated with pine cones, bunches of dry rowan berries, dried flowers or ears of corn.
Figured basics
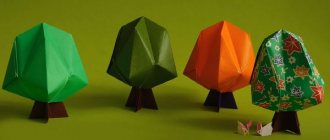
The sphere is the most popular, but not the only shape for the basic crown of the tree of happiness. Figured blanks, usually made of polystyrene foam, are sold in stores that sell craft supplies. Topiary bases come in many different forms:
- heart;
- egg;
- cornucopia;
- Christmas wreath;
- ring;
- house;
- bike;
- dollar;
- star;
- pumpkin;
- apple;
- horseshoe.
Important element: burner
Before making a balloon, you need to carefully consider the design of the burner. Its fuel currently is liquefied propane. The average power of the device is 4.5-6.0 thousand megawatts. You should purchase special burners for balloons, which are made of durable stainless steel using a special technology that allows the device to withstand large temperature changes.
Decorating vases
If you have an old unnecessary container at home in which you can put a bouquet of flowers, but its appearance leaves much to be desired, twine can give it new life.
You can make a beautiful handmade vase from cans, bottles, glasses, flasks, canisters and other containers. The material from which the container is made is not particularly important.
Layouts of planets in the form of papier-mâché
Earth and Moon
Prepare materials:
- inflatable ball (round);
- a bucket of PVA glue;
- brush;
- newspaper;
- toilet paper;
- set of gouache paints;
- plasticine (to the moon).
Step by step execution:
- Cut the newspaper into strips, inflate a ball (custom size).
- First coat half of the base material and stick on the pieces. You will get 4-6 layers. Do not dip all the strips into the paste at once, lubricate them in layers:
- In the same way, glue the second half with the same number of layers. Turn the workpiece, apply layers transversely. Hang the future product to dry.
- Burst the ball inside the newspaper shell, and seal the two remaining holes too.
- Place one layer of paper (toilet paper) on the dried papier-mâché model:
- Bend the pin and insert it into the two holes. Draw contour continental lines, paint with gouache paints:
To create the Moon, use the same method of doing the work. Make the craters with plasticine, roll them into sausages and lay them out in circles. Cover all the details of the toilet again. paper and dry. Paint with silver gouache, top with yellow paints:
Saturn
The above steps are suitable for round planets, Earth and Venus. In this step-by-step master class we will make Saturn, and it has rings.
Using the same scheme, make a spherical base:
Draw a ring on the cardboard. Draw rectangles inside this figure, their size is 4 cm. Cut out. Attach the workpiece using adhesive tape to the rectangles from the inside. Place tissue paper on top so that the tape is not visible:
Saturn is ready. We make lunar craters by rolling up pieces of newspaper and wrapping them in rings:
Cover the craters with tissue paper. What the planet will look like depends on what you know how to do and how hard you try. Alternatively, paint the surface as a landscape using a map and books. This does not mean that you need to exactly transfer every country and island to the layout. Just draw a general view. In your work, use acrylic paints, depict the continents using various shades of green, and the oceans blue-blue. Trace the contours of the continents with a felt-tip pen.
Draw Saturn, which looks like mixing layers of gases. Blur where the borders of yellow and orange paint are. Color the rings bright purple. Draw the moon in gray tones. Make the centers of the craters darker. Dry brushing creates a mottled effect. Sprinkle glitter on the surface to imitate moon dust.
Frame wrapping for decorative wood
The base of the crown of 8 out of 10 topiaries - the backing - performs 2 functions: it improves the gluing of materials, and is also a base decorative layer that masks the color of the ball.
Pre-winding or painting the base prevents the material from burning when gluing the decor with a hot glue gun.
Substrate manufacturing methods:
- Sisal wrapping.
- Twine.
- Wrapping with knitting or sewing threads.
- Gauze or fabric covering.
- Painting a topiary ball (required when gluing coffee beans).
- Apricot kernel base.
1. Wrapping with sisal 2. Wrapping with twine or yarn 3. Wrapping with thread 4. Covering with gauze 5. Painting the base 6. Backing with apricot kernels
Of course, a ready-made foam ball is the best choice for a base for a tree of happiness, with virtually no disadvantages. However, you should not neglect free methods: we recommend using a topiary ball made from newspapers - the best option, also without flaws and, moreover, with minimal costs!
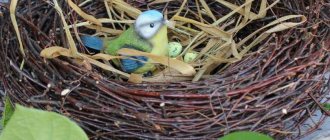
"The Bird of Happiness"
People are constantly coming up with new crafts made from twine, but there are crafts that have been created by people for a long time as decorations and amulets. They have survived to this day for a reason. These are very beautiful works, well thought out and elegant looking.
The famous “bird of happiness” can be considered one of these crafts.
Note!
Craft letter - TOP 120 photo reviews of craft letter. Simple diagrams + step-by-step DIY instructionsCrafts made from nut shells: the best step-by-step master classes on creating DIY crafts with photo examples of finished works
Mushroom craft - reviews of ready-made DIY crafts + step-by-step instructions and diagrams for children (180 photos)
For this work you will need:
- 40 pieces of natural-colored jute rope, 20 cm long;
- 40 pieces of natural-colored jute rope, 30 cm long;
- 1.5 meters of red rope;
- 1.5 meters of green rope.
Creating a bird begins with the head. Pieces 30 cm long are folded in half and tied in the middle with thread. The 4 threads of the head become the beak. They are wrapped in red rope.
You need to determine the size of the head and make a neck, wrapping it around it with red twine. Then it is important to divide the torso into 2 equal parts - lower and upper. Wings are inserted between these parts - segments 20 cm long.
The tail is separated with red thread and the body is wrapped in the form of a cross. The tail and wings are divided into strands, which are connected to each other using colored threads of both colors. Both the tail and wings are divided into 5 equal parts. Using scissors, you can shape the tail into a fan shape and curl the wings.
Coloring pages for the New Year - Christmas balls
Perhaps coloring books will also be useful for creativity. Therefore, below is a selection.
Option for Christmas with an Angel.
It turned out to be a long article, but there are a lot of ideas. Save the entry to your bookmarks so that you always have it at hand.
All the best to you and a happy New Year!