I am engaged in selling various decorative wood products on the Internet. I don’t earn millions, but it’s enough to live on. One of the most popular tools in my workshop is the engraver, which requires attachments that constantly need to be changed and increased in number. I realized a long time ago that homemade attachments are better than purchased ones - they are cheaper to produce, safe to use, and last much longer if they are made with high quality. Now I suddenly remembered all of this and decided to share it with you. So today we will look at how to make attachments for an engraver with your own hands.
Source sdelaysam-svoimirukami.ru
Types of nozzles
petal circle
To begin, take scraps of plywood and cut them into 9 small even circles with a hole in the center.
Next, fasten these holes together with glue, after which you need to level them by connecting them to the engraver and running them along the sandpaper.
Clamp the attachment in a vice and make eight cuts with a metal saw. Small square pieces of sandpaper with the grit you need for the job are inserted into these cuts.
Then saturate the pieces with glue or epoxy resin and let them stick out.
Finally, put the homemade flap wheel on the engraver and test the attachment.
Source pinimg.com
Making a mini drill from a motor
It happens that at home you need to make small holes in wood or plastic, and drill bits are not suitable. In such cases, a homemade mini-drill made from a motor will help. It can also be used for wood engraving. And if you are interested in amateur radio, then using the created tool you can drill and cut boards.
To create a homemade device, you will need to take a miniature electric motor from an old tape recorder . Even various models of motors from children's toys are suitable. If you use a mini-motor from a 12 V tape recorder as a drive, you will also need the following materials and parts:
- power supply or several batteries (battery) with 12 V output;
- a piece of plastic pipe (about 10 cm long) with such a cross-section that a miniature electric motor can be inserted inside;
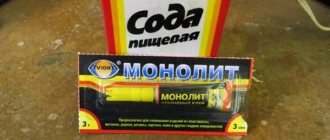
- heat-resistant glue;
- power button;
- wiring for electrical connections.
Large diameter petal circle
The principle of collecting is the same as the previous one, but with some details.
You still need to take scraps of plywood and cut out circles, but larger ones.
Then fasten them and make eight cuts with a metal saw. Pieces of sandpaper are still inserted into these cuts, but then they are compressed with an elastic band and impregnated with glue or epoxy resin.
Let it sit and dry, then start testing a homemade large-diameter flap wheel for an engraver.
Source mozgochiny.ru
Tool selection
The high efficiency of instruments of this type is determined by a number of specific parameters. Among the performance indicators, the most important are:
When choosing a device, it is also recommended to take into account the power and number of revolutions of the equipment being equipped. The technical characteristics of the product must correspond to the metric indicators of the tool.
Metal emery with a fine, universal, ultra-fine notch and for working with soft metals can have a head of a specific shape. The effectiveness of the device depends on the shape and location of the cutting part; the tool may have:
Homemade cutting wheels
Now let's look at how to make the most common homemade attachment for an engraver.
To begin, take a cutting wheel for an angle grinder, a regular compass, but better with two needles at the ends, an awl and unnecessary scissors or metal scissors.
Using a compass, draw small circles (slightly larger than the standard size of the cutting wheel on the engraver attachment), then cut the circle into pieces from which it will be easier to cut out your circles and, in fact, cut.
Right in the center of the cut out circles, you need to make a hole with an awl using rotational movements. The diameter of the hole should be equal to the diameter of the screw from the engraver on which the nozzle is attached.
Finally, sharpen the homemade wheels on an unnecessary sharpening stone, putting them on the engraver itself.
Such cutting wheels are cheaper than purchased ones, and they last longer than non-reinforced ones.
Homemade cutting wheels for the engraver are ready.
Source mozgochiny.ru
Metal cutters with diamond coating
Diamond is the most expensive and durable material on the planet, which is why diamond-coated nozzles are quite expensive. Such attachments can also be used in conjunction with a drill and even a screwdriver for boring, grinding and stripping. In addition to metal, diamond-coated burrs are used for processing ceramics, glass and other fragile materials.
The main advantage of diamond-coated cutters is that they can handle a variety of materials - from wood to plastic, from metal to granite. Diamond sputtering makes it possible to obtain attachments with minimal roughness values. This means that they can be used to finish surfaces.
Ground cylinders for engraver
For this attachment you will need a thin but durable cloth, glue, a tube of the same diameter as an engraver attachment and sandpaper.
To begin, wrap several layers of fabric 12 millimeters wide around the tube and soak it with glue.
Attention, do not use wood tubes or superglue for gluing. Superglue sticks the fabric and the tube together too much, it will be difficult to tear it off, and you shouldn’t glue the fabric even with regular glue on a wooden tube, because the glue will be absorbed into the tube and stick the fabric to the tube itself, which will again make it difficult to tear them off.
Cut strips of sandpaper, shaped like a parallelogram, and the width is the same 12 millimeters, the length should be such that the strip covers the entire tube.
Next, wrap these strips on dried fabric, then soak them in glue again and let it sit.
Carefully remove from the tube, put it on the already prepared engraver attachment and you can test.
By experimenting with tube diameters, you can make different sized cylinders to suit different needs.
Homemade grinding cylinders are ready.
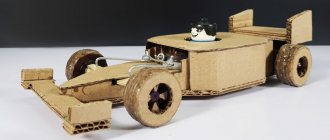
DIY DREMEL® Tripod (2222)
I’m finishing the tripod topic I started earlier.
The idea was to build a functional analogue of this device from scrap materials.
Actually, that's the idea. I had a steel tube left over from attaching a canopy to a crib. The tube consists of two elbows connected like a fishing rod (the upper end of one of the tubes is rolled, and the lower end of the upper elbow is put on it. I completely screwed the lower elbow to a 2 mm thick steel plate, and shortened the upper elbow. I made the Dremel suspension from steel wire with a diameter of 3 mm, it can be inserted into both the lower elbow and the upper one. The sleeve in both the first and second cases is a dowel-dowel, wrapped with fabric tape, so that it sits more tightly in the tube.
Now about what happened. Here's how I attached the tube to the plate (there are groovers under the nuts to prevent it from unwinding):
This is what it looks like from below:
I glued a piece of pimply rug from Ikea to the bottom surface (it turned out to be a useful material in the household, multi-purpose) so as not to spoil the surface of the table:
The top surface was painted with gray Hammerite enamel:
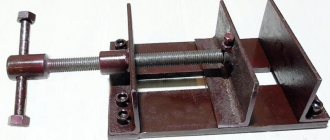
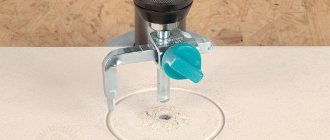
Center cutter
This specific attachment is a type of drill and cutter; it is convenient for cutting and drilling holes in thin materials.
This attachment can be used for cutting small washers from, for example, fiberglass.
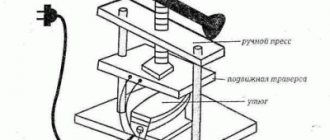
To make it you will need a metal block, a drill, a tap, a cutter and a drill.
First, in a metal block (it should be shaped like an oblong brick), drill a hole for a drill and a cutter from the tip of an old small drill.
Then drill a hole in the side for the clamping screws; these holes are driven with a tap.
Next, insert the drill and cutter into place, tighten with clamping screws and you can test.
The do-it-yourself center cutter for the engraver is ready.
Source mozgochiny.ru
Assembling an electric engraver with a tripod and flexible shaft
An electric engraver is the most common type of this type of tool at home. To make a functionally complete device yourself, capable of competing with industrially produced analogues, you will need an electric motor that runs on 220 V alternating current . Such electric motors can be taken from the following equipment:
- Soviet-style reel-to-reel tape recorders;
- DVD players;
- washing machines;
- angle grinders;
- electric sewing machines.
The last option is optimal because it is possible to adjust the speed over a fairly wide range using the built-in rheostat.
For domestic use, a drill with an idle engine speed of up to 6 thousand revolutions per minute is sufficient.
Holding an electric motor from any of the listed types of equipment in one hand is inconvenient, and in most cases it is simply impossible. Therefore, you will need a flexible shaft for the engraver. In this case, the general view of the future device will turn out approximately as in the photo below.
The functionality of the created engraving device will depend on the materials and mechanisms used during assembly. The motor can be placed on a table, but it is more convenient to make a tripod for the engraver, or rather something similar.
Manufacturing of flexible shaft
With a flexible shaft everything is relatively simple. It can be done in several ways:
- from an old drive shaft, for example, from a dental drill;
- using the speedometer cable of a motorcycle or car.
The working attachment on the shaft can also be used from a drill or made independently from different materials, for example, wood, textolite, plastic pipes. A device (handle) for holding the equipment is made from textolite as follows:
- cut 2 textolite platinums (sheet thickness should be about 1 cm) measuring approximately 2 by 10 cm;
- connect them together and grind them with a file or emery from the outside to form a cylinder;
- grooves are machined from the inside;
- metal rings secure the parts to each other;
- a tube is inserted into the front part of the handle, under a cartridge consisting of two separate halves connected with a bolt.
The end result will be a handle like the one in the photo below.
The internal hole made between the textolite plates should be of such a cross-section as not to interfere with the free rotation of the cable. It will be possible to insert nozzles with shank diameters from 2 to 5 mm into the chuck.
Assembling the engraving unit
It’s very easy to make a tripod (a base for installing an electric motor) from plywood or the same PCB. To do this, do this:
- cut out several pieces (4 are enough) from a sheet of material corresponding to the size of the electric motor;
- a motor is attached to one of the fragments using clamps;
- assemble the box;
- A hole is drilled in the front part for the flexible shaft.
The created structure is hung on the wall.
It is convenient to use a factory holder on clamps for an engraver, if the dimensions of the electric motor allow. The mount connects to any table. But such a device will need to be purchased additionally.
Further assembly of the engraving device is carried out in the following sequence:
- using a coupling made from a drilled bolt, connect the cable to the electric motor shaft;
- put a rubber hose of the appropriate diameter on the cable and attach a handle made to it;
- install a start button;
- connect equipment to the network;
- check the functionality of the device made.
A homemade drill will allow you to process wood, bone, metal, glass, plastic, ceramic workpieces, as well as various metals, natural and artificial stone.
When creating homemade straight grinders, you can also use electric motors designed for 380 V, but if they can be adapted for 220 V. In such cases, you will need to tinker a little more. There is a lot of information on this issue both on the Internet and in books on electrical engineering.
Decorative sanding attachment
Also, someone might find a similar attachment useful for decorative sanding made from ordinary cork.
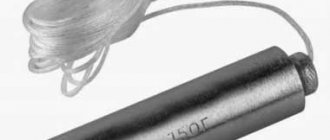
Take the prepared cork and screw a self-tapping screw without a head into its center.
Place a washer on the self-tapping screw and glue it to the base of the plug.
The chuck's jaws will prevent the screw from screwing deeper into the plug during operation, as they will rest against the washer.
Source drasler.ru
I recommend the following video, where the author makes several interesting homemade attachments for the engraver with his own hands:
How to choose cutters
The choice of such a tool depends on the intended work, what material will have to be worked with, and what specific operations are expected to be performed. Modern tools, as a rule, are all powered by electricity, where high speeds are maintained.
Therefore, when choosing a cutter, you should take into account the characteristics of an electric drill or screwdriver, their power and rotation speed. Surface treatment often depends on the chosen type of cutting of the cutter teeth, which can be:
Using such a tool makes it possible to obtain a perfectly flat and smooth surface. In addition, much less time will be spent on such work, and the cutter head itself will serve for a long time.
There are burrs in which the head can be double sharpened, which has a positive effect on the efficiency of the processing of any metal surface.
But in order to always have the right cutter on hand, experts recommend purchasing sets that contain several types of burrs with different head shapes, differing both in material and in the method of sharpening them.
Application area
Using cutters equipped with sharp teeth, grinding wheels are dressed, the dense structure of which consists of abrasive grains of minimal size. If, with the help of sharp-toothed cutters, you start dressing wheels made of abrasive grains of medium and coarse fraction, then the dressing tool will simply ruin their working surface, causing serious damage to it. In such cases, a blunt-toothed cutter is used, specially designed for dressing medium- and coarse-grained abrasive wheels.
The high efficiency of using star cutters is ensured by the fact that processing with their help is carried out at a high rotation speed. It should be borne in mind that the dressing of grinding and grinding wheels is carried out not with one cutter, but with a whole set of them, placed on a special axis equipped with a lubricating nipple.
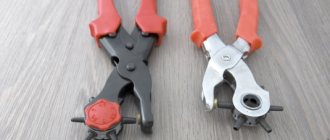
Special holder for cutters
Considering the fact that the roller-cone tool experiences serious mechanical impact from the abrasive wheel during use, its working part must be subjected to high-quality hardening.
Tips for treating various surfaces
Large industries have their own instructions and requirements on how to use burrs, but our task is to tell you, dear readers, how these devices should be used in everyday life.
Stone cutter
When processing stone surfaces, be it natural stone or artificial, which can be ceramic tiles, porcelain stoneware or marble, it is necessary to wet the treated surface with water.
And here it is important to ensure that moisture does not get on the operating power tool in order to eliminate the risk of electric shock. Supply wires, cables and their connections must be well insulated and located away from water.
Wood cutter
When processing surfaces made of wood or similar materials (multi-layer plywood, chipboard, fiberboard), cutters that have large notches or teeth are used.
In addition, it is necessary to choose the correct operating mode for an electric drill or screwdriver, because when working at high speeds, such a side effect as setting the tree on fire is possible.
Each power tool has a dial for adjusting the number of revolutions. If you smell burnt wood, you should quickly reduce the speed.
Roller cutter for ceramics and glass
Working with materials such as glazed ceramic tiles or glass requires special care and attention. First, you need to make the outline of the required hole on the surface using a forma-y cutter, after which the hole is selected with a roller cutter, the head of which is made in the form of a ball.
Cone manufacturers
Burrs today are produced by many companies and enterprises, both in our country and abroad. It is possible to order burrs according to an individual drawing. Since the scope of such a tool is large, it is not always possible to find the required analogue on sale.
Domestic manufacturers
Among the domestic manufacturers, we can note such enterprises producing cutters as:
Foreign manufacturers
Among the most popular foreign products are products for grinding and other plumbing work from companies such as:
Watch a video on working with burrs:
Whatever manufacturer you choose, do not forget that you may always need more than one cutter, so it makes sense to purchase sets of these devices so that each individual case has its own burr.