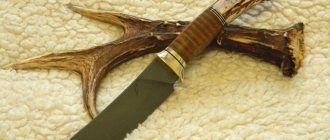
A wooden ladder, or how to make a necessary household item with your own hands, we’ll look into it below.
Extension ladder - this simple tool is often needed by people who have a dacha or live in a private house. With its help, it is easy to repair the roof, harvest fruit trees, and update the façade of a building. At the same time, a metal structure is usually much heavier than a wooden one; it is difficult to make it yourself without complex special tools and skills. A wooden product, with the right choice of material for its manufacture, will last for many years, and almost any owner who is accustomed to ordinary men’s housework can make it.
Requirements for ladders
The design of wooden ladders is regulated by GOST 26887-86, where clause 7.4.25 reflects the general technical conditions that it must comply with.
There are a number of requirements for these stairs
An extension ladder should not be more than 5 m in length; such a structure is made from high-quality hardwood timber. Bars with a core are not used for steps. The distance between the strings (vertical posts) is from 45 to 80 centimeters. The height of the first step should be no more than 40 centimeters.
The distance between the steps is also regulated; it can be from 30 to 34 centimeters.
If the attached structure is intended for installation on loose soils (for example, during gardening), metal fittings with pins are installed at its ends, allowing the product to be securely fastened in the ground. For work indoors or on a hard, smooth surface, rubber pads or shoes are attached to the lower supports of the ladder.
Often the upper edge of the stairs is equipped with metal hooks so that the structure can be further secured if necessary.
In this video you will learn how to make a similar staircase:
At the level of the lower and upper steps, and for a long length - every 2 meters, the bowstrings are additionally fastened with tie bolts.
The height of the first step should not exceed 40 centimeters.
For production, wood is selected that is free from cracks, knots, resin pockets and other defects. Coniferous wood is usually used.
All elements must be sanded to avoid burrs and treated with protective compounds to prevent rotting and mold, this will significantly increase the life of the product. Since the design is subject to increased danger during operation, you should be very careful about the recommendations for manufacturing and selection of materials.
Attaching support posts to the floor
Support pillars are vertically located load-bearing elements that form the basis of the frame of the lower part of the staircase. They provide support for the winder steps (landing) and the stringer (string).
There are no special requirements for the wood of the part - the main thing is that it is uniform, without cross-layers and large knots. Typically made from the same type of wood as the rest of the staircase.
In order for the future structure to be strong and reliable, the pillars must be firmly secured. This can be done using steel angles, studs, zip bolts, wood glue and other devices - there are a lot of options.
Finally, it is recommended to connect the columns with supporting stiffening beams.
Of course, by this time, all the technological holes and grooves for other elements of the staircase should already be made in the pillar structure.
Pros and cons of wooden stairs
When choosing a wooden structure, people are usually guided by the following criteria:
- low cost of necessary materials;
- ease of self-production;
- low weight of the structure;
- many owners prefer to use products made from natural materials in their home and garden;
- minimum tools for work;
- dry wood is a dielectric; a wooden ladder is safer for electrical installation work.
However, it should be remembered that such a product also has disadvantages:
- wood is a less durable material compared to metal;
- In order for the ladder to serve for a long time, it is necessary to store it in dry, ventilated areas;
- Over time, a wooden staircase dries out and loses its visual appeal;
- In order for operation to be safe, the strength of the structure should be checked every six months - there should be no deep cracks or signs of rotting.
If the staircase is made from high-quality materials, do not forget to treat it with protective compounds and store it properly, it will serve the owner for many years.
Regulatory documents that reflect the requirements that such stairs must satisfy
A wooden ladder, including one made by yourself, must meet the requirements reflected in the following documents:
- GOST 24258-88 “Technical conditions for scaffolding and temporary structures”;
- GOST 26887-86 “Stairs and platforms used for installation and construction work.”
The staircase will be more stable and safer to use if, during its manufacture, the sidewalls are not parallel to each other, but are made to converge upward. But in this case, the steps will be of unequal length, which means that making calculations and manufacturing the structure will be somewhat more difficult. It is more correct and safer to climb up or down such a structure by grabbing or holding on to the bowstrings rather than the crossbars.
Calculation of staircase strength
It is not difficult to make a wooden ladder with your own hands; the structure can be straight or slightly widen towards the bottom, then it will be more stable. To determine the required number of steps, the length of the string must be divided by the distance between the steps. The resulting value is never a whole number; the remainder is added to the distance from the beginning of the stairs to the first step.
For clarity, before starting work, you should draw a diagram on which you should note the number of steps, the distance between them, and the places where the ties are attached. If difficulties arise with the execution of the drawing and calculations, you can look for ready-made calculations on our website. It should be borne in mind that too small a distance between steps will make the climb inconvenient, and too large - dangerous for the worker. Strength calculations are made using formulas that are easy to find on our portal.
If you don’t want to bother with this, you should refer to the GOST requirements: for bowstrings up to 3 meters, use bars with a minimum cross-section of 40×50 mm; over 3 meters - 40×80 mm; for steps - 35x40 mm. Strength tests are carried out annually: alternately, a weight of at least 120 kg is loaded onto each step, installed at an angle of 60-75°.
Don't forget to calculate the strength of the stairs
Lightweight portable ladder
You cannot make a wooden staircase without knowing its dimensions. We took the tested ones - 150 cm height, 52 cm width of the lower part, 40 cm width of the upper part. To assemble a portable ladder with your own hands you will need:
- Bars size 6x3x150 cm, 2 pcs.
- Boards size 6x2x47, 4 pcs.
- Hand router or chisel
- Self-tapping screws 75mm, 16 pcs.
- Protractor
- Roulette
- Pencil
- Ruler
- Hacksaw for metal
- Kiyanka
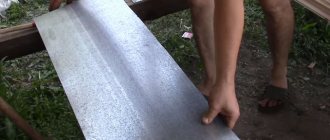
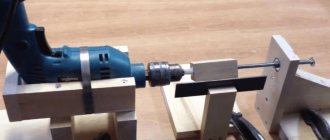
Marking the space for the grooves of the steps
The beams will serve as the supporting part of our stairs and the first thing to do is to mark the grooves on them for the steps. The step size (distance between steps) is chosen to be 35 cm, and the step angle is 105 degrees.
To do this, take a tape measure and a pencil, apply the tape measure to the wide part of the block (6cm) and measure 35 centimeters from the bottom. We put a mark “A” on the edge of the block, this will be the beginning of the groove for the step. From the mark set, we measure another 2 cm and put a new mark “B”, this will be the width of the step. See Fig.1.
Fig.1
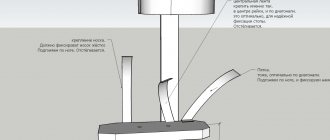
Now our task is to measure the angle of inclination of the step and put 2 more marks on the opposite edge of the block. To do this, take a protractor, place its center at point “A”, look for an angle of 105 degrees on the divisions. Then we apply a ruler so that a line is formed between the center of the protractor and the 105 degree division. In the place where the opposite edge of the block will connect to the ruler, place the mark “D”. We do the same with the marks “B” and “C”. When we have all 4 points, under the ruler we connect them with lines, “A” and “D”, “B” and “C”. The place for the groove of the first stage is ready. See Fig.2.
Fig.2
It is not necessary to use a protractor to mark subsequent steps. It’s enough just to measure 35 centimeters up from each of the previous points and put new 4 points, and then connect them with lines in the same way.
We do the same with the second supporting part. Or, in order to save time, after taking measurements on the first block, you can place two supports end-to-end and move the marks on one side. Afterwards, attach the second support to the other side of the first support and copy the marks from there. All that remains is to draw lines between the points.
Cutting grooves for steps
If after difficult measurements you haven’t given up and given up the idea of making a stepladder with your own hands, let’s continue. Using a hacksaw for metal, along the drawn lines on the bars, we make light cuts, thereby creating a kind of guides. Then we set the depth to 5mm on the router and make a selection along our guides. If you don’t have a hand router, you can use a chisel, remember that the groove depth should be 5mm.
We measure the first and last step
Since our staircase is wider at the bottom and narrower at the top, we need to know the length of each step. To do this, it is enough for us to know the dimensions of the first and last steps. To find out the size of the first step, we need to take the width of the stairs at the bottom 52 cm and subtract the thickness of the supports 3 cm. But since we made grooves, we need to subtract the depth of the groove 0.5 cm from the thickness of the supports, we get 2.5 cm. As a result, from 52 cm, we subtract 2.5 cm twice (since there are two supports), the length of the first step will be 47 cm. For the last, highest stage, we perform the same calculations. The width of the top of the stairs is 42 cm, so 42-2.5-2.5 = 37 cm. If you have already prepared boards of the specified sizes according to our list, then you do not need to cut anything from the first step. You only need to cut 10cm from the last step to get a board 37cm long. Otherwise, make two boards 47 and 37cm respectively. To obtain the dimensions of the second and third steps, we need to do preliminary assembly.
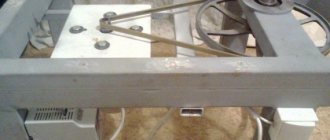
We do preliminary assembly
We lay one of the supports on a hard surface so that the grooves for the steps are on top. We take the first step, insert it into the first groove and hammer it in with a mallet until it stops, then do the same with the last step, but hammer it into the last groove.
At the place where the step will be inserted into the groove, you can remove the edge with a chisel, this will make it easier to install the steps.
We take the second support and place it on top of the protruding steps, observing the grooves. All that remains is to nail the support beam with a mallet to secure the structure. To prevent the steps from moving out, we secure them to the outside of the supports with self-tapping screws. 4 screws for each step, 2 on one side and two on the other. Part of our staircase is ready, all that remains is to measure and install the second and third steps.
We measure out the remaining steps
Now that we already have a finished structure, we can measure the length of the remaining steps. To do this, we take our boards and apply them to the corresponding grooves, and mark everything that does not fit into the groove with a pencil and then cut it off. Of course, you can use formulas and initially calculate the size of the steps, but this method has one drawback. If during the calculation process, or when cutting out grooves and steps, an error is made, even by 1-2 mm, your steps may turn out to be shorter or longer than they should be. And if the long ones can be trimmed, then the short ones can no longer be used in this design.
Final assembly
To complete the structure, all that remains is to mount the remaining 2 steps. To do this, we place our structure on a hard surface with the front side facing us. We install the steps into the grooves and carefully hammer them in with a mallet. We also secure it on the sides with self-tapping screws. Our portable wooden ladder is ready.
If the steps become loose during operation or you simply want to strengthen the structure, you can install corners under the steps on both sides and place them on 4 self-tapping screws, 2 in the step and 2 in the supporting structure.
Application of portable ladder
Most often, a wooden staircase is used in a country house or country house. For example, a stepladder for wells will help carry out repair work in hard-to-reach places. But garden ladders of this subspecies are used for pruning trees.
Tools and materials
For work you will need high-quality, dried wood without cracks, knots and other defects. The following will be useful for work:
- hammer;
- chisel;
- saw;
- electric drill and drills;
- grinding machine or sandpaper;
- tape measure and pencil;
- bolts for screed.
Additionally, a screwdriver and a workbench may be useful. If the steps of the stairs were fastened with nails or self-tapping screws, you should be especially careful during operation. Metal elements are subject to corrosion and can become loose under load.
Video description
And here is an interesting video on making a wooden staircase structure of a different shape:
Performing "notches"
350-400 mm retreat from the lower ends of the stairs and mark the lower limit of the first step fastening on the support beams. This action is repeated every 400 mm. All other rungs will be fixed at this distance.
Transverse cuts with a depth of 20 mm are made at the marks. Above them, at a distance of 50 mm, places are marked in which a chisel or sharp ax is then installed. Using these tools and using a hammer, a piece of wood is split off at an angle of 300. As a result, steps are formed at all marked places. They are treated with anti-corrosion compounds, such as paint.
Manufacturing of rung steps
Take bars whose length is 600 mm. Excess parts of such blanks are cut off, but only after they are secured. For example, if a five-meter staircase is being manufactured, 15 blanks are used.
Manufacturing instructions
It should be remembered that the obvious way to make an extension ladder with your own hands - simply placing steps on top of parallel vertical posts - is incorrect and dangerous.
The structure is made from dry, first-class bars. Before starting work, the wood is treated with an antiseptic and dried. When making a folding ladder or stepladder, special hinge joints are additionally purchased. With their help, it is easy to build a folding structure that is convenient to store.
Content
- Introduction
- Wood grain direction
- Wall stringers
- External stringers
- Attaching the stringer to the ceiling
- Connecting stringers to each other
- Attaching steps to a string - methods
- Methods of fastening balusters
- Installing railings on stairs
- Attaching the handrail to the pole
Types of connections
Tenon and groove
The safest and most correct for an extension ladder is the tongue-and-groove connection.
Spikes are made along the edges of the bars for the steps, grooves are hollowed out in the string bars at the pre-designated locations of the steps. The grooves and tenons are treated with high-quality glue, after which the tenons, for greater joint strength, can be wrapped in 1-2 layers of bandage and glue applied to them again.
The structural elements treated with glue are connected. The fastening must be tight. Pinch bolts are installed under the bottom and top steps of the stairs. They must be secured with nuts and large washers. If the staircase is long, then additionally such bolts are installed every 2 meters.
Inset
This is a simple and accessible way for almost everyone to make an extension ladder with their own hands.
In this case, using a chisel, a sample is made for each step. The step bars are tightly installed into it and secured with nails or self-tapping screws. The screw caps are completely recessed. It is necessary to pay special attention to the quality of hardware for such a design. In this case, the screws should not be painted over so that they can be easily replaced if necessary.
After manufacturing, hooks are installed on it. In the case where the product is supposed to be installed on different bases, the brackets with pins and anti-slip shoes can be made removable.
Important design features
Unlike a sliding or folding ladder, an extension ladder has a very simple structure. It is a one-piece structure consisting of two long wooden blocks and steps.
Side beams or bowstrings act as supports for the structure, which are connected by crossbars. Such a product assumes the absence of any mechanisms, so anyone can make a staircase without certain skills and knowledge.
Installation of fences
The finished look of the staircase is given by auxiliary elements. Fences can be used both carved and smooth, steel or wooden figured.
Installing supports with wooden balusters is a rather difficult task, requiring precise marking and adjustment.
The hole in the step for the dowel is assigned at a distance from the edge, taken to be 1/2 of the width of the baluster base. Next, holes are made and dowels are glued inside. They rise above the surface by 10-15 mm.
All elements are mounted on dowels with vertical level adjustment. Next, prepare the handrails by cutting the edges at the desired angle and milling them from the bottom. To connect to the supports, holes are drilled at the edge of the element. The handrail is installed on a dowel glued into the support post.
When preparing handrails, their edges are cut at the required angle and milled from the bottom. To connect the railings to the posts, holes are drilled on the edge. The wooden railings are installed on a dowel inserted into the support post.
The balusters are coated with high-quality glue, and railings are placed on top of them in the existing groove. Despite the high reliability of the resulting connection, it is recommended to additionally strengthen the joint with small self-tapping screws.
After the glue has dried, the stairs must be coated with an antiseptic primer, then the surface is treated with transparent varnish or paint. You can install a decorative plinth. In a spiral staircase, you can design it with an axial support in the form of a log or beam, or install a bent string to support the steps. The price of such a design will be high, since viscous flexible wood is used in production, but the final effect is worth it.
When choosing a staircase with a complex configuration, be prepared for some difficulties in everyday life: for example, it will be difficult to move bulky furniture up the stairs. You should not skimp on fencing by sparingly placing balusters: the safest distance is considered to be no more than 15 cm.
Assembly steps
- First, a trial assembly is carried out with your own hands to eliminate possible defects in the stairs;
- After final fitting, the wooden parts are treated with a special antiseptic solution to protect the wood from damage by fungus and mold;
- The ends of the steps and the inner surface of the grooves are coated with glue and tightly fastened, as shown in the photo;
- To increase the level of reliability, the steps are additionally fixed with screws on the outside. In order not to spoil the aesthetic appearance of the stairs, it is better to recess the heads of the screws into the beam by 5-8 mm, and fill the resulting recesses with putty;
- Then the staircase undergoes finishing treatment - varnish or paint.
Let's sum it up
There are many design options for lifting products and materials used to equip them. The steps of the stairs, which are installed on a bowstring, look especially beautiful. And thanks to modern technologies, this design has become much stronger and stronger, which makes it possible to extend the service life of such a structure.
The width of stairs recommended by professionals in individual houses is 1300±200 mm.
Protective treatment of wooden staircases
In order for an extension-type wooden staircase to retain its appearance for a long time, the structure is treated with special means to protect the wood. Substances prevent bacteria and microorganisms from penetrating into wood fibers. Therefore, the material does not rot and its strength does not decrease.
For processing, deep penetration impregnation and wood varnishes are used. The order of their use is as follows:
- First, a thin layer of impregnation is applied. It takes 1 to 2 hours for it to dry completely.
- Then the structure is covered with a second layer of impregnation. Within 2 hours, the applied material also partially dries.
- Then the wooden equipment is treated with varnish, which will improve the appearance of the device. The surface of the stairs will begin to shine. The treated structure can be used after 24 hours.
Protective treatment of an attached folding ladder made of wood Source stroiremdoma.ru
If the product is periodically re-varnished, the wooden indispensable device in the summer cottage can be used for 10 years or more.
Marking the load-bearing beam for carpentry under the stringer
The steps for marking a beam or board are as follows:
- Using a square with a right angle, we mark the locations of the cutouts for the steps. After marking the first step, moving the square along the length of the workpiece, we mark all the corners for the steps, which we then cut with a saw.
Making markings for cutting the first step (step)
- We make markings at the bottom step, taking into account the fastening of the supporting structure to the floor.
We mark the bottom step for joining with the floor with a square
- We mark the upper step of the stringer to join the ceiling opening (the supporting beam of the opening).
Marking the top step