A table with a ceramic tile top looks very presentable in any room, and its practicality and convenience leave similar tables made of other materials unrivaled. A ready-made table with a ceramic top costs quite a lot, and you may not like its color. A good option for purchasing such a piece of furniture is to make it yourself. Moreover, anyone who is comfortable with tools can do such work. The result of your efforts will be an exclusive table, which certainly none of your neighbors will have.
Having used the following recommendations and prepared the necessary materials, feel free to get to work.
Country table with tile top in frame
Decorative tiles can be purchased new in stores. One of the best producers is Italy, but Russia and Malaysia are no worse.
The most economical option is to use leftover tiles from a kitchen or bathroom renovation.
For the labor process you will need:
- Standard square ceramic tiles;
- Tile adhesive;
- Crosses for styling;
- Grout for joints;
- Respirator mask;
- Sponge;
- Sandpaper or sanding machine;
- Pencil;
- Ruler;
- Hammer, nails;
- 4 wooden planks for tabletop passe-partout;
- Wood varnish.
What tools will you need?
To lay ceramics in this case, you will need the following tools:
- Grinder with a diamond wheel - for cutting tiles. A grinder will cope better with dense porcelain stoneware or thick floor tiles, as well as with shaped trimming.
- The tile cutter will cut straight strips and will not produce much noise or dust.
- You will need a jigsaw to update the countertop and cut the wood boards to the desired size.
- A set of spatulas: rubber for grouting joints and regular metal for applying glue to the base.
- Level: the cladding must be in the same plane. You can't do without a level.
Step-by-step instruction
- First, the countertop needs to be cleaned and thoroughly sanded, not forgetting to wear a protective mask so as not to inhale dust. If the legs and supporting structure require restoration, they are also cleaned for subsequent application of a special varnish.
- Existing chips are repaired with putty.
- The cleaned surface of the furniture is primed to protect the wood. Allow to dry and sand again with fine sandpaper (for adhesion).
- Next, use a ruler and pencil to mark the layout of the tile squares and the location for the frame. It is better to first make a template on paper and then transfer it to the surface. Or mark out the entire drawing with one tile. To do this, place it in the center, outline it with a pencil and then, rearranging the square, outline the entire surface.
- Using special glue, they begin to lay the tiles, not forgetting to insert crosses between the elements for even laying.
- First lay out the central row, and then all the rest.
- Next, add epoxy grout for the seams (it is considered the best quality and safest for health), remove the holders and seal the seams.
- Wipe the surface of the table with a damp sponge and dry cloth.
- A frame is installed on nails or using wood glue, which is then covered with colorless varnish (or tinted).
The tabletop is allowed to dry for at least 10-12 hours. After which the table is ready for use. The good thing about a ceramic countertop is that you can safely place very hot kettles, pots and pans on it - nothing will happen to it.
Advantages of tile products
Ceramics or porcelain stoneware cannot be called a new solution for finishing the kitchen area. But this is an unusual way to decorate a work surface. It is easy to highlight the advantages of tiles:
- practicality of ceramics - it is easy to wash and clean. No special detergents are required to clean the countertop. It is recommended to use compounds without abrasive additives;
- withstands temperature changes. You can safely put on a hot kettle or put out frozen food;
- moisture resistance is a guarantee that over time the work area does not deform from moisture;
Tile countertops are a great idea
To cosmetically update the table, just refresh the grout at the seams. Such minor repairs will not even require dismantling the surface. And if you choose silicone of a different color, the entire kitchen will take on an updated look.
Ceramic coffee table
A small and old square table for tea drinking, which was about to be thrown away, can easily be turned into new exclusive furniture using ordinary ceramic mosaics.
After renovations in the bathroom or kitchen, several pieces of whole or split slabs are often left: they are quite suitable for mosaic decor.
Prepare for work:
- Sandpaper with grains of different sizes;
- Solvent for varnish and old paint;
- Ceramic tiles of two samples - light and dark shades;
- Hammer;
- Tile adhesive;
- Grout and spatula.
The work ahead is like this:
- First you need to remove the old paint and varnish with solvent. The liquid is carefully applied using rubber gloves. Leave for 20-30 minutes and remove the corroded varnish with a cloth or sponge.
- Next, the surface of the tabletop is treated with abrasive paper for better adhesion to the finishing material.
- The tiles are placed in a plastic bag and broken into pieces of different sizes with a hammer.
- On the tabletop, with a simple pencil, draw a pattern: waves of different sizes (you can lay out the pattern in three levels: the first light, then dark and again a light tone).
- The work of gluing each mosaic element is very difficult, painstaking and energy-consuming, but the result is worth it.
- The ends of the table are also covered with tiles.
- After all the mosaic elements are fixed with glue, it is necessary to go over the voids between the fragments with grout.
- They let the masterpiece dry and proudly bring it into the living room to the admiring exclamations of the household!
Drying and stripping
For drying, the forms with the solution are placed in one row on racks. “Drying” is a common name for this stage, which does not reflect reality.
In fact, it is not the removal of water that occurs, but its reaction with cement, therefore it is important to prevent intense evaporation:
- forms protect from sun and draft;
- covered with polyethylene;
- In hot weather, periodically sprinkle with water.
It is also useful to line the walls of the drying room with polyethylene to maintain high relative humidity. The tiles are laid somewhat differently when using a hardening accelerator. As already mentioned, this additive causes the solution to heat up and to retain heat, several rows of tiles are placed one on top of the other, then the stack is covered with a tarp.
Plywood sheets are laid between the rows. Wooden and metal forms will withstand such a load; if they are made of plastic or silicone, each form is placed in a frame made of bars or metal profiles.
The modules are removed from the molds after the following period of time:
- when using a hardening accelerator: 24 hours;
- without accelerator: 2-3 days.
The formwork is removed carefully; the module should not be knocked out. A soft form made of plastic, rubber or silicone is slightly bent at the edges so that it comes unstuck from the tile
Next, the form is turned over, allowing the module to fall under its own weight onto a floor previously covered with a soft cloth. You can help it by lightly pressing on the bottom of the mold.
Metal and wooden forms, as was said, are best made detachable. One-piece forms are placed upside down on a frame specially made to fit the mold and lightly tapped with a rubberized hammer. The tile will fall to the floor under its own weight.
The advice of some users to remove modules on a working vibrating table has not been confirmed in practice: the tiles sit firmly in the molds and cannot be released without outside help. Forms with traces of solution are washed with acid before new use.
Rectangular kitchen table with ceramic top
A rectangular kitchen table with surfaces worn out from time to time is restored, decorating the tabletop in a new way - with a pattern of ceramic tiles.
Whole squares of tiles are laid out on the central part of the table, and on the sides and edges - a mosaic of pieces of cut layers.
Of course, you can buy ready-made mosaic tiles in bulk or on a backing in a store, but the prices for this type of finishing material are high. Or you can cut small pieces from old tiles using a tile cutter.
To create the decor, you will need a standard set of tools and materials, as well as for restoring and decorating previous furniture samples.
- On the prepared tabletop, using two tiles, a pencil and a large ruler, mark the future drawing.
- The tiles are arranged in a horizontal line of 2-4 (depending on the dimensions of the furniture) or in diamonds in two rows (as you like).
- After the diagram is applied, they begin to glue the squares, placing cross holders between the plates.
- When the whole elements are glued, assemble the mosaic around the large elements from small square pieces, not leaving out the wide edges of the tabletop.
- The penultimate stage is rubbing the seams and voids between the mosaic elements with mortar.
- And the final stage is to go over with a damp sponge and rag to remove any imperfections and dirt.
The chic kitchen table is ready! You can cover it by pouring hot soup into plates and not be afraid of ruining the surface. The family will be very happy!
Grouting joints
No matter how hard you try, you will still get a thin line at the junction of the tiles, so purchase grout in advance. It is better to buy materials based on epoxy resin: they have increased resistance to all reagents, fats, oils and temperature changes.
You can buy them at any hardware store, it’s better to be guided by the cost. The price for quality products will be a little higher, but they will last longer.
Most often, products are sold in the form of two components, which are mixed together in a separate container and are immediately ready for application.
Grouting tips:
- Use small rubber spatulas to thoroughly coat the joint without damaging the tile.
- To simplify the process of cleaning the surface of porcelain tiles from grout, you can use masking tape. It glues easily and does not leave streaks: glue it along the entire length of the line you are going to process.
- It is better to remove dried grout after a day.
Metal square garden table decor
Metal furniture is first painted with a special paint, using an aerosol for painting or dipping it into the paint with a regular dishwashing sponge. The dried table is covered with glossy varnish.
- Then glue is applied to the cleaned and degreased surface of the countertop with a wavy spatula and the tiles are laid out in rows.
- The glue dries very quickly, so apply to small areas.
- All seams and irregularities are grouted with black grout (if the furniture is painted black, and light grout if the metal is white/beige).
If you wish, you can radically update the color scheme of the furniture - paint it a different color (white, for example) and select the tiles for the tabletop taking into account the shade of the legs and the supporting structure of the table.
Recommendations for choosing material
Basic principles of using a square:
- It is preferable to line the tabletop with glazed products. This is the easiest material to maintain. Such elements are resistant to loads, temperature changes, and pollution. The main accent of the interior will be shiny squares;
- The non-standard tile relief or texture will appeal to fans of original types of finishes. Caring for such products is more difficult and takes longer. Removing dirt from your countertops will require different cleaning products, time, and extra effort. The cleaning procedure will be simplified by brushes and special metal sponges;
- the optimal size of squares for finishing a work area is 15x15 cm. To visually expand a small room, it is advisable to lay them out in sizes 10x10 cm or 5x5 cm. The mosaic canvas will also decorate a small kitchen in an original way and visually make the room more spacious;
A great idea is to depict a pattern or ornament made of chopped material (in the form of different geometric shapes) on the tabletop.
An original competitor to other types of finishes
- This is such a stylish interior design option that the room will not require additional decor. Products with too elegant bright ornaments are used in doses - you can decorate individual zones (sink, gas stove, small countertop). In this case, the work apron is made monochromatic;
- If you don’t particularly want to thoroughly wash your countertop every day, then it’s better to opt for multi-colored material. On a plain surface, dirt and minor damage are immediately visible (especially on dark-colored materials).
If other surfaces (floors, walls) are also covered with tiles, then it is recommended to take a closer look at the collections. Combining different materials (plastic, wood, ceramics) will make the work area functional and stylish.
With tiles, the room will not require additional decor
Mosaic for a round wooden table
Tools and materials for work:
- Several bags of ceramic mosaic tiles in blue, beige, orange, dark blue, green (swamp) colors;
- Tile adhesive;
- Sander;
- Abrasive paper (coarse and fine-grained);
- Light epoxy grout for joints;
- Varnish-stain for wood with a light light shade.
The wooden table is prepared: it is cleaned, puttyed, primed, cleaned again and the surface of the legs is varnished, and dust is removed from the tabletop.
- They take several bags of mosaics and lay out the drawing on the table to estimate the final result.
- And only after that they begin to glue one mosaic element at a time.
- A spiral pattern (lay from the center) or a chaotic pattern (suitable for beginners) looks beautiful.
- The edges are decorated using a tile cutter and nippers.
- When working, wear safety glasses and stretch your arms forward when breaking off pieces (they fly quite far).
After the tiles are completely laid and the end edges are glued, a light grout is applied to the surface. Remove excess with a cloth and a damp sponge. The table is ready!
If desired, ceramic tiles can also be glued onto glass countertops and plastic tables (using a special technology). You can update worn-out and boring tables by replacing the table top with tiled mosaics and tiles.
This decor has many advantages: budget savings, original author's design for little money and the creation of a durable coating with good performance characteristics!
What glue to use
Using standard cement-based tile adhesive is not advisable. Cement mortar has poor adhesion to wood. It is better to use acrylic or epoxy based glue.
It is more flexible and does not crack upon impact. It does not peel off when the wood gets wet, it is easy to apply and dries quickly. Holds ceramic countertop tiles well.
A very good option is to use Liquid Nails glue in syringe tubes, which is squeezed out with a special gun.
The glue layer should not exceed 2-3 mm. A thicker layer takes longer to dry and does not improve the strength of the connection between the ceramics and the countertop. In addition, if you lay the tiles on a thick layer of glue (mortar), you will have to use a level to give it a strictly horizontal position. Otherwise, moisture may accumulate in the recesses, and the tile may burst under mechanical stress.
The glue must be leveled with a comb spatula over the entire surface. You cannot glue tiles by applying adhesive in stripes or dots.
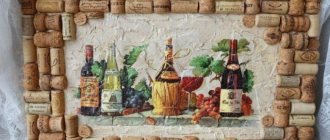
Photo of a table made of ceramic tiles
How to choose the style of the room?
The tabletop cannot be called a “capricious lady”. The surface of the table can effectively emphasize the sophistication of the kitchen set or “dissolve” against its background. It seems that the simplest solution would be to choose a countertop that matches the color of the facades. But it's not entirely simple. It is not always possible to find materials of the same shades .
There are no difficulties when installing monochrome furniture. But black will be sad, and white will be impractical. In this case, the set will visually look large and “monolithic”. To destroy these feelings, you will need bright decorative elements.
The choice of contrasting materials should be thoughtful and determined by the style of the room. A high-tech or minimalist interior can be decorated in black and white. A soft rustic mood will be better emphasized by a range of similar shades (sand/brown, white/blue, light green/green).
To create a harmonious environment, it is advisable to “link” the tiled countertop with other surfaces in the interior. A win-win way is to have the same finish on the table and window sill.
Rustic style
An excellent design move is to decorate the apron and tabletop with the same material. This duet in the kitchen can become one compositional solution.
The combination of floor finishing and work surface made of the same material looks original. Moreover, manufacturers often offer tile collections united by one shade or pattern. A stone union (squares of the same color on the floor and on the table) will give the kitchen a noble look. We must admit that such materials are not cheap.
Decoration with snow-white tiles
Sunny Mediterranean flavor
A kitchen decorated in a bright mood looks summery and joyful at any time of the year. Natural materials (wood, stone, metal) are used to decorate the kitchen. The range of natural shades (cream-yellow, greenish-sand, white-blue) evokes only positive emotions. The Mediterranean interior can be given a different character:
- in the Italian direction stone dominates. The material is used for finishing literally all surfaces (floor, walls, ceiling). Stone squares are incredibly convenient in everyday life and look very colorful. You can decorate the work surface with textured material. Suitable colors – gray, brown;
Stylish kitchen in dark colors
- The Spanish interior will be decorated with bright azulejo tiles. This unique material will refresh a wall near the work area or an apron in an unusual way. To prevent the kitchen from looking provocative or colorful, choose a plain, dark-colored material for the tabletop decor;
- Greek-style kitchens are characterized by the use of rough-finished wooden surfaces. White plastered/painted walls will highlight the natural grain of the wood. The kitchen decor looks somewhat laconic, but at the same time fresh and light.
When decorating a kitchen in a Mediterranean style, it is not necessary to create the decor in perfect condition.
On the contrary, some irregularities, chips, cracks will emphasize the naturalness of the situation.
Classic style
An excellent option for an Italian-style kitchen: the walls are plastered and painted with matte sand-colored paint. The kitchen apron is lined with decorative rectangular red brick tiles imitating brickwork. The tabletop is decorated with squares of sand-colored porcelain stoneware (to match the walls).
Appliances with chrome surfaces will dilute the brown color. The hood is made of the same metal. Light sand-colored kitchen facades will visually make the room lighter and more spacious.
Small square azulejo products will add unusual brightness to a Mediterranean interior with Spanish notes. Each square can be an independent picture or part of a national ornament. In order not to distract attention from the bright decor, single-color tiles are selected for the desktop.
To maintain the glossy shine of the wall surface, choose glazed ceramic squares or shiny porcelain tiles for the table.
When everything is in the same style and in the same color
The ascetic Greek Mediterranean style is distinguished by simple forms. The interior is strictly decorated, monochromatic light shades, combined with wooden elements, give the atmosphere coziness and tranquility . In such a kitchen it is pleasant to welcome guests and chat leisurely. The countertop, lined with square ceramic tiles, is easy to care for.
Installation nuances
Any construction process requires skill. If this is your first experience working with tiles, then it is better to choose a small countertop for renovation. The principle of covering walls and countertops is the same. The edges and ends of the tabletop are decorated with special ceramic corners or elements made of wood or aluminum. During repairs, several subtleties should be taken into account:
- To finish the countertop, you can specifically buy materials or use leftovers. When laying it yourself, it can be difficult to accurately calculate the amount of material. Therefore, it is necessary to buy tiles slightly larger than the table area required (about 10-15%). If several types of remains have been preserved, the surface is decorated in the form of a mosaic. Moreover, the elements are selected to be of the same thickness. And to cut mosaics they use a tile cutter;
- The table surface must be absolutely flat and clean. If the base of the tabletop is wooden, then it is treated with moisture-proof impregnation. For reliability, the base can be attached to the wall. The plywood base is made from two multi-layer sheets and attached to the furniture with self-tapping screws;
Stylish kitchen in a modern style