Hello! I was inspired by autumn applications and therefore here is a new selection of ideas. This is especially true for parents of children of kindergarten or school age.
This topic is also very interesting to me now, so I’ve collected it in my piggy bank. But before we get into the master classes and the ideas themselves, I want to express my gratitude.
I sincerely thank those artists who make the results of their creativity available to the public. I took some from social networks, links are in the photo. Of course, I don't wash them. I also thank the parents, whose wild imagination and sleepless nights allow us to save time and take a ready-made idea into implementation.
Let's start with simpler applications and move on to more complex ones. You will also find templates, diagrams and even coloring pages. Let's learn more about them.
I also invite you to view interesting ideas made from pine cones, such as hedgehogs, Autumn bouquets, crafts made from natural materials, creativity for children and applications from tree leaves.
Application on the theme “Autumn” for kindergarten, for children in middle and senior preparatory groups
So, my dears. Children love crafts and applications. Of course, preschool children are not very skilled yet. For example, they are still just learning to cut along the outline and color without going beyond the boundaries. However, I repeated almost all the ideas in this section with my 5-year-old child. Unfortunately, there were so many of them that I didn’t take pictures. Therefore, the photos were taken from the Internet.
I really like these ideas where you can use cotton swabs, cotton pads or pieces of sponge for drawing. For example, here is a tree with colored foliage.
We remember the peculiarity of children: they are still poor at using scissors and the cut out shapes may not turn out quite even and neat. It is precisely for such cases that this applique idea is suitable.
If the child is already good with his fingers, then you can stimulate fine motor skills by making such a tree. The photo below shows a detailed master class. I don’t give dimensions, and they are not needed, the idea itself is important.
It is better to glue paper blanks with PVA glue. It is considered one of the safest adhesive materials. Therefore, it is used in children's institutions.
Advice! It is better to make the strips on the “foliage” the same size, for example 1*5 cm. Then they will turn out neat.
We also made a similar application. The child really liked it. To depict autumn on a tree, you need to take paper from yellow to red shades. The barrel can be cut out of self-adhesive paper.
Advice! For this master class, select double-sided colored paper. Then the wrong white side will not stick out.
A ruler helped us fold the circles evenly. The child quickly understands this.
If it is difficult to cut out round leaves or there is no time for it. Then give your child cotton pads and paints. And let him paint these round pieces in autumn colors. This can be done with a pipette, brush, or by collecting colored water in a spoon. The pieces need to be glued after drying using the same PVA glue.
Advice! Tell your child that you can stack the discs one on top of the other and then the applique will turn out to be three-dimensional.
Below you can see a more refined idea. Instead of disks, ordinary cotton wool is used. And instead of the usual cardboard barrel, it was cut out of a sleeve. By the way, you will have to make the trunk yourself, because children usually do not have enough strength to cut such thick cardboard.
By showing your imagination, you and your child can learn the seasons at the same time. I use just this one idea, see below.
When we were children, we loved to draw with pastels. And then this idea caught my eye.
Pastels, by the way, are sold in most supermarkets in the stationery and creativity department.
The child takes a blank sheet of paper and draws any ornament by hand. Or you will already give him a printed template with a piece of paper. This is optional.
Take the desired pastel color and paint over the voids. You need to blend it with your fingers.
The next master class really helped us out for Easter. Yes! We took this idea as a basis, but replaced the leaf template with a rabbit. You can also come up with a craft for any holiday: New Year, March 8, February 23, and even Valentine's Day.
And everything is done simply. You need to take:
- sheet A4,
- scissors,
- glue,
- multi-colored paper.
Or use a template like this.
On the second sheet you need to glue strips of colored paper. They can be the same size, or they can differ in length and width. Also, it should not be positioned horizontally, but vertically or diagonally.
This is what you get on the reverse side. On the other you have a drawing of a leaf.
And cut the blank along the contour.
This is how applications can turn out.
Here are the templates for them.
In this master class you can bring your own changes. For example, instead of stripes, make a chaotic tear-off composition. Instead of paper, use table napkins with designs.
That's not all, see what happens in other sections.
Pumpkin
You will need: rolls of toilet paper or paper towels, scissors, twine or rope, stick, pva glue, for decoration - glitter or book pages.
Master Class
- Cut the sleeve into circles.
- Apply glue to one piece, sprinkle with glitter or glue a piece of page and leave to dry.
- Decorate with glitter or book pages with every detail.
- Gather the circles onto twine to form a pumpkin.
- Glue the stick into the middle of the pumpkin.
The pumpkin made from bushings is ready! You can find even more crafts made from bushings HERE.
Autumn applique for students in grades 1, 2, 3, 4 made of paper with templates
Well, now let's move on to more complex crafts. I’ll say right away that I took some from social networks, that’s why there’s a link there. If you're interested, type it into a search engine and look there. But here I have selected ones that are more suitable for schoolchildren.
For example, this application. It is quite complex and requires accuracy. However, a 4th grade student can definitely handle it.
Advice! Use double-sided paper.
I won’t describe the steps, everything can be seen in the picture. This template was used. Please note that the stem of the leaf is not cut off, but falls on the fold. This is fundamentally important.
Next is the master class “Autumn City” .
So, for houses you need to cut 7 roofs: 4 trapezoids and 3 triangles. Our houses will be in the form of rectangles of different sizes.
Place rectangles on the base and distribute them so that they do not completely cover each other. In other words, create a composition. After this, they can be fixed to the cardboard with glue. Then we put them on the upper sides of the roof and also fix them.
The leaves will be circles, which we will make with a hole punch from different shades. We also cut out tree crowns; they can be uneven in shape. And we finish the craft.
Use pieces of colored paper from which you made leaves with a hole punch. You can put together such a tree. Waste-free production is achieved.
The next craft is with a mouse.
Use this template.
Here's an idea for a fall harvest basket. Instead of paper, cotton pads, felt and foamiran are suitable for depicting fruits.
Here is a diagram for the blanks.
Do you want to laugh? Then it's time to sculpt such a positive acorn.
You need to take two sheets of paper: a brown shade and a yellow or orange one. We cut out two blanks. From a brown shade, a square with sides 6*6 cm. From yellow we make a rectangle 6*5 cm.
Fold the square in half and insert the short side of the rectangle into it. Glue them together.
Next, you need to give the bottom of the rectangle the shape of an acorn or bowl by cutting off the ends. We bend the edges of the brown workpiece on the wrong side.
We complete the remaining details with a felt-tip pen.
These are the beauties they turn out to be.
Next up are some cool umbrellas. This important element of autumn is reflected in applications.
Below is a step-by-step master class.
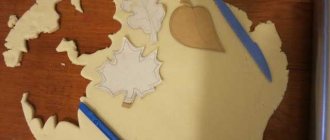
To make cones, it is convenient to first draw a circle with a compass. Cut it out. And then cut into 3-4 equal parts.
Leaflet templates can be used those presented in the lower sections of the article.
Based on this idea, such masterpieces are created.
And here is a voluminous idea with a maple leaf and umbrellas.
Advice! When you glue the umbrellas, go beyond the base.
This is the diagram that will come in handy for you.
Next in front of you is a cute dog with a romantic soul.
This is what the details look like.
Another voluminous idea in the form of a pumpkin. You've definitely done something like this before. There is absolutely nothing complicated here.
Cut out these parts. Place it on colored paper and trace it. You cut out the blanks or fix them on the base, as in the photo.
Advice! For pumpkin, choose several shades of orange, then it will turn out brighter.
Here is a version of an autumn umbrella with a squirrel.
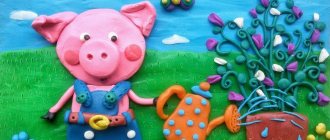
It can be painted and covered with plasticine. Fill the white voids with cereals, berries or napkins.
You will also like the mushroom basket.
By the way, the mushroom itself can be anything: from saffron milk cap to fly agaric.
A dress for the beauty of autumn will not leave any girl indifferent.
Here's a diagram for the details. The skirt can be made from toilet paper or a napkin. Just fold it like an accordion and secure the top part of the workpiece together. You can see it in the photo.
Warm tea is sorely missed in autumn. Typically, these are herbal drinks with lemon, cinnamon and ginger. This is what inspires.
Take the diagram.
By the way, the mug can be made in a single color!
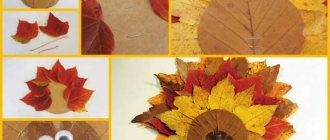
Open palms inspire confidence. We will also put autumn leaves on them.
Here is the palm template. You need two of them. One side is not cut off, but gets folded.
This is what it should look like on paper. The diagram of the maple leaf will be below.
The squirrel was amused. The work is painstaking, but very nice. I give it for inspiration.
Of course, the most important thing is that the squirrel turns out to be friendly and cheerful.
And then we add any design.
A voluminous basket with fly agaric mushrooms made of paper. They can also be repeated from felt or foamiran.
The leaves are folded like an accordion. Here's a sketch.
You can also take paper helpers. For example, bushings. Flatten them to make an oval. Dip the edge in paint and make imprints in the form of leaves.
Or use it completely in an application. The inside can be painted or filled with napkin balls.
Like here. Plasticine balls are also suitable for filling.
A little more children's creativity. Autumn spoils us with rain and clouds. This is what is shown below.
But nature itself is simply beautiful. Especially when the sun comes out. Therefore, we personify her in the form of a beautiful girl with an ornament of flowers, leaves and harvest.
To make the task easier for the child, part of the application can be drawn. And make some details voluminous.
The composition of the lower craft is interesting. The master made it against the background of a circle. And along the edge he let out branches and moss.
Older guys can repeat this beautiful idea.
Or this one.
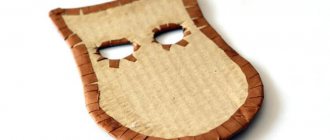
Well, at the end of this section, I’ll show you some cool hedgehogs.
Take a sheet of paper. Fold it in half. In the upper part of the half we draw the face of a hedgehog.
Cut out the nose along the contour.
And we fold the rest of the sheet like an accordion.
Glue both ends together.
Decorate them as desired.
Acorns
You will need: cardboard, scissors, glue stick, marker, templates.
Master Class
- Print out the lid template.
- Print out the box template.
- Cut them out.
- Make folds in the marked places.
- Fold the box and lid as shown in the photo instructions.
- Secure with glue.
- Make a small leaflet out of paper and draw a face for it.
- Make a whole collection of brightly colored acorns.
Acorn boxes are ready! I recommend watching this video!
Acorn made of corrugated paper. DIY. Acorn from paper.
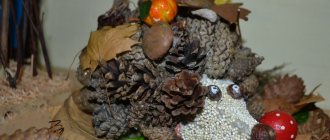
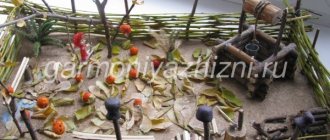
Volumetric ideas made from natural materials and tree leaves
Let's quickly run through this section and see how we can use nature's gifts.
Cereals, dried legumes and even pasta are suitable here.
To do this you need to draw a large picture. Apply PVA glue inside it, onto which you apply tightly to each other to fix the cereal.
Scales from pine cones will help you make a basket, and a hedgehog made from postcards will make the idea brighter.
Migratory birds have already created their wedges in the sky. So we will depict them from peas, buckwheat and seeds.
In autumn there is not enough warmth and sunshine, let’s make it ourselves.
The whole panel is made from pine cones and withered grass. Also use dried flowers.
The cones lend themselves well to coloring and are very similar to flower buds.
Another material for creativity can be pumpkin seeds.
They are applied to the drawing, fixed with PVA glue.
The seeds are also well painted with gouache. Only after this let them dry, otherwise the child will get all dirty.
Wheat harvests are also possible only in the fall. And they can also be depicted as seeds.
Pistachio shells will add texture and volume to the basket.
Next, let's look at rowan bunches. It is also well fixed with PVA glue. Just keep in mind that if you use fresh berries, they will begin to dry out after a couple of weeks. The berries will become smaller in volume and shrink.
You can lay out the fruits in a chaotic order or, conversely, tightly next to each other in even rows.
Or use bunches as accent elements.
But let’s look at rowan differently! Let's take it just for prints.
Don't have natural berries on hand? No problem, roll it out of napkins in red or bright orange shades. And stick it into the voids of this drawing. You can simply paint over the leaves and twigs.
Below are ideas for umbrellas we already know. But now their decorations are not paper, but real ones made of leaves, berries and dried flowers.
Next, I offer options for panels, for example, in the form of a woman.
Or a bouquet in a vase.
Below we will talk about what can be made from fallen tree leaves.
Lizard, lion and ballerinas - this is not the whole list of ideas. But they definitely deserve attention.
For ballerinas, take these diagrams.
And here is a selection of eagle owls. Just repeat the arrangement of the leaves as in the photo and you will succeed.
It is also easy to make applications from leaves in the form of fish.
The jackdaw is created from two maple leaves of different sizes.
Since we've moved on to birds, this bird will definitely win the work competition.
What else is there in autumn? Rain.
Even the leaves get wet from it.
The mushroom theme stands alone. Therefore, we make sure to make such gifts of the forest.
We looked at how we can use the material that nature provides. Below I will tell you what can be made from scrap materials.
Business profitability
Consistently high demand for paper and packaging materials makes it possible to establish a profitable business, but this requires a combination of the following factors :
- free straw in sufficient quantities;
- the presence of premises or land plots equipped for long-term storage of straw;
- electricity at a low tariff;
- water at a low tariff;
- location of the entire complex on its own land;
- availability of good roads;
- the presence of regular customers who are ready to immediately pick up the entire volume of products at a good price;
- availability of qualified personnel, especially technologists and equipment adjusters;
- sufficient funding;
- access to modern equipment at the lowest price (without a chain of intermediaries);
- good relationship with the leadership of the district, city and region.
If any of these factors are missing, then it is unlikely that you will be able to launch a profitable business. One of the problems that such a business will face is competition with existing pulp and paper mills (PPM) and other enterprises operating in this area.
Despite the very high price of traditional raw materials, that is, wood, they can reduce the cost of products due to :
- well-established technology;
- well-established logistics;
- established trade relations;
- use of waste paper and other types of secondary raw materials.
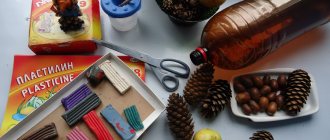
Ideas for crafts from scrap materials (plasticine, plastic)
Here I mean fabric, plasticine, disposable tableware and other accessories that can be found in almost every home.
Therefore, here is a master class on creating such a plasticine application.
First, draw the shape of a leaf. Then tear off a piece of plasticine and smear it inside the drawing with the pad of your finger. Next, cut out the blank along the lines and glue it onto the base.
Advice! For creativity from plasticine, take soft types.
The following photo depicts the crown of trees in the form of spirals. First, a long and thin sausage is rolled, which is twisted into a spiral.
A plastic disposable plate can become the basis for a mushroom.
Or warm the bird.
You can cut out animal details from a piece of fabric and paste them onto a piece of paper.
Another option is made of plasticine.
There will be a lot more interesting things to come.
Story
Paper is made not only from wood. In China, this material has been made from reed or rice straw for hundreds of years. In Russia, the first attempts to produce such paper date back to 1715.
Actor Woody Harrelson founded a company that produces paper from wheat straw. It promotes the production and use of this environmentally friendly and high-quality type of paper made from wheat straw. Woody Harrelson believes that using straw to make paper can help protect the environment more effectively.
Woody Harrelson with a book on making paper from straw
How to make a hedgehog?
Autumn hedgehogs are a very popular idea for creativity. Its needles can be depicted with leaves, seeds, plasticine, well, you will soon see for yourself.
Here is an application for little ones. With button decoration.
Or seeds and cereals.
Character from the cartoon "Tilimilitryamdia".
This template will come in handy.
The hedgehog bears rowan on its needles.
Parts in the shape of children's hands also form a composition.
Or from long strips that are glued together in the shape of a drop.
The circles we already know will also come in handy.
Just draw this cute animal using watercolor.
It is possible to cut out a handsome man from a postcard and decorate his needles with natural materials.
Also a fabric hedgehog.
Look at the finished results of children's creativity, taken from the school competition exhibition.
You may find these diagrams and drawings of hedgehogs useful in your creativity.
They can be painted, filled with plasticine or cut along the contour.
Creative approach
Drawing the attention of people passing by to a painting is quite simple; you just need to use your imagination or use existing tips from experienced handicraft lovers.
- You can highlight the foliage on the trees using wood shavings from a pencil of a suitable color. It is better to take thick copies of the product; thanks to the sharpener, you can prepare a sufficient number of elements and secure them to the base with a hot gun.
- The rod, which will crumble due to manipulation, should not be thrown away; if you crush it and rub it with a small piece of paper, the background will look just great.
When using improvised items, you should not give up on any small things; these components will not only add uniqueness, but will also add zest to the craft.
Making an autumn forest, trees and nature
But the most important advantage of autumn is the colorful trees. They just brighten up this slushy time. Therefore, we cannot do without images of forests and nature.
Let's start first with single trees.
Master class on making this curly tree.
You need strips 15*1 cm long. They need to be fanned out on the base. And having fastened one end to the trunk, begin to twist the strip so that it looks like a wave. We also fix the second end.
Glue pieces of colored paper onto them.
There is still a forest in front of you. Absolutely any texture and color of blanks will do.
Below is an applique postcard.
Try to depict the forest and nature with leaf prints. To do this, you need to apply gouache to one side of it. Press the painted side onto the paper, transferring the pattern of veins.
The same technique can be used for the “Autumn Outside the Window” master class.
Autumn will swirl you in these applications. And gouache will depict the wind.
Leaves glued in rows on top of each other are very similar to a forest of birches and fir trees.
Look at the variety for creativity.
Birch trees also look beautiful with their own yellow birch leaves.
The trunk can be drawn or glued from cardboard.
Next, the work “Wind”. It's also not difficult to repeat.
Also create an abundance tree with your own hands!
Use candied fruits, nuts, dried fruits, seeds.
The crown of the pumpkin seed tree is very iridescent and bright. The kids will love it.
Did you like the ideas? Below are diagrams and templates that you can use as a basis.
Preparing a “station” for making paper yourself at home
Before you start making your own paper, you need to set up an assembly line to ensure the process goes smoothly. Arrange all the necessary equipment in stages:
Stage 1. Blender: This is where warm water comes in handy. Stage 2. Basin: it should be filled with warm water about 7-8 cm. Also at this stage you will need a frame, deckle and Velcro tape. Stage 3. Draining the water: the felt, flat spacer and sponges should be right here, right next to the basin. Stage 4. Drying: Lay out several newspapers to dry the paper.
Now you're ready to make paper! Stock up on warm water, 8-10 sheets of scrap paper and start making paper with your own hands with your child.
Choosing paint for paper
Additionally, materials such as paints and markers, or colors of various tones of green may be useful. A sponge and sponge for applying paint will also be useful. These items will most likely be needed by those who decide to create quilling strips on their own. You can paint paper for grass, in fact, in any way - after some experiments and attempts to use different dyes, it will be easier to decide and choose those that are best suited for your work. Many craftswomen prefer to paint paper for grass with emerald paint on an acrylic base, or salad acrylic dye, and also use markers of 2 colors. Others prefer water-based colors over everything. However, the best results are obtained with the use of color.
Different shades of green
The grass can have any shape, thickness and color - it depends on your personal preferences and flight of fancy.
Accessories
Before you start making the craft, prepare the following:
- Thick and multi-colored paper;
- Scissors with a rounded cutting edge;
- Paste or silicate glue;
- Vatu;
- Wallpaper;
- Marker and felt-tip pens;
- Cotton pads;
- Drawing supplies.
Carved grass
For appliqués, the method most often used is to cut one edge of a wide strip. Children in kindergarten take a rectangular piece and, holding the leaf on one side, cut the second part with scissors, but not all the way, so as not to cut off excess.
Students will be able to make triangular cuts so that the grass is pointed at the top. It will be interesting to look at a craft on which paper grass is attached in two rows. It is advisable to use two different shades of green, then the work will look more voluminous. You can also add a tree to the grass, how to make it is described in detail here: https://fb.ru/article/354164/obyemnoe-derevo-iz-kartona-svoimi-rukami—poshagovoe-opisanie-interesnyie-idei-i-rekomendatsii .