November 30, 2022 ditim Home page » Reading Views:
The birthday of Baba Tanya, my mother, is approaching. Gifts from adults have already been purchased. But there is also a small family member (my son is 5 years old). For all the holidays together, we are happy to make gifts ourselves , and it doesn’t take much time. And so, in my spare time, I decided to look for fresh ideas: what to give as a gift to my mother . It turned out that in literally 5 minutes you can create original things with your own hands. We’ll leave the ideas in the article for now, but once we make it, I’ll be sure to post the result of our creations. By the way, these gift ideas are suitable not only for birthdays, but also for Mother’s Day and March 8th.
Simple technologies
Making easy DIY crafts for children is not difficult. You just need to decide on an idea, select materials and choose a method of processing them.
Usually in such creativity they use ideas that a child can implement. It could be something simple but entertaining: a drawing, an applique, a plasticine figurine, a composition of vegetables, etc.
Classes may require certain things, for example, spools of thread, needles, glue, scissors, ruler, gouache, watercolor.
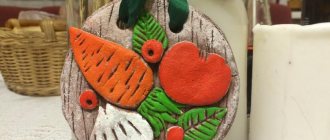
As you can see in the photo of easy DIY crafts, they can be created from paper, cardboard, wood, pebbles, dry leaves, pine cones, clay and waste materials.
Ponytail with a backcomb: a spectacular and simple hairstyle for every day
First you need to comb your hair, dividing it into 2 parts. The crown area is combed well and volume is created. Next, all the curls are gathered into a ponytail, after which you should select a thin strand from either side of the tail and begin wrapping it around the base. When there is no length left, the tip is hidden under an elastic band and secured with bobby pins or decorative hairpins.
There is nothing difficult in creating such a hairstyle. In addition, the position of the tail is adjustable. It is not necessary to create this hairstyle in one specific place. Medium hair will allow you to create a spectacular and beautiful ponytail. Using your imagination, you can dilute this styling with a hoop, strip or other hair accessories.
Crafts using paints
Paints help to make stylish and unusual panels. At the same time, drawing and writing techniques are honed, which is important for fine motor skills. Can:
- Apply the image with your fingers. This technique is usually used to make paintings with sea and forest landscapes.
- Make impressions using potato or cork stamps. In this case, any subject matter of the works is acceptable.
- Create wax paintings. The technique is suitable for older children who already know how to draw.
Simple spikelets in 5 minutes
- Spikelet inside. The strand at the top of the curls should divide them into 3 equal parts. The strands are alternately placed one on top of the other, and new strands are gradually added to the sides. At the base of the neck, the weaving should turn into ordinary. The end of the braid is tied with an elastic band.
- Spikelet out. The principle of weaving will be slightly different from the previous one in that the strands are placed one under the other. This type of spikelet will look more impressive if you can stretch the strands a little with your fingers, making them more voluminous.
- A spikelet braided from bangs. The strands from the side of the parting need to be intertwined with strands from the bangs, which from ear level will go into an ordinary braid and will be secured with an elastic band at the end. As a result, you will get a beautiful and quick framing of the edges of the hairstyle in front.
Especially for you: Haircuts for triangular faces (40 photos)
Options for homemade paper products
Paper and cardboard crafts have always been considered one of the easiest to make. Despite this, they look quite nice. From white or colored paper you can make:
- animals and insects;
- holiday garlands and decorations;
- Christmas decorations;
- Greeting Cards.
From glass jars
Glass jars are used to make original and beautiful crafts for the home.
Method of making an oil lamp:
- Take a small glass container and fill it 2/3 with kerosene, then close the lid.
- Place the rope in the oily liquid and leave it for 1 hour to soak.
- Make a hole in the lid and stretch the soaked rope through it.
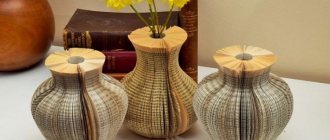
How to decorate a shiny vase:
- Cover the jar with strips of tape in the desired direction (horizontally, diagonally or vertically)
- Remove the adhesive tape.
- Sprinkle the container with glitter; it will stick to the adhesive surface.
Decorating a vase in vintage style:
- Cut a rectangular piece from light brown burlap and glue it to the glass container.
- Cut a strip of white burlap and cover the jar with it.
- Form inflorescences from twine. To do this, take the edge of the twine and gradually twist it. Then the flower should be fixed with glue. In a similar way, make several blanks of different sizes.
- Attach the blanks to the container with glue.
- It is recommended to decorate the vase with lace and beads.
Ideas from cotton pads
Crafts made from cotton pads have a special elegance. From such unusual material you can make:
- flower with the addition of soft multi-colored pompoms;
- snowman on a postcard;
- funny chickens.
Such things can be used to decorate a nursery. They look very cute and cozy.
Crafts for kindergarten, school from natural materials: ideas, photos
While walking with your child, you can always pick up something that is around. At the same time, these strategic reserves will come in handy when the time comes to make crafts. For example, you can quickly make with leaves . You will need:
- Actually, the leaves themselves - autumn leaves of various colors look especially beautiful
- Glue
IMPORTANT: You can use PVA, but one specifically designed for decoupage is even better.
- Jar
- A brush or an ordinary sponge
- Alcohol
- Thread or twine
Such a rope on crafts with natural materials looks more organic than ordinary thread.
You can start making a candlestick:
- First of all, you should treat the jar with alcohol. It will help degrease the vessel. No matter how clean the latter may seem, there will almost certainly still be traces of something there.
- Next you can apply glue.
- Now the leaves are glued in any desired order . Layering one on top of the other is very welcome.
- If you have glue for decoupage, it is recommended to use it on top of the leaves attached to the jar .
- All that remains is to tie the jar with twine or thread and put a candle inside - the craft is ready!
Crafts in the form of candlesticks made of autumn leaves
To create the following craft you will need:
- Large twig
- Small pebbles
IMPORTANT: It is preferable that the pebbles are flat - they will be easier to stick.
- Glue
- A4 cardboard
- Paints, markers, pencils
The panel is made as follows:
- To begin with, stick a twig onto the cardboard
- pebbles are glued next to the branch
- All that remains is to complete the missing details, which will instantly turn simple pebbles into birds or tree buds.
It turns out this nice panel craft.
You can also create a bird's nest. For it you will need:
- Straw
- Sheet of cardboard
- Glue, threads
- Any natural material - cones, twigs, fluff. You can also take a couple of regular chicken eggs
Let's get started:
- of cardboard - this will be the basis of the future nest
- Then the straw is twisted into a rope. If the straw is stubborn and does not want to form into a rope, it can be held together with threads
IMPORTANT: Just do this carefully, masking the threads. They should not be noticeable from the outside.
- The harness is laid along the diameter of the circle . You can even use several layers - this will make the nest look more voluminous
- All that remains is to decorate the nest. It transforms in the blink of an eye!
Craft in the form of a bird's nest
By the way, you can also put a bird in such a nest! Making it is much easier than it might seem at first glance. You will need:
- Plasticine
- Pumpkin and sunflower seeds
Having built the nest described above, you can start making a chicken or some other bird:
- , the outlines of a bird are molded from plasticine . Even a small child can cope with this
The body for a bird craft can be like this
- Then you need to feather the bird . This is easy to do - you just need to stick the seeds into the plasticine
You can start feathering a bird craft from the wings
IMPORTANT: The pumpkin seeds will be the wings and tail, and the sunflower seeds will be the rest of the plumage.
The end result will be something like this:
- Next, a beak, scallop, and eyes are molded from plasticine. But you can try to recreate not a chicken, but some other bird - it all depends on your imagination.
The result is a craft in the form of a bird in a nest.
A plate made of leaves is simple and at the same time original. You will need:
- Balloon
- Leaflets
- Glue
The manufacturing process is easy and fast:
- The ball is coated with glue. But we will not need the entire surface of the ball, but only lower part. There is no need to feel sorry for glue!
- While the glue is not dry, leaves are glued onto it.
- If you have decoupage glue, use it to apply it to the top of the leaves.
This is how you need to cover a ball while creating a craft.
- After the workpiece dries , the ball simply needs to be pierced with a needle. And now the plate is ready!
It turns out such a cute plate consisting exclusively of leaves
Ideas from napkins
Paper napkins have long become commonplace. They are used in table setting, when cleaning an apartment, and as a hygiene product. But not everyone knows that the product of the pulp and paper industry can be used to realize creative ideas.
Making easy crafts from napkins with your own hands can turn into an interesting hobby. From this material you can make photo frames, panels, paintings, dolls, figurines of fauna, flowers, and gift wrapping.
Beautiful New Year's candlesticks
You can make a very beautiful house candlestick from an ordinary jar.
To do this, cover a glass jar with plasticine or hardening plastic. Leave space for windows or cut them. Decorate the top of the jar with foil, tinsel or glue glitter. And then attach a candle inside. When it burns, the windows in the house will glow.
Illustration from the book “Wonderful Time: Winter”
Giving gifts is not only fun, but also very pleasant, especially if these are gifts made by the hands of our children.
* The book “Wonderful Time: Winter” is provided by the publishing house Mann, Ivanov and Ferber.
Stone crafts
Stone is one of the most accessible materials. It makes very stylish decorative items. To work with it you may need the following things:
- acrylic paints;
- glue;
- plasticine;
- clay.
From pebbles you can make a hot stand, a rug for a vestibule, a panel to decorate a wall in a kitchen or nursery, a vase for the garden, a candlestick for a gazebo, etc. Refrigerator magnets and key rings made from pebbles are in demand.
Romantic hairstyle in 5 minutes
In order to quickly create a hairstyle, you need to separate the short front curls, pinning them on the top of the head using two bobby pins. This will create a slight lift. On the side of the resulting elevation you will have to separate 3 strands and braid a loose French braid.
Quick hairstyles of this type often have one problematic area at the temporal part on the side of the free edge of the braid. Large bobby pins or hairpins with flowers will help hide the defect in the form of hair covering the ear.
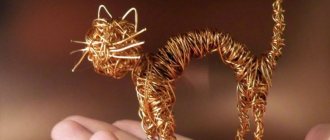
Doll made of threads
As you know, a child never has enough toys. But buying a new one every day is too expensive. Therefore, it is worth learning how to make them yourself, using improvised means, for example, threads. To create a thread doll, you should prepare:
- floss threads;
- half a cardboard sheet;
- scissors;
- flesh-colored ribbon;
- markers.
Progress:
- Wind the threads onto the cardboard. The thickness of the thread layer should be large.
- Tie the completed winding with thread. Determine the location of the doll's head and mark it by rewinding it with thread.
- Design the arms and legs in the same way.
- Measure the flesh-colored tape according to the volume of the head. Glue its sides.
- Wrap hair threads around your hand. Cut the resulting roll on one side and glue it to the head.
- Use felt-tip pens to sketch out eyes, eyebrows, mouth. The toy is ready! If you wish, you can sew clothes for her using old scraps.
Dinner
You can provide yourself first for a week in advance - borscht and cabbage soup stand well in the refrigerator for a week and only become tastier. But for the second there is always not enough time and energy. But some tasty things can be prepared in a hurry.
Macaroni and cheese in a mug
In a large mug, heat ½ cup of milk (one minute in the microwave is enough). Add 2-3 tablespoons of thin pasta and microwave for another 3 minutes. Then remove, stir, sprinkle with grated cheese and cook for another minute.
Cheesy scrambled eggs
Pour ½ cup of oatmeal with two cups of boiling water. Let stand for a couple of minutes. At this time, grate the cheese (100–200 g) on a fine grater, chop the green onions and pass the garlic through a press. Add all this to the oatmeal, salt, pepper and mix thoroughly.
Fry a couple of eggs in a separate pan. The fried egg should be placed on top of the oatmeal-cheese mixture. You can sprinkle herbs and pepper on top.
Panini with chicken and tomatoes
Photo: Haley Photeau / Flickr
Mix a tablespoon of mayonnaise, a tablespoon of tomato sauce, the juice of ½ lemon and chopped basil. Brush the mixture onto the bottom of the panini bun. Place slices of boiled or smoked chicken fillet and tomatoes on it. Sprinkle with grated cheese and cover with the other half of the bun.
Fry the panini for 3-5 minutes in a cast iron skillet, pressing down on top with a lid or other pan. A crust will form on the bottom and the cheese inside will melt.
Caprese with chicken and avocado
To ½ cup of balsamic vinegar, add 2 tablespoons of cane sugar. Microwave for a couple of minutes to dissolve the sugar.
At this time, fry the boiled chicken fillet in olive oil. This is necessary to heat it up and get a golden brown crust. Place cubes of chicken, avocado, mozzarella and cherry tomatoes (can be cut in half) into a deep dish. Drizzle with balsamic vinegar, sprinkle with chopped basil and serve.
Spicy garlic shrimp
Heat 2-3 tablespoons olive oil in a large sauté pan. Add 300–500 g of peeled shrimp, 2–4 chopped garlic cloves and spices of your choice.
Fry the shrimp for 3-5 minutes until they turn slightly pink. Then place them on a dish, pour over the juice of one lemon and sprinkle with chopped herbs.
find out