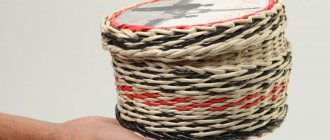
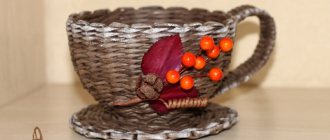
Although this is a relatively young type of needlework, there are more and more adherents of newspaper weaving every day. The hobby requires minimal costs, provides the opportunity to use unnecessary paper, and finished products, made carefully, can become a real masterpiece. Vases made from newspaper tubes will decorate any interior and make it interesting and stylish.
Where to begin?
To master the weaving technique, you will need desire and a set of certain tools and materials. First of all, you need paper:
- a newspaper that has already been read;
- brochure of any store (not glossy);
- packaging of newsprint or office paper;
- cash register tape, etc.
Experienced craftswomen prefer to work with purchased newsprint, but regular brochures are also suitable for a beginner. Before twisting them, the material is cut into strips with a width of 7 to 10 cm. This depends on the knitting needle used in the work; the thicker it is, the wider the sheet of newspaper.
Additionally, you will need:
- It is a toe knitting needle, but it is advisable to use it with a thickness of 1 mm.
- PVA stationery glue or carpentry instant.
- Kitchen knife, sharpened.
- Scissors.
- Construction colors.
- Primer.
- Water-dispersed varnish.
- Braiding form.
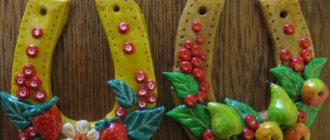
- Decorative elements.
How to make decorative branches for a floor vase with your own hands?
In order to make the interior of your home original and individual, you don’t have to spend money on expensive designer items - it’s enough to use ordinary tree branches for decoration. Few people seriously think about this option, and in vain, because dry pods are a very beautiful and sophisticated material with which you can create original things for the home with your own hands.
Wooden rods will look great in any room, be it a living room, bedroom, kitchen, hallway or bathroom. They are great for decorating candles, decorating mirrors, creating an interesting cornice or hanger for things. You can even consider making decorative branches for a floor vase with your own hands. Here everything will depend solely on your imagination.
Processing branches for decoration
Before you create decor from branches for your home with your own hands, you should know that only dry branches are suitable for these purposes, otherwise you will have to dry them.
It is not necessary to use tree shoots in their original form; they can be:
- Paint with spray paint;
- Coat with wood varnish;
- Cover with enamel.
We offer you some interesting ideas on how you can use dry branches in the interior of your home. To do this, you don’t need any special skills - all you need to do is find beautifully shaped sticks.
Partitions in the room
An interesting and rather original screen for zoning can be made from equal length, even and well-dried branches. At the final stage, it is better to varnish the partition, so the finished product will acquire a certain charm.
Important! This zoning option will look not only very interesting, but also stylish. In the same way, you can make a screen in the bedroom from parts of the same size.
Headboard
The most important thing in the execution of such decor is to process the material well so that in the future it does not crumble on the heads of those who will sleep under it. You should also pay careful attention to the fastening of such decor so that when the mattress moves, the branches do not move in different directions.
Wall decor
Dry painted rods with a large number of branches will be a wonderful decoration for the living room, however, here are some points to consider:
- The main secret of this decor is that the rods should be of contrasting color to the wall.
- If the wall is dark in color, then the decoration elements should be either light or have a metallic sheen. If the wall is in a light tone, then it is advisable to use sticks of their natural color or painted in dark colors.
- It is also advisable to think about the lighting of such wall decor made from branches. For these purposes, you can use small candlesticks attached to sticks with glue, spotlights on the ceiling, or a garland wrapped randomly.
Important! It is thanks to the lighting that this original version of wall decor looks impressive and can turn an ordinary, discreet wall into a stylish part of the room.
Kitchen decor
Dry branches also look appropriate in the kitchen interior:
- Old, ugly batteries can be disguised with a screen of dry branches of the same length.
- Do-it-yourself eco-paintings, which can be quite large in size, will come in very handy in the kitchen.
- You can also make such a useful thing as a hot stand yourself from ordinary twigs.
- The trinkets on the refrigerator look original and very cute; they can be easily made from small shoots and then glued to magnets.
Non-standard and original design of the kitchen with twigs will help add a special atmosphere.
Bathroom decor
From simple dry branches you can make very practical decor in the bathroom - for example, it can be a beautiful shelf on the entire wall where you can store all kinds of bathroom accessories, or a ladder for towels.
Important! The sticks also look good and will serve as hooks - it’s convenient to hang bathrobes on them. You can also use a dry twig as a holder for a toilet paper roll.
Furniture
Dry branches and their cuts can be used in furniture decoration. Tables, the basis of which can be thick sticks, and the tabletop is made of transparent glass, look very stylish and elegant.
Important! Coffee tables and dressing tables can be covered with cuts from dry branches - they turn out not only beautiful, but also very comfortable.
Decorative lamps
There are so many different ideas for creating lighting fixtures. Lamps in which tree shoots of different diameters are used as a base look very beautiful.
Important! A thick, dry tree branch equipped with light bulbs will make any room more comfortable. This Eco-style element will perfectly complement a modern interior.
Shelves for storing small items
Quite practical and very cute shelves for storing souvenirs, books, jewelry and other small items can be very easily made using dry branches.
Such decor only needs to be well fixed on the wall and supplemented with finishing materials for decoration.
Important! A wooden trunk can serve as the basis for several shelves in the form of partitions.
Hangers
Their dry branches make beautiful and convenient wall hangers, as well as hangers. These can be not just knots that look like hooks on the walls, but also unusual floor and wall hangers for bedrooms and hallways.
Thus, thick sticks with branches can become convenient vertical hangers for clothes, while thinner ones can be placed along the wall.
Panel
To create such a decor requires a lot of energy, in contrast to the usual arrangement of a “bouquet” in a vase of branches. Initially, you need to come up with a composition, for example, a bird, a star or a heart, and then begin to implement it.
Pictures and frames
It’s not that difficult to make original and unique paintings from tree branches with your own hands. To do this, attach a composition of branches to the wall and surround it with a beautiful frame. You can decorate a photo frame with thin rods or their cuts, pasting it in a circle.
Important! You can decorate a mirror in the same way, which will look great on the wall in the hallway.
Branches in floor vases
Floor vases with dry branches look very stylish and impressive. Long branches standing in a transparent vase will perfectly replace any other decor and will attract attention.
Vase decoration
Decorative branches for a floor vase are a stylish way to decorate the interior of a room in Scandinavian and Eco-style. For these purposes, rods of their natural color selected from the ground can be used, however, if they are painted, they will look even more impressive.
Important! When starting to paint them, it is advisable to choose a color that matches the color scheme of the interior of the room. The most interesting and effective colors for these purposes will be black, white, silver and gold.
Such original vases with decorative dry branches will look good on coffee tables, shelves and bedside tables.
Video material
In conclusion, I would like to say that any decoration made from branches looks simply amazing, and most importantly, all decorations made from dry branches are environmentally friendly.
Share on social media networks:
serviceyard.net
Sequence of work
A beautiful vase made from paper tubes will not be made in a few hours, but the time investment is worth it. By following all the instructions, in the end, from under the hands of the craftswoman, a product will come out worthy of being exhibited in a museum.
Overview of species
Techniques are mastered one by one; without mastering the previous one, you should not move on to the next one.
Direct
In this weaving, one rod is used. The risers should be taken in turns, one at the back and the other at the front, and so on until the end of the rod. The next rod will be connected to the previous one. When joining the thin ends, both the old and the new are involved in the weaving, simultaneously running between the three risers. Simple weaving along a closed contour requires an odd number of risers. On one circle the riser is braided from the outside, on the next - from the inside.
Simple weaving is good for decorating bottles and vases.
Rows
This also applies to simple weaving; the main thing is to choose rods of approximately the same thickness. Their length will not matter in this case. It is produced with two rods at once: it starts from the butt ends of the shortest elements. With simple weaving, they are braided through one post to the end of the element, thin fragments remain out of use.
The butt part of the second rod is laid behind the next rack and then a simple diagram follows.
Square
It involves weaving with one or two paired branches; you can also use a willow ribbon (this is a different level of complexity). The main thing is that the weaving goes through two posts. The square method comes in two variants: checkerboard and checkerboard. Checkers is a simple option through two posts, chess is more complicated. The first element will first go around the outside of the first and second posts, then bend inward between the second and third posts, go around the third and fourth, and between the fourth and fifth the rod will come out.
With a rope
Otherwise the technology is called twisting. It is used when it is necessary to give the product greater strength. A single rod is used, but in the weaving process at least two of them are used. The rods of the rack will be intertwined, which will give strength.
Openwork
This is a variation of the same rope. Usually it is made in two branches, which should be equal in thickness and strength. The rod is bent in half, bends the butt end inward around the first post, and the apical end goes outward. The apical tip extends beyond the butt bridge, bends between the first and second posts inside the craft, goes around every second post inside and is brought out between the second and third.
Diamond-shaped
Very interesting schemes are presented in this technique. It is necessary to combine rods and tapes. If the warp and weft are different colors, it turns out especially beautiful. Weaving begins traditionally from the middle, then leads in different directions. In order for all sides of the diamond to be perfectly even, the number of weft and warp rods must match.
Making newspaper tubes
To do this, cut newspaper sheets along the length of the spread into three equal parts (at least 7 cm). We select one of the sheets and place it in front of us, place a knitting needle on the corner and wind the paper onto it. At the end of the twist, a drop of glue is added, which will hold the finished vine together. We remove the workpiece from the working knitting needle and continue in the same spirit.
The angle between the knitting needle and the sheet should be made as small as possible.
The vine should not widen too much at one end and narrow at the other. Hollow tubes will also not give the finished product the desired appearance.
Technical points
A master class on making a vase from newspaper tubes will require mastering some constantly repeating processes:
The growth (lengthening) of the vine occurs by pushing its thinner end into the expanding edge. To achieve an imperceptible transition, you will need to make cuts with scissors (at an acute angle) and then perform the procedure.
The braiding of the base tubes begins on either side. To do this, one tube is bent and applied (encompassing the main tube) as close as possible to the core of the crossed vine. The lower end rises up, and the upper end is brought under the bottom of the base lying next to it.
Popular articles Panel “Mysterious couple” using iris folding technique
The walls of the product are woven in the same way, only now the top turns into the front, and the bottom into the back tube.
To form the bottom, you need to measure the volume of our shape in its widest part. And for every 1.5-2 cm there should be a tube of base. If the girth is 250 mm, then at the base of the bottom you need to put 7 newspaper tubes crossed with each other. As a result, there should be a snowflake with 14 ends on the work surface.
Dyeing the vine
There is practically no universal composition for coloring newspaper tubes. Each craftswoman, by trial and error, selects the paint independently. The most commonly used stains are water or alcohol stains. It is better to work with the latter outside or on a balcony with an open window, as they smell strongly.
And also, “Richard’s cocktail” is in demand. To create it you will need:
- construction primer;
- color (color at your discretion);
- water based varnish.
All ingredients must be mixed in a 0.5 liter jar. First, 300 ml of primer is poured in, followed by three tablespoons of dye and 10 tablespoons of varnish. This is an approximate scheme for adding ingredients and it all depends on the desired color of the future product.
After the tubes dry, their color fades a little.
Recently, craftsmen often replace varnish with impregnation, claiming that it achieves the effect of gluing seams. You can paint several tubes at once with a brush.
You can dry the tubes with a hairdryer if you don’t have time to wait, or simply lay the painted vine on a plastic mat in a checkerboard pattern. This is necessary so that the tubes do not stick together and become moldy. You can see how to make a vase from newspaper tubes below.
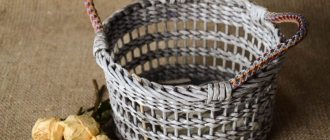
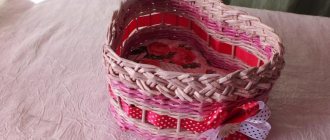
We study weaving from paper wicker in a step-by-step master class
To make a basket with a paper vine handle, you need to have:
- newspaper
- stationery knife
- paper glue
- pencil
- awl with rounded end
- ruler.
For needlewomen and craftsmen who know the basic technologies of weaving from wicker, it will not be difficult to build a craft quickly, without much effort. As for beginners in this business, such a craft will also not be problematic for them, because all the steps are simple and concise.
Step-by-step instructions for making a paper wicker basket:
- Using a ruler and pencil, measure equal sections on a sheet of newspaper.
- Use a utility knife to cut along the marked lines.
- Build tubes from pieces.
- Weave the bottom of the future basket.
- Weave the bottom in a circle.
- Attach the handles to the base of the basket.
- Can be decorated with any accessories.
Your paper wicker basket product is ready. Enjoy it!
Due to its versatility, paper fragments can be woven indefinitely. It will not be difficult to connect them together and build the desired structure. The only disadvantage of such crafts is their fragility.
But today there are a great variety of strengthening compounds. Using which you can achieve the desired result and make your product durable for many years.
Weaving from newspaper tubes is perhaps one of the cheapest and most enjoyable types of needlework. In most homes, sooner or later, a lot of old newspapers accumulate. This happens especially often in the period before elections or voting.
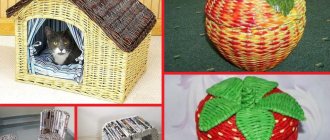
From such newspapers you can always make a lot of beautiful things, which, moreover, can be useful in the household. These include a variety of baskets, trays, boxes and much more.
If you can’t afford to weave from wicker, then try to master weaving from newspapers first. Until recently, this technique was completely unknown in our country, but in recent years it has gained enormous popularity. Meanwhile, in countries such as China, Japan, Poland, Czechoslovakia, Germany and others, this type of needlework has been known for a long time. Craftsmen from these countries create real masterpieces from newspapers.
It doesn't cost you anything to start doing these things yourself, for free and at home. We wish you good luck in your new endeavors!
Weaving the finished product
At the beginning, you need to choose a form for braiding, because without it a beginner will not be able to maintain the desired shape. For these purposes, any jar or bottle is suitable, which you can then leave in place and pour water into it.
How to weave a basket?
For this job you will definitely need:
- pruner or knife;
- side cutters;
- awl;
- spray bottle (to moisten the rods during the weaving process).
Master class for beginners - step by step basket.
- At the beginning of the process, you need to split five solid, fairly long branches. Another 5 branches are carefully inserted into the split layers. And then into the same holes - the tips of the first two.
- Now you can start braiding the bottom. The first twig is taken, it covers the split branches from above, and using the second twig it covers the remaining ones below. With the third and fourth vines everything is done as was done before.
- The crosspiece rods are moved apart so that it resembles a fan; they are braided with two rods.
- The braided branches are pressed against each other. A tailor's awl will help with this.
- When the bottom is ready, you need to install the ribs of the basket. A round willow tree is taken, its ends are cut off obliquely, but at a distance of 5 cm. Then the sharp ends are inserted into the braiding of the bottom, and everything unnecessary is, of course, cut off.
- The edges of the bottom are made from four round willow branches, which are inserted 4 cm from the side ribs. The basket should be given a round shape and small nails should be driven into the bottom. This is all done to strengthen the product.
- It's time to move on to braiding the sides. And again the tips of the twigs are cut off, only the branches are needed to be of medium size. A new vine is inserted along each rod.
- Next, the new vine bends exactly under two adjacent vines: first to the left, then down, then up.
- The rest of the material is the same. But the last two branches simply twist around the first twig. And the weaving continues until the craft becomes optimal in height.
- The basket needs handles, for which thick willow is suitable. Such massive branches are bent, the required length is determined, and the excess is cut off. And again you should sharpen the ends by inserting them into the walls of the basket. At the base of the handle, 5 rods are placed with which this handle will be wrapped. All excess willow must be trimmed and hidden behind the walls.
This master class is really not that difficult to repeat with your own hands. There are no complex patterns here, everything is simple and predictable, which is what you need for your first job.
Photo of vases made from newspaper tubes
Procurement of material
The varieties of willow most often harvested for weaving are willow, three-stamen and basket willow.
You can harvest vines at almost any time of the year. Branches cut in summer and early autumn do not require additional processing, but are less durable and break more often. Vine harvested in the autumn-winter period will be more durable.
The bark of this vine is thicker and more difficult to peel off. To make it easier to peel the bark from the branches, place the branches in a saucepan (if the branches are large enough, twist them in a circle), cover with water and boil for 2-3 hours. After this, rinse with cold water. Then you can easily clear the branches.
If time is tight and you consider boiling the branches a troublesome task, put them in water and leave them in a warm place for 10 days. The branches will be saturated with moisture, and the bark will be easily removed.
To harvest thin vines that will be used for delicate work, annual shoots are usually taken. To work on large products, as well as for making frames and bases, two-year-old shoots are harvested.
Branches for harvesting vines must be flexible, strong and healthy, without damage or heavy contamination. With additional cleaning, their fragility increases and elasticity is lost. To cut the rods, use a sharp pruning shears, which is used to make an oblique, even cut without splinters. If the vine is wet, it should be well dried for long-term storage, arranged according to size in a sunny place with good air ventilation. This treatment will help to naturally whiten the shoots. Insufficiently dried vines can quickly become moldy.
Before starting harvesting, cut one rod from the selected bush and carefully inspect it. Flexible and elastic branches usually have a small core. If this is the case, feel free to harvest twigs from the selected bush.
Store the vines, sorted by size, in a cool, dry room.