Crocheting with jute is extremely popular this season, because the threads are natural and environmentally friendly. The natural material is harmless and has many advantages, and crocheted products made from it are beautiful and durable.
Can you crochet? Publish your work on kru4ok.ru
Crochet from jute: what can be done
Jute is the name given to the material obtained from the leaves of the southern plant of the same name. The thread resembles a rope made from hemp, not only in color, but also in its light hairiness. Natural undyed jute has a yellowish-beige color, but the threads can also be purchased in dyed form.
The color of dyed jute can be any.
The thickness of the jute thread also varies depending on the number of fibers twisted together. You can crochet wonderful exclusive products from jute, and depending on the functional purpose of the item, choose the thickness of the thread.
Crochet from jute:
- Panama hats, hats, visors;
- bags, backpacks;
- rugs;
- baskets;
- panel;
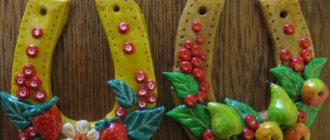
- cases for flowerpots, flower pots;
- napkins;
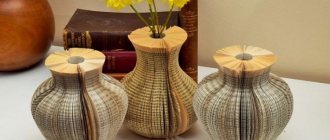
- dishes - vases, plates, bread bins, etc.;
- boxes;
- bookmarks;
- belts, etc.
The threads are even, so crocheted items turn out gorgeous.
Jute for crochet: advantages and disadvantages
The advantages of jute are:
- natural material;
- lasting;
- does not stretch;
- not electrified;
- does not deteriorate from moisture;
- it is easy to care for;
- excellent air permeability;
- has an unlimited service life, etc.
The disadvantages include the fact that the thread has fibers that can break off and crumble. But you should know that this only happens during knitting; nothing like this happens during operation.
To get rid of lint, you can shake the product and knock it out (like a carpet).
The thread is somewhat rough to the touch, which does not allow you to crochet clothes from it.
You can knit any patterns using a jute hook. Spatial products of complex shape (hats, baskets, etc.) can be made using a plastic frame and tying it.
Both products made from raffia and knitted yarn, and crochet items made from jute look great - they are fashionable and stylish.
Caring for crocheted jute items
Such products should be washed in warm water using any detergent, but it is advisable to use gels. Just don’t twist, bend or rub things too hard.
Washing is acceptable both by hand and by machine. Do not load bulky items into the washing machine - they may become damaged and lose their shape.
To remove dirt, you can do without washing: just heat the product with hot steam and lightly wipe with a damp cloth. Flat knitted items can be ironed.
The use of jute in needlework
Jute thread is affordable and easy to find in stores. To create crafts from jute twine with your own hands, you will need a standard set of stationery. Having started getting acquainted with this type of needlework with simple products, it will soon be easy for the master to move on to the most complex works.
The technology for creating such crafts does not require the purchase of expensive additional equipment. It is easy to apply the skills to make crafts from rope and twine with your own hands.
Jute cords are actively used for the manufacture of various openwork weaving items using the filigree technique and for interior decoration.
Using string or twine, you can quickly and easily transform any item.
Basket for all kinds of small things
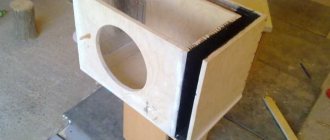
The methods of making any container or container using twine do not end with the wrapping technique. With the right skills and a little patience, anyone can create a full-fledged basket for storing small items. To make such a container, you will only need to select any plastic container of the size you want for the box. You will also need standard tools for the work of a craftsman: reliable glue, scissors, and a crochet hook. Production will take place in the following stages:
- In the upper part of the plastic container you have chosen, you need to make cuts located at the same distance from each other.
- Through the holes made, you will then need to wind the twine vertically.
- After the wrapping process is completed, the twine is cut and its end is sealed so that it is not visible.
- Next, twine is wound onto the bottom of the container in vertical strips. If necessary, you can use a crochet hook to wind it in this way.
- To complete the work, you will need to turn the container over and secure its bottom with glue.
- Let the glue dry and then pull out the container. The container is ready!
Advantages and disadvantages of jute
Jute is a fiber of natural origin. It is grown in India. The technology for producing jute fiber involves cutting the long stems of the plant and soaking them in water.
After two to three days of soaking, the jute stems are dried and processed. The technology does not involve the use of active chemicals, so jute is absolutely safe for human health.
Its advantages include flexibility and ease of use.
The disadvantage is the ability to actively absorb moisture and susceptibility to rotting.
Jute cord must be stored in a dry place, since when wet it is less susceptible to processing and takes a long time to dry.
Pattern for weaving flowerpots using the macrame technique for beginners
You will need:
- cord with a diameter of 5 mm (length 40 m)
- metal or wooden ring with a diameter of 4.5 cm
The length of the finished flowerpot is about 70 cm
Cut the cord into 8 pieces of 5 m each.
Fold the thread so that one end is 3.5 m and the other 1.5 m and secure it to the ring. Make a loop by bringing it under the ring. Bend it over the base towards you and pull the ends of the thread into the loop. Lock on the bottom.
Fasten parts of the rope to the ring so that 2 long (working) parts are located along the edges, 2 short (axial) parts are located between the long parts.
To prevent the threads from getting in the way, tie them into a skein and secure with rubber bands
We weave the handles of flowerpots
Divide all the threads into 4 groups (2 long and 2 short parts). Make single left-handed flat knots using long pieces of rope.
You need to tie approximately 30 knots or approximately 50 cm (their number depends on the thickness of the rope and the required length of the product).
Secure the twisted chain with two flat knots:
Two twisted knots for fastening
And the finished chain
Weave three more twisted chains in the same way.
We weave a basket for a flowerpot
To do this, weave 1 flat knot with two right ropes from one group and 2 flat knots with left ropes from the group closest to the right at a distance of 8 cm from the last knots. We repeat 4 times, sequentially including all the ropes in a circle.
We measure 8 centimeters...
...we fasten the threads with a flat knot...
...and so on in a circle
Knit three rows of warp.
Step back a little from the last knots and use the braiding method to gather the ropes into one bundle.
Braid method
The braid must be very strong so that the flower pot does not break!
We pull all the threads into a bundle. Take a piece of thread, fold it in half and add it to all the threads with the loop facing up.
Using one thread from the bundle from top to bottom, we make several turns.
We insert the end of the cord into the loop and pull the ends of the loop down so that the cord comes out from below under the turns. Pull the second end of the loop up and pull it under the winding.
Carefully cut off the upper end of the thread, and hide the lower end along with the rest of the threads.
Braid weaving pattern
Leave the length of the thread for the tassel about 20 - 30 cm, cut the ends with sharp scissors. The pot is ready!
Author - Anastasia (https://myfl.ru/blog/hand-made/master-klass-pletem-kashpo)
Video tutorial on weaving a simple flowerpot for beginners:
Differences between jute and flax and manila hemp
Manila hemp is durable and does not absorb moisture. It produces a very strong rope with a pleasant shade, which is especially valued for its strength and durability. The cost of Manila hemp determined its use for the decoration of rich rooms.
Linen twine has a dull grayish tint. It is fragile and soft, which makes the work very simple. It is flax that is most often used to make burlap.
The pleasant golden-yellow hue of jute makes it an excellent option for decorating wooden surfaces. Jute is quite durable, and making jute crafts with your own hands is not particularly difficult.
Openwork flowerpot with “Butterfly” pattern
To weave such an openwork flower pot you need:
- rope – 50 m
- three rings with a diameter of 7 cm, 10 cm and 21 cm
- scissors
- pins for fastening thread
- work pillow
- hook for attaching flowerpots
Operating procedure
1) Cut the threads: 3 parts of 8 m, 6 parts of 3 m, 2 parts of 1 m, 1 thread - 2.5 m
2) Wrap the 10 and 21 cm diameter rings tightly with rope so that there is no gap. A ring with a diameter of 7 cm must be braided with double flat knots with a thread 2.5 m long.
Diagrams of the main macrame components of this flowerpot
3) Marking the middle, lay all the threads vertically and secure them in the middle with pins.
Place the shortest ones (meters) along the edges. With these threads, tie 8 cm chains of double flat knots in both directions from the middle. All other threads will be the basis.
Next, thread it into a ring with a diameter of 7 cm, fold it in half and, under the loop formed, tighten the threads using the braiding method ( Fig. 11 on the “Diagram of the main macrame knots of this flowerpot”)
4) Distribute the threads by 6 (long ones - along the edges) and in each part, first tie a chain of 4 double flat knots, then make 4 more of the same knots, leaving 3 picot air loops between them (Butterfly pattern , Fig. 6 ).
5) Using horizontal rep knots, secure the ends of the chains ( Fig. 2 ) to a ring with a diameter of 10 cm. Next, first weave 3 “butterflies”, and then simple chains of 4 knots without picot. Tighten the bundle of cord under the chains using the “braid” method.
6) Again divide the threads of 6 into groups and tie 3 hanging cords 40 cm long. Weave each one like this: first with single flat knots of 17 cm of twisted chain, then a “butterfly”, then a “pea” ( Fig. 8 ), again a “butterfly” "and then 13 cm of twisted chain.
7) Secure the ends of the hanging cords to a ring with a diameter of 21 cm, tying 3 threads in between them (a total of 9 threads of 1 m each, folded in half). On every 6 threads under the ring, make a “butterfly”.
 Connect together the two outer cords from the adjacent butterfly patterns and tie 6 chains of 6 double flat knots, leaving the two inner ones free. We make a bundle of all the threads and tighten it using the “braiding” method.
We decorate the ends of the cords with “rollers” ( Fig. 12 ). The finished length of the knitted brush is 25 cm.
Jute filigree technique
The method of weaving jute crafts with your own hands for beginners is quite easy to learn. An important component of success is the placement of the product on a flat surface during the production process.
Filigree involves creating openwork patterns by interweaving fibers in different ways.
Modern jute filigree techniques suggest:
Note!
- Quilling crafts: features of the working technique, step-by-step instructions and clear diagrams for beginners + ideas for creative crafts (150 photos)
Crafts made from corrugated paper: 100 photos of creative solutions for crafts + step-by-step diagrams and instructions for making your own
- Crafts from foamiran: ideas for creating crafts and interesting patterns for making flowers
- using transparent glue to connect parts of the craft;
- selection of strong threads for the base of the product;
- painting with acrylic paint.
The absence of a wire frame and the adhesive joining method allow you to make crafts from twine in a relatively short period of time.
Two-level flowerpot “Juliana” using macrame technique
Most often, a flowerpot is woven for one flowerpot, but it can be two (or more) level. The shape, size, patterns, and material for it are also very diverse.
The Juliana flowerpot is woven from ordinary linen cord. It is designed for two flowers, located above and below.
Finished product length is about 70 cm
Required material:
- linen cord 5 mm thick (length 40 m)
- 2 rings with a diameter of approximately 4 and 6 cm
- 8 beads for decoration
The procedure for weaving pots “Juliana”
1) Cut the cord into 8 pieces of 5 m each. Mark the middle of the thread.
2) Make a ring for fastening. We take 4 threads, place them parallel and horizontally to each other. From the marked middle weave “up” and “down” about 8 flat square knots. We fold this resulting lace in half and thread it through a ring of smaller diameter. And if you don’t have a ring, then weave a few more knots, make a “loop” and tie 1-2 flat knots on all cords to strengthen it. Another option is to secure the thread using the braiding method.
3) We divide 8 ropes into 4 groups of 2 pieces and weave about 6-8 Lotus knots. It can be replaced with regular flat knots or weaved into a twisted chain.
4) We fasten it on the second ring, 5-6 cm away from the last knot, using horizontal rep knots. Between these cords we hang the remaining threads, folded in half. Now we have 16 threads at work.
5) Weave beads. We divide the threads into groups of 4 pieces. We knit 8 flat knots in each group, first weaving in one bead for decoration. Then we weave 2 more flat knots, weave a second bead and again 8 flat knots.
6) We weave the base for the first pot. We retreat 5 cm from the last knots, weave twisted chains, working with threads from neighboring ropes, shifting the knots.
7) Check if our flowerpot fits. If it doesn’t fit or, conversely, falls out, undo the knots and tie them correctly. Weave twisted chains about 20-25 cm. (Their length depends on the height of your pot.)
We weave the base for the second pot. We retreat 10-12 cm from the last knot, using 2 threads from adjacent chains, weave one flat knot each.
9) Again we retreat 12 cm, collect all the cords using the braiding method.
Be sure to try on the pot when you finally secure the threads. This will be the place for the second pot. It should fit there securely.
10) Design of the “tassel”. Back off 25-30 cm and cut the cords. You can fluff them, untwist them, or add beads for greater decorativeness.
To make it clearer, watch the video on how to knit a “Juliana” flowerpot:
Creating stencils
It will greatly simplify creating crafts from twine with your own hands by preparing a stencil with a sketch of the invented pattern.
Stencils are a schematic representation of the design of the future product. Their use helps to create symmetrical patterns and speeds up the process of creating crafts from jute twine using the filigree technique.
The main rule for making convenient stencils is to apply a clear image on white paper.
It is not difficult to come up with a pattern to create a template yourself. It is wise for beginning craftsmen to look for jute crafts, patterns and new ideas on the Internet.
Note!
- Crafts made from polymer clay | Step-by-step master class on creating beautiful crafts
- DIY epoxy resin crafts - options for original crafts, step-by-step instructions for pouring and making them yourself
- Lego crafts: step-by-step master class on creating simple DIY crafts + original versions of Lego products (photo + video)
What to crochet from jute, ideas from the Internet
Crochet jute bag pattern
Women's crochet jute vest
A stylish openwork vest is knitted from ribbon lace from jute yarn. Hand-crocheted, it slims the figure due to the vertical pattern. fastens with wooden stick buttons. The original design and cut will not leave you indifferent.
Jute cosmetic bag with openwork valve
I knitted a basket from jute and used an openwork motif on the flap.
And, since I had jute, an eco-style formed by itself: a coconut button and a bone bead on a pendant, and the lining, flap and tassel were made of 100% cotton. So all materials are natural)
Rectangular basket knitted from jute
For a long time I had an idea to knit a basket from twine. I bought jute twine (three-strand), took a 3.5 hook and started knitting.
Simple craft ideas
You can start creating interior items using jute cord by making your own crafts from burlap and twine.
How to make flowers from burlap
It turns out that burlap makes wonderful flowers that look as close as possible to the original. To bring your idea to life, you need to learn how to make flowers with a beautiful bud from burlap. The simplest option would be roses made from this material. Even a novice craftswoman can make a bud.
It is advisable to first prepare the tools and material:
- burlap;
- scissors;
- needle and thread;
- ruler;
- chalk;
- 3 beads.
Rose from burlap
Algorithm for how to make flowers from burlap with your own hands step by step:
- Prepare a strip of burlap cloth at least 15 cm long and 6-8 cm wide. First measure an even strip using a ruler and set the measurements with chalk.
- Fold the burlap strip in half along its entire length. Secure the starting corner with a stitch. Next, the bud shape will be prepared.
- Start twisting the middle of the future rose. Sew several turns of material at the bottom. The result will be a roll of 2-3 turns.
- Next, the petals are made. Gradually tucking the ribbon, sew it to the formed center.
To make the petals look natural, you need to additionally fold each fold of the ribbon in the form of a triangle.
Additional Information! To prevent the burlap sections from unraveling during work, you can coat the edges with glue or melted wax.
After the bud is completely made, you need to sew 3 beads into the center of the composition. You can do without this decor. Spread each petal to make the rose bud more voluminous.
Frame
Any beginner can make a stylish frame for a family photo.
You need to prepare:
- thick packaging cardboard;
- a sheet of dark A4 paper;
- wooden skewers;
- wire;
- a piece of burlap;
- jute twine;
- universal glue;
- scissors;
- decorative elements (coffee beans, beads).
Operating procedure.
- Cut out the base of the frame with a window for the picture from cardboard. Glue a piece of paper to the back so that you can insert a photo.
- Cover the workpiece with burlap.
- The pattern for decorating the frame must be thought out in advance and a sketch made. The twine is twisted and glued to the burlap base, forming its own pattern. The twine must be cut at an acute angle. This makes it easier to glue the edges of the cord together. It is convenient to trim the twine with a skewer.
- After completing the pattern, the product is additionally decorated with beads, coffee beans or other decorations.
Using a similar technique, it is easy to make various crafts from burlap and twine.
Note!
- Christmas crafts - how to make them yourself? 150 photos of the best themed crafts
- Crafts made from stones: creative options for crafts made from stones + step-by-step instructions for making your own, methods and schemes of work
- Crafts from disks: a step-by-step master class on how to create them yourself, creative ideas for crafts of varying complexity + simple patterns for beginners
How to make leaves
Flowers and leaves made of jute are in perfect harmony with each other in the overall composition. There are many options for making this element - it all depends on the type of plant and the technique of execution. Initially, you should choose a pattern to implement your idea, and then prepare the materials:
- Leg-split. You can choose green or natural brown material.
- Prepare a template with a leaf shape and a stationery file as the basis for forming the product.
- Super glue or glue gun.
- A long wooden skewer and tweezers for adjusting shapes.
Options for manufacturing different types of leaves:
- The simplest option for making a leaf is to make a leaf by curly twisting jute with sizing thread. Moving from the center, twist the fiber, giving it the desired shape. Additionally, you can make veins from pieces of twine.
Regular leaf
- The filigree technique is often used; you can choose any intricate pattern-shape and start gluing the parts onto a stationery file. The work is very painstaking, since the rope must be positioned correctly on the base using tweezers.
Unique yet simple leaf
- Laying pieces of rope on top of each other like a lattice. Each binding must be coated with glue. Cut out the shape and glue the outline with rope. This option will look like the leaf was made from burlap.
Making a figured sheet
Important! The size of the leaves should be proportional to the size of the flowers. To make the composition whole, it is advisable to make the leaves using the same technique as the buds before.
The idea of creating plant compositions from twine and burlap is a unique principle for creating beautiful products. In addition, such materials are in harmony with any type of base. The flower will be an ideal addition or decoration to clothing, interior design, and accessories.
Jute rug
Crafts made from jute can not only serve as interior decorations, but also perform certain household functions.
Any novice craftswoman can make a simple rug.
At the preparation stage, it is necessary to determine the size of the product.
To work you need to prepare:
- thick fabric or cloth for the base;
- universal glue;
- stationery knife or scissors;
- jute cord.
Operating procedure.
- Cut out a fabric base of the desired shape and size.
- Form spiral elements from cord or twine on a flat surface.
- Carefully glue the finished parts onto the fabric base.
The size of the product directly depends on the number and diameter of spiral blanks. It is easy to use cardboard as the basis for twine crafts.
To form spirals, a cord or twine of any cross-section is suitable.
Craftswomen use strong thread to crochet rugs, washcloths and bags of various shapes and sizes. The patterns depend on the skill and imagination of the needlewoman.
An original rug will effectively complement any room.
What to crochet from jute, video tutorials
Crochet jute mitten
My loofah is shaped like an exfoliating mitten. I crocheted a washcloth for a large man's palm, because... it was an attachment to a gift for February 23rd. Using the same principle, a washcloth and mitten can be crocheted to any size. In the video tutorial I crochet number 4.
The video should load here, please wait or refresh the page.
Crocheted openwork napkin LEAF from jute
This napkin can be used not only in the kitchen, in the dining room, as a table setting, but also as an eco-friendly washcloth! I crocheted from two-strand jute with crochet size 4mm.
The video should load here, please wait or refresh the page.
We crochet a simple jute basket part 1
The jute basket is crocheted without using rope. The bottom of the basket is a perfect circle. I knit with the simplest single crochets. Even a novice master can handle it.
In the first part we will tie the bottom, and in the second part we will tie the walls of the basket.
To knit a basket you will need the following materials:
- double-strand jute;
- hooks No. 4,5 and 6.
The diameter of the bottom is 14 cm, the height of the basket is 8 cm, the jute consumption is approximately 100 g.
The video should load here, please wait or refresh the page.
We crochet a simple jute basket part 2
The video should load here, please wait or refresh the page.
We crochet a jute bag, part 1
My jute summer bag is made from 8 crocheted granny squares. The bag is small in size and very easy to knit! The highlight of the bag lies in the contrasting strapping and embossed handles.
If desired, you can attach a knitted long handle or belt.
Dimensions of my jute bag:
- width - 22 cm
- height - 23 cm
- thickness - 7 cm.
To knit a bag you will need the following materials:
- double-strand jute (width 2 mm, composition 100% jute);
- black yarn Pekhorka Spring (100% cotton, 250m/100g);
- hooks No. 3.5, 4, 4.5 and 6 mm;
- carabiner rings and lining.
The video should load here, please wait or refresh the page.
We crochet a jute bag, part 2
The video should load here, please wait or refresh the page.
Dish rack
An example of a rope craft for beginning needlewomen would be a stand for hot dishes.
To create it you will need:
- rope or jute cord;
- base (cardboard, cloth, wooden blank);
- universal glue;
- scissors or stationery knife.
Operating procedure.
- Give the base the required shape. Usually stands are made round or square. It is easier for beginning craftsmen to use a circle as a basis.
- The desired pattern is formed from rope or cord. It's easier to start with a spiral blank. The base is covered with glue, the cord is carefully laid in a spiral.
- The edge can be decorated with a cord of larger cross-section.
It is not difficult to depict any ornament on a wooden base. If you pre-impregnate the wood with stain and varnish it, the result will be a unique interior element.
Rose boutonniere
The craft consists of several separate parts. Roses are rolled from a thin strip folded in half and sewn together with nylon thread on the back side. The craft is placed on a felt base. The first layer is glued with hemp threads laid out in a circle in a “sun pattern”. It is more convenient to use hot glue. The second layer is laid out from multi-colored threads folded in loops. Finally, the base is filled with roses of different sizes.
A safety pin is threaded through the wrong side of the felt, and the bouquet is secured to the clothing. This craft can be glued to gift wrapping or a vase.
Decor of containers
Using a jute cord, it is easy to give an original look to any storage container, transform a jar beyond recognition, or decorate a bottle.
For gluing, experts recommend using PVA glue. It does not leave streaks after drying.
The selected container will need to be pre-rinsed, dried, and glass or plastic degreased. After this, cover with an even layer of glue. The cord is laid in even rows and pressed so that there are no gaps.
In a similar way, you can decorate flowerpots, interestingly shaped boxes, and pots for indoor plants.
You can complement the decor with pebbles, beads, lace or fabric appliqués.
Jute decor
New Year's balls for the Christmas tree that have lost their visual appeal and aesthetics can be transformed using jute thread.
To remodel, you will need a rope, a glue gun and spray paint with a metallic tint; before the creative process, it is recommended to cover the working surface with newspapers or an old tablecloth.
The ball can be placed on a cup or glass, an improvised stand will keep it from turning over, its surface must be covered with glue.
Monograms and curls imitating a frosty design are laid out on a wet adhesive base made of rope; after drying, the ball is covered with a thick layer of spray paint.
Stool decoration
Jute cord is highly durable. Therefore, it is used for the manufacture and decoration of stool seats.
It is easy to knit a decorative cover for a stool using knitting needles or a hook made of natural thread.
Another way to make a cover for a stool is to glue a spiral blank onto a fabric base. This method is suitable for those who do not know how to knit.
To make a seat, you need to wrap the opposite edges of the frame with cord.
Basic rules for creating a simple flowerpot (for beginners)
1) Select a design and suitable material.
2) Cut the threads into pieces of the required length.
3) We fasten the threads on a working basis. There should be four ends (sometimes three or another number).
4) Make a loop for hanging the flowerpot. A ring is often used for fastening.
5) Then we begin to knit a twisted chain of right-handed or left-handed flat knots. They need to be knitted in four of the required length (or another number, according to your plan).
6) Measure the diameter of the pot so that it fits well in the flowerpot.
7) Choose a pattern of knots with which we will braid the base - a flower pot. Most often this is a square flat knot.
We knit a recess for the flowerpot.
9) At the end, we secure the work with a tight knot so that the flowerpot does not fall out of the flowerpot.
10) Cut the threads, leaving the ends long. They can be fluffed or beads attached to them to give the product an original look.
Next, we offer you to watch master classes on weaving both the simplest and more sophisticated flower pots using the macrame technique.
Jute lampshade
You can also use natural cord to create a new lampshade for home lighting fixtures.
The first step is to carefully consider the design of the product, the theme of the ornament and select additional decorative details.
You can come up with patterns yourself. It’s easy to look for topics for inspiration on the Internet by studying DIY jute crafts and their new items.
It is convenient to use an inflatable children's ball as a base for a lampshade. The cord is impregnated with PVA glue and wound onto the base in any order or according to a stencil.
After drying, the ball must be pierced, and the product must be additionally decorated with pebbles or other decor.
The basis for making a lampshade will be a glass jar wrapped in cling film.
Cup holder for office
Every home has office items: a pencil, a pen, a ruler... Often such items are found anywhere and it is often difficult to find them; for this, you can make a jute glass holder to store them. Required materials for this craft:
- jute;
- glue gun and rods for it;
- coffee beans;
- cardboard chip tube or paper towel roll.
- Using a glue gun, wrap the cardboard tube with jute in 2 or 3 layers so that there is no gap.
- Glue the coffee beans in fairly order throughout the tube.
This is a simple and quick way to make a jute glass holder. If you used a paper towel sleeve for the base, then you need to glue a circle of cardboard with the same diameter as the sleeve to the bottom of the future cup holder. As decoration, you can use other materials, such as paper clips or buttons.
Clock decor
It’s easy to decorate a wall clock with twine, changing it beyond recognition.
It’s easy to give a watch any shape, for example, turn it into an owl or a cat.
To decorate a watch in the shape of a cute cat you will need:
- a clock mechanism with a dial or a regular watch;
- jute cord;
- cardboard;
- universal or PVA glue;
- scissors.
Operating procedure.
- The dial is wrapped with a cord, having previously smeared the base with glue.
- For the animal's head, a round shape is cut out of cardboard. A cord is glued onto it in a spiral.
- The cord is formed into oval legs and an elongated tail by creating spiral blanks.
- The front legs are fixed closer to 1 and the number 11 on the clock.
- The tail is attached at the bottom and directed along the product.
- The cord is used to make triangular ears, rounded cheeks, paw pads and mustaches.
- The tongue is cut out of red cloth or felt.
- Buttons or beads are used for the eyes and nose.
It’s easy to complement the craft with a satin bow tie.
There are many options for decorating watches. For decoration, it is easy to use twine patterns on a floral theme.
Vase from any container
A glass, tin jar, bottle, glass and any other container can easily become an aesthetic vase for flowers or storing small items if you properly wrap it with twine and decorate it with decorative elements. This is done like this:
- Prepare the necessary materials and tools: container, rope, glue and scissors.
- Wash the jar, bottle or glass thoroughly and dry.
- Treat with glue (in whole or in part).
- Carefully, tightly and evenly wind the twine, starting from the bottom towards the neck.
- Cut the thread without letting it unravel, coat it generously with glue and hide it discreetly.
- Wait until completely dry.
- Decorate the product with painting, applique, beads or flowers.
There are even more ideas on the website https://podelkimaster.ru, see photos of finished crafts
In a similar way, you can update any home or garden item: flower pot, cans of cereals, boxes, furniture elements. You can cover not the entire surface with twine, but stick strips, leaving gaps.
Candlestick
An original handmade candlestick will not only serve as an interior decoration, but will also be a pleasant gift for loved ones.
For production you will need:
- jute cord;
- cardboard base;
- glue;
- scissors.
To decorate the product you will need a stencil with a pattern.
Operating procedure.
- The cord is laid in rings, the diameter of which is approximately 5 cm. A cylinder of 12 turns is formed.
- To decorate the base, openwork twisted loops and ribbons are made from cord according to the stencil.
- They are glued to the base according to the chosen pattern.
- Ribbons and beads are used for additional decoration.
It’s easy to come up with a lot of options for decorating lamps. It’s easy to use the idea with a candlestick as a basis when planning to make New Year’s crafts from jute with your own hands.
In addition to candlesticks, interesting crafts for the New Year holidays can be created by familiarizing yourself with the technique of modeling openwork cord products.
Flat letters
Unusual and exclusive home decor can be made from ordinary cardboard, which is necessary for cutting out large letters or holiday symbols.
Such New Year's crafts are wrapped with jute rope, to give them aesthetics, you can use paper templates, according to which flat figures are painted with white paint.
Openwork crafts
Original decorative elements from cord are made using the air weaving technique.
The basis for creating any pattern are:
- loops;
- bends;
- leaves;
- rings.
It is easy to give the loop any shape using a toothpick.
First of all, to work, you need to think through the design of the product and create a stencil. It is used as a basis for forming patterns from thread or cord.
The cord is impregnated with PVA glue and laid according to the template. This creates an openwork pattern.
After the glue dries, the product will retain its shape.
Using modeling techniques, it is not difficult to create snowflakes, butterflies, dragonflies or various flower patterns from thread.
The items can be used to decorate the interior and decorate the wardrobe.
Products can be not only flat, but also three-dimensional objects. It’s easy to decorate a box or cup stand with openwork details.
It’s easy to get the basis for creative ideas by looking at do-it-yourself twine crafts and all the new items on the Internet.
Hanging decorations
These include Christmas wreaths, decorative rings and openwork balls. The latter are the easiest to manufacture. The base for them is a balloon, inflated to the required size and tied very tightly.
It is wrapped with twine, which is not only glued together at the joints, but also treated with PVA in several layers over the entire surface. After drying, the balls can be painted or left natural color.
When coated with varnish, they will have a matte shine (it will also add strength to the craft). At the end of all these manipulations, the ball can be deflated or burst, and its remains can be removed from the product. Such openwork balls can be further decorated and hung on a jute thread or burlap ribbon.
Decorative rings are hung both as panels on the wall and as a design element freely located in the space of the room. Their design can be abstract, sometimes even abstract, or correspond to the theme of a holiday.
The cardboard or wooden base is wrapped with twine or burlap tape (it is also possible to cover it with a whole cloth). Details corresponding to the design theme are made of jute, burlap or elements combining various materials. Rings are hung in the same way as balls.
Design of costume jewelry
Jute thread is often used to make unusual jewelry. Using a cord or thread, you can decorate an old bracelet, hairband, or make an unusual pendant.
As a basis for work you will need old jewelry. The item will need to be cleaned of old decor and its surface degreased with a solvent.
Having thought through the pattern, the thread is glued to the product according to the template.
Additionally, it is easy to glue beads or rhinestones for beauty.
Take a non-standard approach, it is not difficult to create many interesting items from jute.
Volumetric figures
The New Year's pig craft made from jute is easy to make together with children; to make it you will need a jute thread, which is tightly wrapped around a ball of newsprint.
The snout, ears and tail are formed from pieces of rope of different lengths; instead of eyes, you can glue black, round buttons.