The purchase of this device is not always justified, since often affordable models are small in size, and more spacious options are too expensive. In addition, there are often variations in designs that are not safe. Unstable platforms easily tip over when a child leans on the sides. It’s safer and easier to make a simple design yourself.
Product sizing
In many ways, the area allocated for children's games depends on the room.
In cramped conditions, triangular models of playpens, which are located in the corner of the room, are preferable. If the apartment is spacious, then you can choose classic rectangular and square shapes or not quite standard hexagonal ones - it all depends on your desires and capabilities. Having decided on the shape and dimensions of the future playpen with your own hands, you can begin to calculate the necessary materials. For a wooden structure everything is simple. The two perimeters of the arena are the total length of the beam. If you want to make a reinforced structure, you can add 4 more heights - for corner posts.
The recommended gap between the bars ranges from 5 to 7 cm. Their number, respectively, is equal to the perimeter (in cm) divided by the distance between the lattice elements. The resulting number is rounded to the nearest whole number, and a couple of rods are added to it “in reserve.”
With a mesh playpen it is a little more difficult. The perimeter of the structure indicates the linear meters of the grid. To calculate the length of the pipe, you will also need the height.
It is also important to consider the number of vertical posts. Corner is a must
If the side of the arena is equal to or more than 1.5 meters, then one additional stand will be needed.
The final formula: two perimeters + the height of the arena, multiplied by the number of racks. Fittings are calculated a little easier: number of corners * 2 = total number of corners, and number of posts * 2 = number of straight tees.
Manufacturing process
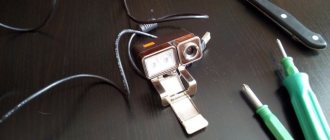
First, the lower trim of jumpers and tees was soldered.
For soldering, a 25-diameter nozzle was used. The pipes are heated from the edge to a depth of 15 mm for 6 seconds. Then they are inserted into the fittings and set after 2 seconds.
Then the vertical posts were inserted.
Tees and top jumpers are soldered onto the racks.
Even if the child gets tired or doesn’t like the playpen, it won’t be such a shame to cut it up and put it in the garage for storage; nothing will happen to the plastic. Then solder it and you can use it again. The appearance is not so glamorous, but we don’t need to take photos on Instagram. Plastic is harmless to health, the pipes meet all sanitary and hygienic requirements according to GOST. And with the money you save, it’s better to buy diapers.
Source
Do-it-yourself playpen house for a child (master class, photo)
Do-it-yourself playpen house for a child (master class, photo)
Hello! From personal experience I know that parents who bought a playpen for their baby often face the problem that he refuses to play there.
And the purchase often ends with an announcement like: “I’m selling a playpen in perfect condition.” Faced with such a situation, I decided to convert the playpen into a house, which radically changed the situation. I decided to share this experience.
So, we will need (in parentheses I will indicate the amount of material that I needed, since the amount of material depends on the size and configuration of the arena being converted):
- Playpen with mesh removed
- Fabric: for the front side - plain (1.5 m x 1.5 m), a tone darker for the door and window frames (0.5 m x 1.5 m); for the reverse side - with a child's drawing (1 m x 1.5 m).
- White felt for windows (two A4 sheets)
- Transparent dense polyethylene to imitate glass
- Zipper (0.9 m or two 0.45 m each)
- Bright knitwear for covering the additional handrail (0.2 m x 1.5 m)
- Colored elastic (4 m)
- Polypropylene pipe (3 m) and 4 90 degree angles
The main drawing depends on the dimensions of the base:
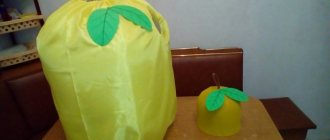
My six-month-old child could not reach the upper soft handrail, and therefore, there was a desire to make an additional handrail at a height where it would be comfortable for my son to hold on to it. We make a frame size axb from a polypropylene pipe. If you have a special soldering iron, good. I don't have one, so I heated the end of the pipe on a gas stove. We cover the resulting structure with padding polyester.
I made the windows by covering a cardboard template with fabric, and since I wanted to make them beautiful, and not just rectangular, I had to tinker a lot with the circles. That is why, I think, it is advisable to make window frames from felt and stitch them together with polyethylene. It is better to make the trim and the door from fabric a little darker than the main color. For the casing, we build a cardboard stencil according to the drawing, add a polyester layer for volume and cover it with fabric.
The door can be decorated with decorative cord and applique. I inserted a sheet of fiberboard into the door between layers of fabric so that when opening the door would act as a ramp, but during operation I realized that a soft fabric door would be more convenient. It is more convenient to first sew the zipper between the front and back fabric of the door and wall, and only then sew the base of the door to the bottom of the front fabric (the fabric for fixing the structure).
We sew a strip of knitwear (10cm wide) to the top of the walls of the house to cover the handrail, not forgetting to insert elastic bands for fastening into the seam (each 20cm long). The lower part, which will be located under the base (bottom) of the arena, consists only of facial fabric and is pulled together with a cord. We trim the handrail by hand. We assemble the playpen with new walls, tighten the cord from below, and tie elastic bands to the frame from above. The house is ready! Baby, move in!
Not only my son liked the playpen:
Thank you for your attention! I will be glad if my rework inspires
You to create something like this, rainbow, cheerful, playful, because this is what childhood should be like! I will be happy to answer if you have any questions.
21.03.2014
Rate a homemade product, a master class, an idea. Comments
Connecting elements
Polypropylene or PVC is widely used in areas such as baths, kitchens, and toilets. But besides plumbing tasks, they can serve as an excellent basis for creating original pieces of furniture.
Quite often you can see something like this:
- shelves;
- awnings;
- folding chair;
- bunk bed;
- stool;
- swing;
- rocking chair;
- racks;
- hangers;
- whatnot;
- garden furniture;
- arches, etc.
Looking into your garage or storage room, you will probably find a lot of scraps from old plastic pipes that turned out to be unnecessary after renovation. And for some reason you were in no hurry to throw them away.
I think you just knew that sooner or later you would read this material, and there would be an irresistible desire to make something out of them. But what exactly is still an open question. I would like to start not with what to do, but how to do it.
We are talking about connecting elements together into the structures you need. When using plastic products, you must determine exactly what kind of material it is. The most commonly used are polypropylene and PVC.
If it is a polypropylene pipe, then you will need a special welding machine for the connection. I think many people know how much it costs. Buying a device for one-time use is a complete waste of money. It's good that there is a rental service. But even the presence of welding does not allow many home craftsmen to achieve what they want. Working with such devices is difficult and requires special training and extensive practice. If you have no experience, and there’s nowhere to get a welding machine, look for other methods.
An alternative to welding is the use of glue and fittings. Moreover, in the case of polypropylene, I advise you to give preference to compression fittings.
If it is PVC, then a connection with a socket and rubber seals, glue or fixation with flanges will do.
Children's playpens. Typical designs
There are many types of playpens for children. They are divided according to configuration:
- Square.
- Rectangular.
- Hexagonal.
Along the enclosing perimeter:
- Wooden fence. Preferred option. The material is environmentally friendly, strong, durable. Disadvantages: If it falls and hits a wooden grate, it can cause injury.
- Net. Lightweight, soft, smooths out impacts, softens falls. Disadvantages: the baby's fingers may get tangled in the cells.
By purpose:
- Game. It is used to develop the baby’s motor skills, as a temporary device for several hours. The industry produces these products in a variety of shapes, from modern and classic materials. The bottom of the arena is covered with rubberized fabric or raincoat fabric. Average cost from $67.
- Cot-playpen. They come in two types: wooden and mesh. Wooden ones are made stationary or folding, with a folding front wall, with the ability to adjust the height of the side. The playpen is selected taking into account the growing up of the child. In such a sleeping playpen, a child will sleep until he is 3-4 years old. The advantage of this type is the high stability of the structure. Disadvantage: the material is poorly processed with hygienic means. Average cost from $100.
- Screen. Placed depending on the area of the apartment and the preferences of the parents. The main functionality is temporary fencing. Convenient for creating safe movement of the baby around the apartment. Masks and protects the child from entering dangerous places: stairs, fireplaces, office equipment. Average price from $40.
- Inflatable. Has a seasonal purpose. Made from food grade plastic or rubber. Brightly colored, has bizarre shapes. Convenient for trips with a child to nature, the sea, or a summer cottage. The average cost is $20.
For small apartments, a classic crib fenced with round wooden rods is a rational playpen. The rigid design reliably holds the baby who is beginning to stand up and allows him to take his first steps around the perimeter.
This is interesting: How children are distributed into groups in kindergartens: we'll tell you the story
How to choose
Those who are interested in how to sew a protective playpen for a child’s train with their own hands should also learn about the rules for choosing a store-bought product. This will help create a functional and high-quality playpen.
You might be interested in this: Creating a pattern and instructions for sewing suitcase covers with your own hands
Selection instructions:
Pay attention to the direction of the shared thread. The fabric should not stretch
If cut incorrectly, it will be stretched after the first use. And after washing the product will be uneven. The fence in its installed form should only extend horizontally. The bottom and top must be equal. If there are 100 centimeters on top, that means the same amount on the bottom. The base should be made of calico or raincoat fabric, the walls should be made of fine mesh. Slings with fabric are stitched several times. The load falls precisely on the junctions of these elements. The optimal size is 100 centimeters. It is recommended that there is a pocket for a towel, toys, diaper. The best option is to have a pocket on the wall that will touch the wall of the train. In this case, you can put a towel or something else, as it may be cold.
Instructions for the playpen It is strongly recommended to take a black mesh, as it blocks the sun and is easier to see through it than through a light-colored material. She doesn't strain her eyes.
Assembled
https://youtube.com/watch?v=-Yo7uX6TdKc
Playpens from what you have at home
If you use the playpen quite often, you can come up with something more thorough and reliable. A good option is a frame playpen made of mesh or fabric. The frame can be made from plexiglass tubes or similar material. The main advantage is that you can choose any shape and size of the playpen that is convenient for you. The tubes are covered with mesh, and the result is a light and safe playpen without sharp corners.
The base of such a fence must be weighted or attached to the floor, otherwise the child will easily knock it over and fall himself.
If the tube playpen seems too bulky for you, it can be improved a little. Instead of tubes, we sew tight ropes, which we tie to heating radiators and fastenings specially attached to walls and/or furniture. Stretching such an arena will be somewhat reminiscent of setting up an old “Soviet” tent. Its main advantage is compactness. After use, the playpen can simply be rolled up.
A playpen is a good means of restraint for a child if he needs to leave for a couple of minutes. But remember, you can’t leave your baby in the fence for a long time. He must move around the house, learn something new and develop. Therefore, even before the birth of the child, you should try to secure your home - close sharp corners and dangerous bedside tables, secure everything that could fall, and get rid of trash.
Advice from experts
When making a wooden version, you can use a little trick - connect the corners using rods. To do this, in addition to the cut, a through hole of the appropriate diameter is also made along the edges of the beam. The height of the corner rods should be half the thickness of the array greater than that of the other lattice elements. During assembly, the corner rod will reliably connect the structure of the playpen without glue or screws.
It is not recommended to coat wood with varnish or paint. Polishing with a thick cloth is quite enough to remove splinters, and if the child decides to chew on the obstacle, he will not eat harmful paints and varnishes.
To prevent a lightweight playpen made of mesh and plastic from turning over, you can make it heavier. To do this, it is enough to pour simple sand into the lower pipes of the structure - a child will definitely not be able to cope with such a load.
Subscribe to our Social networks
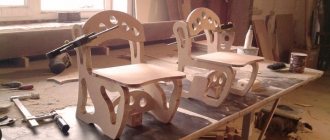
The assembly of the structure proceeds as follows:
1. Pipes are cut into segments of the desired length. The presented design is assembled from four sidewalls. To assemble the two sides, pipe sections and corner fittings were used. To assemble the two longer sides, pipe sections, angles and tees were used.
2. The elongated sides must be reinforced in the middle with vertical posts (connected via tees) for greater stability of the structure.
3. To make the podium, padding polyester is glued onto a sheet of plywood, after which the latter is covered with either fabric or oilcloth. The edges of the protective material are folded from below and secured with staples.
4. The clamps (clips) are screwed with self-tapping screws to the edges of the podium. The spacing between fasteners is at least 50 cm.
5. The sides are installed on the edges of the podium and fixed with clips.
6. The mesh, made by weaving fishing nets, is stretched over the sides. With its help, the sidewalls in the corners of the structure are pulled together.
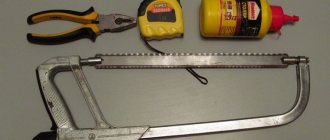
Necessary materials
The size of the arena is 150×115 cm, height 65 cm. Vertical partitions go every 10 centimeters.
- Pipes cut into 10 cm pieces for vertical jumpers.
- Tees: 32 pieces in width and 44 pieces in length. This is for the top and bottom.
- Corners 8 pieces.
- Vertical posts 38 pieces, 60 cm each.
20 mm PVC pipes were used for assembly.
In fact, 76 tees, 8 angles and 18 two-meter pipes were used.
It took 1300 rubles for materials and 2 hours for work.
Even if you don’t have a pipe welding machine, you can buy the cheapest set for 1,500 rubles; it will come in handy on the farm.
Playpens and their varieties
There are many different models on sale now. All of them are comfortable and absolutely safe, guarantee a good overview, so the risk of injury to the child is minimized, and you can observe the curious creature from anywhere in the room. However, not all parents are ready to shell out an excessively large sum for a product that they are quite capable of creating on their own.
To determine which playpen is best to construct with your own hands in a particular situation, you first need to get acquainted with the materials used for their manufacture, with the varieties of these products. They differ in the type of fencing, purpose, configuration. There are such shapes of “limiters” for kids: square, round, polygonal and rectangular. According to their purpose, they are divided into:
- Temporary structures. These playpens look like portable screens, which is what they essentially are. The advantage of the models is that they are easy to move around the house.
- Gaming. They are designed to improve the child’s orientation in space and to develop musculoskeletal functions. These products are usually quite large in size, so they are chosen as a stationary fence.
- Inflatable. These playpens are made from two materials at once: plastic and rubber. This type is bought if parents often go to the country, or just go out into nature.
- Playpen-cribs. This is the smallest design, but a child can play and sleep in it. The height-adjustable sides make it possible to use them for older children.
The last option is the most undesirable, since the baby needs more space for development. The type of fencing is the last factor taken into account when choosing a model for a restless creature. There are only two types of playpens - lattice and mesh. In the first, the role of a fence is played by wooden rods. Secondly, a special mesh is stretched around the entire perimeter of the frame structure, protecting the child from falling and softening him.
The most popular (and recommended) material remains environmentally friendly wood, which, if processed properly, will be absolutely safe.
Plastic pipes. Ideas for children
If you have a small child in your home, then do not rush to buy the necessary items for crazy money. Kids are growing up quickly and soon all this will no longer be relevant. Try to show your imagination and make useful things for the children with your own hands.
Manege
In order to limit a small child’s movements around the apartment, a wonderful device has been invented - a playpen. You can buy it, or you can make it according to your individual measurements! You will need a lot of material to make the playpen, so you won’t be able to get by with scraps in the design.
It is best to purchase pipes in the store, having previously calculated how many of them are needed to create the playpen. Do not regret the money spent; after the child grows up, the playpen can always be disassembled and made into something else.
When creating a playpen, take into account the distance between the bars and the size of your baby; it will be a shame if the child crawls between the bars. Experienced parents advise to come up with fastening the structure to a reliable support to prevent the playpen from tipping over.
Swing
To make swings, it is recommended to use reinforced plastic, because... the situation here is related to the movement and safety of the child. Start making them only when you get good at working with simple crafts.
There are many swings. The most interesting and attractive ones in the form of swinging sofas can be found in country furniture supermarkets. They're just expensive. See how they are made, take the necessary dimensions, develop a sketch adapted to your leftovers.
Football goal
Do you live in the private sector or have a dacha? Consider making children's soccer goals from plastic pipes. In fact, the product will consist of several components that will need to be assembled into a frame. To be more convincing, you can purchase a net and stretch it over the manufactured gate. When the little football player grows up, you will disassemble the structure and immerse yourself in creating a new masterpiece.
small waterfall
An interesting tip for a summer residence is a small waterfall. On hot days it will be a great salvation for children. The waterfall is a U-shaped structure. Drill holes in a row in the horizontal rack, and provide places at the base for attaching water hoses. By supplying water you will get a water arch, you won’t be able to kick your baby out of such a shower!
Plastic pipes are an excellent material for realizing your bold ideas. Create, dream, create, delight your loved ones and friends with useful homemade products.
How to make a folding hexagonal playpen yourself
The size of the playpen is chosen independently; the dimensions depend on the capabilities of the total area of the apartment. Recommended height 75 – 100 mm. Height plays a role in preventing the child from falling out of the crib. As he grows up, he will learn to throw his leg over the edge. A high fence will not give him such an opportunity.
The following materials are required for the frame construction:
- Bars made of hardwood: birch, alder, aspen, maple. These rocks are characterized by medium hardness and are easy to process and cut. They have a beautiful natural color, a calm, non-irritating look. Recommended size – 15x50x1000 mm. In the amount of 12 units. Before purchasing, the wood is checked for quality: good drying, absence of roughness and defective areas, absence of a bluish coating. Undried timber will lead and warp during operation. Blueness on wood means it has been in damp condition.
- For the grating, round bars with a diameter of 10 mm. In the amount of 36 units. The type of wood is selected similarly to the previous point.
- Bolts and nuts with a diameter of 5 mm. Select connecting elements with a smooth metal surface. The heads protruding above the bar should not scratch children's hands. The material of the bolts is selected taking into account environmental friendliness and safety for the health of the child.
- Self-tapping screws.
- Sandpaper for wood: No. 0 and standard.
- Thick construction PVA glue.
- Varnish or paint without organic solvents, water-based. For example, AZ 2130/00. In the container, this varnish is white and looks like thick milk jelly. When dry, it becomes transparent, protecting the surface from mechanical damage and without masking the natural pattern of the wood.
To work, you need to prepare a set of tools:
- A hacksaw for wood with a removable blade.
- Jigsaw: manual, electric.
- Electric drill and set of drills with a diameter of 5 mm and 10 mm.
- Brush for applying varnish.
The playpen is assembled from separate sections connected by bolts to the posts. The convenient and mobile design allows you to fold the crib for transportation or put it away during cleaning or repairs.
Transforming playpen
The transforming playpen is a multifunctional structure in the shape of a polygon. Most often, these models are equipped with a door and do not have a bottom. Typically, a transformable playpen comes with a mat made of a special non-slip material, which is laid on the floor under the structure. At first glance, this device seems fragile and unreliable, but this is not so. When installed correctly, it is very stable, will not tip over and can easily withstand the pressure of a baby. Later, when the child grows up, the playpen for children can be used as an enclosing structure to limit the baby's entry into the kitchen, stairs and other dangerous areas of the house. The walls of the structure consist of partitions and allow you to view the room. These models have one drawback - the high price.
Floor
It will be good if you cover the entire playpen with a single piece of linoleum. The edges of the linoleum need to be let out and attached to the walls, thus creating a kind of trough. Thanks to this, you will protect the floor of the playpen from dog claws and urine leakage. Please note that you cannot make a floor from several pieces of linoleum. As soon as the dog finds this joint, it will begin to tear it apart and will not calm down until it ruins the entire coating.
If the room in which the playpen will be located is poorly heated, then the floor must be insulated. To do this, ordinary insulation is laid under the linoleum.
Special fur rugs are placed on the floor of the arena in which small puppies will live, under which a layer of absorbent material or paper must be placed. Thanks to this, the puppies will always have warm, dense and dry bedding under their paws. If you do not have the opportunity to buy such bedding, we recommend covering the floor of the arena with padding polyester blankets. As they become dirty, such blankets are replaced with clean ones, and the dirty ones are sent for washing. We recommend washing dirty synthetic blankets in a washing machine on a high temperature setting.
How to choose the right playpen - do-it-yourself playpen for a child
Last modified 04/24/2017
A playpen is a fence for a baby that allows parents to safely leave and
play the child alone and be sure that he will not crawl away or climb over the sides. Today, the market offers a huge number of playpens of varying shapes and sizes: rectangular, corner, round, as well as materials of manufacture: wood, plastic, mesh and others.
Does a child need a playpen? Or is it a waste of money
No one will give you a definite answer to this question. One baby can happily sit and play for hours on end, without requiring additional attention from loved ones, while another will want to be held in his favorite arms as soon as possible. Of course, it is possible to accustom a child to a playpen and should start as early as possible, so the question is: “should I buy a playpen or not?” should be placed in the family immediately after the birth of the baby.
A child who happily sits in the playpen even for at least 30 minutes is already magic and happiness for the mother, especially if the mother is at home alone and there are no “free hands” to intercept the baby. (I previously wrote a review about the bouncer cradle for a newly born baby and what a lifesaver it is).
Another advantage of the playpen is that it most often has wheels and can be moved around the house. Thus, your child will always be with you, but will not run away or distract you from household chores.
At what age can a baby playpen be used?
As soon as the baby has learned to roll over, the time for constant monitoring begins. A child should not be left unattended anywhere. Therefore, you need to buy a playpen for your child when he is 3-4 months old.
How to choose a playpen
What you should pay attention to. The main criteria to pay attention to when choosing a playpen:
The main criteria to pay attention to when choosing a playpen:
The playpen must “stand firmly on its feet” so that the child cannot turn it over
This is extremely important, as it relates to the safety of your child. The materials from which the playpen is made must be of excellent quality. The paint should not come off and stain everything around, because children at this age learn everything by heart and toxic substances can easily get into the baby’s mouth
If the playpen is made of fabric, check that it does not have a persistent synthetic odor, which also indicates a low-quality product. If you choose a playpen made of mesh, then choose the color as neutral as possible, not bright. In order not to create additional strain on the baby's vision, what is your choice of a wooden playpen? Amazing! Just make sure that the distance between the rods is a maximum of 5-7 cm. This is safe. The head will not fit through anywhere and will not get stuck. If the playpen has fastenings, then they must be well fixed and have plugs
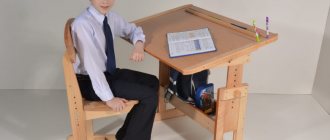
How to make a playpen yourself? Inexpensive do-it-yourself playpen for a child
I hasten to share with you the idea of a wonderful playpen that you can easily make yourself and will cost several times less than its analogues from leading brands.
What we need:
- Bed from Ikea “Sniglar” (made of real beech without treatment) -2 pcs. Price 1 bed - 2199 rub.
- Mattress from Ikea “Vissa Slappna” - 2 pcs. The price of 1 mattress is 899 rubles. Since the playpen will be 120*125 when assembled, there will be a 5 cm void between the mattress and the wall of the playpen. This did not bother us in any way, but if you wish, you can find 1 mattress of a non-standard size (60*125)
- Sheet from Ikea “Knoppa” 1 pc. Price-249 rub.
- 6 clamps - 50 rub.
Total: A wooden playpen for a child measuring 120*125 made of natural beech will cost you 6,500 rubles
A similar playpen from the well-known company Geuther made of natural wood costs about 15,000 rubles
Assembly instructions:
We assemble 2 beds together (without 1 side wall) and secure them with clamps for strength
Tip 1! To prevent the bottom of the cribs from falling out, you can screw the self-tapping screw all the way through. Dad's initiative is welcome!
Or
Immediately turn the cribs upside down so as not to use the special mesh bottom at all.
Tip 2! When the child grows up and moves around the house independently, you can turn the playpen over and pull out (saw in the middle and pull out entirely) 3 twigs.
Then the baby will have a real corner of his own! But the most important thing is that the child will be interested in getting in and out of there himself.
(Visited 266 times, 1 visits today)
Types of filler for baby bed sides
Today, a large number of fillers have been developed that have their own advantages. Namely:
- Foam rubber is a microfiller that requires special conditions.
This is, first of all, meticulous and high-quality drying. This base has the ability to retain water well, which promotes the formation of microorganisms inside.
Foam rubber has good wear resistance, which is important for frequent washing.
- Sintepon is the best microfiller.
This material is not expensive, simple, quite flexible, washes well and dries instantly. Its qualities prevent the formation of fungus.
The most important thing when making a border with your own hands is to quilt the fabric so that the filling does not roll off.
- Holofiber is the latest filler, superior in quality to padding polyester.
It is absolutely non-toxic, does not retain moisture, and dries instantly without changing its original configuration. Due to the spiral texture, the filler is very wear-resistant.
It does not cause allergic reactions, which is very important for babies.
- Periotec is an innovative fiber.
Its main advantage is hypoallergenicity. This is a very flexible artificial material that washes well.
It also dries quickly and holds its shape well.
- Hallcon is an artificial filler.
How to make a playpen without bars
For small apartments, the ideal playpen for a child would be a mesh box crib. It is mobile, has a compact design, and a secure fence. Absorbs and softens the baby's fall.
Materials and tools for the playpen:
- Synthetic mesh.
- Plexiglas tube.
- Metal hacksaw/jigsaw.
- Tailor's scissors.
- Roulette.
- Chalk.
- Sewing machine.
- Colored threads No. 10.
The dimensions of the playpen with a net are selected based on the capabilities of the apartment area. Having chosen the sizes, buy a synthetic mesh in the store. Requirements for mesh material:
- Color: dim, calm. The shade recommended by child psychologists is cream, light beige, softly blurred pink, light heavenly. The baby will look at this grid for a long time, strain the lens or experience pain in the eyes if an acidic-bright color scheme is chosen.
- A grid with an average cell size is selected. In a large one, the child will get confused, try to stick his arm or leg behind the toy and wrap the material tightly around the skin. Small - will make the baby nervous and feel a feeling of loneliness, and will impede visual review. Recommended cell size is from 20 mm to 35 mm.
- The synthetic mesh thread is chosen to be of medium thickness. The thread is not twisted, solid, without inserts of fishing line or metal. A very thin thread will cut delicate skin.
Assembly of the structure:
- Segments of the arena are cut out of the plexiglass pipe with a hacksaw according to the selected dimensions.
- For a square arena, a mesh pattern is made for one side. There is plenty of room for drawstrings on all four sides. Tubes will be threaded into the drawstrings.
- The pattern is placed on mesh fabric and outlined with chalk. Cut out the first side.
- The drawstrings are wrapped on four sides and sewn with a strong, fine stitch. Sewing threads are chosen to match the color of the material.
- Tubes are inserted into the finished drawstrings. One at the top and one at the bottom. Then the tubes are threaded into the sides. The tension of the material is adjusted, hemmed or unraveled, establishing a tight position. This turned out to be the first wall of the arena.
- The operations described above are performed to produce the remaining three walls.
- In the mesh fabric, holes are made to fit the tubes to the diameter of the plexiglass.
- The walls are assembled together.
- For strength and safety, the joints are wrapped in soft material. For example, a removable overlay is sewn.
The mesh playpen will serve as a baby's bedroom and place to play.
Soft fencing
The wooden playpen for children is durable and hard, but the baby can hit himself. It's easy to make it soft. Instead of wooden inserts, you need to stretch the mesh using plastic tubes. The main thing is to make the base heavier. Then the baby will not be able to turn it over when he wants to lean on his elbow.
Wooden playpens up to 3 years of age allow you not to worry about your child; it will be a safe place where the baby develops motor skills and relaxes. Curious children always want to sneak away somewhere. To prevent this from happening, parents need to use a space limiter until they are 3 years old. This will help protect children from injury. It is quite possible to assemble a structure for a child yourself. After all, this design is no worse, and even better, than the purchased one. And material costs will be significantly lower.