As sad as it may sound, the last summer month, August, is ending. This means that school days are very close. You have probably already purchased or are just about to purchase beautiful office supplies in the form of notebooks, notepads and diaries.
The news portal “Vtemu.by” in this article would like to offer you some interesting and simple ideas for decorating notebooks. After all, you always want to stand out from the crowd, be interesting and extraordinary.
So, if you are ready, then let's get started with these ordinary and nondescript school notebooks. Let us turn ordinary notebooks into a real work of art and your pride! With notebooks decorated with your own hands, you will definitely not confuse a notebook on physics with a notebook on mathematics, a notebook on Russian literature with a notebook on biology, because each of them will have its own unique appearance.
DIY embroidery on the notebook cover
Such a creative option for decorating a notebook will definitely evoke admiring glances from your teachers and classmates, and of course, they will delight you and lift your spirits, even in the most boring and uninteresting lesson.
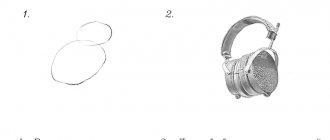
So, first of all, you need to decide what image you would like to see on the cover of your notebook. The image can reflect the essence of the subject or, on the contrary, reflect your hobbies; in a word, choose what you like.
In our case, we chose the image of a cheerful pineapple.
The image must be secured with masking tape on the cover of the notebook, and then proceed to making holes using a needle or awl. The more holes you make, the neater the embroidery will look in the future.
Now you can start embroidering.
Cover the inside with a glued sheet of cardboard.
Interesting ideas
There are not many options on how to make a cover out of paper. Therefore, we will look at several other interesting ideas for creating a product from different materials.
- The cover can be made from a road map. You just need to take an old atlas or other map. The product will be wicker. Therefore, you need to cut strips 1.5 centimeters wide from the card, and the length should be such that this part wraps the product on both sides. Next, the interweaving of horizontal and vertical segments occurs. All strips along the edges must be connected with glue. Unnecessary edges must subsequently be trimmed. To keep the woven strips together, they can be glued to wide pieces of tape with the inside. Ready!
- You can make an interesting cover from your photos. Measure the width and length of the front of your notebook or book. Print the photo so that you get 9 square photographs, the area of which would be equal to the area of the front side of the book. Next you need to make a regular paper cover. We talked above about how to make a cover from A4 paper. You need to glue the pictures to this paper base. The same can be done with the back of the cover. The result will be a beautiful and memorable thing that will delight you while working or reading.
- The cover can be made from fabric or old clothes. You just need to look for unnecessary things at home or buy fabric at the store. In this case, measurements of the length, width and thickness of the product are also taken. The only difference will be that the side pockets of the cover will not be glued together, but stitched together. You can also use a sewing machine for this.
- We figured out how to make a cover out of paper. You can now think about more complex materials, such as leather. The cover production process will be standard. You just need to pay attention to the fact that the leather cannot be stitched with a thick needle, otherwise large holes will remain that will not decorate the product.
All covers can be decorated in any way. Various buttons, ribbons, stickers, beads. You can also glue finished embroidery onto it. For decoration they use scrapbooking paper, transfer drawings and many more interesting ideas for decorating or designing such products.
How can you decorate a notebook?
As a material for decorating the cover of a notebook, you can use decorative tape, or if this is not available, it can be replaced with decorative paper, which must first be cut into strips of the same width.
Now concentrate and come up with a pattern. Glue the finished strips tightly to each other. You should end up with a bright, unique surreal pattern on the cover of your notebook.
Materials and tools for work
To prepare for the process of creating a book, you need to know what will be useful. First of all, these are scissors, a ruler, colored or white paper, PVA glue, cardboard, fabric.
Paper is needed for origami, glue is useful for gluing the necessary parts, scissors for cutting and trimming, cardboard and fabric are useful for creating the binding of a future book. A ruler as an assistant tool, without which any creative work is indispensable.
How to decorate a notebook with your own hands for school?
A very original and at the same time multifunctional decoration for a notebook can be anti-stress pictures that need to be glued to the cover of the notebook.
As you attend lessons, you will add bright colors to the cover of your notebook and thereby feed your emotional state with positive charges.
Fabrics
You can also make a book cover from fabric. Dense colored material is best suited for this. To ensure that the product looks good, does not wrinkle or slip, it is recommended to glue the fabric with non-woven material on the reverse side.
You need to do the following:
- According to the already known scheme: the book is placed in the center of the fabric and outlined at the top and bottom with a horizontal line. There should be a margin of at least 5 cm for pockets on the sides, about 1-2 cm on the top and bottom.
- The fabric is cut out along the marked lines. A fold is made at the top and bottom, lined with non-woven fabric inside and ironed - this way the fabric will not unravel and will retain its shape.
- Then the book is placed again in the center, the leading edge of the fabric is folded over and secured with a few stitches at the top and bottom. The same is done with the back cover. A book can be easily inserted and removed into the resulting pockets.
DIY notebook decoration
The notebook cover will look elegant and unusual if you use multi-colored buttons and beads of different sizes in the decoration.
Glue the buttons to the cover of the notebook, and then fill each of them with multi-colored beads, which are also secured with glue.
Plastic film
You can make a soft cover for a book from film; it is one of the most popular materials for such textbook design. The choice may fall on transparent or bright film.
For everything to work, you need to follow the instructions:
- Unroll the appropriate size of wrapping plastic and place the book in the center. If there are markings on the film, a piece of film is cut out along it. Otherwise, you need to use a ruler and pencil. Leave a couple of centimeters of allowance along the edges.
- If adhesive film is used, the protective layer is removed from it and the book is placed strictly in the center.
- The front cover of the book is then opened and the cover is folded inside. The same is done with the back side.
- In the corners of the book, the cover is folded and the excess is trimmed.
- After this, the film is unrolled, and the corners are completely cut off so as not to damage the textbook. Next, the edges of the film are folded inward again. As a result, the cover should fit tightly around the book.
- The folds are secured with adhesive tape, being careful not to touch the paper. If there are any bubbles left under the cover, they are expelled by smoothing the surface of the book with the edge of a ruler.
Hard cover
According to a similar scheme, book binding is done in a printing house. Of course, with professional equipment the result will be different, but don’t forget about skill: having designed a book in this way several times, you may be pleasantly surprised by the result.
You can make a book cover with your own hands by following the instructions:
- A stack of eight sheets of paper is folded in half so that they form a single whole. You need to make four identical stacks.
- The sheets are unfolded and fastened along the fold line.
- All stacks are connected together and the width of their end part with allowances is measured.
- A strip is cut out of durable fabric according to the measurements taken.
- Stacks of sheets are held together with a large paper clip for ease of use. The end part is smeared with glue and a fabric strip is applied on top.
- The finished stack is placed on cardboard and outlined with an allowance of 5 mm on three sides. You will need two such parts (top and bottom of the cover).
- A part of the required width is also prepared for the end part.
- All parts are placed on a well-ironed fabric, leaving an equidistant distance between the end part and those to the right and left of it. Glue is applied to each piece and applied to the fabric.
- The top and side edges are smeared with glue and folded inward. The cover is ready, all that remains is to glue the sheets of paper.
- The stack is glued to the end of the cover from the inside with the fabric down, additionally secured on each side with a strip of cotton material.
- Until the glue dries, keep the stack vertical to avoid sticking the sheets together.
Seal
Now you should go to the “File” - “Print” section.
In the settings you need to set duplex printing. But the printer may not support this option automatically, and you will have to insert sheets into the printer when prompted on the computer screen. To print correctly, you need to turn the sheets over the short edge of the paper. You may need to place the top sheets of paper in the tray with the text facing up/down (as the device itself suggests).
An A4 sheet holds 4 A5 pages. Accordingly, the book should have the number of pages that is a multiple of four. The latter is the outside of the brochure and should be left blank.
Click the “Print” button, and the software Wizard will independently combine the brochure and set the printing order.
When printing, it is recommended to immediately divide a large document into several thin books, otherwise it will be inconvenient to fold the sheets later. In the parameters, set the number of pages in the brochure. In a document of 16 pages, select 8, and you will get two books of 8 sheets each.