In the preschool and school curriculum, along with autumn crafts, homemade cards for March 8 and Christmas tree decorations, there are unusual and original products from scrap materials for Cosmonautics Day - bright models of the Solar system, small space stations, stars and asteroids, rockets, spacesuits . Crafts for Cosmonautics Day for kindergarten and school, created with their own hands from paper, cardboard, plasticine, discs, bottles and even pasta, allow children to show their imagination, bring the distant and unattainable world of space closer, open the veil over dozens of secrets of the Universe, and literally touch hands to the mystery of the universe. Our page presents the best ideas and step-by-step master classes with photos and videos. Be sure to use them!
Simple DIY crafts for Cosmonautics Day in kindergarten
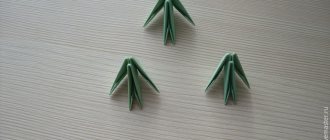
We invite the littlest dreamers to make a simple craft with their own hands for Cosmonautics Day in kindergarten - space stars. Unusual figured products with small colored crystals will decorate an exhibition of children's crafts and will certainly bring victory at the holiday competition.
Necessary materials for a simple craft for Cosmonautics Day in kindergarten
- chenille wire (fluffy sticks for needlework)
- sugar
- thin satin ribbon
- wooden skewer
- wide ribbon
- clear nail polish
- star cookie cutter
Step-by-step instructions for creating an interesting craft for kindergarten for Cosmonautics Day
- Wrap the cookie cutter with red chenille wire. Wrap the ends of the stick, remove the mold and set the resulting figure aside. Do the same with sticks of other colors. The brighter the shades of the fluffy wire, the more impressive the finished craft will look.
- Tie a thin satin ribbon to each finished star. Fix the loop, hang the stars on a wooden skewer, as in the photo.
- Prepare any glass jar (or several if there are a lot of stars). Place a skewer on the neck. Make sure that the figures hang freely and do not touch the bottom or walls.
- Mix a glass of sugar with a glass of water and heat until completely dissolved. Pour another glass of sugar into the bowl with syrup and repeat the process.
- Pour clear, sweet liquid into jars with hanging stars.
- Leave the container in a warm, bright room for several days. Every day the crystals on the stars will form more and more noticeably.
- After 3-5 days, remove the stars from the water and place on parchment paper. Let the crystals dry. Generously coat the space stars with clear coat.
- Hang the dry figures by a thread on a long piece of wide colored ribbon. Now you have a ready-made simple DIY craft for Cosmonautics Day in kindergarten.
Interesting DIY crafts for Cosmonautics Day for school: step-by-step master class
Younger schoolchildren are in some ways smarter, more diligent and patient than kindergarten children. This means that for Cosmonautics Day they can easily prepare not just small space stars, but the entire solar system as an interesting thematic craft. And step-by-step master classes and tips from parents will help you complete the task much faster.
Necessary materials for an interesting craft for school on Cosmonautics Day
- flexible wire
- foam balls
- plasticine
- fishing line
- scissors
- gouache paints and brushes
- glass of water
A step-by-step master class on creating an interesting DIY craft for Cosmonautics Day at school
- To make the Sun and major planets of the solar system, paint several foam balls with gouache in suitable colors. To create small planets, mix several colors of plasticine and form balls of different shapes.
- Using strong flexible fishing line, twist the “system”. To do this, make several orbits in which the planets will be located. Secure the orbital rings together with fishing line.
- Make through holes in the foam and plasticine balls and place the planets on the wire in the desired order. In the center of the composition is the Sun, then Mercury, Venus, Earth, Mars, Jupiter, Saturn, Uranus, Neptune.
- Tie a loop of fishing line to the very last turn of the wire so that the homemade solar system can be hung.
- At this stage the master class is finished. Take an interesting craft to school for Cosmonautics Day and listen to admiring reviews from your classmates and teachers.
GUI
It’s hard to keep the entire program in your head, so I attached a simple indicator on which the entered information is duplicated.
Once launched, a prompt is displayed:
When you enter a command, the command icon and number of repetitions are displayed in the upper left corner:
If more than one command is entered, there will be a list at the bottom (essentially a program), and the entered command will still be displayed at the top:
Fun crafts from pasta and cereals for Cosmonautics Day
By creating fun crafts from pasta and cereals for Cosmonautics Day with their child, parents can not only pass their leisure time together in a fun and useful way, but also teach their children important things. So, during the assembly of stars, you can tell your assistants in detail about these distant and magical space objects, about their types and origin.
Supplies needed for a fun pasta craft for Cosmonautics Day
- star shape for cookies
- gelatin and water
- grains and cereals
- pasta
- pan and spoon
- PVA glue
- gouache paint
- dry glitter
- parchment paper
- clear nail polish
- jute cord
Step-by-step instructions for creating fun star crafts from cereals and pasta for Cosmonautics Day
Bright crafts for Cosmonautics Day from paper, cardboard and foam: master class with photos and videos
Children just starting to explore the world will be very interested in studying the model of the solar system, hearing interesting facts about our galaxy, and getting to know our cosmonaut heroes. You can’t do this without the help of your parents. In your free time, make a bright craft from cardboard, paper and foam plastic for Cosmonautics Day and explain in detail to your child what’s what.
Necessary materials for crafts from paper, foam plastic and cardboard for Cosmonautics Day
- large cardboard box
- black and white acrylic paint
- wooden skewers
- foam balls
- foil paper
- paints and brushes
- plasticine
- fishing line
- sharp utility knife
- scotch
Master class with photos and videos on making bright crafts from paper and foam for Cosmonautics Day
Tags
From paper from paper from paper what to make fromYou can make a paper flying saucer with your ownFlying saucer with your own paper saucer aliensOrigami UFO platespaper plate aliensdisposable plates.The flying saucer is ready with your own hands from with your own hands will bring with your own hands a UFO with your own hands will be with your own hands for with your own hands will be
masterbottomfoilalieninnloclassmozhetorigamiphotocreationmaterialsyearsimpleveryvoluminousbodymostreadyideasjustwhateverrocketnew
Interesting crafts from plastic bottles and cardboard for Cosmonautics Day
Interesting crafts for Cosmonautics Day from cardboard and plastic bottles can be made even in the company of the smallest craftsmen. But before class, it is better to move actively in order to stock up on perseverance for the entire creative process.
Necessary materials for crafts from a plastic bottle for Cosmonautics Day
- small plastic bottle
- acrylic paint
- bottle caps
- colored cardboard
- glue gun
- scissors
Master class on interesting children's crafts made from bottles for Cosmonautics Day
To create a festive atmosphere at school and kindergarten, teachers often use interesting crafts for Cosmonautics Day from paper, cardboard, bottles, disks, pasta, etc. They are easy to make with your own hands at home and even easier to use in decorating children's rooms.
Fireworks to everyone!
How are you, dear readers and guests of my blog? Did you have time to take a break from? I think it’s not stressful to make something and do it with the kids. And now there is still one more holiday ahead - Cosmonautics Day. And it falls on April 12th. On the day when our Soviet cosmonaut Yuri Gagarin flew into space for the first time.
Usually this is a boyish theme - space. They really love inventing flying machines, saucers and rockets. But some girls are not far behind either. Still would! This is very exciting, and from waste and natural materials you can make such works that they will win any competition.
Let's look at a selection of interesting ideas. Most likely, they will give you interesting thoughts and create your own masterpieces. After all, there is room for imagination to run wild here. The work can include planets, satellites, flying vehicles, UFOs, rockets and much more.
I would like to note that I also get ideas from the Internet, from its publicly available sources. Basically, these are cool and original creations for kindergarten and elementary school children. Plus, I can recommend excellent options for paper airplanes in the note https://mognotak.ru/kak-sdelat-samoletik-iz-bumag.html
Well, here we go! As Yuri Gagarin once aptly said).
Version 2
I took into account previous experience, which suggested that there were several problems:
- The chassis from Ebay is made of plexiglass and is very (!) fragile (I overtightened the screw securing the gearboxes and the mount simply broke).
- There are many mounting holes on the chassis, but none that fit.
- The chassis comes with 1:48 gearboxes, but they are too fast.
- And in general the chassis is not enough.
- Arduino Uno has few "legs".
- There is no sound module (and it is needed for the “fire” command).
- There are horror stories written about Li-ion on the Internet; you don’t want to give your child a potentially dangerous device.
As a result I bought:
- Gearboxes 1:120.
- Motors with two shafts (hoping to install a PID controller later).
- Module L293.
- Arduino Mega.
- Lots of colored trains!
- 6V lead-acid battery (it doesn’t drain as quickly, delivers more current, and it’s heavy—the wheels “grind” less).
- Ultrasound sensors as obstacle sensors.
- The third wheel is in the form of a ball.
- Tact buttons.
- Button pusher.
- Slot sensor.
Besides:
- The LCD 2004 (5V) display remains from version 1.
- I soldered the R-2R DAC on the circuit board (here is a diagram in KiCAD and a 3D model).
Achtung! Warning! Attention! These links are provided solely for illustration and to simplify further search for parts. I cannot guarantee that the seller will not suddenly change the item to something else, change the price, quantity, etc.
Iron
I transferred the keyboard to a printed circuit board (perhaps this is the only element difficult to replicate).
I had my keyboard overlay milled to order. The question remained: what should the chassis be made of? There was no suitable plastic, metal is difficult to process... What if we take plywood? “But this is not aesthetically pleasing!” I thought. But when half an hour later I received a normal chassis, I changed my mind. The chassis was not very presentable and went into the trash, but I liked the processing speed so much that I decided to continue using plywood.
True, I started sawing the second sheet only after I drew a rough plan:
To mount the motors, I cut off a piece of aluminum angle and drilled out:
I secured the boards on hexagonal stands and connected them together with cables.
(here you can see a 5V stabilizer and some power contacts).
There were too many power wires, so I made a power board from a stripboard (details here). I suspect that you can take a regular sensor shield, which has an excess of power pins.
Since there were no more I/O expanders, the keyboard had to be redesigned (sources). I transferred diodes and pull-up resistors to it:
As a speed sensor I used a slot optocoupler and a gear (colored it with a permanent marker):
I used a ball as a third wheel:
Initially there was a support in the form of a wheel on a rocker arm, which came with the chassis. However, when changing the direction of movement, the wheel began to turn at the most unexpected moment and the cart was thrown to the side.
Connection diagram
It's best to look at the consts.h and lcd.ino files, they contain the most up-to-date information. The connections as they are now look like this:
The picture is clickable.
Firmware
The firmware, in essence, is an ordinary program written in the Arduino IDE.
There are two modes of operation: editing and execution. During the editing process, a command + number of repetitions is received from the keyboard. All this is packed into a 16-bit value and added to an array in RAM. When the program is executed, the values are scooped out from the array and executed. Performing one step (in a very simplified form) looks like this: if (already working) check the trip counter if (counter >= required distance), wait a little go to the next command otherwise counter increment otherwise turn off the engines take the next command turn on the engines required distance = constant * number of repetitions from the command The distance traveled is determined by the number of pulses from the optocoupler, which is checked in the timer interrupt. The only exception is when playing audio. If the “shot” command is encountered, then a simple for loop is launched, which scrapes the values from the wav file (it is flashed in the same flash memory as the program) and outputs them to the R-2R DAC. When the values run out, the program returns to normal execution.
Unfortunately, the real world is somewhat different from the software model for which the firmware is designed, so I added a certain amount of delays that allow us to take into account the inertia of the chassis.
I deliberately installed the MIT license. In my understanding, firmware with such a license can be freely used as you wish, without the need to publish further changes (I don’t want to force anyone to do anything).
Interesting ideas on the theme of Space with your own hands
First, let's look at what can be made on this topic. For younger kids, it will be possible to make (with the help of their parents) such a layout from colored paper. All the planets of our Solar System are located on it. At the same time, of course, we teach the kids the names of the planets.
Application Solar System
You can make such applications from small plasticine balls. It’s better to draw such compositions first and even paint them with flowers. And then you can roll small balls and just stick them on.
After all, it’s really possible to submit it for a competition?
Squirrel in a rocket
We make figures of astronauts and a lunar rover from salt dough. Simple . This material is pleasant to work with for several reasons:
- it hardens quickly and can even be placed in the oven;
- it can then be easily painted in different colors with acrylic paints or gouache;
- environmentally friendly, you can even swallow it))).
Russian cosmonauts and lunar rover
Children 4-5 years old can make simple paper rockets. This turns out to be a simple form of origami. And you can glue them onto a dark blue background, which will represent outer space.
Rockets in the universe
Let's make these funny aliens from toys, jars, tubes and plasticine.
Funny aliens
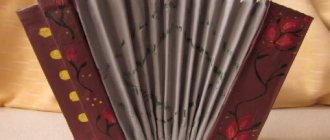
Another option for the competition using the modular origami technique.
We turn on our imagination and use everything: polystyrene foam, tree branches, foil, wire. Bushings will even be useful for making rockets.
Gagarin in flight
Plasticine composition with Saturn, stars, rocket and our green planet.
Milky Way
And a little humor)
Cat in a hat from the planets of our solar system
I hope that we have already more or less chosen something for ourselves, that we will make it and move on.
Version 1
I had an inexpensive chassis on hand from Ebay and an Arduino Uno.
To control the motors, I took a PWM Servo Shield and soldered L293D + PCF8574 on a breadboard:
To read from the keyboard I took a PCF8574 and a handful of diodes:
I made the keyboard itself using a printed circuit board:
To prevent the keyboard from falling apart in your hands, I attached a cover on top. It had to be ordered from the milling companies 
To display the program, a conventional 20 by 4 character display is used. Yes, also via PCF8574 
At first I used 4 batteries for power, but they ran out too quickly, so I replaced them with a pair of 18650 batteries:
For charging I used TP4056 modules, which I connected via a relay to the batteries, although not very successfully.
The fastest way was to write the firmware. Unfortunately, it turned out that the I2C LCD library is GPL licensed, and the code went to the trash. Around the same time, I realized that the Arduino Uno was not the best option, and that a handful of PCF8574 was very inconvenient to solder.
And I decided to start over.
Simple crafts for kids in kindergarten on Cosmonautics Day
I suggest making a rocket with the kids from a sleeve (you can even use toilet paper) and colored paper. It turns out such a long and stable little thing that can be placed on a blue background and next to an astronaut figurine.
Add some foil and you'll have a more realistic spacecraft.
Let's make a starship out of paper. You can do this simply according to the diagram below.
And here is the finished version. Color it as you wish.
Or we’ll make an unidentified flying machine out of thick paper. You can make several of these things and put them again on the blue sky.
Look how colorful and at the same time original UFOs we produce.
Let's use the baby's favorite toy - plasticine. It is pliable, soft and adheres well to almost any surface.
Here are some applications you can make with it in disposable plates.
Saucers - open space
Oh, and we parted ways! Let's sculpt a cute alien. It will look good next to a paper flying saucer.
Funny alien
Don't feel like folding paper? So let's blind her too, because there is a lot of plasticine!
When working with plasticine, the first thing you need to do is explain to children that this is an inedible material and should not be put into their mouth.
Alien and flying saucer made of plasticine
Flying saucer made from paper dishes
Interest in UFOs arose quite a long time ago, so any child will be interested in making a flying saucer, which he often saw in films and cartoons. The easiest way to make this craft is from plastic or paper of different sizes.
A UFO made from two plates, one of which serves as a control cabin, will look original. In order to glue them together, you need to make cuts in the lower part of a small plate, and then bend them in a circle and glue them onto a large plate. If you are working with paper materials, then this can be easily done using regular PVA; it is better to glue plastic with hot glue. Don’t forget to paint your craft with acrylic paints and decorate it by gluing regular buttons along the outline.
A flying saucer made from half a large egg from Kinder Surprise will look original. You can even use part of a plastic egg; it will be much more convenient to glue than the larger half. Don't forget to decorate your craft.
Space idea made of paper and cardboard for April 12
From components such as paper and cardboard, it is easiest to do work for kindergarten and school. Because they are always present in any home. And also scissors and glue. If all this is available, then I propose to build such a composition from a flying spaceship, the sun and Saturn on a black background.
To work you need:
- Cardboard with a black background about 30*25 cm;
- Toilet paper roll;
- Colored paper;
- Gold and silver foil;
- Semolina;
- Scissors;
- PVA glue;
- Pencil.
Manufacturing:
1. Cut the sleeve in half. At one end we cut off the edges to create the nose of the rocket.
2. From blue paper, cut out three blue cones, which we bend in the middle. These will be our rocket engines. We glue them to the uncut (back) part of the sleeve.
3. Glue the rocket onto a black background.
4. Cut out two petals from red and gold paper. This will be fire coming out from behind the ship.
5. Glue the flame and the cut out window.
6.Draw the sun on gold foil, and Saturn with a ring on silver foil. Cut out and glue both shapes onto black cardboard.
7. Apply glue to the background and sprinkle semolina on top. This is our milky way. Beautiful craft is ready!
Did you like the collage? If you have schoolchildren, you can make a flying luminous object below.
Bad takes
I like Jackie Chan movies because there's a montage of bad takes at the end. I couldn’t do without them either. What surprised me most was the fact that a round drill with two flutes produces a triangular hole
How to make crafts from disks on a space theme?
CDs are already being thrown into the trash, but in vain. After all, this waste material is very suitable for souvenirs for Cosmonautics Day. Its shiny and round flat surface is very suitable for the production of unidentified flying objects.
Here is a second grader's masterpiece. She used the disk under a flying saucer with a very cute alien.
And this is the alien himself with antennas made of springs and foil.
Interplanetary taxi from the children from the preparatory group in kindergarten.
The cutest plate made of rhinestones and fluffy antennae.
ABOUT! And here is a whole group of funny humanoids with their own transport.)
And one more idea on how to use CDs.
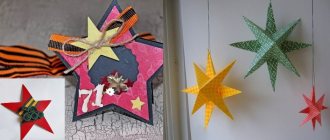
Five-pointed Kremlin stars
With such a large star, made from an A3 sheet and painted red, it is not a shame to decorate the top of the New Year tree.
Cut a square from a sheet of paper and fold it in half away from you. Fold the corner along the line from the top left corner to the middle of the bottom side. Fold the same angle from the bottom left corner of the rectangle to the middle of the top side.
On the left half of the rectangle you should get a cross of folds. Press the lower right corner at the intersection point of the cross and smooth the fold with your fingernail. Bend the tip from the center of the cross along a line from the lower right corner to the intersection point at the top.
Make another fold from the lower right corner through the center of the cross from left to right. Fold the resulting triangle, end down, in half with the ends facing toward itself. You should get a narrow triangle with the sharp end down and a shapeless process on top.
Cut this tail along a line perpendicular to the right edge of the triangular figure. Straighten the remaining triangle, you should get a pentagonal figure with ten folds.
Note!
- Macrame: diagrams, interesting projects and detailed descriptions of making crafts
- Crochet amigurumi - examples of how to make a beautiful toy with your own hands (75 photos)
Coffee topiary: step-by-step master class on how to make a small decorative tree from coffee beans
Bend all five edges one by one towards the center of the figure and straighten it again. Starting from the bottom edge and carefully bending the edges clockwise towards the center, you will get something resembling a flower with petals. Roll it up completely, iron it firmly with your fingernail, you should get a five-pointed star with curved ends.
Fold these ends clockwise along the length, placing the folded pieces into the grooves of the new end. The result should be a large pointed star, two rays pointing down, one up and two more to the sides.
If you paint this star with shiny red nail polish and place a garland light bulb behind it, you will get a copy of the star that burns over the Kremlin on New Year's Eve!
Step-by-step 3D postcard in the form of a rocket
If you have never created three-dimensional postcards, here is a step-by-step method for you. Again, everything is as simple as two and two. Templates can be found at the end of my post.
We need:
- A blank sheet of paper A4;
- The pencil is simple;
- Scissors;
- Colored paper;
- Glue;
- Gouache paints.
Manufacturing:
1. Fold the A4 sheet in half. On the fold we draw half a rocket.
2. Part of the rocket in the photo below is marked with a dotted line. This means that we will not cut here. And we will cut out all the straight lines using scissors.
3. We try to do everything as carefully as possible.
4. We turn our spaceship inside. It will fold inward and the entire card will fold outward.
5. Draw the details of the ship: nozzles, porthole, nose and flame below.
6. Paint the background black with gouache. And the rocket itself in suitable colors.
Here you can get creative and make an astronaut’s face in the porthole window.
7. Draw beautiful flames.
8. Cut out different planets from colored paper. We glue them all over the background. You can also make stars from foil.
Voila! Our cool three-dimensional card is ready. We give it away for its intended purpose.
How to make a pirate ship from cardboard boxes
- With a cardboard box you can go on any adventure.
- We will need:
- 2 large cardboard boxes (the thicker the better).
- Scotch.
- Cutter.
- Hot glue gun.
Since our box had a pattern, we turned it inside out. If your box is clean, then you don't need to do anything like that. Stand the box upright and cut 3/4 off one of the sides as shown in the picture.
Level the second cardboard box on the floor and cut off one side, leaving only three. The middle of the box is the bottom of the ship, the sides are the sides. Cut from the middle along the triangle from the top of the box. From the sides, also cut a triangle along the edges. The picture below shows what should happen.
Fold and glue the sides of the boat, as seen in the picture below, so that the sides are stronger.
Now glue the bow of the ship together with tape.
Place two boxes together and glue them together using tape and a hot glue gun. Our ship is almost ready.
We also cut out the porthole.
If you wish, you can make a sail from a piece of cardboard and a wooden dowel. To create a pirate flag, you will need a sheet of black paper. A skull and crossbones cut out of white paper is glued onto it.
Well, an anchor made from a piece of cardboard and rope will not be superfluous. And for the captain you can make a spyglass from a cardboard tube.
Let's sail towards adventure!
Source: https://smekalo4ka.ru/2019/09/13/kak-sdelat-piratskiy-korabl-iz-kartonnyh-korobok/
Making original works for a school competition
Let's be inspired by the ideas of the kids who won space-themed craft competitions. They all tried, working out every detail in their masterpieces.
Any available materials were used in the work. These are twine, foam balls as planets, glass pebbles, felt and much more.
International station
Composition of planet Earth, a rocket and two astronauts in outer space.
Russian cosmonauts
Solar System with satellite and planets.
And here is a magnificent model made from plastic bottles.
We use felt for voluminous applique.
Intergalactic travelers.
Beautiful applique made from napkin balls.
To make it, you need to roll out many, many balls from colored paper napkins. But the work seems to be worth it!
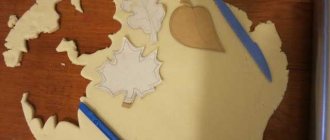
The squirrel and the salt dough arrow are waving their paws at you).
A little imagination on the theme of the galaxy, starships and UFOs - and a wonderful work is ready for the competition!
Craft ideas for kindergarten
Now let's take a closer look at several crafts for young children, namely about preschoolers from kindergarten. Here you can build both rockets and beautiful pictures using applique. The simplest and most inexpensive thing is to sculpt Martians from plasticine.
You can also split the group into several creative cells.
Next is the rocket appliqué. You will need several sheets of colored paper, scissors and glue.
To assemble a flying saucer, take two plastic or paper plates and glue them together with the convex side out. Color them in any shape you like. Here, of course, every child can show their imagination. Next, we’ll make a passenger from plasticine. And we place it in a cabin made of a plastic cup. Which we attach with glue.
Now we’ll make a rocket where you can make a child as an astronaut. You will need colored paper or felt.
We glue the blanks onto a sheet of cardboard to make a rocket, and paste a photo of the child into the porthole. This is how beautiful it turns out. You can even make a group flight into space.
But this rocket was made using the quilling technique. This is when objects are assembled from strips of paper twisted into a spiral.
You can also print out the outlines of the rockets and give them to the children so they can color them as they wish. The result of all the crafts is, of course, an exhibition of works. Here is an example of newspaper walls made from rockets that the kids made in kindergarten.
For different ages
It is advisable to choose which craft should be made, taking into account the age of the child. Of course, moms and dads will still have to help their child, but this should be his victory. Achievements are difficult to share among everyone, just like success, praise, and good grades.
Preschoolers can create figurines, paintings, and soft toys. It is worth paying attention to photo frames, greeting cards, stained glass, and Christmas tree decorations. But decorating covers for books and notebooks will not be interesting for children at this age, since reading and writing skills have not yet been developed or honed. Primary school students will like this idea more.
Crafts made from wood, wire, matches - “aerobatics”, an interesting task for children studying in the 5th, 6th, 7th or 8th grade.
Making beautiful crafts for school
For school, of course, you need something more complicated. Therefore, for Cosmonautics Day, this time we will build not a rocket, not a plate, but an alien made of foil.
You can also make a homemade earth satellite for school using improvised materials. How to do this, watch a video that describes the assembly process in detail.
There is a great idea for a composition on a space theme. To do this, take a small cardboard box and prepare it by painting it with a suitable background. Cut out the stars from tar paper and paste them on. Let's find something semicircular and wrap it in foil. This will be a small space flying object. Next, using plasticine, we will attach improvised antennas and solar panels to it. Let's build a rocket out of cardboard and colored paper. We will make 1-2 astronauts from foil. And then we place all the made objects on our cosmic surface.
Or you can mold astronauts from the Barboskins series entirely out of plasticine.
But these characters can be made from cardboard and ordinary tin cans.
Make a space applique and decorate it with a beautiful macaroni frame.
Try making planets from plasticine by placing them on a beautiful stand.
Or this picture might come out of the same plasticine.
What can be improved
Chassis
. With a sharp start, the wheels “grind” and the toy goes off course. You can try to make a six-wheeled chassis, or even a tracked one (there is one on Aliexpress, but I haven’t tried it yet).
GUI
. Currently, only the minimum amount of information is displayed on the indicator, and this is done in the simplest way.
Code
. I definitely won't get a Pulitzer.
Sound
. There are cheap and very small mp3 players. You can safely throw out the R-2R DAC and replace it with a ready-made player.
Reserve buttons
. You can record the finished program in EEPROM so that it is not lost when the power is turned off. The implementation can be the same as in radio tape recorders: with a long press, we save the program, with a short press, we launch it.
Out button
. Not implemented at the moment. You can screw something like a relay/serva to one of the Arduino pins.
Acknowledgments
- To the child who motivated me all this time.
- To my wife, who patiently waited for me to play enough and helped me with Corel Draw!
- Sergei Dudnikov, who drew the keyboard overlay.
- Andrey Shishkov, who milled this very overlay.
- Anton, who made me an excellent mp3 with the sound “pew!”
- hudbrog, for the idea to implement a PID controller!
- Chat of DIYers who morally supported me and were forced to look at the interim results of the work
Cool works from the land of masters
I suggest looking at pictures on crafts for Cosmonautics Day. Pictures taken from the website Country of Masters. Perhaps they will encourage you to create something similar.
In our material you will find the most interesting ideas for crafts on the theme “Space” that a child can make with his own hands for projects at school or for independent study of the Universe.
The mysterious cosmos and everything connected with it have always fascinated both adults and children. Is there life on Mars, why do stars glow, how to get to the Moon - . If your child enjoys this topic, encourage him to explore space in more detail. They will be a wonderful start. And so that studying your favorite topic does not turn into boredom, invite your child to make interesting crafts about space with his own hands for school.
Such DIY children's crafts about space not only have an educational effect, but are also perfect for concentrating a student's attention. With their help, you will be able to act out stories from them well, your child will learn more about the solar system and will be able to prepare well for thematic lessons at school. Just imagine the joy of a child when his craft about space at school receives a lot of praise!
How the Solar System works: a cheat sheet for children's crafts for school on the theme of Space
Tell your child how the solar system works: what planets are included in it, how far the Earth is from the Sun. Let the child gradually remember the names of all the planets. Don't rush it - it will take time.
Kirigami postcard
One of the directions of origami is kirigami. This technique is needed to create very beautiful cards. Scissors are permitted.
Multidimensionality is easier to convey than it seems. There is no need to learn the rules for the placement of light and shadow on the canvas. If a child loves to draw and has artistic abilities, he himself will be able to develop them in the future, and kirigami will be an ideal start to work, a springboard for further improvement.
For production you will need:
- templates;
- paper;
- scissors.
The template indicates where the pattern will fold. They are arranged in such a way that the craft ends up being voluminous when the postcard is opened. When closed, the sheets fold neatly on their own. Ready-made templates can be downloaded online or purchased. You can draw them yourself. Video, master class will help you master the basic rules.