Plastic bottles are a wonderful and versatile material that serves many purposes. Not only do we store liquids in them, but the container can also be useful for all kinds of crafts. Some may be purely decorative, but others are useful in practice. One way to use plastic bottles is to turn them into a broom. This is a useful device that you need for your home or garden. Instead of buying a broom from the store, you can spend an hour or two making one.
Everyone has the material, but all you need is a simple set of tools. Let's find out how to make your own broom from plastic bottles step by step.
Method 3. Broom made from dry branches
Among other things, a beautiful and quite lush broom can be made from dry twigs collected in an autumn meadow or field. To make it you will need the following materials:
- natural jute twine
- sharp pruners or scissors
- dry twigs collected from dry bushes or herbs
Progress:
- Gather the lush branches into a bunch, cutting off the long ends.
- Choose the longest and strongest branch, making it the basis for a broom.
- Tie all available branches around it, wrapping the latter several times with jute twine.
- If necessary, trim the shape of the broom in sectors. The decorative decoration is ready.
What products can be made from fiber?
The photo of crafts made from twine shows samples that you can make yourself using our master classes. The fiber is quite durable, does not tear when working with it, does not wrinkle, and does not lose color over time.
The finished products have a pleasant, natural shade, from dark to light tones, depending on the thickness of the threads. Useful things in everyday life are made from jute: napkins, capes, covers, bags, coasters, amulets, wreaths; decorative: vases, flower pots, wall panels, openwork napkins; various decorations for hair and clothing: brooches, hairpins, buttons. Beautiful crafts made from twine and burlap are made on a children's theme: all kinds of toys, pencil holders, Christmas tree decorations, weaving.
Buying a broom, broom, brush. What should you pay attention to?
When deciding to buy a broom for cleaning the area around the house, you need to pay attention to two important elements that can affect the functionality of the tool: the stick and the brush itself
Stick length
Theoretically: the longer, the better, but every extra centimeter is, first of all, an unnecessary burden on our muscles. Therefore, it is better to choose a broom with a stick of such length that it suits your height.
When choosing a rubber broom, a cobweb brush, or a dust brush, it is recommended to consider tools with a telescopic (retractable) stick. This design is especially convenient if the tool will be used by several people of different heights. The weight of the broom will be the same, but everyone will be able to adjust the length of the stick to their needs, making the work more comfortable.
It is better to purchase a broom, broom and brush on a long stick separately. Such tools will be especially useful for cleaning in hard-to-reach places, where the length of standard-sized products is insufficient (for example, when cleaning under furniture, shelving, etc.).
Scoop
Some models of brooms and brooms with a long stick are sold with a dustpan attached to the stick. A brush with a dustpan on a stick allows you to immediately sweep and collect dirty debris without bending over, which not only increases the comfort of work, but also reduces the time required for cleaning work.
Brush
When choosing a tool for sweeping an area, also pay attention to the hardness and elasticity of the brush. Its fibers must be properly processed, rounded, they should not be too soft or too hard
Well, of course, ask the seller what material it is made of - it is important that it is strong, durable and safe for health. Sources
Sources
- https://kliningovyj-raj.ru/uborka/metla-dlya-territorii/
- https://stroy-podskazka.ru/metly/berezovye/
- https://stroitelcentr.ru/instrukciya-kak-sdelat-metlu/
- https://strazhchistoty.ru/cleaning/cleanterritory/metla-dlya-ulic.html
- https://stroy-podskazka.ru/metly/raznovidnosti/
- https://HouseChief.ru/iz-chego-delajut-veniki-dlja-podmetanija-pola.html
- https://sdelatlegko.ru/kak-sdelat-metlu/
- https://mirputeshestvij.mediasole.ru/7_schetok_dlya_pola_i_venikov__plyusy_i_minusy_sovety_po_vyboru_venika_dlya_podmetaniya_pola
- https://Nedvio.com/chem-ubrat-listya-i-gryaz-s-dorozhek-na-uchastke/
Materials and tools
Before you begin, you need to prepare the components for a homemade broom and tools.
You will need the following:
- plastic bottles (from 1.5 to 3 l);
- wooden stalk;
- strong wire;
- nails or screws;
- knife;
- awl;
- hammer or screwdriver;
- scissors.
Bottles can be of any capacity, except 5-liter bottles
Before starting work, you should pay attention to their condition. They should not be wrinkled or have any bulges or depressions. It is better to choose standard flat bottles
It is necessary to take into account that the wall thickness of bottles may vary. For example, beer drinks will be thicker, while mineral water or lemonade drinks will be softer and thinner. The density of the material is also affected by the volume of the container - larger bottles have thicker walls
It is better to choose standard, flat bottles. It is necessary to take into account that the wall thickness of bottles may vary. For example, beer drinks will be thicker, while mineral water or lemonade drinks will be softer and thinner. The density of the material is also affected by the volume of the container - larger bottles have thicker walls.
What components are required?
The main advantage is that creating such a broom does not require a lot of money. Therefore, this option is perfect for those who like to save money. All the necessary components are found in almost every home, which means that a trip to the store is not necessary. The set of tools is quite simple, and even children are allowed to work with them.
So, to create a broom you will need:
- plastic bottles (preferably 2 liters) – 5-8 pieces;
- a stick that will serve as a handle;
- some strong wire;
- nails/screws – 2 pieces;
- hammer/screwdriver;
- stationery knife;
- awl;
- scissors.
Assembling a broom in 5 minutes
A garden broom should have a strong and light handle. It’s hard to think of anything better than wood, especially since it’s the easiest way to attach our rods to it.
Approximately 10 cm from the tip of the cutting you need to secure a 2 cm wide ribbon from the same plastic bottle. The length of the tape must be at least 1 m, and it should be secured using staplers. Our double rods must be strung on this tape. Just hang them with a fringe at the fold, alternating different colors. Now you need to wrap this fringe around the handle
It is important to ensure that it rolls evenly and that the rods do not jump out of the general line. The tighter you wrap it, the stronger the broom will be. Wrap the free end of the tape tightly around the handle and rods several times. Secure the end of the tape in the handle directly through the rods with a self-tapping screw with a large head.
We unravel the bottles into “threads”
As you can see, Giorgio has a semi-automatic machine, which, when the handle is rotated, cuts the bottle, producing a plastic string that is wound around a metal frame. The height of the frame is 35 cm. It should be noted that on the Internet you can find a lot of simpler devices for unraveling a plastic bottle onto ropes.
Later you will see that the frame should be metal.
Master class on making a broom
You can make a broom from plastic bottles in different ways. Let's look at the most popular of them.
Option 1
Creating such a product will require a minimum of time and materials.
To work you need:
- 5 two-liter plastic eggplants;
- a stalk or a suitable stick;
- strong wire;
- a pair of nails and a hammer;
- knife and scissors.
Step-by-step instruction:
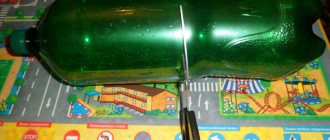
- Using a stationery knife, cut off the neck of one bottle, stepping back a little from the edge.
- We cut off the bottom in the same way.
- Using scissors, cut the workpiece into strips 1 cm wide, not reaching the edge about 6 cm.
- We repeat all the steps with other containers, leaving only two untouched.
- With one of the whole bottles we do the same as with the others, but we do not cut off the neck.
- On the blank with a neck we place all the other parts of the product without a bottom and neck.
- We flatten the resulting part of the broom, giving it a flat shape.
- Cut the remaining bottle in half and use scissors to make cuts in the half with the neck to the middle.
- We place the part from step 8 on the previously made workpiece. We pierce the future broom in two places with a nail and fasten it with wire.
- We secure the handle and use the broom for its intended purpose.
This broom is the simplest and is suitable even for beginners.
Option 2
Another option for making a broom for the garden is also possible.
For the product you need to prepare:
- 20 eggplants for 2 liters and one for 1 liter;
- holder;
- self-tapping screw
Manufacturing technique:
- We cut two-liter bottles into strips 5 mm wide, for which you will need to make a homemade bottle cutter.
- During the cutting process, we wind the tape onto a piece of chipboard measuring 250x300 mm. The tape should be wound as tightly as possible and tied together with a knot.
- After winding is completed, screw a self-tapping screw into the board and tie the edge of the strip to it.
- To make the tape more rigid, pour boiling water over it. You can also use a hair dryer. As a result, the tape will curl into tubes and become stiffer.
- Having completed the shrinkage, we cut the material one end at a time.
- We hang the ribbons bent in half on a plastic strip of larger width, collect them into a ring and tie them.
- We straighten the bundle and tie it with a ribbon just below the bend.
- Cut off the bottom and neck of a 1 liter bottle and insert a bunch into it. We stuff the workpiece onto the holder.
- We compress the bunch in a yew, level it, and shrink the top bottle using a hairdryer. We fix the broom on the handle with a screw. We cut off the part of the bottle that remains uncrimped with a knife.
- We cut the edge of the broom evenly with scissors so that there are no bends.
This panicle has medium hardness. It works great on smooth surfaces. If you plan to clean asphalt with holes, it is recommended to make the tape 10 mm wide. During heat treatment, it is also twisted into tubes, thereby obtaining higher rigidity.
From the video you can learn more about how to make a broom from eggplants:
From plastic rods
For manufacturing, you will need to assemble a device for cutting bottles into strips, which will then be processed into rods. To build such a product, a slot is made in a small block, the depth of which corresponds to the width of the plastic tape.
We fasten the blade of the stationery knife at an angle with self-tapping screws. We make a small hole in the bar and insert a strong wire, which is used as a bottle holder.
To get strips from the eggplant, cut off the bottom and make a cut with scissors, which will be the beginning of the strip. Then we thread the edge into the slot of the bar and gently pull it towards ourselves.
We make strips from 10-20 plastic bottles, after which we move on to making a broom:
- Using a hair dryer, heat the edge of the tape and twist it a few centimeters. We clamp this edge into a drill or screwdriver, place the tape over the included hair dryer and twist the tape into rods.
- We cut long rods into 70 cm lengths.
- Heat it with a hairdryer and bend each rod in the middle.
- We cut a wide ribbon about 1 m long from a plastic bottle and attach it to the handle.
- We hang the rods on the tape in the form of a garland, after which we wrap the handle with the rods and tightly tighten the entire product with the tape, securing it with a self-tapping screw. To better tighten the rods, the tape can be heated with a hairdryer.
- To make the tool more convenient to use and look like a broom, the rods will need to be slightly fluffed.
As the owner of a summer cottage, a country house, or a workshop, it would be useful to acquire such a useful tool as a broom, but it is not necessary to buy it. All you need to do is collect a dozen plastic bottles, which will make an excellent broom, and interesting ideas and step-by-step instructions with photos will help you figure out how to make one with your own hands for beginners.
The first method is two-liter bottles
In the first case, you will need to collect quite a few eighteen two-liter plastic containers. To do this, you should prepare the following set of building materials and tools:
- A sharp stationery knife.
- Awl.
- Hammer.
- Nail.
- Scissors.
- The wire is soft.
- Broom handle.
- 18 two liter bottles.
So, if you already have everything at hand, then let’s look at how to make a broom from plastic bottles step by step. According to some estimates, not everything is about everything, it will take you about two hours. Let's get started:
- Seventeen bottles need to have their bottoms cut off.
- Next, use scissors to cut the prepared container lengthwise into 20 mm strips. but not cutting to the neck by approximately 60 mm.
- This procedure should be performed on all remaining sixteen bottles. Let only one remain temporarily unchanged.
- Then you take these chopped containers and cut off the necks of all of them, leaving only one.
- Now you hold a bottle in your hands that has a neck. On top of it you put sixteen bottles without a neck. During this process, care should be taken to ensure that the cut elements do not bend.
- At the next stage, you need to take a completely intact container.
- You should cut off the top part from it. To do this, measure 150 mm from the edge of the neck. The cut should be smooth.
- From above you put all the collected bottles together according to the principle of one into the other.
- In the next step, take an awl. For one piercing you need to pierce a hole. The hole must be made at a distance of 150 mm from the edge. Make a hole in two places.
- Through these holes you insert a wire that should be tied together. The protruding remains of the wire should be cut off with wire cutters.
- Next you need to prepare a wooden cutting. Its diameter should be equal to the internal diameter of the neck of the container.
- Having stripped the handle to the required diameter, thread it into the neck of the plastic container until it stops. The plastic container should sit tightly on the handle and not wobble.
- After this, a hole should be made in the neck in place of the existing thread. It will be necessary to screw one self-tapping screw into this hole so that the broom made from a plastic bottle is securely held on the wooden handle.
This is the simple way to make a broom from a plastic bottle
When working, it is important to follow several important requirements or even safety rules. If you have ever had to cut a plastic bottle with a knife, then you know that the knife can sharply go in the wrong direction.
For this reason, it is easy to cut your fingers or hands. Moreover, when cutting strips with scissors, it is important to ensure that they are the same size.
Advice! There are many different shapes of two-liter plastic containers. You should choose eighteen plastic bottles of the same shape. Otherwise, it will be difficult to put the broom together.
So, now let's look at the second manufacturing method.
Making a broom
Let's take a step-by-step look at how to make a panicle out of 18 bottles.
- Bottles must be prepared: rinsed, removed labels and allowed to dry. We take only 17 bottles for work, leaving one aside for now.
- We cut off the bottom of the selected plastic bottles. Then, using a sharp knife (or a stationery knife), cut them lengthwise into strips 0.5 cm wide. We move our hands from bottom to top. We do not cut it all the way, leaving about 6 cm to the neck of the container.
- You need to work very carefully, since the plastic is soft, the tool can slip at any time and you will injure your hand.
- You should get 17 cut pieces. Then we cut off the necks of sixteen of them. One remains with the upper part intact.
- On a container with a whole neck we put the resulting cut blanks, the upper and lower parts of which have been cut off.
- It was time for the whole bottle. We cut off the upper part, retreating about 15 cm from the throat. We will not need the lower part; it can then be used for other purposes. We put the resulting blank on the base of the future broom, already made from 17 bottles.
- Using an awl, you need to pierce all the bottles through and thread a piece of wire, the ends of which are then tightly twisted.
Now we work with the cuttings. It will need to be trimmed so that it can be threaded into the neck of the bottle. Paste it. The stalk should fit tightly. Using a hammer and nails, we secure the handle with the bottleneck. You can use a screwdriver and screws. The broom is ready to go.
Forming a blank
In the process of removing the workpiece from the frame, it is necessary to place the same plastic rope or wire inside. With this we can close the ring, as shown in the photo below.
After the ring is formed, it is necessary to wind one or two ropes on top in a circle for additional fixation.
Assembling a broom in 5 minutes
A garden broom should have a strong and light handle. It’s hard to think of anything better than wood, especially since it’s the easiest way to attach our rods to it. Approximately 10 cm from the tip of the cutting you need to secure a 2 cm wide ribbon from the same plastic bottle. The length of the tape must be at least 1 m, and it should be secured using staplers. Our double rods must be strung on this tape. Just hang them with a fringe at the fold, alternating different colors. Now you need to wrap this fringe around the handle
It is important to ensure that it rolls evenly and that the rods do not jump out of the general line. The tighter you wrap it, the stronger the broom will be. Wrap the free end of the tape tightly around the handle and rods several times. Secure the end of the tape in the handle directly through the rods with a self-tapping screw with a large head.
We unravel the bottles into “threads”
As you can see, Giorgio has a semi-automatic machine, which, when the handle is rotated, cuts the bottle, producing a plastic string that is wound around a metal frame. The height of the frame is 35 cm. It should be noted that on the Internet you can find a lot of simpler devices for unraveling a plastic bottle onto ropes.
Later you will see that the frame should be metal.
Making a broom with your own hands
So, let's first select the base of the broom. An old brush is suitable for this, and you can use either a wooden or plastic base. If you don’t have an old brush, this is also not a problem: cut it out of a suitable board, the length of which is from 25 to 30 cm, the width is 5 cm and the thickness is about 2 cm.
If you have chosen an old brush as a base, this area must first be “shaved”, that is, get rid of the remnants of the old stubble. This operation can be easily performed using a utility knife. The fibers should be cut flush to the base. In this case, you will still have the base of the bristles inside the brush, but this is not a problem and will not interfere at all in the future. The main thing is that nothing sticks out.
Also, to make a broom from plastic bottles, you will need the main raw material for a broom - plastic bottles. Samples of almost any capacity are perfect for this - from 1.5 to 3 liters, but the main condition is that the bottle is not wrinkled and has a cylindrical shape in the central part, without depressions, grooves, etc. By the way, for this reason, five-liter eggplants are unsuitable, since they usually have concentric grooves along their entire height, i.e. stiffening rib.
Please also keep in mind that the thickness of the bottles varies. Beer bottles are considered thicker, but containers for mineral water and lemonade are much thinner. The thickness largely depends on the volume - with a larger displacement the walls are thicker.
So, take a plastic bottle, remove the label, rinse the inside and let it dry. Next, you need to cut it using a stationery knife - cut off the neck with the plug and the central cylinder. You need to cut off the neck below the wide ring into which the cork rests. The bottom and the body itself are of no use to us. For waste-free production, the most that can be made from them is a bowl and funnel for your beloved cat.
Now from the cut part we need to get a fishing line for making bristles. To make a good broom from plastic bottles, we cut an even strip from the cylinder. This can be done with scissors, but the process will be longer and more tedious. To speed things up, you can make a convenient cutter.
Processing the neck of plastic containers
If the previous steps were duplicated and did not differ in any way from the sequence of cutting a plastic bottle, then something new is coming next. The top of the second bottle is cut off. To remove the neck, use a stationery knife.
Important! Cut off the top carefully, otherwise the strips will fall off and you will no longer use this bottle. The first bottle is pushed into the second, as if putting it on
Make sure that the neck of the second bottle fits properly through the first, center the structure, giving it the correct appearance
The first bottle is pushed into the second, as if putting it on. Make sure that the neck of the second bottle fits properly through the first, centering the structure, giving it the correct appearance.
Then they prepare the next bottle.
Important! The more plastic containers you take, the more magnificent the broom will be. The top of the bottle with the neck is also cut off
It is this part that will make up the upper part of the future broom made from plastic bottles with your own hands. They do it this way: taking a stationery knife, cut off the bottle by 2/3 from the bottom. At the same time, enough space is left so that the third part of the structure can hold the previous two
The top part of the bottle with the neck is also cut off. It is this part that will make up the upper part of the future broom made from plastic bottles with your own hands. They do it this way: taking a stationery knife, cut off the bottle by 2/3 from the bottom. At the same time, enough space is left so that the third part of the structure can hold the previous two.
Baking in the oven
At this stage, the master places a steel frame with a plastic string wound around it in an oven at a temperature of more than 200 degrees for 30 minutes. According to Drodjo, this stage is extremely important. Thanks to this “hardening” the broom will be quite rigid and will not tend to deform. After heating for half an hour in the oven, you need to lower the frame with the string wound around it into the water.
Attention! The operation is quite dangerous, since the material is hot. If you wish to repeat, you must take all necessary precautions. Safety first! Under no circumstances should children be allowed near.
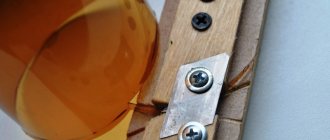
Making a cutter for making strips from a bottle
Now, you need to step back 0.5 cm from the bottom edge of the slot, and make a horizontal cut perpendicular to the first cut, the depth of which will be 1.8 cm. This will be the place for the knife. As a cutting knife, use a piece of blade, for example, from the same stationery knife with which you deftly dealt with the bottle. A piece should be cut off from the blade, slightly shorter in length than the width of the beam, inserted into the slot and secured with two screws. Ready! Next, we begin the process of making long ribbons from a plastic bottle. The edge of the cylinder should be cut with scissors, and thus make the beginning of the tape. A cut length of 10 cm and a width of 0.5 cm will be sufficient. Now the beginning of the strip should be inserted into the cutter, but UNDER the knife. Take the device in your left hand, and with your right you just have to pull the tip of the strip. The bottle will begin to rotate, and a smooth ribbon will appear from under the knife.
It is important that you pull smoothly, without any jerking. Hooray! We have a long polyethylene ribbon.
And it would seem that a broom made from plastic bottles with your own hands is not so difficult to make, but there are some nuances. The ribbon-shaped blank is soft enough for a broom, and still retains its ring shape. To give the tape certain characteristics, heat it. This is easy to do if you use a candle, gas burner or blowtorch.
- We will consider leveling using an example using a gas stove. Take the tape in your hands as far as your arm span allows, and move it smoothly and evenly over the fire source. When heated, it will straighten, the edges will curl inward, and now in cross-section it will not be flat, but semicircular. The main thing when heating is to choose the ideal pulling speed, because if you pull quickly, the tape will not have time to warm up and straighten, and if you hesitate, you will burn through it, and it will melt and tear.
- In the photo comparisons you can see that at first the tape was soft and twisted, and then it became straight and hard. Now we have a great ribbon made from a plastic bottle! All that remains is to collect the broom.
- The broom itself consists of many individual panicles. Their number depends on the size of the base of your broom. For the above sizes, only 9 panicles were needed. The finished fishing line should be cut with scissors into equal lengths of 20 cm. Now you need to take 2 cut necks from PET bottles and glue them together. So, we need to glue the necks together, and for this we will use glue like “BF” or “Moment-classic”.
After drying, the resulting sleeve should be filled with bristles, that is, already prepared pieces of fishing line. The number of twigs that fit into one bushing is unknown, but it needs to be packed tightly. Next we fasten it in the sleeve. To do this, you need to move it to the middle of the bundle, and coat the ends with the same glue that you used before to the full depth or a little more.
By the way, instead of glue, you can use ordinary sealant from a tube - when hardened, it will reliably fix all the twigs. Next, return the sleeve to the edge of the bundle and leave it alone until it dries completely.
While all the elements for the broom made from plastic bottles are drying, prepare the base: screw screws onto it with plugs, with 2 screws for each plug, and place them along the line of the broom. This will ensure that they will not be torn out when sweeping. Please also take into account that due to the rings that protrude on the bushings of the panicles, the plugs should not be fixed close to each other, but with a small distance of 0.4-0.5 cm.
They can be arranged in one line - the broom will then be thin, or it can be arranged in a zigzag, and then the working thickness will be 2 times thicker. When everything is dry, you can collect the panicle. To do this, screw them into the plugs that are located on the base. Now you just need to attach the handle and you can carry out your first test!
After the first use, we can safely say that the broom perfectly cleans concrete and asphalt, and if necessary, it can perfectly clean even snow compacted by car wheels, which even a snow shovel cannot always cope with.
But this is not the end of making a broom from plastic bottles with your own hands. The necks of the bottle need to be cut off along the lower edge of the ring, but since the material in that place is too dense, use scissors or a knife. To make combing easier and faster, you can use a simple device that requires only a cork.
Make a hole in the center with a diameter of 0.5 cm. Insert a bolt of the same diameter into it, insert a cap inside the lid, secure the lid to the bolt with a nut and enhance the effect with a washer. Now all that remains is to insert such a template into the drill chuck, tighten the neck and you can easily cut off the excess.
Unexpected and bold: interior decoration
Jewelry storage
For such a stand you need different bottles of the same shade (or rather, the bottoms of them). You will also need metal rods, nuts, washers, and ideally, a drill. But if you don't have these "boyish" tools, use a wooden sushi stick and hot glue. The finished version may seem a little “craft” in appearance, but all your rings and earrings will be at hand without getting lost.
But here is a more feminine, glued version.
And a laconic scarlet flower...
Butterflies for decorating your home or garden
They just need to be cut out. And then do what you want.
You can paint the “flock” with one paint, “scattering” it around the flowerbed (a long wire will help you) or nailing it to the fence.
Or you can show maximum imagination by using permanent paints (even old shiny nail polishes will do, albeit of cheap quality), sequins, rhinestones, and so on. It’s no longer a shame to attach such a butterfly to a work or study place, a mirror or a wall above the bed.
Candlesticks
Of course, it’s hard to expect from a plastic bottle that you can use it to make something exquisite. But cute, cheerful and bright - easily. For example, here is a good example of decorating a house for Halloween. Scissors and permanent paint required. Yes, and a candle, of course!
Although we can still argue about the sophistication... Here's what you can make for a long candle of medium thickness from the necks of two small bottles.
Flower pots or small vases
Imagine a bottle hanging from the wall with a flowerpot sticking out of it... Meanwhile, the idea of flower pots or flower beds can be played out in a very “fun” way. Examples for a children's room...
More interior ideas (difficulty level “for handy adults”) will be shown in this video. Vases, flower pots, boxes... Look and you will gasp!
DIY crafts for birthdays that will be accessible even to a child.
Broom made from branches
This is probably the most ancient and simplest option. Our ancestors answered the question of how to make a broom from branches very well. They took twigs of a fairly strong tree, such as hazel or willow, tied it into a bundle and tied a holder to it. It turned out to be a good broom.
The whole procedure took a minimum amount of time, and the size of the broom was regulated by the number of rods.
The advantages of such a broom include:
- minimum costs
- fast production
But this broom also had disadvantages:
- Fairly quick wear
- The need to select flexible but durable wood
- This broom is afraid of moisture and quickly becomes unusable in water.
Baking in the oven
At this stage, the master places a steel frame with a plastic string wound around it in an oven at a temperature of more than 200 degrees for 30 minutes. According to Drodjo, this stage is extremely important. Thanks to this “hardening” the broom will be quite rigid and will not tend to deform. After heating for half an hour in the oven, you need to lower the frame with the string wound around it into the water.
Attention! The operation is quite dangerous, since the material is hot. If you wish to repeat, you must take all necessary precautions. Safety first! Under no circumstances should children be allowed near.
Making rods from plastic bottles
We have about 20 plastic bottles, 14 of them are mine from mineral water and 6, guess whose, are from beer. This was just enough for our idea.
All bottles need to cut off the bottom along the transverse line, which is present on all models
Next, the bottles need to be cut into strips. You can do this with simple scissors, but we have been using a homemade bottle cutter for a long time. My husband made it. Convenient item that is used quite often
The width of the stripes can be adjusted. For the broom, we cut 12-14 mm, this is enough.
An important tool for creating rods is a hair dryer. Only with the help of high temperature can the plastic half-shell be slightly melted and deformed. That’s why we called the broom “fiery”, since without a light we can’t cope with this. Instead of a hairdryer, you can try making rods over a stove or gas burner, but it will be more difficult to control the degree of heating.
Turn on the hairdryer and first roll the tip of the strip into several turns with your fingers.
The very tip, where there are no turns, needs to be cut off
This hard tip must be clamped in the chuck of a screwdriver or drill.
And then it’s just magic. You need to rotate the strip over a hot hairdryer, holding it lightly with your fingers and forming coils. The finished rod needs to be held in a level position for a while until the plastic cools down. It is better to work with gloves, because the plastic slides better between your fingers and you are guaranteed not to cut yourself on it
All rods must be cut so that they are the same length
From 20 bottles we got about a hundred of these long rods, that is, from one bottle - 4-5 pieces. Each long rod needs to be bent exactly in half
To fix the bend, lightly heat it with the same hair dryer or with a regular lighter.
The rods are ready, you can start assembling the broom.
Attaching the handle to the broom
While the working part of the broom dries, you can start making the handle. To do this, you can use the most ordinary stick, which is made from scrap materials. The thickness of the handle should be about 3 cm. If possible, you can use a handle from another product that is no longer in use or has broken down, such as a rake.
The selected stalk should be sharpened at one end and adjusted in diameter so that it can be easily inserted into the neck of the bottle. Accordingly, the cap from the container is thrown away. You can use the remaining necks to adjust the handle while the working part of the broom dries.
The prepared cutting is inserted into the bottle and secured with insulating tape. The main thing is that the tape has sufficient adhesive properties. Instead of tape, it is quite acceptable, and maybe better, to use a self-tapping screw screwed into the area of connection between the handle and the working part of the broom, perpendicular to the entire product.
Additionally, you can compress the working part of the broom and tie the bundles of strips with wire. This will result in a broom that will have a wider working area.
Forming a blank
In the process of removing the workpiece from the frame, it is necessary to place the same plastic rope or wire inside. With this we can close the ring, as shown in the photo below.
After the ring is formed, it is necessary to wind one or two ropes on top in a circle for additional fixation.
Making a broom
Let's take a step-by-step look at how to make a panicle out of 18 bottles.
- Bottles must be prepared: rinsed, removed labels and allowed to dry. We take only 17 bottles for work, leaving one aside for now.
- We cut off the bottom of the selected plastic bottles. Then, using a sharp knife (or a stationery knife), cut them lengthwise into strips 0.5 cm wide. We move our hands from bottom to top. We do not cut it all the way, leaving about 6 cm to the neck of the container.
- You need to work very carefully, since the plastic is soft, the tool can slip at any time and you will injure your hand.
- You should get 17 cut pieces. Then we cut off the necks of sixteen of them. One remains with the upper part intact.
- On a container with a whole neck we put the resulting cut blanks, the upper and lower parts of which have been cut off.
- It was time for the whole bottle. We cut off the upper part, retreating about 15 cm from the throat. We will not need the lower part; it can then be used for other purposes. We put the resulting blank on the base of the future broom, already made from 17 bottles.
- Using an awl, you need to pierce all the bottles through and thread a piece of wire, the ends of which are then tightly twisted.
Now we work with the cuttings. It will need to be trimmed so that it can be threaded into the neck of the bottle. Paste it. The stalk should fit tightly. Using a hammer and nails, we secure the handle with the bottleneck. You can use a screwdriver and screws. The broom is ready to go.